目前世界主流的web服务有:
1. apache
2. nginx
3. iis
4. lighttpd
Apache HTTP服务器时一个模块化的服务器,源于NCSAhttpd服务器,经过多次修改,成为世界使用排名
第一的web服务器软件。它可以运行在几乎所有广泛使用的计算机平台上。
apache是市场占有率很高的一款web服务器,跨平台和安全性被广泛认可,可以运行在windwos,Linux,unix
系统中。支持虚拟主机功能(ip,port,FQDN),高度集成模块,https加密,检测用户访问日志,反向代理
,负载均衡,用户认证等功能。
【安装apache】
1.安装命令
[root@chaogelinux ~]# yum install httpd -y

2.添加httpd开机自启
[root@chaogelinux ~]# systemctl start httpd
[root@chaogelinux ~]# systemctl enable httpd

3.检查程序进程和端口
[root@chaogelinux ~]# netstat -tunlp|grep httpd
tcp6       0      0 :::80                   :::*                    LISTEN      2344/httpd

[root@chaogelinux ~]# ps -ef|grep httpd
root       2344      1  0 15:34 ?        00:00:00 /usr/sbin/httpd -DFOREGROUND
apache     2345   2344  0 15:34 ?        00:00:00 /usr/sbin/httpd -DFOREGROUND
apache     2346   2344  0 15:34 ?        00:00:00 /usr/sbin/httpd -DFOREGROUND
apache     2347   2344  0 15:34 ?        00:00:00 /usr/sbin/httpd -DFOREGROUND
apache     2348   2344  0 15:34 ?        00:00:00 /usr/sbin/httpd -DFOREGROUND
apache     2349   2344  0 15:34 ?        00:00:00 /usr/sbin/httpd -DFOREGROUND


4.此时启了一个web服务端,可以用客户端访问  ,注意关闭防火墙
http://192.168.178.185/
【apache配置文件】
| 文件路径 | 作用 |
| /etc/httpd/conf/httpd.conf | apache主配置文件 |
| /etc/httpd | apache主配置目录 |
| /etc/httpd/conf.d/*.conf | apache子配置文件 |
| /usr/sbin/httpd | 二进制脚本 |
| /var/log/httpd | 日志路径access_log_error_log |
| /var/www/html | 站点资源目录 |
| /usr/lib/systemd/system/httpd.service | httpd服务脚本文件 |
| /usr/lib64/httpd/modules | httpd模块文件路径 |
【httpd主配置文件】
#过滤掉注释空白行
[root@chaogelinux ~]# grep -Ev '^[# ]|^$' /etc/httpd/conf/httpd.conf
ServerRoot "/etc/httpd"
Listen 80
Include conf.modules.d/*.conf
User apache
Group apache
ServerAdmin root@localhost
<Directory />
</Directory>
DocumentRoot "/var/www/html"
<Directory "/var/www">
</Directory>
<Directory "/var/www/html">
</Directory>
<IfModule dir_module>
</IfModule>
<Files ".ht*">
</Files>
ErrorLog "logs/error_log"
LogLevel warn
<IfModule log_config_module>
</IfModule>
<IfModule alias_module>
</IfModule>
<Directory "/var/www/cgi-bin">
</Directory>
<IfModule mime_module>
</IfModule>
AddDefaultCharset UTF-8
<IfModule mime_magic_module>
</IfModule>
EnableSendfile on
IncludeOptional conf.d/*.conf
主配置文件中,主要分为3类。
1. 全局配置
2. 主服务器配置
3. 虚拟主机
【常见参数解析】
| 参数 | 解析 |
| serverRoot “/etc/httpd” | 定义服务工作目录 |
| ServerAdmin root@localhost | 管理员邮箱地址 |
| User apache | 运行服务的用户信息 |
| Group apache | 运行服务的组信息 |
| ServerName www.example.com:80 | 填写服务器域名 |
| DocumentRoot /var/ww/html | 定义网站根目录 |
| 定义网站数据目录的权限 | |
| Listen | 监听的IP地址和端口号 |
| DirectorIndex index.html | 默认的首页页面文件 |
| ErrorLog “logs/error_log” | 定义错误日志位置 |
| CustomLog “logs/access_log” combined | 定义访问日志路径 |
【apache常见配置】
【修改配置内容】
[root@chaogelinux ~]# vim /var/www/html/index.html
[root@chaogelinux ~]# curl 127.0.0.1
<meta charset=utf8>

超哥带你学apache
【修改网站资源目录路径】
1.修改配置文件如下,两处修改
[root@chaogelinux ~]# cat /etc/httpd/conf/httpd.conf
DocumentRoot "/www"

<Directory "/www">
    AllowOverride None
    # Allow open access:
    Require all granted
</Directory>


2.创建资源目录,创建html文件
[root@chaogelinux conf]# cat /www/index.html
<meta charset=utf8>
我是新的首页,你好兄弟们


3.修改了配置文件,还得重启http服务才能生效
systemctl restart httpd

4.注意关闭防火墙和selinux,影响实验
[root@chaogelinux conf]# systemctl stop firewalld
[root@chaogelinux conf]# systemctl disable firewalld
[root@chaogelinux conf]# iptables -F
[root@chaogelinux conf]# setenforce 0  #临时关闭selinux
[root@chaogelinux conf]# grep -i '^selinux' /etc/selinux/config
SELINUX=disabled    #永久关闭selinux,重启机器生效
SELINUXTYPE=targeted
【修改监听端口】
[root@chaogelinux ~]# grep -i "^listen"  /etc/httpd/conf/httpd.conf
Listen 85
【apache的工作模式】
Apache提供了三种稳定的(多进程处理模块)MPM(Multi-Proceesing-Modules 多通道处理模块),使得
Apache能够使用更多不同的工作环境,扩展了Apache的功能。
检查默认的apache工作模式
[root@chaogelinux ~]# httpd -V|grep -i "server mpm"
Server MPM:     prefork
可以在编译apache软件时候,添加编译参数,更改mpm模式
--with-mpm=prefork|worker|event
apache提供的三种工作模式
1.prefork
Apache在启动之初,就预先fork一些子进程,然后等待请求进来。之所以这样做,是为了
减少频繁创建和销毁进程的开销。每个子进程只有一个线程,在一个时间点内,只能处理一
个请求。

优点:成熟稳定,兼容所有新老模块。同时,不需要担心线程安全的问题。
缺点:一个进程相对占用更多的系统资源,消耗更多的内存。而且,它并不擅长处理高并发
请求。

2.worker
使用了多进程和多线程的混合模式。它也预先fork了几个子进程(数量比较少),然后每个子
进程创建一些线程,同时包括一个监听线程。每个请求过来,会被分配到1个线程来服务。
线程比起进程会更轻量,因为线程通常会共享父进程的内存空间,因此,内存的占用会减少
一些。在高并发的场景下,因为比起prefork有更多的可用线程,表现会更优秀一些。

优点:占据更少的内存,高并发下表现更优秀。
缺点:必须考虑线程安全的问题。

3.event
它和worker模式很像,最大的区别在于,它解决了keep-alive场景下,长期被占用的线程
的资源浪费问题。event MPM中,会有一个专门的线程来管理这些keep-alive类型的线
程,当有真实请求过来的时候,将请求传递给服务线程,执行完毕后,又允许它释放。这样
增强了高并发场景下的请求处理能力。

HTTP采用keepalive方式减少TCP连接数量,但是由于需要与服务器线程或进程进行绑定,
导致一个繁忙的服务器会消耗完所有的线程。Event MPM是解决这个问题的一种新模型,
它把服务进程从连接中分离出来。在服务器处理速度很快,同时具有非常高的点击率时,可
用的线程数量就是关键的资源限制,此时Event MPM方式是最有效的,但不能在HTTPS访
问下工作。
【Userdir】
userdir模块可以很方便的与他人共享目录资源,
# vim /etc/httpd/conf.d/userdir.conf

1.启用userdir,
<IfModule mod_userdir.c>
    #
    # UserDir is disabled by default since it can confirm the presence
    # of a username on the system (depending on home directory
    # permissions).
    #
    #UserDir disabled  #添加注释,表示启用

    #
    # To enable requests to /~user/ to serve the user's public_html
    # directory, remove the "UserDir disabled" line above, and uncomment
    # the following line instead:
    #
    UserDir public_html
</IfModule>

<Directory "/home/*/public_html">
    #AllowOverride FileInfo AuthConfig Limit Indexes
    AllowOverride all
    authuserfile "/etc/httpd/passwd"
    authname "input your account"
    authtype basic
    require user chao
    #Options MultiViews Indexes SymLinksIfOwnerMatch IncludesNoExec
    #Require method GET POST OPTIONS

</Directory>

2.创建网站数据文件夹,注意权限
[root@chaogelinux conf.d]# su - chaoge
[chaoge@chaogelinux ~]$ mkdir public_html

3.创建首页文件
[chaoge@chaogelinux ~]$ echo "超哥带你学apache,666" > public_html/index.html

4.设置权限
[root@chaogelinux www]# chmod -Rf 755 /home/chaoge/

5.创建需要验证的账户密码,生成数据库文件
[root@chaogelinux www]# htpasswd -c /etc/httpd/passwd chao
New password:
Re-type new password:
Adding password for user chao


6.重启httpd,注意退回root
[root@chaogelinux conf.d]# systemctl restart httpd

7.可以访问http://192.168.178.187/~chaoge/   格式是 ip/~用户名

8.访问目录下资源
[root@chaogelinux public_html]# pwd
/home/chaoge/public_html
[root@chaogelinux public_html]# ls
hehe.html  index.html
【虚拟主机】
能够以用户请求的不同IP,域名,端口来区分不同的站点
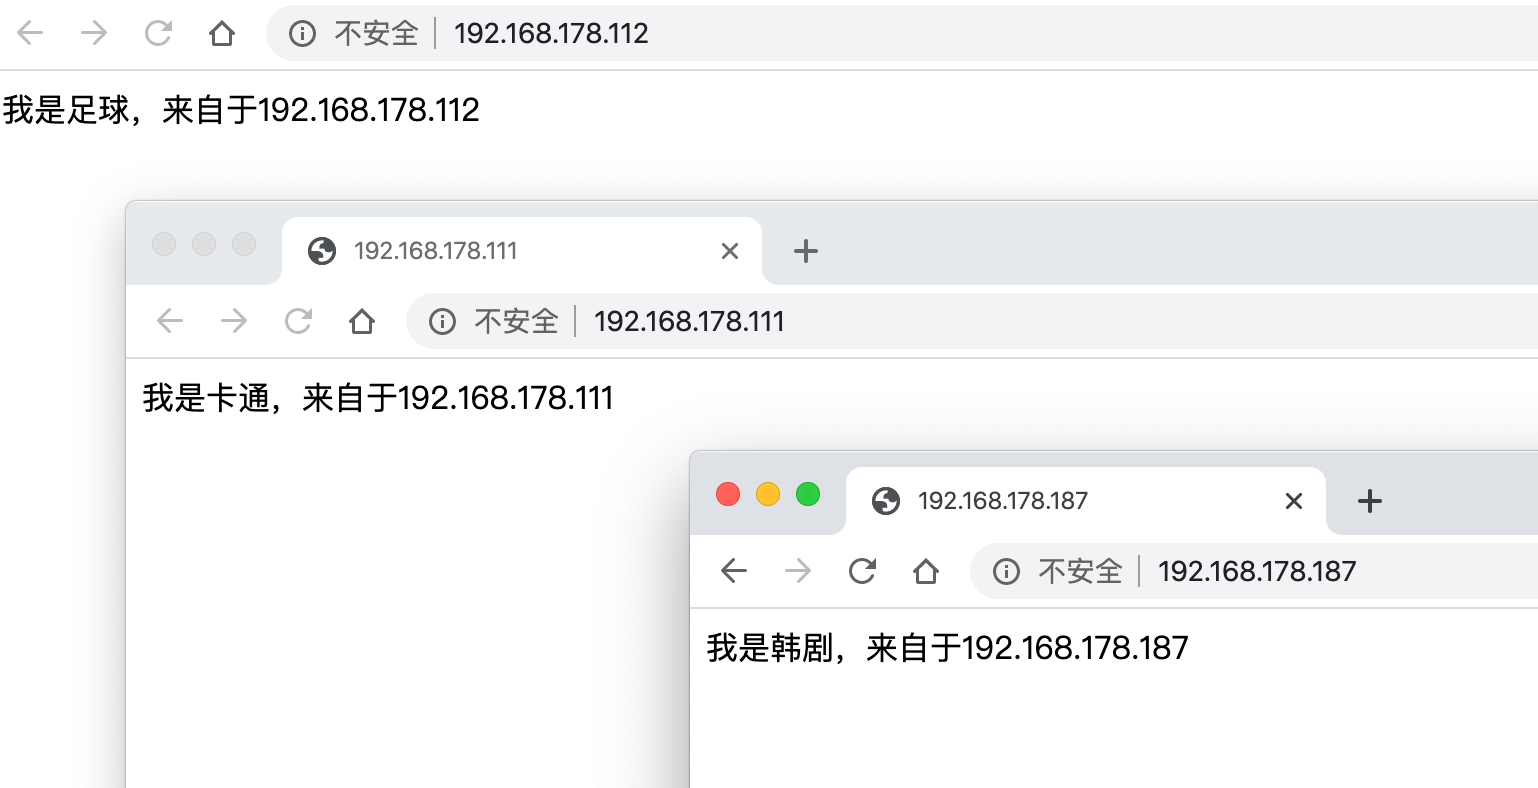
1. 基于IP的虚拟主机
服务器绑定三个ip地址

[root@chaogelinux ~]# ip a|grep 'inet'
    inet 127.0.0.1/8 scope host lo
    inet6 ::1/128 scope host
    inet 192.168.178.187/24 brd 192.168.178.255 scope global noprefixroute dynamic ens33
    inet 192.168.178.111/24 scope global secondary ens33
    inet 192.168.178.112/24 scope global secondary ens33
    inet6 fe80::22c3:376e:b0ae:5076/64 scope link noprefixroute
# 配置三个文件夹,对应三个站点资料

[root@chaogelinux ~]# mkdir -p /www/{hanju,cartoon,football}
[root@chaogelinux ~]# echo "我是韩剧,来自于192.168.178.187" > /www/hanju/index.html
[root@chaogelinux ~]# echo "我是卡通,来自于192.168.178.111" > /www/cartoon/index.html
[root@chaogelinux ~]# echo "我是足球,来自于192.168.178.112" > /www/football/index.html
修改httpd.conf配置文件,最低行添加apache虚拟主机的配置
<VirtualHost 192.168.178.187>
DocumentRoot /www/hanju
#ServerName
<Directory /www/hanju >
AllowOverride None
Require all granted
</Directory>
</VirtualHost>
<VirtualHost 192.168.178.111>
DocumentRoot /www/cartoon
#ServerName
<Directory /www/cartoon >
AllowOverride None
Require all granted
</Directory>
</VirtualHost>
<VirtualHost 192.168.178.112>
DocumentRoot /www/football
#ServerName
<Directory /www/football >
AllowOverride None
Require all granted
</Directory>
</VirtualHost>
重启服务
2. 多域名虚拟主机
1.配置hosts文件解析
[root@chaogelinux ~]# cat /etc/hosts
127.0.0.1   localhost localhost.localdomain localhost4 localhost4.localdomain4
::1         localhost localhost.localdomain localhost6 localhost6.localdomain6

192.168.178.189 www.chao.com www.pyyu.com

2.分别创建不同的虚拟主机站点,且创建前端文件
[root@chaogelinux ~]# mkdir -p /www/{chao,pyyu}
[root@chaogelinux ~]# echo "超哥666" > /www/chao/index.html
[root@chaogelinux ~]# echo "pyyu带你学apache" > /www/pyyu/index.html

3.修改apache的配置文件,写入虚拟主机的参数
[root@chaogelinux ~]# cat /etc/httpd/conf/httpd.conf
<VirtualHost 192.168.178.189>
DocumentRoot "/www/chao"
ServerName "www.chao.com"
<Directory "/www/chao" >
AllowOverride None
Require all granted
</Directory>
</VirtualHost>
<VirtualHost 192.168.178.189>
DocumentRoot /www/pyyu
ServerName "www.pyyu.com"
<Directory "/www/pyyu" >
AllowOverride None
Require all granted
</Directory>
</VirtualHost>

4.检测页面内容
[root@chaogelinux ~]# curl www.chao.com
超哥666
[root@chaogelinux ~]# curl www.pyyu.com
pyyu带你学apache
3. 基于端口号的虚拟主机
1.生成多个数据文件夹
[root@chaogelinux ~]# mkdir -p /www/{66,99}
[root@chaogelinux ~]# echo "端口号66的虚拟主机" > /www/66/index.html
[root@chaogelinux ~]# echo "端口号99的虚拟主机" > /www/99/index.html

2.修改配置文件,支持多端口的虚拟主机
#######

<VirtualHost 192.168.178.189:66>
DocumentRoot "/www/66"
ServerName "www.chao.com"
<Directory "/www/66" >
AllowOverride None
Require all granted
</Directory>
</VirtualHost>
<VirtualHost 192.168.178.189:99>
DocumentRoot "/www/99"
ServerName "www.pyyu.com"
<Directory "/www/99" >
AllowOverride None
Require all granted
</Directory>
</VirtualHost>

3.重启httpd
[root@chaogelinux ~]# systemctl restart httpd

4.查看不同端口的页面内容
[root@chaogelinux ~]# curl www.chao.com
超哥666
[root@chaogelinux ~]# curl www.chao.com:66
端口号66的虚拟主机
[root@chaogelinux ~]# curl www.pyyu.com
pyyu带你学apache
[root@chaogelinux ~]# curl www.pyyu.com:99
端口号99的虚拟主机
【资源限制访问】
# 定义一个内部人员基于端口号访问的目录

http://192.168.178.189:99/
1.创建一个资源文件,禁止用户访问
[root@chaogelinux ~]# mkdir -p /www/denyhtml/
[root@chaogelinux ~]# echo "小样,想偷看我?" > /www/denyhtml/index.html

2.修改httpd配置文件
<Directory "/www/99" >
Order allow,deny
#Allow from 192.168.178.0/24
</Directory>
</VirtualHost>

3.打开注释,允许某个网段访问

4.重启httpd
[root@chaogelinux ~]# systemctl restart httpd

5.即可访问资源了
注意!!httpd的版本问题
apache目录站点 访问限制总结:

2.4之前版本的:

语法是
Order Deny,allow
Allow from 192.168.178.190


2.4版本开始:

不再使用上述的语法了

改为
Require all granted  # 允许所有ip访问
Require ip 192.168.178.190  #只允许某个ip访问
Require ip 192.168.178.0/24 # 允许某个我那网段访问
限制访问详解
给指定的文件夹配置对应的访问权限是Apache配置中的基础应用,也是Apache使用者的必备技能之一。

在Apache配置文件中,给指定目录设置基本的访问权限,主要是靠Allow、Deny、Order三个指令的配合使用来实现的。

1.Allow指令

Allow指令的作用与其英文单词的含义一致,用于设置允许访问当前目录(及其子目录)或文件的用户范围。例如,Allow from all表示允许所有用户访问。下面,我们参考更多的例子,以帮助理解(Deny与Order用法一致):

<Directory /web>
#只允许IP为123.10.10.2的用户访问/web目录
Allow from 123.10.10.2
</Directory>
<Directory /web>
#只允许IP以10.10开头的用户访问/web目录
Allow from 10.10
</Directory>
<Directory /web>
#只允许域名为365mini.com的用户访问
Allow from 365mini.com
</Directory>
2.Deny指令

同样的,Deny指令的作用就是“Deny(拒绝)”,用于设置拒绝访问当前目录或文件的用户范围。例如,Deny from all表示拒绝所有用户访问。

3.Order指令

在Apache的配置文件中,Order指令用于控制Allow指令和Deny指令的生效顺序。例如,Order Allow,Deny表示当前配置段中的Allow指令先生效,Deny指令后生效。

在Apache中,Allow指令和Deny指令在同一配置段中都可以有多条。不过,对于Allow和Deny指令而言,如果先生效的指令与后生效的指令的作用范围存在冲突,则起冲突的作用范围部分以后生效的指令为准。

下面,我们同样参考几个具体的例子以帮助大家理解:

<Directory /web>
Order Allow,Deny
Allow from all
Deny from 112.2.10.2
#先允许所有用户访问,再拒绝112.2.10.2
#总结:允许除IP为112.2.10.2外的所有用户访问
</Directory>
<Directory /web>
Order Allow,Deny
Deny from 112.2.10.2
Allow from all
#先允许所有用户访问,再拒绝112.2.10.2
#总结:允许除IP为112.2.10.2外的所有用户访问
#(即使Deny指令在Allow指令之前,但是根据Order Allow,Deny语句,仍然先看Allow,再看Deny)
</Directory>
<Directory /web>
Order Deny,Allow
Deny from 112.2.10.2
Allow from all
Deny from 123.10.10.1
#先拒绝112.2.10.2访问
#再拒绝123.10.10.1访问
#最后允许所有用户访问
#总结:允许所有用户访问
#(即使Allow指令在Deny指令前,但是根据Order Deny,Allow语句,仍然先看Deny,再看Allow)
</Directory>
【定义访客日志格式】
查看httpd配置文件
ErrorLog "logs/error_log"  #错误日志存放位置

#
# LogLevel: Control the number of messages logged to the error_log.
# Possible values include: debug, info, notice, warn, error, crit,
# alert, emerg.
#
LogLevel warn
<IfModule log_config_module>
    #
    # The following directives define some format nicknames for use with
    # a CustomLog directive (see below).
    #
    LogFormat "%h %l %u %t "%r" %>s %b "%{Referer}i" "%{User-Agent}i"" combined
    LogFormat "%h %l %u %t "%r" %>s %b" common

    <IfModule logio_module>
      # You need to enable mod_logio.c to use %I and %O
      LogFormat "%h %l %u %t "%r" %>s %b "%{Referer}i" "%{User-Agent}i" %I %O" combinedio
    </IfModule>

    #
    # The location and format of the access logfile (Common Logfile Format).
    # If you do not define any access logfiles within a <VirtualHost>
    # container, they will be logged here.  Contrariwise, if you *do*
    # define per-<VirtualHost> access logfiles, transactions will be
    # logged therein and *not* in this file.
    #
    #CustomLog "logs/access_log" common

    #
    # If you prefer a logfile with access, agent, and referer information
    # (Combined Logfile Format) you can use the following directive.
    #
    CustomLog "logs/access_log" combined
</IfModule>
日志级别
# LogLevel: Control the number of messages logged to the error_log.
# Possible values include: debug, info, notice, warn, error, crit,
# alert, emerg.
#
LogLevel warn

#解释
emerg 紧急 - 系统无法使用。 "Child cannot open lock file. Exiting"
alert 必须立即采取措施。 "getpwuid: couldn't determine user name from uid"
crit 致命情况。 "socket: Failed to get a socket, exiting child"
error 错误情况。 "Premature end of script headers"
warn 警告情况。 "child process 1234 did not exit, sending another SIGHUP"
notice 一般重要情况。 "httpd: caught SIGBUS, attempting to dump core in ..."
info 普通信息。 "Server seems busy, (you may need to increase StartServers, or Min/MaxSpareServers)..."
debug 出错级别信息 "Opening config file ..."
日志格式
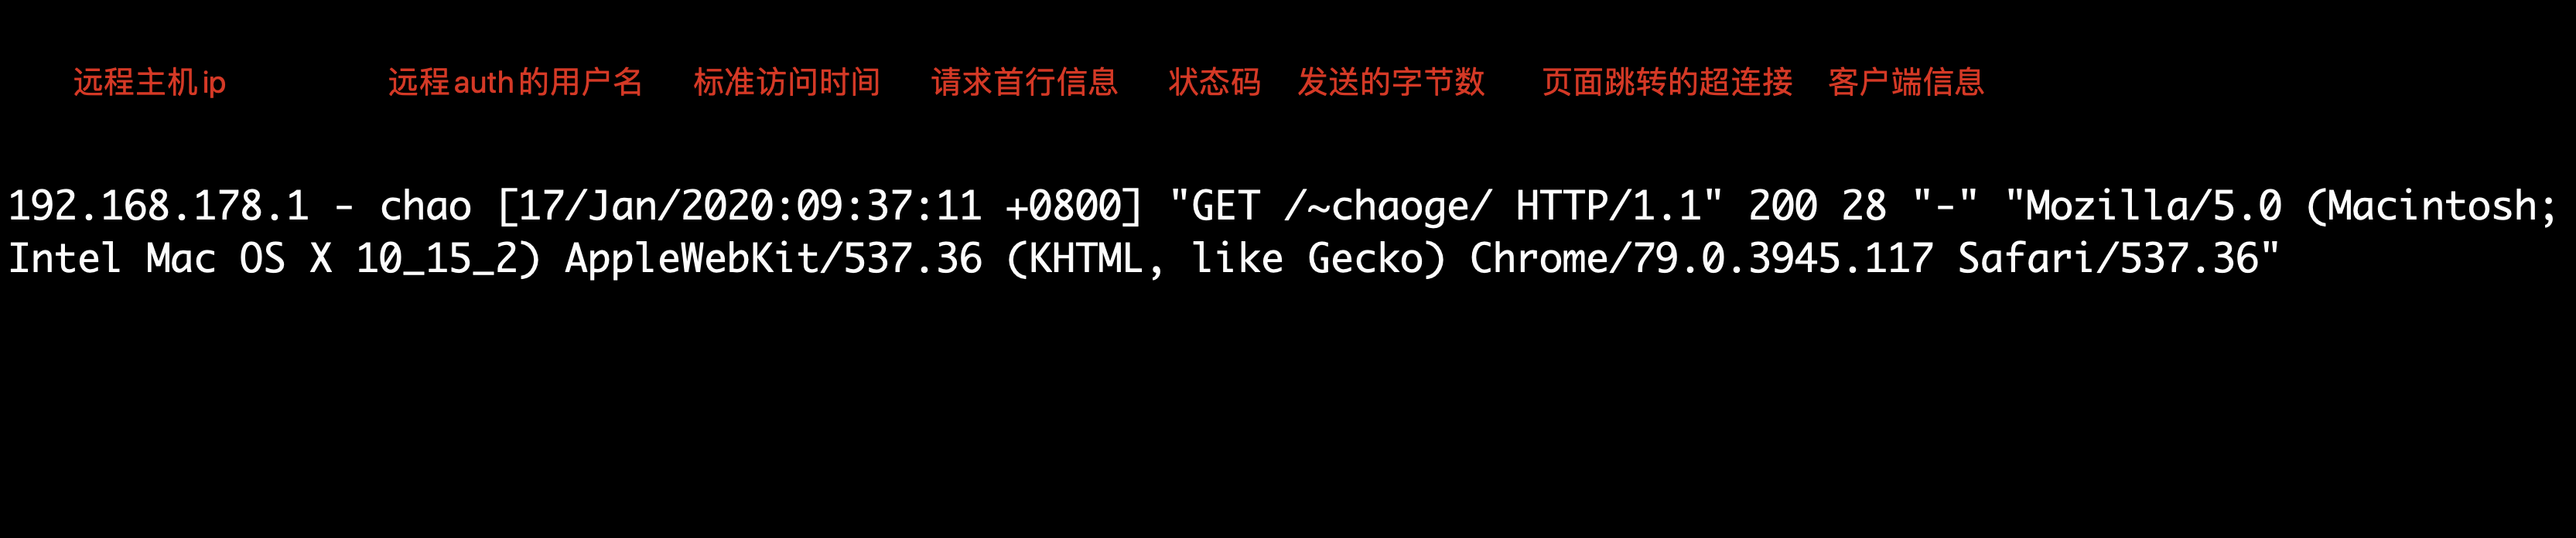
 LogFormat "%h %l %u %t "%r" %>s %b "%{Referer}i" "%{User-Agent}i"" combined #组合日志
    LogFormat "%h %l %u %t "%r" %>s %b" common    #通用日志格式

%…a: 远程IP地址
%…A: 本地IP地址
%…B: 已发送的字节数,不包含HTTP头
%…b: CLF格式的已发送字节数量,不包含HTTP头。例如当没有发送数据时,写入‘-’而不是0。
%…{FOOBAR}e: 环境变量FOOBAR的内容
%…f: 文件名字
%…h: 远程主机
%…H 请求的协议
%…{Foobar}i: Foobar的内容,发送给服务器的请求的标头行。
%…l: 远程登录名字(来自identd,如提供的话)
%…m 请求的方法
%…{Foobar}n: 来自另外一个模块的注解“Foobar”的内容
%…{Foobar}o: Foobar的内容,应答的标头行
%…p: 服务器响应请求时使用的端口
%…P: 响应请求的子进程ID。
%…q 查询字符串(如果存在查询字符串,则包含“?”后面的部分;否则,它是一个空字符串。)
%…r: 请求的第一行,如 "GET / HTTP/1.1"
%…>s: 状态。对于进行内部重定向的请求,这是指*原来*请求 的状态。如果用%…>s,则是指后来的请求。
%…t: 以公共日志时间格式表示的时间(或称为标准英文格式)
%…{format}t: 以指定格式format表示的时间
%…T: 为响应请求而耗费的时间,以秒计
%…D: Apache 2.0 开始,提供了一个新的参数 %D。可以记录服务器处理请求的微秒时间
%…u: 远程用户(来自auth;如果返回状态(%s)是401则可能是伪造的)
%…U: 用户所请求的URL路径
%…v: 响应请求的服务器的ServerName
%…V: 依照UseCanonicalName设置得到的服务器名字
%…{Referer}i:请求报文中首部“referer”的值;即从哪个页面中的超链接跳转至当前页面的;
%…{User-Agent}i:请求报文中首部“User-Agent”的值;即发出请求的应用程序;
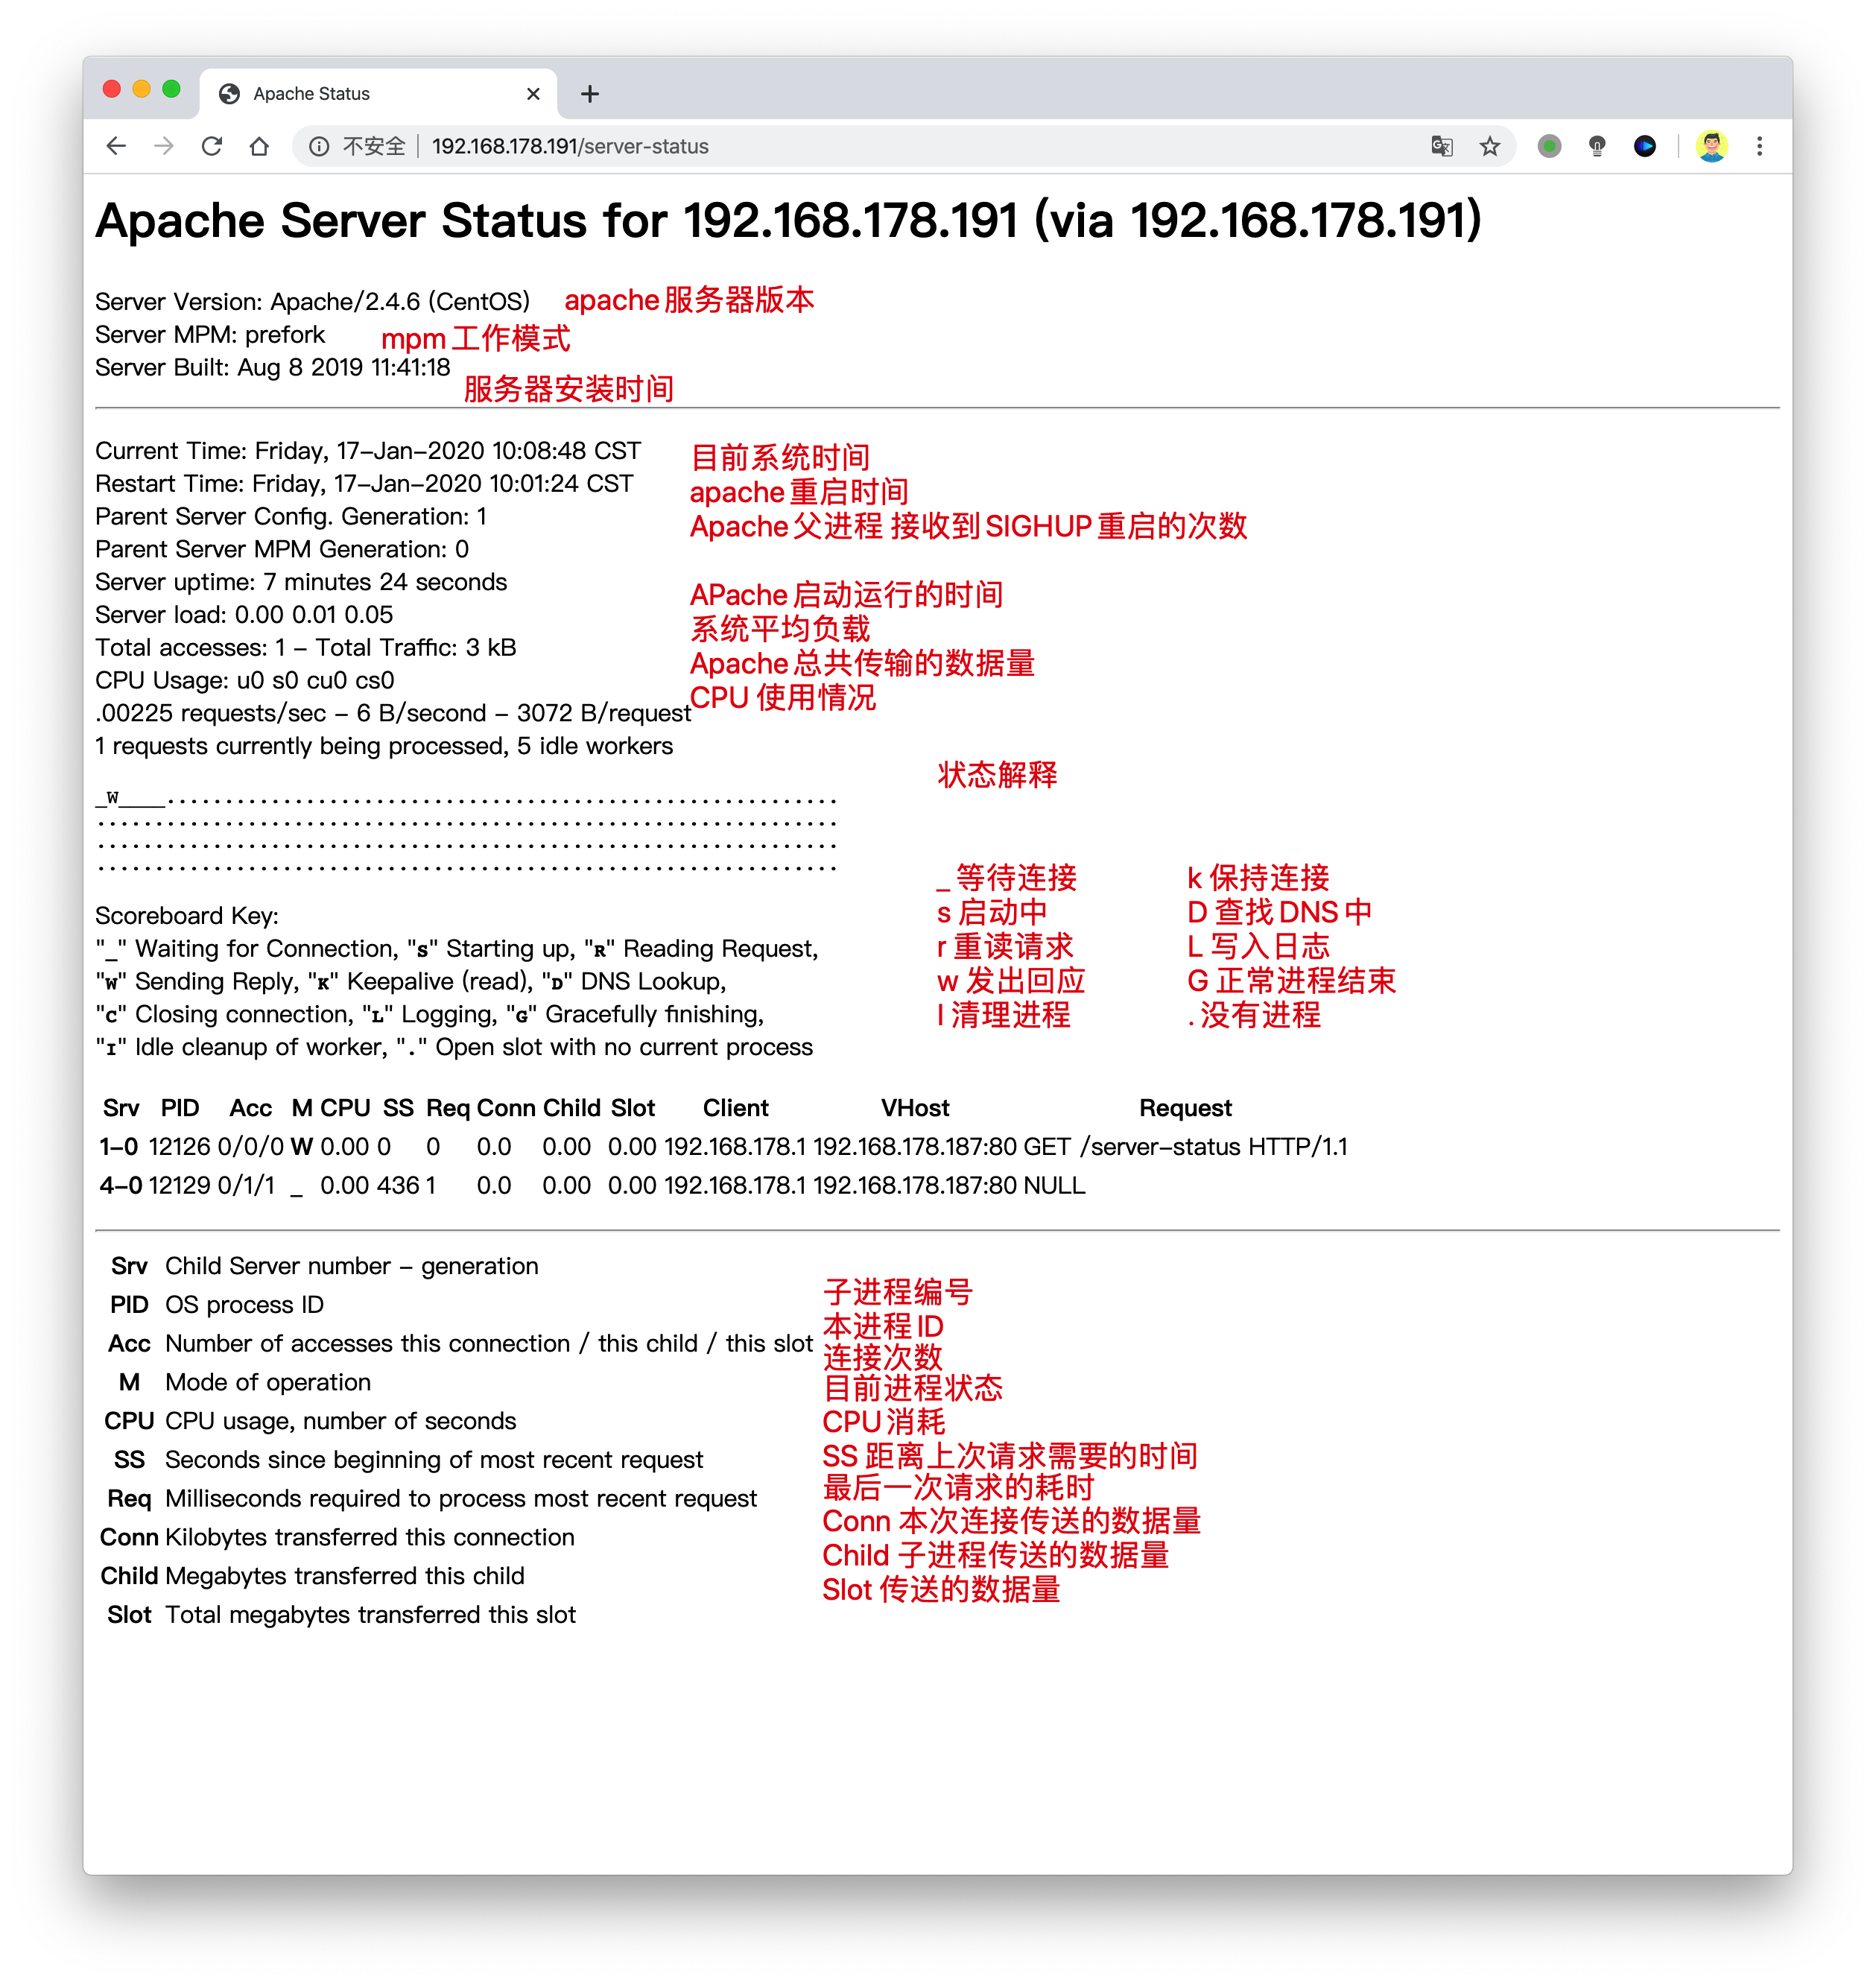
【开启status状态页面】
需要在编译安装apache的时候,开启mod_status模块
/etc/httpd/conf/httpd.conf配置文件中添加状态参数

<Location /server-status>
SetHandler server-status
<RequireAll>
Require ip 192.168.178.0/24
</RequireAll>
</Location>

重启httpd
访问状态页路径
http://192.168.178.191/server-status
【针对apache进行压力测试】
使用apache自带的压力测试工具
1.可能需要单独安装软件包
[root@chaogelinux ~]# yum install httpd-tools
ab命令常用参数
此外,我们再根据上面的用法介绍界面来详细了解每个参数选项的作用。

-n    即requests,用于指定压力测试总共的执行次数。
-c    即concurrency,用于指定的并发数。
-t    即timelimit,等待响应的最大时间(单位:秒)。
-b    即windowsize,TCP发送/接收的缓冲大小(单位:字节)。
-p    即postfile,发送POST请求时需要上传的文件,此外还必须设置-T参数。
-u    即putfile,发送PUT请求时需要上传的文件,此外还必须设置-T参数。
-T    即content-type,用于设置Content-Type请求头信息,例如:application/x-www-form-urlencoded,默认值为text/plain。
-v    即verbosity,指定打印帮助信息的冗余级别。
-w    以HTML表格形式打印结果。
-i    使用HEAD请求代替GET请求。
-x    插入字符串作为table标签的属性。
-y    插入字符串作为tr标签的属性。
-z    插入字符串作为td标签的属性。
-C    添加cookie信息,例如:"Apache=1234"(可以重复该参数选项以添加多个)。
-H    添加任意的请求头,例如:"Accept-Encoding: gzip",请求头将会添加在现有的多个请求头之后(可以重复该参数选项以添加多个)。
-A    添加一个基本的网络认证信息,用户名和密码之间用英文冒号隔开。
-P    添加一个基本的代理认证信息,用户名和密码之间用英文冒号隔开。
-X    指定使用的和端口号,例如:"126.10.10.3:88"。
-V    打印版本号并退出。
-k    使用HTTP的KeepAlive特性。
-d    不显示百分比。
-S    不显示预估和警告信息。
-g    输出结果信息到gnuplot格式的文件中。
-e    输出结果信息到CSV格式的文件中。
-r    指定接收到错误信息时不退出程序。
-h    显示用法信息,其实就是ab -help。
案例
1.发出100个并发数,总共发出10000个请求
[root@chaogelinux ~]# ab -c 100 -n 100000 http://192.168.178.191/

2.检查状态页的信息
http://192.168.178.191/server-status
1.检查服务器的进程数量,apache每一请求会启动一个进程
开启100个并发,发出一万个请求
[root@chaogelinux ~]# ab -c 100 -n 10000 http://192.168.178.191/

2.检查进程数
[root@chaogelinux ~]# ps -ef|grep httpd |wc -l
107