原文:https://www.objc.io/issues/23-video/capturing-video/
【创建于2019/03/03】
随着每个版本的处理器和相机硬件性能的提升,使用 iPhone 拍摄视频变得越来越有趣。 它们体积小、重量轻,与专业摄像机的质量差距已经缩小了许多,在某些情况下,iPhone 是绝对的备用摄像机。本文介绍各种不同的参数,用于配制捕获视频的管道(pipeline),以充分利用硬件。一个简单的App演示了不同管道的实现,可在GitHub查看。
UIImagePickerController
到目前为止,在你的app中集成视频捕获的最简易方法是,使用UIImagePickerController。它是一个 view controller,封装了完整的视频捕获管道和相机界面。
在初始化相机之前,首先检查当前设备是否支持视频录制:
if ([UIImagePickerController
       isSourceTypeAvailable:UIImagePickerControllerSourceTypeCamera]) {
    NSArray *availableMediaTypes = [UIImagePickerController
      availableMediaTypesForSourceType:UIImagePickerControllerSourceTypeCamera];
    if ([availableMediaTypes containsObject:(NSString *)kUTTypeMovie]) {
        // Video recording is supported.
    }
}
Then create a UIImagePickerController object, and define a delegate to further process recorded videos (e.g. to save them to the camera roll) and respond to the user dismissing the camera:
然后创建一个UIImagePickerController对象,并且定义一个delegate,为进一步处理视频录制做准备(比如,将它们保存到相机胶卷),并且对用户关闭相机做出相应的响应。
UIImagePickerController *camera = [UIImagePickerController new];
camera.sourceType = UIImagePickerControllerSourceTypeCamera;
camera.mediaTypes = @[(NSString *)kUTTypeMovie];
camera.delegate = self;
以上就是调用一个功能齐全的相机所需的全部代码。
配置相机
UIImagePickerController提供了额外配置参数。
设置 cameraDevice 属性可以指定使用某个摄像头,它接收一个枚举类型UIImagePickerControllerCameraDevice。默认情况下,该属性被设置为UIImagePickerControllerCameraDeviceRear(后摄像头),但它也可以设置为UIImagePickerControllerCameraDeviceFront(前摄像头)。记得先检查你想要使用的摄像头是否存在:
UIImagePickerController *camera = …
if ([UIImagePickerController isCameraDeviceAvailable:UIImagePickerControllerCameraDeviceFront]) {
    [camera setCameraDevice:UIImagePickerControllerCameraDeviceFront];
}
videoQuality属性可以控制录制视频的质量。它允许你修改编码预设,这会影响视频的比特率和分辨率。 共有六个预设:
enum {
   UIImagePickerControllerQualityTypeHigh             = 0,
   UIImagePickerControllerQualityTypeMedium           = 1,  // default  value
   UIImagePickerControllerQualityTypeLow              = 2,
   UIImagePickerControllerQualityType640x480          = 3,
   UIImagePickerControllerQualityTypeIFrame1280x720   = 4,
   UIImagePickerControllerQualityTypeIFrame960x540    = 5
};
typedef NSUInteger  UIImagePickerControllerQualityType;
前 3 个是相对预设(低、中、高)。对于不同设备,这些预设实际产生的编码配置可能是不同的,hight 为你提供所选相机的最高质量。其它 3 个是指定分辨率的预算(640x480 VGA, 960x540 iFrame, 和 1280x720 iFrame)。
自定义UI
正如前文所说,UIImagePickerController提供了开箱即用的完整相机UI。然而,你也可以自定义相机界面,你可以隐藏默认控件,并用自定义view来控制相机。自定义的view将显示在‘相机预览视图’之上。
UIView *cameraOverlay = …
picker.showsCameraControls = NO;
picker.cameraOverlayView = cameraOverlay;
然后,你需要将自定义控件挂钩到UIImagePickerController的控制方法。(如: startVideoCapture 和 stopVideoCapture).
AVFoundation
假如你想要对视频录制过程有更多的控制,你需要使用AVFoundation库。
在AVFoundation库中,处理视频录制最核心的类是AVCaptureSession。它协调音频、视频之间的输入和输出数据流:
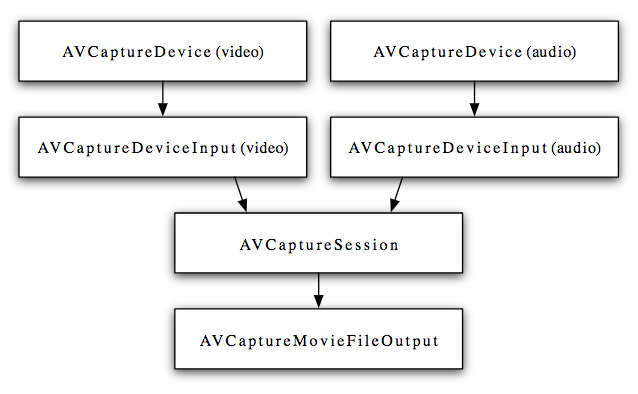
要使用捕获会话,你需要实例化它,添加输入和输出,并启动会话:
AVCaptureSession *captureSession = [AVCaptureSession new];
AVCaptureDeviceInput *cameraDeviceInput = …
AVCaptureDeviceInput *micDeviceInput = …
AVCaptureMovieFileOutput *movieFileOutput = …
if ([captureSession canAddInput:cameraDeviceInput]) {
    [captureSession addInput:cameraDeviceInput];
}
if ([captureSession canAddInput:micDeviceInput]) {
    [captureSession addInput:micDeviceInput];
}
if ([captureSession canAddOutput:movieFileOutput]) {
    [captureSession addOutput:movieFileOutput];
}

[captureSession startRunning];
(为了精简,以上代码省略掉了dispatch queue相关代码。因为AVCaptureSession的所有方法调用都是会阻塞线程的,所以建议把它们分配到子线程处理。)
使用AVCaptureSession.sessionPreset属性,可以配置输出文件的质量。以下有 11 个不同的选项。
NSString *const  AVCaptureSessionPresetPhoto;
NSString *const  AVCaptureSessionPresetHigh;
NSString *const  AVCaptureSessionPresetMedium;
NSString *const  AVCaptureSessionPresetLow;
NSString *const  AVCaptureSessionPreset352x288;
NSString *const  AVCaptureSessionPreset640x480;
NSString *const  AVCaptureSessionPreset1280x720;
NSString *const  AVCaptureSessionPreset1920x1080;
NSString *const  AVCaptureSessionPresetiFrame960x540;
NSString *const  AVCaptureSessionPresetiFrame1280x720;
NSString *const  AVCaptureSessionPresetInputPriority;
The first one is for high-resolution photo output. The next nine are very similar to the UIImagePickerControllerQualityType options we saw for the videoQuality setting of UIImagePickerController, with the exception that there are a few additional presets available for a capture session. The last one (AVCaptureSessionPresetInputPriority) indicates that the capture session does not control the audio and video output settings. Instead, the activeFormat of the connected capture device dictates the quality level at the outputs of the capture session. In the next section, we will look at devices and device formats in more detail.
第一个用于输出高分辨率照片。随后 9 个与UIImagePickerController中用于设置 videoQuality的UIImagePickerControllerQualityType选项非常相似。最后一个AVCaptureSessionPresetInputPriority,表示会话不控制音频和视频输出设置。
在下一节中,我们将更详细地介绍设备和视频格式。
Inputs
The inputs for an AVCaptureSession are one or more AVCaptureDevice objects connected to the capture session through an AVCaptureDeviceInput.
We can use [AVCaptureDevice devices] to find the available capture devices. For an iPhone 6, they are:
(
    “<AVCaptureFigVideoDevice: 0x136514db0 [Back Camera][com.apple.avfoundation.avcapturedevice.built-in_video:0]>”,
    “<AVCaptureFigVideoDevice: 0x13660be80 [Front Camera][com.apple.avfoundation.avcapturedevice.built-in_video:1]>”,
    “<AVCaptureFigAudioDevice: 0x174265e80 [iPhone Microphone][com.apple.avfoundation.avcapturedevice.built-in_audio:0]>”
)