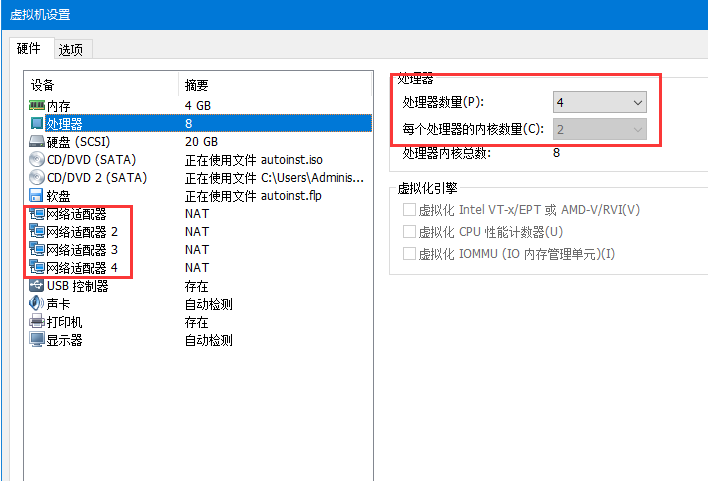
1. 在虚拟机VMware上配置环境
VMware安装:http://www.zdfans.com/html/5928.html
Ubuntu:https://www.ubuntu.com/download/desktop
为了更好地运行DPDK,可以多虚拟化几块网卡和CPU:
- 只有一张网卡是运行不了DPDK的,最少要两张。
- 多一点CPU可以在DPDK的程序中多调度一些逻辑核(lcore)
编译所需条件参考:http://www.cnblogs.com/vancasola/p/8881197.html
2. 编译安装DPDK
在官网下载DPDK的压缩包。建议下载 last stable版本:http://core.dpdk.org/download/
下载完之后解压并编译,完全照着quick-start手册的前三步即可(要在root权限下运行):http://core.dpdk.org/doc/quick-start/
  tar xf dpdk.tar.gz
  cd dpdk

  make config T=x86_64-native-linuxapp-gcc
  sed -ri 's,(PMD_PCAP=).*,1y,' build/.config

  make
3.挂载巨页
DPDK通过使用巨页分配,内存需要较少的页面,减少对TLB访问的miss,缩短了虚拟地址到物理地址的重定位的转换时间,因此提高了性能。巨页通常来说是2MB一个页,而不使用巨页的普通页一般是4KB,差距是明显的。
巨页的分配在每次开机之后都要立即进行一次,以防止内存在物理内存上已经被碎片化。设置巨页的方法如下(root权限下):
cd dpdk/usertools
./dpdk-setup.sh
----------------------------------------------------------
 Step 2: Setup linuxapp environment
----------------------------------------------------------
[17] Insert IGB UIO module
[18] Insert VFIO module
[19] Insert KNI module
[20] Setup hugepage mappings for non-NUMA systems
[21] Setup hugepage mappings for NUMA systems
[22] Display current Ethernet/Crypto device settings
[23] Bind Ethernet/Crypto device to IGB UIO module
[24] Bind Ethernet/Crypto device to VFIO module
[25] Setup VFIO permissions
选取21(对于NUMA架构,就要对每一个NUMA节点分配巨页),按提示输入即可:
Option: 21

Removing currently reserved hugepages
Unmounting /mnt/huge and removing directory

  Input the number of 2048kB hugepages for each node
  Example: to have 128MB of hugepages available per node in a 2MB huge page system,
  enter '64' to reserve 64 * 2MB pages on each node
Number of pages for node0: 64
Reserving hugepages
Creating /mnt/huge and mounting as hugetlbfs

Press enter to continue ...
4.编译示例程序(example)并运行 helloworld
编译过程参考 Sample Applications User Guides 即可:http://doc.dpdk.org/guides/sample_app_ug/compiling.html
编译好DPDK后,意味着你得到了应用程序所需要的依赖库。当需要在Linux下的DPDK环境编译应用程序时,环境变量 RTE_SDK 和 RTE_TARGET 是必须的,含义如下:
- RTE_SDK :指向DPDK的主目录
- RTE_TARGET : 指向DPDK目标环境的目录
以编译DPDK自带的example下的应用程序为例(root权限):
# 设置两个环境变量
export RTE_SDK=/home/chang/dpdk
export RTE_TARGET=build

# 编译example文件夹下的程序
make -C examples
完成后,在example文件夹下会新生成build文件夹,里面存放着可执行文件。下面是helloworld的执行情况:
root@ubuntu:/home/chang/dpdk/examples/helloworld/build# ./helloworld -c f
EAL: Detected 8 lcore(s)
EAL: No free hugepages reported in hugepages-1048576kB
EAL: Multi-process socket /var/run/.rte_unix
EAL: Probing VFIO support...
EAL: PCI device 0000:02:01.0 on NUMA socket -1
EAL:   Invalid NUMA socket, default to 0
EAL:   probe driver: 8086:100f net_e1000_em
EAL: PCI device 0000:02:02.0 on NUMA socket -1
EAL:   Invalid NUMA socket, default to 0
EAL:   probe driver: 8086:100f net_e1000_em
EAL: PCI device 0000:02:03.0 on NUMA socket -1
EAL:   Invalid NUMA socket, default to 0
EAL:   probe driver: 8086:100f net_e1000_em
EAL: PCI device 0000:02:04.0 on NUMA socket -1
EAL:   Invalid NUMA socket, default to 0
EAL:   probe driver: 8086:100f net_e1000_em
hello from core 1
hello from core 2
hello from core 3
hello from core 0
root@ubuntu:/home/chang/dpdk/examples/helloworld/build# ./helloworld -c ff
EAL: Detected 8 lcore(s)
EAL: No free hugepages reported in hugepages-1048576kB
EAL: Multi-process socket /var/run/.rte_unix
EAL: Probing VFIO support...
EAL: PCI device 0000:02:01.0 on NUMA socket -1
EAL:   Invalid NUMA socket, default to 0
EAL:   probe driver: 8086:100f net_e1000_em
EAL: PCI device 0000:02:02.0 on NUMA socket -1
EAL:   Invalid NUMA socket, default to 0
EAL:   probe driver: 8086:100f net_e1000_em
EAL: PCI device 0000:02:03.0 on NUMA socket -1
EAL:   Invalid NUMA socket, default to 0
EAL:   probe driver: 8086:100f net_e1000_em
EAL: PCI device 0000:02:04.0 on NUMA socket -1
EAL:   Invalid NUMA socket, default to 0
EAL:   probe driver: 8086:100f net_e1000_em
hello from core 1
hello from core 2
hello from core 3
hello from core 4
hello from core 5
hello from core 6
hello from core 7
hello from core 0
-c 参数后面跟着16进制的掩码,表示使用那些CPU逻辑核。f代表0xf也就是四个二进制1,使用前4个逻辑核,ff则代表使用8个逻辑核。