更新:可以看看这篇文章,介绍在iOS8下如何实现自动调整大小的Cell。
我发布了几篇关于处理动态类型的文章,其中包括根据字体大小的变化,改变表视图的行高度。但是这些都是假定在表视图中单元行高都是一样的。在这篇文章中,我将讲解,通过使用自动布局来设置不同的行高。
在开始之前,我需要感谢Amy Worrall写的using auto layout to calculate table cell height这篇文章。他介绍了一种在委托方法 tableView:heightForRowAtIndexPath: 中,通过持有一个原型的单元cell来根据内容计算高度的方法。
Huckleberry
我从 Gutenberg项目中,把 “哈克贝利·费恩历险记” 的前15个章节作为表视图的数据源,导入进一个plist文件中(一句话为一个item)。这提供了几乎2000行不同长度的文本。这样做的目的是为了在每个表视图Cell中显示每一句话,同时使用一个标签显示行号。
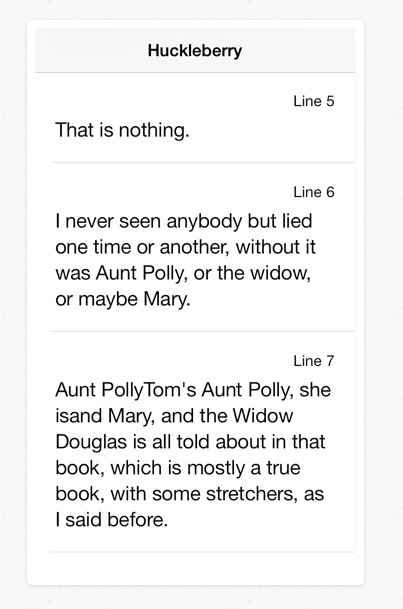
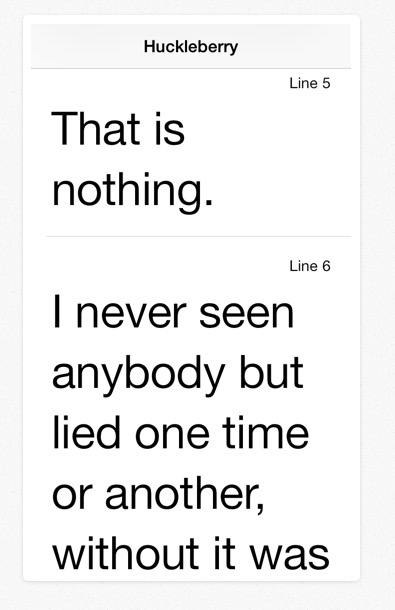
每个单元的行高设置为本文显示所需要的行数。这在采用超大无障碍文本时的效果更明显:
开始
在Xcode中,创建一个当视图的应用程序模板,拖入一个UITableViewController,如下所示:
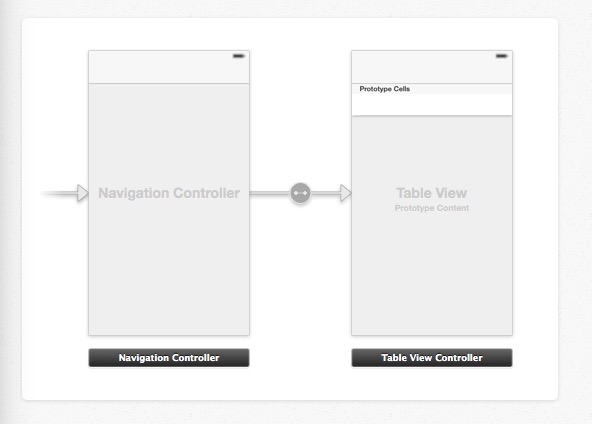
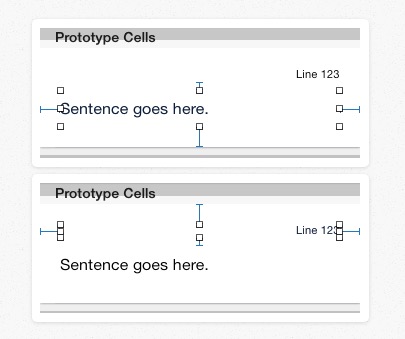
原型Cell
这个表视图有一个自定义的原型Cell,包含了两个UILabel,第一个标签显示行数,第二个显示文本。第一个标签的字体是 Caption 1 类型,刚刚好。第二个标签的字体是Body 类型,同时它的 numberOfLines 属性设置为 0,使得它可以显示多行文本。基本的设置如下(我把行高设置为100来腾出一点空间):

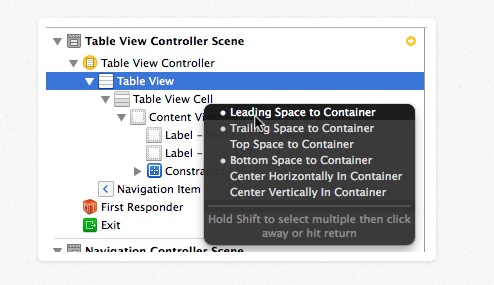
原型Cell的自动布局
给这个显示句子的标签设置与contentView之间的 leading, tailing 和 bottom space 自动布局约束。如果你对使用Interface Builder 类设置自动布局约束不熟悉的话,你可以直接按住 ctrl 键,拖动来设置视图之间的约束(我使用的是Xcode 5.0.2版本):
根据你放置标签的位置,你可能需要使用标准的默认间隔来适应这个约束。你可以像下面那样勾选:

最终的设置如下:

你可以在界面上看到如下的效果:
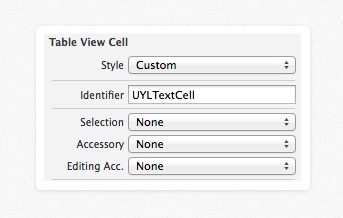
为这个自定义的Cell创建一个类
为这个自定义的Cell添加一个新的Objective-C类:
// UYLTextCell.h
#import <UIKit/UIKit.h>
@interface UYLTextCell : UITableViewCell
@property (nonatomic, weak) IBOutlet UILabel *numberLabel;
@property (nonatomic, weak) IBOutlet UILabel *lineLabel;
@end

// UYLTextCell.m
#import "UYLTextCell.h"
@implementation UYLTextCell
@end
在storyboard中,连接这两个标签,同时设置这个Cell的重用标记:
配置表视图的数据源
在 UITableViewController 的子类中创建一个私有属性,来持有所有的数据:
@interface UYLTableViewController ()
@property (nonatomic, strong) NSArray *sourceData;
@end
源文本放在了一个名字为 SourceData.plist的文件中,我们把这个文件的内容加载到内存中,设置sourceData属性:
- (NSArray *)sourceData
{
    if (!_sourceData)
    {
        NSString *filePath = [[NSBundle mainBundle] pathForResource:@"SourceData" ofType:@"plist"];
        _sourceData = [NSArray arrayWithContentsOfFile:filePath];
    }
    return _sourceData;
}
同时实现下面两个必须的方法:
- (NSInteger)tableView:(UITableView *)tableView numberOfRowsInSection:(NSInteger)section
{
    return [self.sourceData count];
}

- (UITableViewCell *)tableView:(UITableView *)tableView cellForRowAtIndexPath:(NSIndexPath *)indexPath
{
    UITableViewCell *cell = [tableView dequeueReusableCellWithIdentifier:UYLCellIdentifier forIndexPath:indexPath];
    [self configureCell:cell forRowAtIndexPath:indexPath];
    return cell;
}
这个UYLCellIdentifier 是一个静态的NSString类型,值为我们在storyboard中设置的重用标识:
static NSString *UYLCellIdentifier = @"UYLTextCell";
configureCell 方法负责设置cell 的内容,你将发现这是一种很好的方法来处置我们的代码:
- (void)configureCell:(UITableViewCell *)cell forRowAtIndexPath:(NSIndexPath *)indexPath
{
    if ([cell isKindOfClass:[UYLTextCell class]])
    {
        UYLTextCell *textCell = (UYLTextCell *)cell;
        textCell.numberLabel.text = [NSString stringWithFormat:@"Line %ld",(long)indexPath.row+1];
        textCell.numberLabel.font = [UIFont preferredFontForTextStyle:UIFontTextStyleCaption1];
        textCell.lineLabel.text = [self.sourceData objectAtIndex:indexPath.row];
        textCell.lineLabel.font = [UIFont preferredFontForTextStyle:UIFontTextStyleBody];
    }
}
注意,我们每次配置cell时,都重新设置了字体,为了防止用户改变了这个文本大小。
处理动态文本变化
每次用户改变了它们的文本大小时,都应该重新加载这个数据源。我们通过添加一个UIContentSizeCategoryDidChangeNotification 通知来实现这个功能。
- (void)viewDidLoad
{
    [super viewDidLoad];
    [[NSNotificationCenter defaultCenter] addObserver:self
            selector:@selector(didChangePreferredContentSize:)
                 name:UIContentSizeCategoryDidChangeNotification object:nil];
}

- (void)dealloc
{
    [[NSNotificationCenter defaultCenter] removeObserver:self
                  name:UIContentSizeCategoryDidChangeNotification
                            object:nil];
}

- (void)didChangePreferredContentSize:(NSNotification *)notification
{
    [self.tableView reloadData];
}
计算cell的高度
我们需要在tableView:heightForRowAtIndexPath: 方法中计算一个cell的高度。但是当这个方法被调用时,我们还没有设置这个Cell的内容,这让我们计算高度显得有点怪。正如我前面提到的解决方法,就是持有一个虚拟的原型Cell,用来布局和决定需要的高度。添加一个UYLTextCell 类型的属性到视图控制器中,作为这个虚拟的原型Cell:
@interface UYLTableViewController ()
...
@property (nonatomic, strong) UYLTextCell *prototypeCell;
@end
这个原型cell通过下面的Getter 方法来创建:
- (UYLTextCell *)prototypeCell
{
    if (!_prototypeCell)
    {
        _prototypeCell = [self.tableView dequeueReusableCellWithIdentifier:UYLCellIdentifier];
    }
    return _prototypeCell;
}
完整的委托方法的实现如下:
- (CGFloat)tableView:(UITableView *)tableView heightForRowAtIndexPath:(NSIndexPath *)indexPath
{
    [self configureCell:self.prototypeCell forRowAtIndexPath:indexPath];
    [self.prototypeCell layoutIfNeeded];

    CGSize size = [self.prototypeCell.contentView
                        systemLayoutSizeFittingSize:UILayoutFittingCompressedSize];
    return size.height+1;
}
一些注意事项和要点:
-
使用configureCell方法来配置原型cell和当前表视图行的内容。这个跟在显示前调用tableView:cellForRowAtIndexPath:方法是一样的。
-
调用 layoutIfNeeded 方法来强制一个cell来立即进行布局
-
在cell 中 contentView 上 调用systemLayoutSizeFittingSize 方法来获取符合约束(UILayoutFittingCompressedSize)可能的最小大小。
-
返回Cell高度时记得加上1来为分隔线腾出位置。
估算单元格高度
我们的app虽然可以工作了,但是有一个严重的性能问题。为了验证这个问题,你可以在实际设备上运行我们的app,然后在系统设置中改变文本大小,立刻重新进入我们的app,你会发现用户界面被阻塞了,因为在重新加载这个表视图时,需要一次过重新计算将近2000行的高度。解决方法是,在iOS 7 中,实现如下的委托方法:
- (CGFloat)tableView:(UITableView *)tableView estimatedHeightForRowAtIndexPath:(NSIndexPath *)indexPath
{
    return UITableViewAutomaticDimension;
}
这个方法希望你返回一个估算的高度。这个方法的关键是返回一个快速的估算值,不需要你花费大量时间来根据不同的动态本文大小来计算内容高度。
如果你不能轻易地估算这个高度,可以直接返回一个系统默认的值UITableViewAutomaticDimension。重新运行我们app,你会发现一切变得很顺畅了。
在设备方向改变时的问题
感谢有人回复我,提醒在设备方向改变时,这个高度的计算会有错误。这里有一个smileyborg提供的解决方案,托管到GitHub 项目上的。你可以看看erf 写的这个GitHub 开源项目。解决方法是在计算这个行高时,确保设置这个原型cell的宽度为这个表视图的宽度:
- (CGFloat)tableView:(UITableView *)tableView heightForRowAtIndexPath:(NSIndexPath *)indexPath
{
    [self configureCell:self.prototypeCell forRowAtIndexPath:indexPath];

    self.prototypeCell.bounds = CGRectMake(0.0f, 0.0f, CGRectGetWidth(self.tableView.bounds),
           CGRectGetHeight(self.prototypeCell.bounds));
    ...
    ...
}
然后,我们需要在我们自定义的表视图单元格中实现 layoutSubviews 方法,同样设置多行标签的首选最大宽度。 苹果文档关于preferredMaxLayoutWidth 属性的解析如下:
当标签应用自动布局约束时,这个属性会改变这个标签的大小。在布局中,如果文本超出此属性所指定的宽度延伸,文本会增加一行显示,从而增加了标签的高度。
// UYLTextCell.m
- (void)layoutSubviews
{
    [super layoutSubviews];
    [self.contentView layoutIfNeeded];
    self.lineLabel.preferredMaxLayoutWidth = CGRectGetWidth(self.lineLabel.frame);
}
结束语
这是比我想象的更长的文章,但希望你明白那个点。您可以在我的GitHub CodeExamples存储库中找到同样的Xcode 项目。