(前置声明: 本随笔图片资源 选自 http://opengameart.org)
这边继承上一篇随笔的代码, 修改后效果图将如:
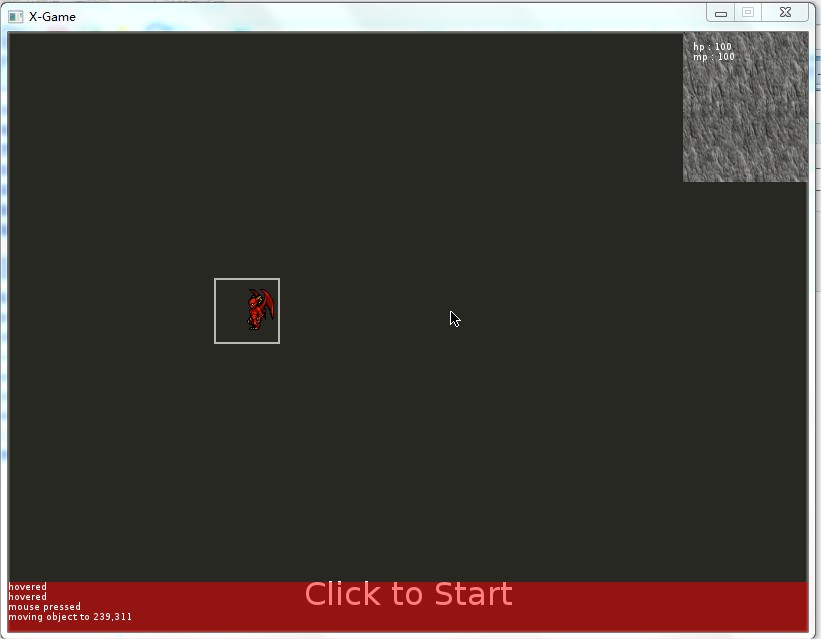
较之有以下改动:
1.使用简洁的背景图片
2.添加了调试文本输出框(下方红色框体)
3.添加了角色属性查看蓝(右上方带背景的框体)
4.添加带四个方向的2D角色模型
5.绘制角色模型的图片sprite边框体
5.鼠标控制移动角色模型
1.使用简洁的背景图片
将 welcome scene 的背景变更为 黑色图片:
function WelcomeScene:Initialize()

    self:SetDesc( "welcome scene")
    self:SetBackgroundImg( "img/black.jpg", g.width, g.height )

    ...
end
2.添加了调试文本输出框(下方红色框体)

新的类 MessagePanel (源自文件 panel/messagePanel.lua), 调试文本输出框 主要由两部分组成 : 红色填充矩形  和 文本:
function MessagePanel:draw( )

    ...

    --红色填充矩形

    local r,g,b,b = love.graphics.getColor()
    love.graphics.setColor( 255, 0, 0, 128 )
    love.graphics.rectangle( "fill", self.x, self.y, self.width, self.height )
    love.graphics.setColor(  r,g,b,b)

    ...

    --绘制文本
    love.graphics.printf(
        self.msgQueue[ msgs - i ],
        self.x,
        self.y + i * charHeight ,
        self.width
    )


    ...
end
封装成一个类, 主要是为了复用 , 以及同步组织 红色填充矩形 和 文本的位置大小信息
文本以 大小为 10条消息的 队列维护:
function MessagePanel:Add( message )
    -- body
    table.insert( self.msgQueue, 1, message)
    if #self.msgQueue > self.maxMsgs then
        table.remove( self.msgQueue )
    end
end
队列内容定时进行删除过时消息:
function MessagePanel:update( dt )
    -- body
    self.delta = self.delta + dt

    if self.delta >= self.timeout then
        self.delta = self.delta - self.timeout

        table.remove( self.msgQueue )
    end
end
此外就是一些例如 绘制时 进行字体变更与恢复, 填充红色时进行 存储与恢复,整体 messagePanel.lua 内容有如
MessagePanel = {}

function MessagePanel:new()
    local o = {}
    setmetatable( o, MessagePanel)
    self.__index = self


    o:_Init()

    return o
end

function MessagePanel:_Init( )
    -- body
    self.msgQueue = {}
    self.delta = 0
    self.timeout = 10.0 --how long to clear one message
    self.maxMsgs = 10 -- max store 10 messages
    self.x = 20
    self.y = 20
    self.width         = 256
    self.height     = self.width * 1.2
    self.fontSize     = 9
    self.filled     = false

    self.font         = love.graphics.newFont( self.fontSize )
end

function MessagePanel:SetFill( filled )
    -- body
    self.filled = filled
end

function MessagePanel:SetFontSize( sz )
    -- body
    self.fontSize = sz
end

function MessagePanel:SetMaxMessages( count )
    -- body
    self.maxMsgs = count
end

function MessagePanel:SetTimeout( tm )
    -- body
    self.timeout = tm
end

function MessagePanel:GetWidth( )
    -- body
    return self.width
end

function MessagePanel:SetWidth( pixels )
    -- body
    self.width = pixels
end

function MessagePanel:SetHeight( pixels )
    -- body
    self.height = pixels

    self.maxMsgs = math.max( 1, self.height / self.font:getHeight() )
end

function MessagePanel:GetHeight( )
    -- body
    return self.height
end

function MessagePanel:SetPos( x, y )
    -- body
    self.x = x
    self.y = y
end

function MessagePanel:update( dt )
    -- body
    self.delta = self.delta + dt

    if self.delta >= self.timeout then
        self.delta = self.delta - self.timeout

        table.remove( self.msgQueue )
    end
end

function MessagePanel:Add( message )
    -- body
    table.insert( self.msgQueue, 1, message)
    if #self.msgQueue > self.maxMsgs then
        table.remove( self.msgQueue )
    end
end

function MessagePanel:Log( ... )
    -- body
    local msg = string.format( unpack(arg))
    self:Add( msg)
end

function MessagePanel:draw( )
    -- body
    local msgs = math.min( #self.msgQueue, self.maxMsgs )
    local charHeight = self.font:getHeight()


    if self.filled then
        local r,g,b,b = love.graphics.getColor()
        love.graphics.setColor( 255, 0, 0, 128 )
        love.graphics.rectangle( "fill", self.x, self.y, self.width, self.height )
        love.graphics.setColor(  r,g,b,b)
    end

    if msgs > 0 then

        local oldFont = love.graphics.getFont()
        love.graphics.setFont( self.font )

        for i = 0, msgs - 1, 1 do

            love.graphics.printf(
                self.msgQueue[ msgs - i ],
                self.x,
                self.y + i * charHeight ,
                self.width
            )

        end

        love.graphics.setFont( oldFont )
    end


end
使用方式:
    g.msgPanel = MessagePanel:new()
    g.msgPanel:SetFill( true)
    g.msgPanel:SetWidth( g.width)
    g.msgPanel:SetHeight( 50 )
    g.msgPanel:SetPos( 0, g.height - g.msgPanel:GetHeight() )
3.添加了角色属性查看蓝(右上方带背景的框体)
如果MessagePanel类能够运行明白, ObjectInfoPanel类也就自然不过了, 由两部分组成: 背景 和 文本输出, 整体类详细内容(panel/objectInfoPanel.lua )有如:
ObjectInfoPanel = {}

function ObjectInfoPanel:new()
    local o = {}
    setmetatable( o, ObjectInfoPanel)
    self.__index = self


    o:_Init()

    return o
end

function ObjectInfoPanel:_Init( )
    -- body
    self.x = 0
    self.y = 0
    self.width         = 256
    self.height     = self.width * 1.2
    self.fontSize     = 9

    self.font         = love.graphics.newFont( self.fontSize )
    self.background = Background:new( "img/info_background.png", self.width, self.height )
    self:SetPos( 50, 50 )

    self.showable = false
end


function ObjectInfoPanel:SetFontSize( sz )
    -- body
    self.fontSize = sz
end

function ObjectInfoPanel:SetWidth( pixels )
    -- body
    self.width = pixels
    self.background:SetWidth( self.width)
end

function ObjectInfoPanel:SetHeight( height )
    -- body
    self.height = height
    self.background:SetHeight( self.height)
end

function ObjectInfoPanel:SetPos( x, y )
    -- body
    self.x = x
    self.y = y

    self.background:SetPos( self.x, self.y )
end

function ObjectInfoPanel:update( dt )

end

function ObjectInfoPanel:show( )
    -- body
    self.showable = true
end

function ObjectInfoPanel:hide( )
    -- body
    self.showable = false
end

function ObjectInfoPanel:draw( )

    if self.showable then
        if self.background then
            self.background:draw()
        end

        local oldFont = love.graphics.getFont()
        love.graphics.setFont( self.font )

        love.graphics.printf( "hp : 100", self.x + 10 , self.y + 10, self.width )
        love.graphics.printf( "mp : 100", self.x + 10 , self.y + 20, self.width )

        love.graphics.setFont( oldFont )
    end
end
使用方式:
    g.objInfoPanel = ObjectInfoPanel:new()
    g.objInfoPanel:SetWidth( 125)
    g.objInfoPanel:SetHeight( 150)
    g.objInfoPanel:SetPos( g.width - 125, 0 )
当点击了角色模型后, 就会显示该属性界面.
4.添加带四个方向的2D角色模型
玩家主控角色模型是 GamePlayer类(object/gamePlayer.lua), 整体代码简单有如:
require( "object/gameObject")

GamePlayer = GameObject:new()

function GamePlayer:new()
    local o = {}
    setmetatable( o, GamePlayer)
    self.__index = self

    o:ChangeStateTo( STATE_IDLE_VANILLA)

    return o
end
GamePlayer类的 目前主要工作仅仅是 设置出示 状态: STATE_IDLE_VANILLIA, 即空闲状态; 相当大一部分代码由基类 GameObject 完成:
require( "position")
require( "sprite/sprite")

GameObject = {}

function GameObject:new( o)
    o = o or {}

    setmetatable( o, GameObject )
    self.__index = self

    o:_Init()

    return o
end

--内部信息初始化
function GameObject:_Init( )

end


--变更状态
function GameObject:ChangeStateTo( stateid )

end

--变更位置
function GameObject:SetPos( pos, y )

end

--设置 GUID
function GameObject:SetGUID( guid )
    -- body
    self.guid = guid
end

function GameObject:GetGUID()
    return self.guid
end

--显示可见性模型
function GameObject:draw()

end

--更新对象的各种状态
function GameObject:update( dt )


end


--移动到鼠标所点击的位置
function GameObject:MoveTo( x, y )

end

--检测是否选择了该对象
function GameObject:mousepressed( x, y, button )
    ...
    self:OnSelected()
    ...
end

--这就是 查看对象信息 事件了
function GameObject:OnSelected( )
    -- body
    g.objInfoPanel:show()
end
一个基本的对象 有以下几个小部分组成:
1.位置信息 pos
2.可见性模型信息的 sprite
3.游戏状态 state, 到本随笔为止有 idle 和 moving 两种状态
4.被鼠标点选标记 hover
function GameObject:_Init( )

    --位置信息
    self.pos     = Position:new()
    self.guid   = nil
    self.scene  = nil

    --可见性模型 sprite
    self.sprite = Sprite:new()

    --显示 sprite 边框
    self.sprite:ShowBounder( true)

    --游戏状态
    self.state     = LoadState( STATE_IDLE_VANILLA )

    --移动路径
    self.movePath = {}

    --移动方向, 将决定 sprite 选用 四个方向的哪个
    self.moveDirect = Direction.DOWN

    --被鼠标点选相关属性
    self.hover = false
end
两个关键函数 GameObject:update(dt) 主要负责维护 对象的状态, 即 idle 与 moving 的切换: moving停下来即进入 idle 状态, 玩家点击鼠标在合适位置则进入 moving状态, 当然还包含以下例如位置的变更等等; GameObject:draw() 利用 sprite 显示绘制 模型, sprite 会根据 对象的 state 状态 和 移动方向进行图片选取:
function GameObject:draw()
    self.sprite:Display( self.moveDirect, g_step, self.pos.x, self.pos.y )
end

function GameObject:update( dt )
    g_stepDelta = g_stepDelta + dt
    g_moveDelta = g_moveDelta + dt

    if g_stepDelta >= 0.25  then
        g_stepDelta = g_stepDelta - 0.25
        g_step = ( g_step  % 4 ) + 1
    end

    if g_moveDelta >= 0.05  then
        g_moveDelta = g_moveDelta - 0.05
        if #self.movePath > 0 then

            if self.pos.x == self.movePath[1] and self.pos.y == self.movePath[2] then
                table.remove( self.movePath, 1)
                table.remove( self.movePath, 1)
            end

            if #self.movePath > 0 then
                self.moveDirect = FindDirection( self.pos.x, self.pos.y, self.movePath[1], self.movePath[2] )

                if self.pos.x ~= self.movePath[1] then
                    if self.movePath[1] > self.pos.x then self.pos.x = self.pos.x + 1 else self.pos.x = self.pos.x - 1 end
                end

                if self.pos.y ~= self.movePath[2] then
                    if self.movePath[2] > self.pos.y then self.pos.y = self.pos.y + 1 else self.pos.y = self.pos.y - 1 end
                end
            else
                --move to target pos
                self:ChangeStateTo( STATE_IDLE_VANILLA )
            end
        end
    end


    self.hover = self.sprite:isHovered( self.pos.x, self.pos.y )
    if self.hover then
        g.msgPanel:Log( "hovered")
    end

end
GameObject.pos 是 玩家正下方的中间的像素位置, isHovered() 函数根据这个 pos 和 sprite 单元的 大小, 确定鼠标是否在 sprite 所能够表示的范围内, 进而确定"鼠标在对象正上方":
function Sprite:isHovered( obj_x, obj_y )
    -- body
    if g.mouse.x > obj_x - self._width_half
        and g.mouse.x < obj_x + self._width_half
        and g.mouse.y > obj_y - self._height
        and g.mouse.y < obj_y
    then
        return true
    end

    return false
end
两个状态 state 是很简单的两个类, 继承自 State 基类:
STATE_IDLE_VANILLA = 1
STATE_WALK_VANILLA = 2


State = {}

function State:new()
    local o = {}

    setmetatable( o, State)
    self.__index = self

    o:_Init()

    return o
end

function State:_Init()
    self.desc = "state"
    self.delta = 0
    self.type = nil
end

function State:Initialize()

end

function State:draw()

end

function State:Type()
    return self.type
end

function State:SetType( stateType )
    self.type = stateType
end
require( "state/state")

IdleVanillaState = State:new()

function IdleVanillaState:new( )
    -- body
    local o = {}
    setmetatable( o, IdleVanillaState)
    self.__index = self

    o:Initialize()
    return o
end

function IdleVanillaState:Initialize()
    self:SetType( STATE_IDLE_VANILLA)
end

function IdleVanillaState:draw()

end
require( "state/state")

WalkVanillaState = State:new()

function WalkVanillaState:new(  )
    -- body

    local o = {}
    setmetatable( o, WalkVanillaState )
    self.__index = self

    o:Initialize()
    return o
end

function WalkVanillaState:Initialize()
    self:SetType( STATE_WALK_VANILLA )
end

function WalkVanillaState:draw()

end
两个状态 主要是维护了 自己的状态 self.type 即是最大的不同(最大用途是 sprite 进行状态判断选择图片), 此外功能函数几乎都一样.
Sprite 类就比较为有趣了. 对于移动状态中的 对象, 可见性模型图片需要从下图中选取:
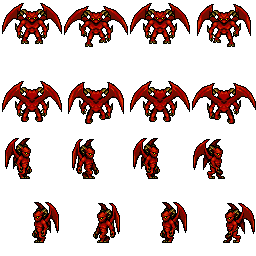
不同移动方向(或静止时的朝向), 即 上下左右, 选取 四行中的一行, 而不同时序, 则选择 某一行中的 4个 图片中的一个.
Sprite = {}

function Sprite:new()
    local o =
    {
        drawable = nil, --预先加载 某一状态下 4 个方向 的 四个时序工 16 个小图形组成的 一个 大图

        row = 0, -- 4个方向
        col = 0, -- 4个时序

        MaxWidth = 0,     --大图的 宽度
        MaxHeight = 0,     --大图的 高度

        _width = 0,        -- 每个小图形的 宽度(每次绘制角色模型的 宽度)
        _height = 0,    -- 每个小图形的 高度(每次绘制角色模型的 高度)

        _width_half = 0,    -- 预处理用 的 半值
        _height_half = 0,    -- 预处理用 的 半值

        down     = {},    -- 向下 方向的 4个时序对应在 大图中的 ( x, y ) 偏移量
        up         = {},    -- 向上 方向的 4个时序对应在 大图中的 ( x, y ) 偏移量
        right     = {},    -- 向右 方向的 4个时序对应在 大图中的 ( x, y ) 偏移量
        left     = {},    -- 向左 方向的 4个时序对应在 大图中的 ( x, y ) 偏移量

        showBounder = false --是否显示 边框标记
    }

    o.direction =  --四个方向的 数值key 索引
    {
        [1] = o.up,
        [2] = o.right,
        [3] = o.down,
        [4] = o.left,
    }

    o.quad =         --绘制用的 与生成对象
    {
        [1] = {},
        [2] = {},
        [3] = {},
        [4] = {},
    }


    setmetatable( o, Sprite)
    self.__index = self

    o:_Init()

    return o
end

function  Sprite:_Init(  )

end

function Sprite:ShowBounder( toSet )

end

function Sprite:SetAsset( filename, row, col )

end

function Sprite:Adjust()

end


function Sprite:Display( direction, step, x, y )

end

function Sprite:StateChanged( state )

end

function Sprite:isHovered( obj_x, obj_y )

end
当sprite 的图片源文件变更, 或者 大小变更时, 都会重新生成 16 个小图形的 偏移值:
function Sprite:Adjust()
    self.MaxWidth  = self.drawable:getWidth()
    self.MaxHeight = self.drawable:getHeight()

    self._width = self.MaxWidth / self.col
    self._height = self.MaxHeight / self.row

    self._width_half  = math.floor( self._width / 2   )
    self._height_half = math.floor( self._height / 2  )

    for w = 0, self.MaxWidth, self._width do
        table.insert( self.down, {x=w, y=0} )
    end

    for w = 0, self.MaxWidth, self._width do
        table.insert( self.up, {x=w, y=self._height} )
    end

    for w = 0, self.MaxWidth, self._width do
        table.insert( self.right, {x=w, y=2*self._height} )
    end

    for w = 0, self.MaxWidth, self._width do
        table.insert( self.left, {x=w, y=3*self._height} )
    end


    for dir = 1, 4, 1 do
        for step = 1, self.col, 1 do
            local offset = self.direction[ dir][ step]
            self.quad[ dir][ step] = love.graphics.newQuad( offset.x, offset.y, self._width, self._height, self.MaxWidth, self.MaxHeight )
        end
    end
end
--显示 角色模型时, 根据 模型的朝向 direction 和 时序 step
--进行绘制
function Sprite:Display( direction, step, x, y )

    --这里就是绘制边框啦, 其实就是 描边 的 矩形
    if self.showBounder then
        love.graphics.rectangle( "line", x - self._width_half, y - self._height, self._width, self._height )
    end


    --显示 角色模型时, 根据 模型的朝向 direction 和 时序 step
    --进行绘制
    local quad = self.quad[ direction][ step]
    love.graphics.drawq( self.drawable, quad, x - self._width_half, y - self._height )

end
角色移动的 方向 和 时序其实都是在 GameObject:update(dt),
function GameObject:update( dt)
    ...
   self.moveDirect = FindDirection( self.pos.x, self.pos.y, self.movePath[1], self.movePath[2] )
    ...
end
FindDirection( x, y, x2, y2) 函数根据 目的地(x2, y2) 相对于 起点(x, y) 的方向:
local tryRight = function( y, y2 )
    if y2 > y then
        return Direction.DOWN
    elseif y2 == y then
        return Direction.RIGHT
    else
        return Direction.UP
    end
end

local tryLeft = function( y, y2 )

    if y2 > y then
        return Direction.DOWN
    elseif y2 == y then
        return Direction.LEFT
    else
        return Direction.UP
    end
end

local tryUP_DOWN = function( y, y2  )
    if y2 > y then
        return Direction.DOWN
    elseif y2 == y then
        return Direction.LEFT
    else
        return Direction.UP
    end
end

function FindDirection( x, y, x2, y2 )
    if x2 > x then
        return tryRight( y, y2)
    elseif x2 < x then
        return tryLeft( y, y2 )
    else
        return tryUP_DOWN( y, y2)
    end
end
时序step, 其实就是 循环在 1, 2, 3, 4 之间进行更换.
5.绘制角色模型的图片sprite边框体
已讲述
6.鼠标控制移动角色模型
关于这一点, 就得先说说 scene, Scene 有三大部分内容:
- 子对象, 例如背景, 按钮控件, 信息栏, 将来扩展的 菜单栏, 一般是人类玩家相关的操作元素;
- 被容器管理的对象, 例如玩家, 怪物, 一般是游戏世界内事物;
- 鼠标,键盘 或者其他响应(暂且重复 第一点的一些事项)
所以 scene 都会迭代的 调用 这三类的 update, draw 和 mousepressed 函数:
function Scene:draw()

    self.background:draw()

    for guid, obj in pairs( self.objlist) do
        if obj.draw then
            obj:draw()
        end
    end

    for _, child in pairs( self.children) do
        if child.draw then
            child:draw()
        end
    end
end

function Scene:update(dt)

    for guid, obj in pairs( self.objlist) do
        if obj.update then
            obj:update( dt)
        end
    end

    for _, child in pairs( self.children) do
        if child.update then
            child:update( dt)
        end
    end
end

function Scene:mousepressed(x, y, button)

    for guid, obj in pairs( self.objlist) do

        if obj.mousepressed then

            if obj:mousepressed( x, y, button ) then
                -- game object selected
                g.msgPanel:Log( "game object selected")
                return true
            end
        end
    end

    for _, child in pairs( self.children) do

        if child.mousepressed then
            if child:mousepressed( x, y, button ) then
                -- child item selected
                g.msgPanel:Log( "child item selected")
                return true
            end
        end
    end


    --default : make rgp move
    if button == "l" then
        g.player:MoveTo( x, y )
    end
end
对于 mousepressed 事件 迭代处理中, 是 假设如果 玩家点击的对象不是子菜单, 也不是 点选对象, 就进行移动位置变更.每个 GameObject 维护一个movePath table对象
GameObject.movePath =
{
     [1] = 第一个拐点 x 坐标,
     [2] = 第一个拐点 y 坐标,
     [3] = 第二个拐点 x 坐标,
     [4] = 第二个拐点 y 坐标,
     ...
}
对于怪物, 在进行寻路时, 可能会产生 一系列的拐点, 而玩家角色, 我将维护两种拐点使用方式:
第一, 人类玩家控制 角色模型时, 用以中途变更目的地, 只维护第一个拐点, 一旦目的地变更, 即刻为 第一个拐点;
第二, 在进行自动挂机或寻路时,采用 和 怪物一样的 拐点列表方式
这里, 其实出现了两个待优化问题:
1.移动时, 先八个方向走, 剩余进行横竖行走;

原因是在 GameObject.update(dt)中 每次都是按照 一个像素进行 "朝着"目的地修正位置, 一旦 移动路径的 横竖坐标分量差异较大时, 都会出现的:
function GameObject:update( dt)
             ...
            if #self.movePath > 0 then
                self.moveDirect = FindDirection( self.pos.x, self.pos.y, self.movePath[1], self.movePath[2] )

                if self.pos.x ~= self.movePath[1] then
                    if self.movePath[1] > self.pos.x then self.pos.x = self.pos.x + 1 else self.pos.x = self.pos.x - 1 end
                end

                if self.pos.y ~= self.movePath[2] then
                    if self.movePath[2] > self.pos.y then self.pos.y = self.pos.y + 1 else self.pos.y = self.pos.y - 1 end
                end
            else
                --move to target pos
                self:ChangeStateTo( STATE_IDLE_VANILLA )
            end

            ...
end
一个解决方案是, 按照浮点数进行位置修正.
2.鼠标穿透不同 叠加了的控件.
会导致 鼠标选择在正下方的 某个控件, 但是没有选中 理应被选中的 在上方的控件.
一个解决方案是, 反序按照显示顺序进行迭代搜索( 记得 在 DirectX9 User interface design 书上介绍过).