1. 爬楼梯
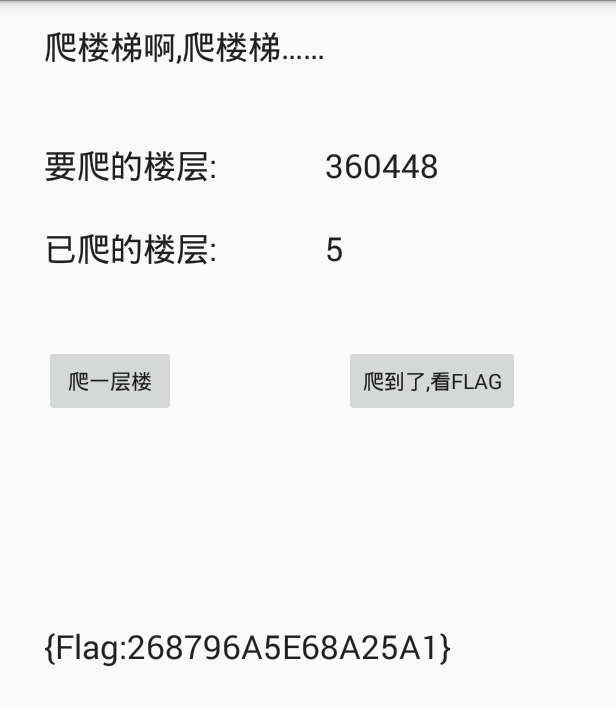
先运行apk,查看具体的功能

爬一层楼是可以点击的,爬到了,看FLAG是不可以点击的.我们可以大致的了解到到了具体的楼层才可以看到flag,多次打开软件,楼层数目是随机的.
用APKIDE反编译后,用jd-gui查看源码
package com.ctf.test.ctf_100;

import android.os.Bundle;
import android.os.Debug;
import android.support.v7.app.AppCompatActivity;
import android.view.View;
import android.widget.Button;
import android.widget.TextView;
import java.util.Random;

public class MainActivity
  extends AppCompatActivity
{
  public int has_gone_int;    //已经爬的楼层
  public int to_reach_int;    //要爬的楼层

  static
  {
    if (!Debug.isDebuggerConnected()) {
      System.loadLibrary("ctf");  //导入库文件
    }
  }

  public void Btn_up_onclick(View paramView)
  {
    this.has_gone_int += 1;    //每点击一次按钮,已经爬的楼层+1.
    paramView = "" + this.has_gone_int;
    ((TextView)findViewById(2131492948)).setText(paramView);
    if (this.to_reach_int <= this.has_gone_int) {    //如果已经爬的楼层 大于或等于要爬的楼层,设置按钮空间点击有效
      ((Button)findViewById(2131492950)).setClickable(true);
    }
  }

  public void btn2_onclick(View paramView)
  {
    ((TextView)findViewById(2131492951)).setText("{Flag:" + get_flag(this.to_reach_int) + "}");  //显示flag
  }

  public native String get_flag(int paramInt);

  protected void onCreate(Bundle paramBundle)  //创建
  {
    super.onCreate(paramBundle);
    setContentView(2130968601);
    ((Button)findViewById(2131492950)).setClickable(false);  //设置显示flag控件按钮点击无效.也就是说刚开始我们是不能点击的,需要一定的条件.
                                     //如果我们将此处改为true,那么开始的时候就可以点击了.

    this.has_gone_int = 0;      //设置已经爬的楼层的默认值为0
    paramBundle = new Random();
    for (this.to_reach_int = paramBundle.nextInt();; this.to_reach_int = paramBundle.nextInt())
    {
      if (this.to_reach_int < 0) {
        this.to_reach_int *= -1;
      }
      if (5 < this.to_reach_int)
      {
        this.to_reach_int %= 32;
        this.to_reach_int *= 16384;
        ((TextView)findViewById(2131492947)).setText("" + this.to_reach_int);
        ((TextView)findViewById(2131492951)).setText("");
        return;
      }
    }
  }
}
从源码中我们有非常多的思路来显示flag,因为APKIDE我无法回编译成功,所以用android killer来进行回编译成功了
查看smail源码,查看setclickable字符串,
    const/4 v3, 0x1

    invoke-virtual {v0, v3}, Landroid/widget/Button;->setClickable(Z)V
invoke-virtual {v0, v5}, Landroid/widget/Button;->setClickable(Z)V
有两处调用了setClickable函数,v3和v5的分别是0x0,0x1,这就是传参中的true和false.我们把上面中的false改为true.然后就可以获得flag
FindPass
用jadx打开apk,找到主要函数
    public void GetKey(View view) {
        String fkey = ((EditText) findViewById(R.id.editText1)).getText().toString();
        if (TextUtils.isEmpty(fkey.trim())) {    //如果输入的字符串为空,则输出下面的话
            Toast.makeText(this, "请输入key值!", 1).show();
            return;
        }
        char[] ekey = getResources().getString(R.string.fkey).toCharArray();  //从资源中获取字符串ekey
        int changdu = ekey.length;  //资源中的字符串长度
        char[] cha = new char[1024];  //新建一个1024长度的字符数组
        try {
            new InputStreamReader(getResources().getAssets().open("src.jpg")).read(cha);  //读取一张图片的数据到cha数组中
        } catch (Exception e) {
            e.printStackTrace();
        }
        for (int i = 0; i < changdu; i++) {
            int temp2 = cha[ekey[i]] % 10;
            if (i % 2 == 1) {
                ekey[i] = (char) (ekey[i] + temp2);
            } else {
                ekey[i] = (char) (ekey[i] - temp2);
            }
        }
        if (fkey.equals(new String(ekey))) {
            Toast.makeText(this, "恭喜您,输入正确!Flag==flag{Key}", 1).show();
        } else {
            Toast.makeText(this, "not right! lol。。。。", 1).show();
        }
    }
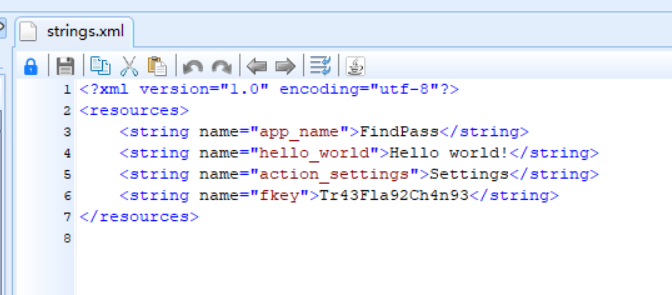
在这里也学到了一些新的知识,android用id定位某些资源,将这些资源都放在xml文件中.从中提取出来fkey字符串的值
我们可以看到就是用图片的字节数据和资源中的字符串进行运算就可以得到flag.一直弄不出来,后来看别人的WP,写出来了.原来是数据类型的问题.InputStreamReader函数读取8位的字节流.也就是说是byte.它的取值范围从-128~127.而python的取值范围是0~255.所以flag中有一位出现错误,总是找不出来错误原因.贴上抄别人的代码.图片资源从解压的APK中获取.
 1 ekey='Tr43Fla92Ch4n93'
 2 changdu =len(ekey)
 3 cha =[]
 4 flag=''
 5 f =open('src.jpg','rb')
 6 f.seek(0,0)
 7 for i in range(0,1024):
 8     byte = f.read(1)
 9     cha.append(ord(byte))
10 #print(cha)
11 for i in range(len(ekey)):
12     if cha[ord(ekey[i])]<128:
13         temp2 = cha[ord(ekey[i])] % 10
14     else :
15         temp2 =(-(cha[ord(ekey[i])]%128))%10
16
17     if i % 2 == 1:
18         flag +=chr(ord(ekey[i]) + temp2)
19     else:
20         flag +=chr(ord(ekey[i]) -temp2)
21
22 print(flag)
23
24 #Qv49CmZB2Df4jB-
最后运行模拟器验证,发现终于对了.
Classical Crackme
先运行查看信息,发现一个输入框,查壳.用C#写的直接去看源码
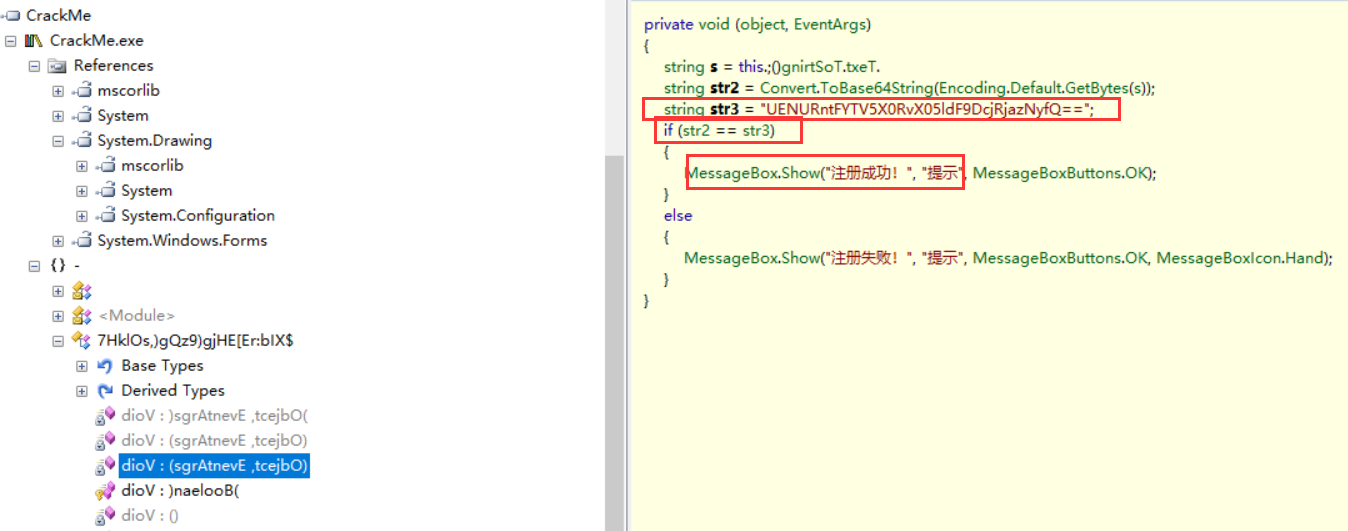
找到了关键信息,base64解密得到flag