Oauth协议,简单来说就是提供第三方登录,比如常见的微信登录、qq登录等。
流程大致如下:(网上copy的图,懒得画了)
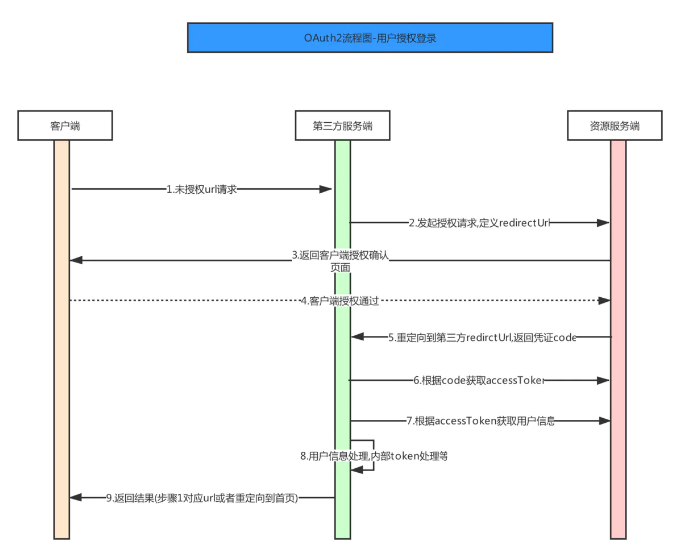
- 客户端发出登录请求
- 服务端给客户端返回code
- 客户端凭借code向服务端获取accessToken
- 客户端凭借accessToken向服务端请求资源
至于oauth的介绍就这样了,有兴趣的去官方看一下:https://oauth.net/2/
一、搭建授权服务
├─auth-server
│  │
│  └─src
│      ├─main
│           ├─java
│           │  └─com
│           │      └─lhf
│           │          └─authserver
│           │              │  AuthServerApplication.java
│           │              │
│           │              └─config
│           │                      AuthServerConfig.java
│           │                      SecurityConfig.java
│           │
│           └─resources
│               │  application.properties
│               │  application.yml
│               │
│               ├─static
│               └─templates
│
├─resource-server
│  │
│  └─src
│      ├─main
│       ├─java
│       │  └─com
│       │      └─lhf
│       │          └─resourceserver
│       │              │  ResourceServerApplication.java
│       │              │
│       │              ├─config
│       │              │      ResourceServerConfig.java
│       │              │
│       │              └─controller
│       │                      TestController.java
│       │
│       └─resources
│           │  application.yml
│           │
│           ├─static
│           └─templates
│
└─test
    └─src
        ├─main
            ├─java
            │  └─com
            │      └─lhf
            │          └─test
            │              │  TestApplication.java
            │              │
            │              └─controller
            │                      TestController.java
            │
            └─resources
                │  application.yml
                │
                ├─static
                └─templates
                        index.html
项目结构大致如上:
添加pom.xml如下
     <dependency>
            <groupId>org.springframework.boot</groupId>
            <artifactId>spring-boot-starter-web</artifactId>
        </dependency>
        <dependency>
            <groupId>org.springframework.cloud</groupId>
            <artifactId>spring-cloud-starter-oauth2</artifactId>
        </dependency>
        <dependency>
            <groupId>org.springframework.cloud</groupId>
            <artifactId>spring-cloud-starter-security</artifactId>
        </dependency>
添加配置文件SecurityConfig.java
package com.lhf.authserver.config;

import org.springframework.context.annotation.Bean;
import org.springframework.context.annotation.Configuration;
import org.springframework.security.config.annotation.authentication.builders.AuthenticationManagerBuilder;
import org.springframework.security.config.annotation.web.builders.HttpSecurity;
import org.springframework.security.config.annotation.web.configuration.WebSecurityConfigurerAdapter;
import org.springframework.security.crypto.bcrypt.BCryptPasswordEncoder;
import org.springframework.security.crypto.password.PasswordEncoder;

/**
 * <p></p>
 *
 * @author zy 刘会发
 * @version 1.0
 * @since 2020/5/11
 */
@Configuration
public class SecurityConfig extends WebSecurityConfigurerAdapter {

    /**
     * 密码比对器
     *
     * @return
     */
    @Bean
    public PasswordEncoder passwordEncoder() {
        return new BCryptPasswordEncoder();
    }

    /**
     * 配置用户
     *
     * @param auth
     * @throws Exception
     */
    @Override
    protected void configure(AuthenticationManagerBuilder auth) throws Exception {
        auth.inMemoryAuthentication()
                .withUser("admin").password(passwordEncoder().encode("123")).roles("admin");
    }

    /**
     * 安全配置
     *
     * @param http
     * @throws Exception
     */
    @Override
    protected void configure(HttpSecurity http) throws Exception {
        http.csrf().disable().formLogin();
    }
}
添加配置类AuthServer.java
package com.lhf.authserver.config;

import org.springframework.beans.factory.annotation.Autowired;
import org.springframework.context.annotation.Bean;
import org.springframework.context.annotation.Configuration;
import org.springframework.security.crypto.password.PasswordEncoder;
import org.springframework.security.oauth2.config.annotation.configurers.ClientDetailsServiceConfigurer;
import org.springframework.security.oauth2.config.annotation.web.configuration.AuthorizationServerConfigurerAdapter;
import org.springframework.security.oauth2.config.annotation.web.configuration.EnableAuthorizationServer;
import org.springframework.security.oauth2.config.annotation.web.configurers.AuthorizationServerEndpointsConfigurer;
import org.springframework.security.oauth2.config.annotation.web.configurers.AuthorizationServerSecurityConfigurer;
import org.springframework.security.oauth2.provider.ClientDetailsService;
import org.springframework.security.oauth2.provider.code.InMemoryAuthorizationCodeServices;
import org.springframework.security.oauth2.provider.token.DefaultTokenServices;
import org.springframework.security.oauth2.provider.token.store.InMemoryTokenStore;

import javax.annotation.Resource;

/**
 * <p>
 * 授权服务
 * </p>
 *
 * @author zy 刘会发
 * @version 1.0
 * @since 2020/5/11
 */
@Configuration
@EnableAuthorizationServer//开启授权服务自动配置
public class AuthServerConfig extends AuthorizationServerConfigurerAdapter {
    /**
     * 密码比对器
     */
    @Resource
    private PasswordEncoder passwordEncoder;

    @Autowired
    private ClientDetailsService clientDetailsService;

    /**
     * 授权安全配置
     *
     * @param security
     * @throws Exception
     */
    @Override
    public void configure(AuthorizationServerSecurityConfigurer security) throws Exception {
        security.checkTokenAccess("permitAll()").allowFormAuthenticationForClients();//开启check_token给所有权限,开启表单登录模式
    }

    /**
     * 客户端配置
     *
     * @param clients
     * @throws Exception
     */
    @Override
    public void configure(ClientDetailsServiceConfigurer clients) throws Exception {
        clients.inMemory()
                .withClient("novel")//添加一个客户端
                .secret(passwordEncoder.encode("123"))//客户端连接密码
                .resourceIds("lhf")//资源id
                .autoApprove(true)//自动授权
                .authorizedGrantTypes("authorization_code")//授权码模式  模式分为4种,除了授权码模式以外还有: PKCE 、 Client Credentials 、 Device Code 、 Refresh Token几种
                .scopes("all")//作用域
                .redirectUris("http://localhost:8082/index.html");//登录成功后重定向页面,可以是客户端登录页面,也可以是客户端首页
    }

    /**
     * 节点配置
     *
     * @param endpoints
     * @throws Exception
     */
    @Override
    public void configure(AuthorizationServerEndpointsConfigurer endpoints) throws Exception {
        endpoints.tokenServices(defaultTokenServices()).authorizationCodeServices(inMemoryAuthorizationCodeServices());
    }

    /**
     * spring security 提供的默认的token处理
     *
     * @return
     */
    @Bean
    public DefaultTokenServices defaultTokenServices() {
        DefaultTokenServices bean = new DefaultTokenServices();
        bean.setTokenStore(inMemoryTokenStore());
        bean.setClientDetailsService(clientDetailsService);
        bean.setAccessTokenValiditySeconds(60 * 60);
        bean.setRefreshTokenValiditySeconds(30 * 60);
        bean.setSupportRefreshToken(true);
        return bean;
    }

    /**
     * token保存方式
     *
     * @return
     */
    @Bean
    public InMemoryTokenStore inMemoryTokenStore() {
        return new InMemoryTokenStore();
    }

    /**
     * 授权码保存方式
     *
     * @return
     */
    @Bean
    public InMemoryAuthorizationCodeServices inMemoryAuthorizationCodeServices() {
        return new InMemoryAuthorizationCodeServices();
    }
}
二、资源服务器
通常来说资源服务器和授权服务器是放到一起的(除非是特别大的项目),这里为了区分我们把它分开
maven的pom节点和授权服务一样,更改端口号为8081
添加ResourceServer.java
package com.lhf.resourceserver.config;

import org.springframework.context.annotation.Bean;
import org.springframework.context.annotation.Configuration;
import org.springframework.security.config.annotation.web.builders.HttpSecurity;
import org.springframework.security.oauth2.config.annotation.web.configuration.EnableResourceServer;
import org.springframework.security.oauth2.config.annotation.web.configuration.ResourceServerConfigurerAdapter;
import org.springframework.security.oauth2.config.annotation.web.configurers.ResourceServerSecurityConfigurer;
import org.springframework.security.oauth2.provider.token.RemoteTokenServices;

/**
 * <p>资源服务器</p>
 *
 * @author zy 刘会发
 * @version 1.0
 * @since 2020/5/11
 */
@Configuration
@EnableResourceServer//开启资源服务自动配置
public class ResourceServerConfig extends ResourceServerConfigurerAdapter {

    /**
     * 远程token验证,就是验证token时到授权服务验证
     * @return
     */
    @Bean
    public RemoteTokenServices remoteTokenServices() {
        RemoteTokenServices bean = new RemoteTokenServices();
        bean.setClientId("novel");
        bean.setClientSecret("123");
        bean.setCheckTokenEndpointUrl("http://localhost:8080/oauth/check_token");//验证地址
        return bean;
    }

    /**
     * 资源配置
     * @param resources
     * @throws Exception
     */
    @Override
    public void configure(ResourceServerSecurityConfigurer resources) throws Exception {
        resources.tokenServices(remoteTokenServices())
                .resourceId("lhf");
    }

    /**
     * 安全配置
     * @param http
     * @throws Exception
     */
    @Override
    public void configure(HttpSecurity http) throws Exception {
        http.authorizeRequests()
                .antMatchers("/**").hasRole("admin")
                .anyRequest().authenticated();
    }
}
添加测试类TestController.java
package com.lhf.resourceserver.controller;

import org.springframework.web.bind.annotation.GetMapping;
import org.springframework.web.bind.annotation.RestController;

/**
 * <p></p>
 *
 * @author zy 刘会发
 * @version 1.0
 * @since 2020/5/11
 */
@RestController
public class TestController {

    @GetMapping("hello")
    public String hello() {
        return "hello";
    }
}
三、添加第三方登录服务
添加maven节点,并修改端口号为8082
     <dependency>
            <groupId>org.springframework.boot</groupId>
            <artifactId>spring-boot-starter-thymeleaf</artifactId>
        </dependency>
        <dependency>
            <groupId>org.springframework.boot</groupId>
            <artifactId>spring-boot-starter-web</artifactId>
        </dependency>
添加测试页面
<!DOCTYPE html>
<html lang="en" xmlns:th="http://www.thymeleaf.org">
<head>
    <meta charset="UTF-8">
    <title>第三方授权页面</title>
</head>
<body>
<a href="http://localhost:8080/oauth/authorize?client_id=novel&response_type=code&scope=all&redirect_uri=http://localhost:8082/index.html">点击登录</a>
<h2 th:text="${msg}"></h2>
</body>
</html>
http://localhost:8080/oauth/authorize: 登录请求地址
client_id: 客户端id
response_type:响应类型
scope:作用域
redirect_uri:自定义重定向地址

添加控制层
package com.lhf.test.controller;

import org.springframework.http.HttpEntity;
import org.springframework.http.HttpHeaders;
import org.springframework.http.HttpMethod;
import org.springframework.http.ResponseEntity;
import org.springframework.stereotype.Controller;
import org.springframework.util.LinkedMultiValueMap;
import org.springframework.util.MultiValueMap;
import org.springframework.web.bind.annotation.GetMapping;
import org.springframework.web.client.RestTemplate;
import org.springframework.web.servlet.ModelAndView;

import javax.annotation.Resource;
import java.util.Map;

/**
 * <p></p>
 *
 * @author zy 刘会发
 * @version 1.0
 * @since 2020/5/11
 */
@Controller
public class TestController {

    @Resource
    private RestTemplate restTemplate;

    @GetMapping("/index.html")
    public Object index(ModelAndView mv, String code) {
        mv.setViewName("index");
        if (code != null) {//当code不为空时,先请求token,然后拿着token请求资源
            MultiValueMap<String, String> map = new LinkedMultiValueMap<>();
            map.add("code", code);
            map.add("client_id", "novel");
            map.add("client_secret", "123");
            map.add("redirect_uri", "http://localhost:8082/index.html");
            map.add("grant_type", "authorization_code");
            Map<String, String> resp = restTemplate.postForObject("http://localhost:8080/oauth/token", map, Map.class);
            String access_token = resp.get("access_token");
            System.out.println(access_token);
            HttpHeaders headers = new HttpHeaders();
            headers.add("Authorization", "Bearer " + access_token);
            HttpEntity<Object> httpEntity = new HttpEntity<>(headers);
            ResponseEntity<String> entity = restTemplate.exchange("http://localhost:8081/hello", HttpMethod.GET, httpEntity, String.class);
            mv.addObject("msg", entity.getBody());
        }
        return mv;
    }
}
这里需要一个restTempalte,可以在启动类上添加一下代码:
package com.lhf.test;

import org.springframework.boot.SpringApplication;
import org.springframework.boot.autoconfigure.SpringBootApplication;
import org.springframework.context.annotation.Bean;
import org.springframework.web.client.RestTemplate;

@SpringBootApplication
public class TestApplication {

    public static void main(String[] args) {
        SpringApplication.run(TestApplication.class, args);
    }
    @Bean
    public RestTemplate restTemplate(){
        return new RestTemplate();
    }
}
请求: http://localhost:8082/index.html
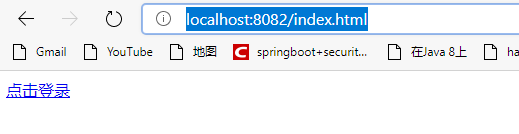
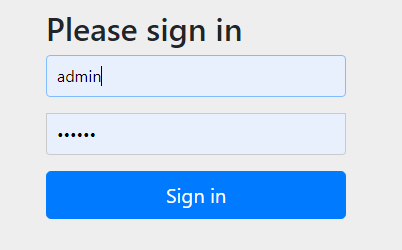
点击登录跳转登录页面
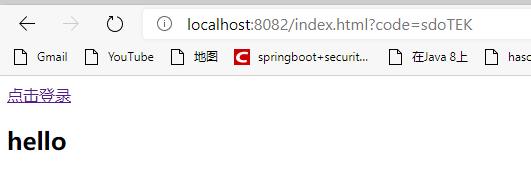
登录后可以看到获取到资源服务的接口返回值
还记得授权服务上有这么一个配置吗?
.autoApprove(true)//自动授权

把他注释掉
然后重启服务再次请求后,登录会看到授权页面
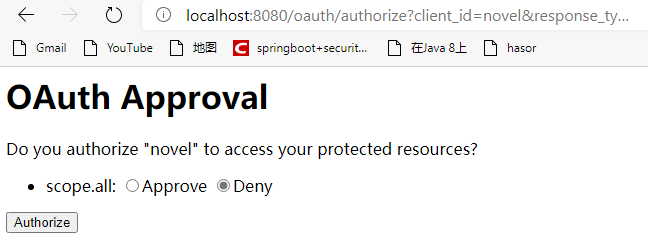
授权后才能访问资源服务上的资源
本文源码地址:
码云地址: https://gitee.com/lhfas/oauth.git
github地址: https://github.com/Liuhuifa/oauth.git