source code repository: https://github.com/aporter/coursera-android
Android Platform and Development Environment
Introduction to the Android Platform
Documentation: http://developer.android.com/training
Android Platform: A software stack consisting of several layers, designed primarily to support mobile devices.
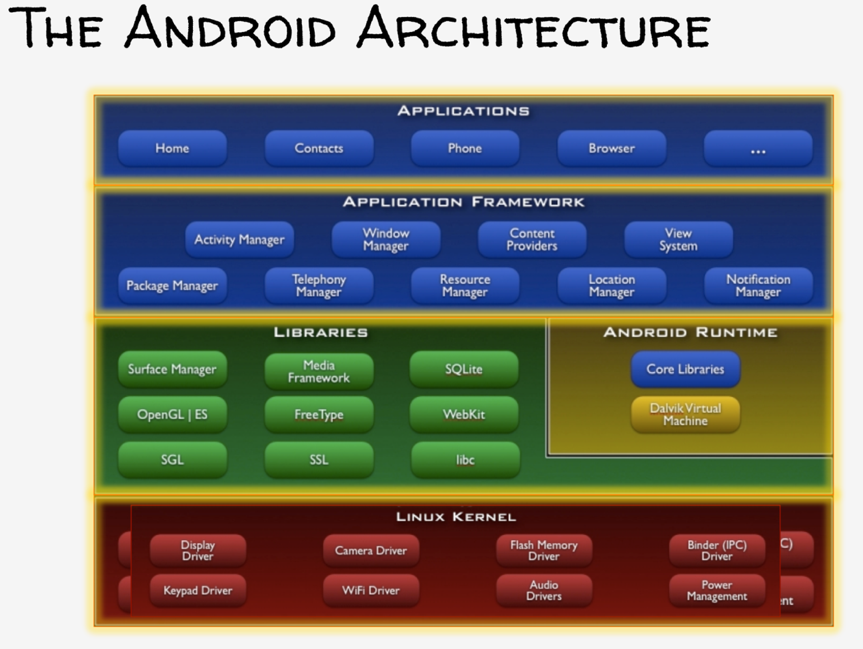
linux kernel: provides the core services that any Android computing device will rely on.
It provides generic OS services like any Linux kernel. e.g. security, memory and process management, (low-level details) file and network I/O, device drivers.
It includes several Android-specific components. E.g.
- power management services
- android shared memory, low memory killer -- its own memory sharing and memory management features
- binder – its own interprocess communication
…etc.
libraries: includes a variety of system libraries typically written in C and C++ (thus are often referred to as the native labraries) that handle the core performance-sensitive activities on the device (e.g. quickly rendering web pages and updating display).
e.g.
- System C Library (bionic libc) – implements the standard OS system call, e.g. process and thread creation, mathematical computation, memory allocation, etc.
- Surface Manager – manages the display updating.
- Media Framework
- Webkit
- OpenGL
- SQLite
Android Runtime: supports writing and running Android applications.
consists of 1) the core Java libraries and 2) the Dalvik Virtual Machine.
e.g. libraries that core Java libraries include
- Java.*, Javax.* -- basic java classes.
- Android.* -- android packages specific to the life cycles of mobile applications.
- Org.* -- supports internet or web operations.
- Junit.* -- supports the unit testing.
Dalvik virtual machine: The software that actually executes Android applications. Unlike the Java Virtual Machine, it was specifically designed to run in the resource-constrained environment typical of mobile devices.
Android apps does not run on a standard Java virtual machine but on Dalvik virtual machine instead.
-> Apps are written in Java
-> Java compiler compiles the Java source code into multiple Java bytecode files
-> DX (a tool) transforms Java bytecodes into a single DEX file (a different bytecode format) usually called classes.dex.
-> the DEX file is packaged with other application resources and installed on the device.
-> when the user launches the app, Dalvik virtual machine will execute the classes.dex file.
More about Dalvik: http://www.youtube.com/watch?v=ptjedOZEXPM
application framework: contains reusable software that many applications are likely to need.
e.g.
- Package Manager -- keeps track of all app packages installed
- Window Manager -- manages windows that comprise applications.
- View System -- provides common graphical UI elements. e.g. buttons, icons.
- Resource Manager -- manages non-compiled resources. e.g. strings, graphics, UI layout files.
- Activity Manager -- helps to coordinate and support navigation among activities.
- Content Provider -- allows applications to store and share structured information e.g. Dialer/MMS/Email apps can access contact information beceause it is stored in a Content Provider.
- Location Manager -- allows apps to receive location and movement information (e.g. generated by GPS)
- Notification Manager – allows apps to place information in Notification bar.
Application: some built-in apps. E.g. home screen, contacts, phone dialer, web browser, email reader.
The Android development environment
Android SDK bundle includes 1) Android Platform, 2) Android Studio IDE, 3) key development tools and 4) system image for the emulator.
Download & install Android SDK bundle:
http://developer.android.com/sdk
http://www.youtu.be/jpFll5aw5rA
Android Virtual Device (AVD): an Android emulated phone instances.
Pros & cons of AVD
Pros:
- doesn’t require an actual device;
- hardware is reconfigurable;
- changes are non-destructive;
Cons:
- slow;
- some features are unavailable (e.g. Bluetooth, USB connections);
- performance/user experience can be misleading;
Advanced features of AVD
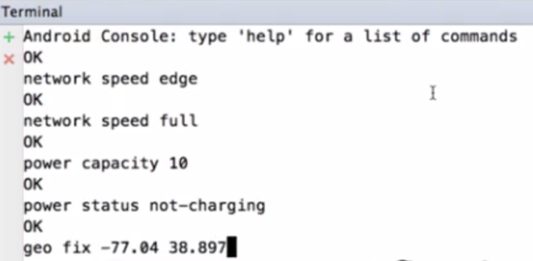
- can emulate many different devices/user characteristics (thus help to test code responding to environment events)
e.g. emulate different network speed/latency, emulate different battery states, inject mock location coordinates to test location aware apps easily.
configure charateristics via Android IDE’s terminal window,
telnet+localhost+[port number the emulator is listening] %connect to the emulator
network spped [new network speed]
power capacity [new battery status]
power status [new charging status]
geo fix [new location]
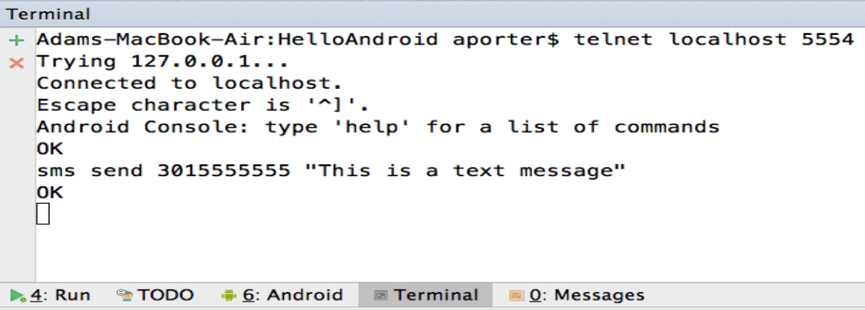
- can emulate networked interactions
e.g. emulate incoming phone calls or SMS messages
emulate SMS via Android IDE’s terminal window
telnet+localhost+[port number the emulator is listening] %connect to the emulator
sms+send+[incoming sms sender’s number]+[text message string]
two emulators interact with each other
the phone number of an emulator is its port number. Use one emulator to dial another.

Debuger
-> Set breakpoints
-> Run->debug
DDMS -- deprecated/removed now
Dalvik Debug Monitor Service (DDMS) provides a number of monitoring tools to monitor system behavior. E.g. file explorer, logcat, traceview, hierarchy viewer.
File explorer: for viewing the device’s file system.
Logcat: for logging and displaying runtime events.
Traceview: graphically displays method traces taken from running application. –subtituted by CPU profiler now.
Hierarchy viewer: allows to examine app’s UI and see how it’s organized.
Application Fundamentals and the Activity Class
Application Fundamentals
Four fundamental building blocks:
1) Activity: provides GUI, to users, primary class for user interaction.
- Usually implements a single, focused task that the user can do. e.g. viewing an email message, showing a login screen.
2) Service: performs background/long-running operations typically away from the main UI thread.
- supports interaction (request operations, share data) with remote processes.
3) Broadcast Receiver: listens for and responds to events (represented by Intent class).
4) Content Provider: allows apps to store and share data.
- uses database-style interface
- handles the low level details of interprocess communication.
each component has its own purpose and APIs.
The process of building an Android app
1. Define resources
- prepare resources* that make up the app.
2. Implement application classes
- implement java classes, usually involves writing at least one activity.
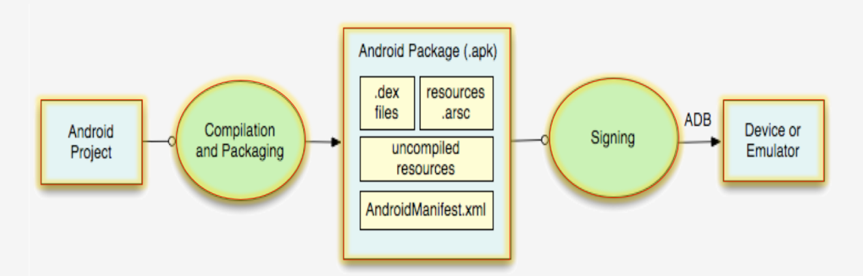
3. Package application
- build tools create application package (.APK file).
- in AndroidManifest.xml file, developers should provide build tools with required information.
- the APK is digitally signed (to identify its developer).
4. Install & run application
- can install the apk on a device/emulator and run.
- can also issue command on ADB tool: adb install <path to apk>
**
Resources
Resources: non-source code entities. E.g. layout files, strings, images, menus, animations.
Pros of Managing resources separately from the app: resources can be altered easily without having to change /recompile the app source code.
String resources
In Android, there are 3 types of string resources – individual strings, arrays of strings, plurals.
Plurals: string arrays that can be used to choose specific strings associated with certain quantities (e.g. one book, two books).
Typically stored in /res/values/*.xml. format e.g. <string name=“hello”>Hello World!</string>.
The actual string can include formatting/styling information, e.g. HTML tags.
Defined strings are accessed by other resources as @string/string_name, by Java code as R.string.string_name.
Android can choose different strings at runtime based on the device’s default language.
e.g. set different values for plural with the same name in string file under res/values and res/values-it, thus provide different @string/loction_string for English/Italian language.

layout files
layout: specify what the UI for some part of the app will look like.
typically stored in res/layout/*.xml.
Defined layouts are accessed by other resources as @layout/layout_name, by Java code as R.layout.layout_name.
Android can choose different layouts at runtime based on the device’s orientation/screen size.
e.g. set different layout file under res/layout and res/layout-land, thus provide different layout for portrait/landscape mode.

R.java
Resources can be accessed in Java as R.something.
R.java: At compilation time, Android uses resources to generate an R.java class, Java code can use this R class to access resources. (thus Resources are referred as R.something in source code.)
e.g. field R.layout.main gives a reference/handle to main.xml file, R.id.mapButton gives a reference to the button defined in the layout file, etc.

**
**
AndroidManifest.xml
AndroidManifest.xml contains packaging information, includes:
- application name;
- list of components;
- others: e.g. required permissions, hardware features requirement, minimum API level.
**
Activity Class
Task: a set of related activities (don’t have to be part of the same app), tasks can span multiple apps. Most tasks start at home screen.
Task backstack: for managing activities through which the user is navigating.
- When an activity is launched, it goes on top of the backstack.
- When the activity is destroyed, it is popped off the backstack.
e.g.
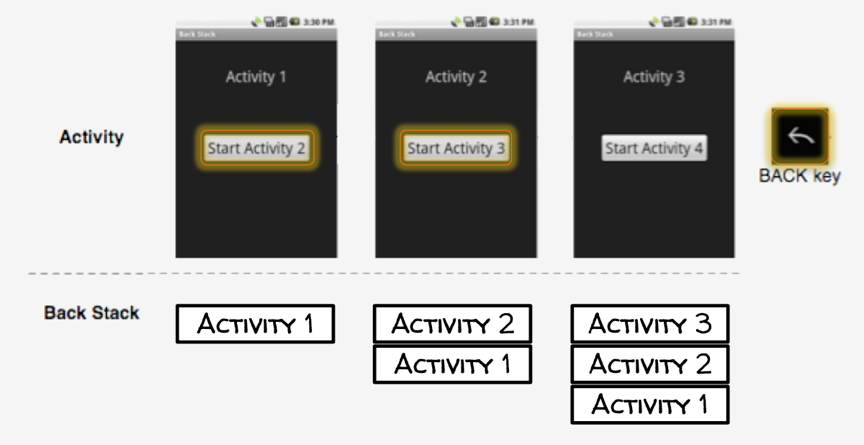
-> launch Activity 1, Activity 1 is pushed on to the top of the task backstack (as the root of the current task);
-> press the “Start Activity 2” button, Acitivity 1 is suspended, Activity 2 is pushed onto the task backstack;
-> press the “Start Acitivity 3” button, Activity 2 is suspended, Activity 3 is pushed onto the task backstack;
-> hit back key, Android kills Activity 3 and pops it off task backstack, unsuspend/resume Activity 2, Acitivity 2 is back on the top of the task backstack.
Activity lifecycle: Activities are created, suspended, resumed & destroyed as necessary when an app executes.
Some lifecycle changes depend on user behavior (e.g. press back key, home key), some depend on Android itself (e.g. Android kill activities when it needs their resources).
Activity lifecycle states
resumed/running -- visible, user can interact with it.
paused -- partially visible, but user can’t interact with it. E.g. when a new activity pops up in front of it. Can be terminated (prior to version 3.0).
Stopped – not visible, can be terminated.
Activity lifecycle methods
To take some specific action when the activity changes states, you need to override one or more of these methods in that activity.

the entire lifetime: the start of onCreate() ~ the end of onDestroy()
visible lifetime: the start of onStart() ~ the end of onStop() (onRestart as well)
visible and in foreground lifetime: the start of onResume() ~ the end of onPause()
* Invisible but at foreground e.g. the device goes to sleep, user can’t interact with the activity but it is still at foreground.
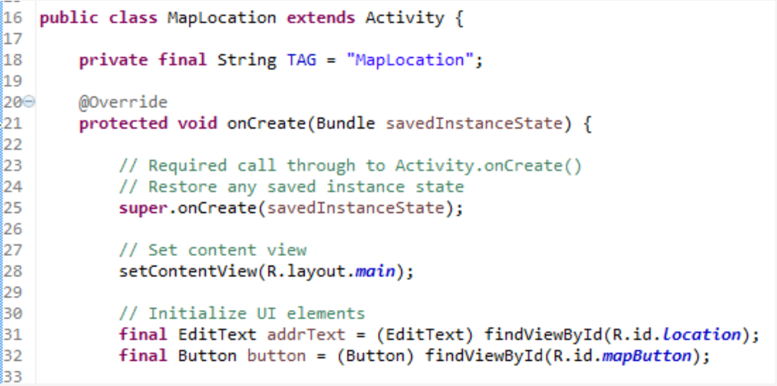
onCreate()
- gets called when activity is created.
Typical onCreate() workflow:
1) call super.onCreate() – so Android can do some of its own initialization
2) set content view – tells Android what the activity’s UI should be
3) retain references to UI views as necessary
4) configure views as required – link UI element to specific code actions
e.g.
onRestart()
- gets called if the activity has been stopped and is about to be started again.
- typical actions include:
· handle any special processing that is needed only when the activity’s been stopped and is about to start again.
onStart()
- gets called when the activity is about to become visible.
- typical actions include:
· start when visible-only behaviors, e.g. request location sensor updates.
· load/reset persistent application state, e.g. update unread messages queue for email reader app.
onResume()
- gets called when the activity is already visible and is about to start interacting with user.
- typical actions include:
· start foreground-only behaviors, e.g. start animation, play background sound track.
onPause()
- gets called when the activity is about to lose focus (focus switches to another activity).
- typical action includes:
· shut down foreground-only behaviors, e.g. killing animations.
· save persistent state (that user has edited)
onStop()
- gets called when the activity is no longer visible to user.
- it’s possible the activity may be restarted later.
- typical action includes:
· cache activity state (that you want to restore when the activity is later restarted).
Note: onStart() is not always called when the activity terminates. E.g. may not be called if Android kills the app’s process due to low memory. So don’t save persistent data in onStop(), do in onPause() instead.
onDestroy()
- gets called when the activity is about to be destroyed.
- typical action includes:
· release activity resources, e.g. shut down private threads started by this activity.
Note: onDestroy() is not always called when the activity terminates. E.g. may not be called if Android kills the app’s process due to low memory. So don’t save persistent data in onDestroy(), do in onPause() instead.
configuration changes
device configuration: device and app’s characteristics related to app resources, e.g. language, screen size, keyboard availability, device orientation.
Device configuration can change at runtime.
On configuration changes, Android usually kills the current activity and then restarts it with the appropriate resources for the changed configuration.
Two approaches to improve the speed of handling configuration changes:
a) retain an object containing important state information during a configuration change.
-> cache hard-to-recompute data in a Java object.
-> override onRetainNonConfigurationInstance() onSaveInstanceState() to build and return the object.
*onRetainNonConfigurationInstance(): called between onStop() and onDestroy() thus use onSaveInstanceState() instead.
*onSaveInstanceState(): called when the activity is being killed but might be restart later.
-> during onCreate(), call getLastNonConfigurationInstance() use parameter Bundle savedInstance to retrieve the object. /or override onRestoreInstanceState().
Note: these methods have been deprecated in favor of other methods in Fragment class.
b) manually handle the configuration change (thus avoid the shutdown and restart sequence).
-> declare the specific configuration changes that your activity handles in AndroidManifest.xml.
e.g. declare MyActivity will manually handle changes in device orientation, screen size and keyboard accessibility.
<activity android:name=”.MyActivity”
    android:configChange=”orientation|screensize|keyboardHidden”…>
-> when those configuration changes at at runtime, the activity’s onConfigurationChanged() method is called, receiving a Configuration object (as parameter) that specifies the new configuration.
-> code in overridden onConfigurationChanged() can read the object and make changes accordingly.
Intents, Permissions and Fragments
The Intent Class
Intent: a data structure that serves at least 2 purposes in Android: 1) specify an operation that you want to be performed; 2) represent an event that has occurred that you want to notify other components about.
Intent is usually constructed by one component that want some work done, and received by another activity that can perform that work.
Intent fields
Action –- string that represents desired operation.
e.g. ACTION_DIAL, ACTION_EDIT, ACTION_SYNC, ACTION_MAIN.
Intent action can be set via
a) pass directly to the intent constructor.
//e.g.
Intent newInt = new Intent(Intent.ACTION_DIAL);
or b) setAction() method.
//e.g.
Intent newInt = new Intent();
newInt.setAction(Intent.ACTION_DIAL);
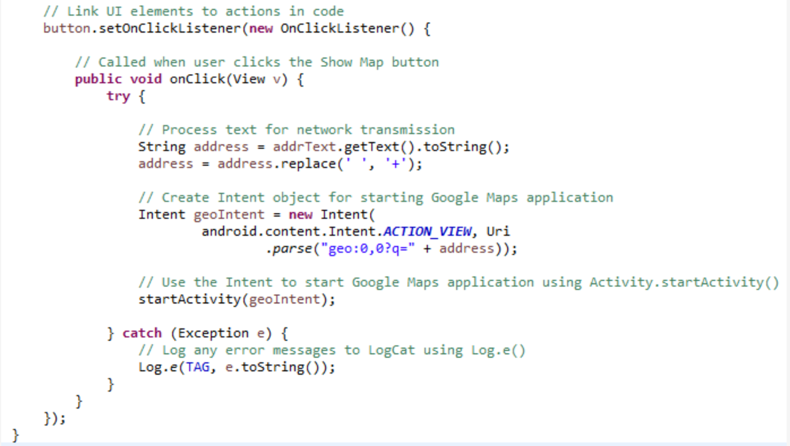
Data – data associated with the intent
The data is formatted as a uniform resource identifier (URI). Uri.parse() method receives a string and returns a URI object.
//e.g. geo-schemed URI indicates map data.
Uri.parse(“geo:0,0?q=1600+Pennsylvania+Ave+Washington+DC”)
//e.g. tel-schemed URI indicates a phone number to dial
Uri.parse(“tel:+15555555555”)
Intent data can be set via
a) pass directly to the intent constructor.
//e.g.
Intent newInt = new Intent(Intent.ACTION_DIAL, Uri.parse(“tel:+15555555555”));
or b) setData() method.
//e.g.
Intent newInt=new Intent(Intent.ACTION_DIAL);
newInt.setData(Uri.parse(“tel+15555555555”));
Category – additional information about the components that can handle the intent
e.g.
CATEGORY_BROWSABLE – can be invoked by a browser via a URI link.
CATEGORY_LAUNCHER – the target activity can be the initial activity of a task, and is listed in top-level app launcher.
Type – specifies the MIME type of the intent data
e.g. image/*, image/png, image/jpeg, text/html, text/plain.
If unspecified, Android will infer one.
Intent MIME type can be set via
a) setType() method.
Intent.setType(String type)
or b) setDataAndType() method.
Intent.setDataAndType(Uri data, String type) //set both the data and the type together
Component – identifies the intent’s target component.
use this when there’s exactly one component that should always receive the intent.
Intent component can be set via
a) pass directly to the intent constructor.
//the class object represents the activity that should perform the desired operation.
Intent newInt = Intent(Context packageContext, Class<?> cls);
or b) setComponent(), setClass(), or setClassName().
Extras – stores additional information associated with the intent
Treated as a map (key-value pairs), thus the target activity has to know both the name and the type of the extra data.
//e.g. Intent.EXTRA_EMAIL – passes a list of recipients
Intent newInt = new Intent(Intent.ACTION_SEND);
newInt.putExtra(android.content.Intent.EXTRA_EMAIL,
    new String[]{aporter@cs.umd.edu”, ceo@microsoft.com”,
                “potus@whitehose.gov”, “Mozart@musician.org”});
Intent data can be set via
putExtra(String name, String value);
putExtra(String name, float[] value);
… etc.
flags – specify how intent should be handled
e.g.
FLAG_ACTIVITY_NO_HISTORY – don’t put the target activity in the history stack
FLAG_DEBUG_LOG_RESOLUTION – print extra logging information when this intent is processed
Starting activities with intents
An activity can be started programmatically via
a) startActivity(Intent intent, …)
or b) startActivityForResult(Intent intent, …)
statActivity()
- starts the desired activity, pushes the current activity out of the foreground.
e.g.

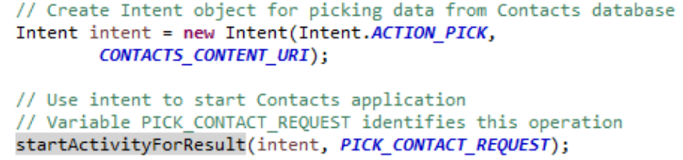
startActivityForResult()
- starts the desired activity, with the expectation that the called activity will provide a result back to the calling activity;
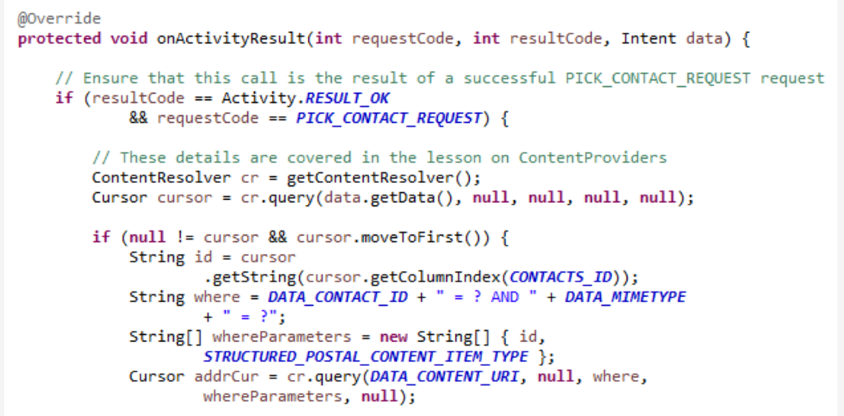
- The result is communicated back via the calling activity’s onActivityResult() method.
Activity.setResult()
New activity started by startActivityForResult() is responsible for setting its result by calling Activity.setResult().
public final void setResult(int resultCode) //pass a result code
public final void setResult(int resultCode, Intent data) //pass a result code and optionally some result data
built-in code include:
· RESULT_CANCELLED – the user chose not to complete the activity normally, e.g. press back key.
· RESULT_OK – the activity completed normally.
· RESULT_FIRST_USER – can add custom result codes after RESULT_FIRST_USER.
Usually starts off by checking result code and request code to determine what to do with that particular results.
e.g.
given intent, how does Android know which activity to start up
a) Explicit Activation - name the target activity explicitly by setting the intent’s component
or b) Implicit Activation – Android implicitly determine based on the intent & properties of installed activities
explicit activation
//e.g.
// Create an explicit Intent for starting the HelloAndroid Activity
Intent helloAndroidIntent = new Intent(LoginScreen.this, HelloAndroid.class);
// Use the Intent to start the HelloAndroid Activity
startActivity(helloAndroidIntent);
the intent constructor takes 2 parameters: 1) context (loginActivity.this); 2) class object for the target activity.
* Context: an interface used to access global app information.
implicit activation
Intent resolution: The process of Android trying to find activities that match the intent.
relies on: 1) an intent describing the desired operation; & 2) Intent filers that Android knows about
Intent filer: describes what kinds of operations/intents an individual activity can handle, is specified either in AndroidManifest.xml or programmatically.
Android will look at the Action, Data (include URI&MIME Type) and Category field
specifying intent filter within AndroidManifest.xml file
intent-filter tag is specified inside activity tag.
a) add intent action info to intent filter
<activity …>
  <intent-filter>
    …
    <action android:name=”actionName” />
    <!--
    e.g. for an activity that can handling Intent.ACTION_DIAL (can dial number)
    <action android:name=”android.intent.action.DIAL” />
         -->
    …
  </intent-filter>
  …
</activity>
b) add intent data to intent filter
<intent-filter …>
  …
  <data
      android:mimeType=”string”
      android:scheme=”string”
      android:host=”string”
      android:port=”string
      android:path=”string”
      android:pathPattern=”string”
      android:pathPrefix=”string” />
  …
</intent-filter>
c) add category to intent filter
Note: to accept implicit intents, an activity should specify an intent filter with category “Android.Intent.Category.DEFAULT”.
Priority
When more than one activity can accept a particular intent, Android will break the tie via
a) ask the user which activity to use; or b) decide based on priority.
Priority: can be given to an activity when handling matching intents, causing Android to prefer one activity over another.
Priority values should be between -1000 and 1000, higher values represent higher priorities.
Command: dumpsys package
adb shell dumpsys package command gives information about intent filters on the device.
e.g. run %adb shell dumpsys package
search for “geo” in the output:

meaning: google map app has an intent filter for URIs with geo scheme.
Permissions
Permissions are used to limit access to resources/data/operations like:
- user information e.g. Contacts app’s database
- cost-sensitive APIs e.g. sending SMS/MMS
- system resources e.g. access to camera
Permission are represented as strings.
If the required permissions are missing, a security exception will be thrown.
An App’ permissions are declared in its AndroidManifest.xml, including:
1) permissions it uses itself;
and 2) permissions that it requires of other components (that want to use it).
Declaring permissions for use
apps specify permissions they use by adding a <uses-permission> tag in their AndroidManifest.xml. e.g.
<manifest ...>
   …
   <uses-permission android:name="android.permissioin.CAMERA"/>
   <uses-permission android:name="android.permission.INTERNET"/>
   <uses-permission android:name="android.permission.ACCESS_FINE_LOCATION"/>
   <!-- e.g. to have access to contact list-->
   <uses-permission android:name="android.permission.READ_CONTACTS"/>
   …
</manifest>
defining own permissions
apps can also define and enforce their own permissions (thus other apps will have to grant those permissions to be allowed to use them).
-> Apps defines specific permissions by adding a <permission> tag in their AndroidManifest.xml.
-> enforce permission on the app: Include the defined permission as an attribute of <application> tag makes sure components trying to start this app have already been granted this permission.
e.g. in AndroidManifest.xml of some app that might perform dangerous operations.
<!--Attributes “description” and “label” can be shown to the user when installing the app. Their values are stored in strings.xml. -->
<manifest>
   …
   <permission
        android:name="course.examples.permissionexample.BOOM_PERM"
        android:description="@string/boom_perm_string"
        android:label="@string/boom_permission_label_string">
   </permission>
   <application
        …
        android:permission="course.example.permissionexample.BOOM_PERM">
        …
   </application>
   …
</manifest>
// add: can also enforce permission on just the activity, by including the permission as an attribute of <activity> tag. e.g.
<application ... >

        <!--enforce the custom permission on this Activity -->
        <activity
            android:name=".DangerousActivity"
            android:permission="course.labs.permissions.DANGEROUS_ACTIVITY_PERM" ...>
        ...
        </activity>

    ...
</application>
-> other apps that want to use that app should declare that newly defined permission (e.g. course.examples.permissionexample.BOOM_PERM) by adding a <use-permission> tag.
e.g. in AndroidManifest.xml of app that might use the previous app
<manifest …>
   …
   <uses-permission android:name="course.examples.permissionexample.BOOM_PERM"/>
   …
</manifest>
component permissions
individual components can set their own permissions, restricting which other components can access them.
Component permissions take precedence over app-level permissions.
a) Activity Permissions
- restrict which components can start the associated activity.
- Checked within execution of startActivity() and startActivityForResult().
b) Service Permissions
- restrict which components can start or bind to the associated service.
- checked within execution of Context.startService(), Context.stopService() and Context.bindService().
c) BroadcastReceiver Permissions
- restrict which components can send and receive broadcasts.
- checked in multiple places.
d) ContentProvider Permissions
- restrict which component can read and write data contained in a content provider.
Fragment
Fragment: represents a behavior / portion of UI within an activity.
Multiple fragments can be embedded in an activity to create a multi-pane UI; A single fragment can be reused across multiple activities.
Fragment lifecycle states
Resumed – the fragment is visible in the running activity.
Paused – containing activity is visible, but another activity is in the foreground and has focus.
Stopped – the fragment is not visible.
Fragment lifecycle callback methods
Fragment lifecycle is coordinated with the lifecycle of the activity that’s containing it.
When hosting activity calls onCreate(), fragment calls:
-> onAttach(): fragment is first attached to its activity;
-> onCreate(): initialize the fragment;
-> onCreateView():
- 1. fragment can set its UI via a) be inflated with its own XML layout or b) programmatically build its UI,
- and 2. (must) sets up and returns a view containing the fragment’s UI; (this view is then given to the hosting activity so that it can be installed in the activity’s view hierarchy.)
-> after the hosting activity has been created and the fragment’s UI has been installed, fragment calls onActivityCreated().
When hosting activity calls onStart(), fragment calls:
-> onStart();
When hosting activity calls onResume(), fragment calls:
-> onResume();
When hosting activity calls onPause(), fragment calls:
-> onPause();
When hosting activity calls onStop(), fragment calls:
-> onStop();
When hosting activity calls onDestroy(), fragment calls:
-> the view previously created by onCreateView() gets detached from the activity;
-> onDestroyView(): clean up resources associated with the view.
-> onDestroy(): when the fragment is no longer in use, release fragment resources.
-> onDetach(): when the fragment is no longer attached to hosting activity, null out references to hosting activity.
Adding fragments to activities
There are 2 ways to add fragments to activities:
a) statically declare the fragment in the activity’s layout file;
or b) programmatically add the fragment while the activity’s running
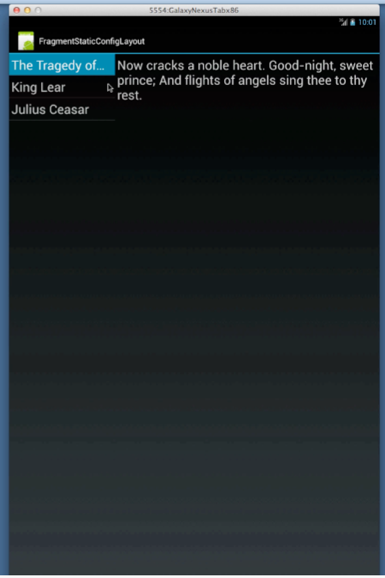
Add fragment statically:
-> add fragment tags inside the activity’s layout file;
-> in the fragment, attribute class ’s value is the name of the class implementing this fragment;
e.g. activity’s layout file
<LinearLayout … >
   …
    <fragment
        android:id="@+id/titles"
        android:layout_width="0px"
        android:layout_height="match_parent"
        android:layout_weight="1"
        class="course.examples.fragments.staticlayout.TitlesFragment" />

    <fragment
        android:id="@+id/details"
        android:layout_width="0px"
        android:layout_height="match_parent"
        android:layout_weight="2"
        class="course.examples.fragments.staticlayout.QuotesFragment" />

</LinearLayout>
-> in fragment class’s onCreateView(), call LayoutInflater class’s inflate() with layout file as parameter;
e.g. fragment’s onCreateView()
//read a xml file and convert it into java object corresponding to some UI view
@Override
public View onCreateView(LayoutInflater inflater, ViewGroup container, Bundle savedInstanceState) {
// Inflate the layout defined in quote_fragment.xml
// The last parameter is false because the returned view does not need to be attached to the container ViewGroup
    return inflater.inflate(R.layout.quote_fragment, container, false);
}
Add fragment programmatically:
-> activity’s layout’s subviews are FrameLayouts (used to reserve some space in for the fragments to be added later) instead of Fragments.
e.g. activity’s layout file
<LinearLayout …>
    …
    <FrameLayout
         …>
    </FrameLayout>

    <FrameLayout
         …>
    </FrameLayout>
         …
</LinearLayout>
-> get a reference to the FragmentManager;
-> begin a fragmentTransaction;
-> Add the fragment to activity;
-> Commit the fragmentTransaction.
e.g. in the Activity’s onCreate()
@Override
protected void onCreate(Bundle savedInstanceState) {
    super.onCreate(savedInstanceState);
     …
     setContentView(R.layout.main);

    // Get a reference to the FragmentManager
    FragmentManager fragmentManager = getFragmentManager();
    // Begin a new FragmentTransaction
    FragmentTransaction fragmentTransaction = fragmentManager.beginTransaction();
    // Add fragments -- passing in:1. Id for the frameLayout; 2. The fragment to add

    fragmentTransaction.add(R.id.title_frame, new TitlesFragment());
    fragmentTransaction.add(R.id.quote_frame, mQuoteFragment);
    // Commit the FragmentTransaction
    fragmentTransaction.commit();
}
dynamically change the layout using FragmentTransaction
-- can make UI more fluid & take better advantage of available screen size
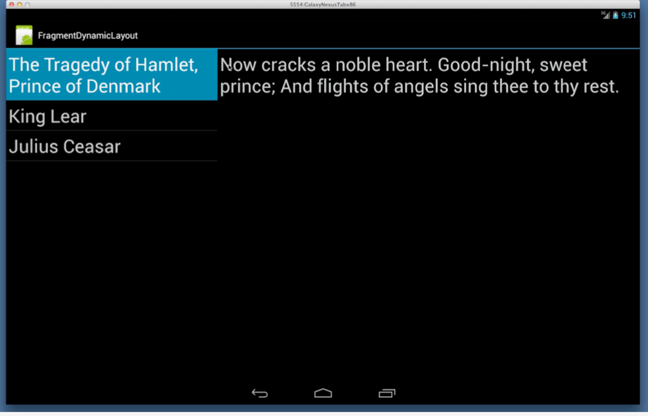
e.g.1) displaying single fragment & 2) displaying two fragments
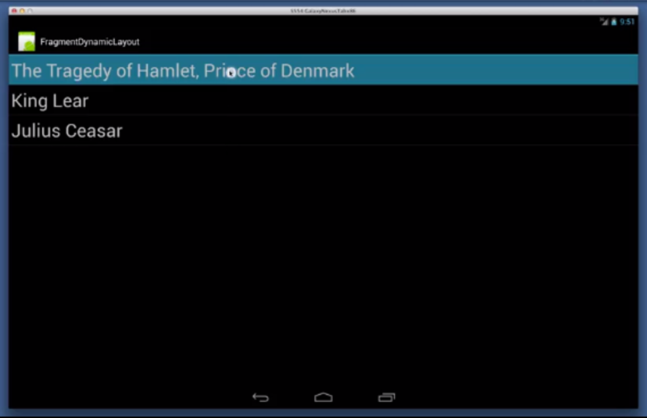
-> in activity’s onCreate(),add fragment A firstly, only add fragment B when user clicks (select from list);
-> in onListSelection(), see if fragment B hasn’t been added:
1.add it by starting another FragmentTransaction & add the transaction to taskBackStack (so that when user hit back button, will go back to one-fragment layout); //necessary, because by default fragment changes are not tracked by backstack.
2. call FragmentManager.executePendingTransaction() thus forces the transaction to be executed immediately. //necessary, otherwise Android might update the display at some time too late.
e.g.
// Called when the user selects an item in the TitlesFragment
@Override
public void onListSelection(int index) {

    // If the QuoteFragment has not been added, add it now
    if (!mQuoteFragment.isAdded()) {
        // Start a new FragmentTransaction
        FragmentTransaction fragmentTransaction = mFragmentManager.beginTransaction();
         // Add the QuoteFragment to the layout
        fragmentTransaction.add(R.id.quote_fragment_container.mQuoteFragment);
        // Add this FragmentTransaction to the backstack
        fragmentTransaction.addToBackStack(null);
        // Commit the FragmentTransaction
        fragmentTransaction.commit();
        // Force Android to execute the committed FragmentTransaction
        mFragmentManager.executePendingTransactions();
    }
    if (mQuoteFragment.getShownIndex() != index) {
        // Tell the QuoteFragment to show the quote string at position index
        mQuoteFragment.showQuoteAtIndex(index);
    }
}
Configuration Changes
SetRetainInstance(true) prevents Android from destroying the fragment it kills the hosting activity on configuration changes.
-- thus on configuration changes, fragment will be detached from activity with its state saved, its onDestroy() and onCreate() will not be called.
-> In fragment’s onCreate(), call setRetainInstance(true);
-> In fragment’s onActivityCreated(), add code to restore its retained state.
e.g. in the fragment’s class:
@Override
public void onCreate(Bundle savedInstanceState) {
    super.onCreate(savedInstanceState);
    setRetainInstance(true);
}
@Override
public void onActivityCreated(Bundle savedState) {
    …
    // If an item has been selected, set its checked state
    if (-1 != mCurrIdx)
        getListView().setItemChecked(mCurrIdx, true);
}
e.g. 1) In landscape mode: uses larger fonts, allows long titles to span multiple lines
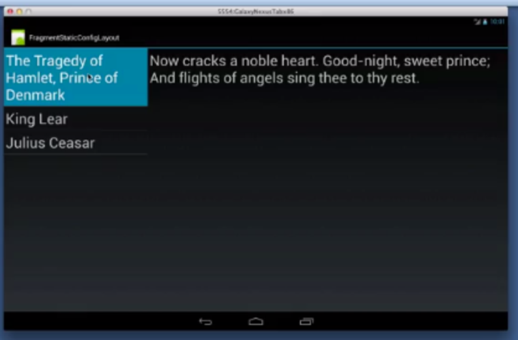
2) after rotating to portrait mode, previously checked title is still checked -- because of setRetainInstance(true) in both fragments; uses smaller fonts, limit long title to single line.
User Interface classes
View class -- a key building block for UI components.
Views occupy a rectangular space on screen.
Views are responsible for drawing themselves and for handling events directed to them.
Android provides some predefined views. E.g.
· Button: view that can be clicked on to start/perform an action.
· ToggleButton: 2-state button. It stays pressed when you press it, and stays pressed until you press it again.
· CheckBox: another 2-state button: checked / not checked.
· RatingBar: A view displaying a row of stars usually used for rating.
· AutoCompleteTextView: An editable text field that provides (drop-down) completion suggestion list as the user types in text.
Operations commonly applied to views: e.g.
· Set visibility: to show/hide the view;
· Set checked state
· Set listener: set code that should be executed when specific events occur;
· Set properties: set the view’s opacity/background/rotation;
· Manage input focus: allow view to take/request input focus (thus tell Android keyboard clicks should be sent to a particular view.);
View event sources:
· User interaction: from touch, physical input devices (such as keyboard, trackball, D-pad);
· System control: lifecycle changes (e.g. when Android needs to re-position/redraw the views).
Handling view events
Often handle events by attaching listeners to individual view.
Numerous listener interfaces are defined by the view class. E.g.
OnClickListener.onClick(); // is called when the view has been clicked;
OnLongClickListener.onLongClick(); // is called when the view is pressed and held pressed for a specific period of time.
OnFocusChangeListener.onFocusChange(); // is called when a view has received or lost focus;
OnKeyListener.onKey(); // is called when a view is about to receive a hardware key press;
Custom view subclasses can override various view method.
An app’s views are organized as a tree. Displaying has multiple steps: (walk through the tree multiple times)
1st pass: measure – get dimensions of each view.
· onMeasure(): determine the size of this view and its children.
2nd pass: layout – position each view.
· onLayout(): assign a size and position to all its children view.
3rd pass: draw – draw each view;
· onDraw(): render its content.
Custom views might override some other methods: e.g.
onFocusChanged(); // handle when view’s focus state changes.
onKeyUp(); onKeyDown(); // handle hardware key events.
onWindowsViibilityChanged(); // handle when the window containing the view changes visibility status.
ViewGroup
ViewGroup: an invisible group that contains other views, used for grouping and organizing a set of views.
ViewGroup is a base class for view containers and layouts.
Android provide some predefined viewgroups.
RadioGroup: a ViewGroup containing a set of mutually exclusive RadioButtons or CheckBoxes, only one button can be selected at any one instant.
TimePicker: a ViewGroup that allows the user to select a particular time.
DatePicker: A ViewGroup that allows the user to select a particular date.
WebView: A ViewGroup that displays a web page.
MapView: A ViewGroup that displays a map.
AdapterView: a ViewGroup subclass whose child views and underlying data are managed by an Adapter instead of itself. (only responsible for displaying the data views)
Adapter: is responsible for managing and providing views of the data to adapterView.
e.g. AdapterView subclass
ListView: an AdapterView that displays a scrollable list of selectable items. Items are manged by a ListAdapter. ListView can optionally filter the list of items based on text input. E.g.
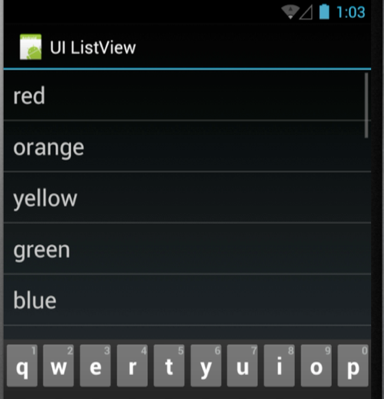
//e.g. In activity’s onCreate(), set ListAdapter for ListView
/* R.layout.list_item: resource id of view containing each single data -> R/layout/list_item.xml;
  R.array.colors: stores  array of data itself. -> R/values/strings.xml/<string-array name=”colors”>.  */
setListAdapter(new ArrayAdapter<String>(this, R.layout.list_item, getResources().getStringArray(R.array.colors)));
ListView lv=getListView();
lv.setTextFilterEnabled(true); //let filtering occur when user types
//set click handler for list items
lv.setOnItemClickListener(new On ItemClickListener() {…});
Spinner: An adapterView that provides a scrollable list within a drop-down view. Items are managed by a SpinnerAdapter.

-> In activity’s layout file, add a <Spinner> element;
-> In activity’s onCreate():
--> super.onCreate(), setContentView, …, etc;
--> set an adapter for the spinner;
/* e.g. R.array.colors: stores array of data itself. -> R/values/strings.xml/<string-array name=”colors”>;
  R.layout.dropdown_item: resource id of view containing each single data -> R/layout/layout_dropdown_item.xml;  */
ArrayAdapter<CharSequence> adapter=ArrayAdapter.createFromResource(this, R.array.colors, R.layout.dropdown_item);
Spinner.setAdapter(adapter);
--> set item selected listener, …, etc.
Gallery: A ViewGroup showing a horizontally scrolling list. Items are managed by a SpinnerAdapter.


Layout
Layout: a generic ViewGroup used to organize and structure other views/ViewGroups.
LinearLayout: child views arranged in a single horizontal or vertical (*defined in attribute android:orientation) row.
*ratio of child views can be set via attribute android:layout_weight.
RelativeLayout: child views are positioned relative to each other and to parent view.
e.g.
<!--1. align button ok to the right of the parent
       2. align the other button to the left& tool of button ok-->
<RelativeLayout …>
  <EditText android id=”@+id/entry” …/>
  <Button android:id=”@+id/ok” …
       android:layout_alignParentRight=”true />
  <Button …
      android:layout_alignTop=”@+id/ok”
      android:layout_toLeftOf=”@+id/ok” />
</RelativeLayout>
TableLayout: child views arranged into rows and columns.
e.g.
<!--1. the 1st textview should go in column 1, column 0 is empty.
      2. the 2nd textview's text should be pushed to the right of that view.-->
<TableLayout …>
  <TableRow>
    <TextView …
        android:layout_column=”1”/>
    <TextView …
        android:gravity=”right”/>
  </TableRow>
  …
</TableLayout>
GridView: child views arranged in a 2-dimensional, scrollable grid.
e.g.
<!--auto_fit: free to determine the number of columns to use-->
<GridView …
    android:id=”@+id/gridview”
    android:columnWidth=”90dp”
    android:horizontalSpacing=”10dp”
    android:numColumns=”auto_fit” />
</GridLayout>
public class GridLayoutActivity extends Activity {

    //list of image resources that should be displayed by the GridView
    private ArrayList<Integer> mThumbIdsFlowers=new ArrayList<Integer>(Arrays.asList(R.drawable.image1, R.drawable.image2, …));

    @Override
    public void onCreate(Bundle savedInstanceState) {
        super.onCreate(savedInstanceState);
        setContentView(R.layout.main);
        GridView gridView=(GridView)findViewById(R.id.gridview);
        //set the adapter
        gridview.setAdapter(new ImageAdapter(this, mThumbIdsFlowers));
    }
    …
}
/* ImageAdapter: subclass of BaseAdapter (implements adapter), methods get used when the gridview is asking for data/data views. */
Public class ImageAdapter extends BaseAdapter {
    …
    @Override
    public int getCount() {
        //should return the number of data items managed by the adapter
       return mThumbIds.size();
    }

    @Override
    public long getItemId(int position) {
        //should return id of the data item at a specified position
        /*e.g. used to indicate which image to load for popping up larger individual view when user click on an image in the gridview. */
        return mThumbIds.get(position);
    }

    @Override
    //called when GridView asks adapter for one view that view go into the grid
    public View getView(int position, View convertView, ViewGroup parent) {
        //convertView will sometimes be null, then need to create&configure a new view
        ImageView imageView=(ImageView)convertView;
        if (imageView==null) {
            imageView=new ImageView(mContext);
            …
        }
        //if convertView is not null, it will reference the view already returned by this method in the past
        /*e.g. as user scrolls the gridview, some views scrolled off the screen (going to be invisible) should get reused, so pass these views to adapter and reset fields for new data item.
       -- this saves time for allocating new views thus makes scrolling more fluid. */
        imageView.setImageResource(mThumbIds.get(position));
        return imageView;
    }
}
Menu
Menu types include: options menu, context menu, sub menu.
Context menus are usually used for operating on specific data held in the view, context/sub menus tend to be for global operations that affect the whole app.
Options: menu shown when user presses a menu button.
// since most latest editions of Android don't have old-days menu button, i'll omit it here and merge the options menu together with Action bar.
Context: menu attached to specific views, shown when user touches and holds the view. e.g.

SubMenu: secondary menu activated when user touch an already visible menu item. e.g.


creating a context/sub menu
-> define contents of the menu in .xml file under /Res/Menu/;
e.g. R.menu.top_menu.xml
<menu …>
    <item
        android:id= …
        android:icon=…
        android:title=… />
    <item …/>

    <item …>
        <menu> <!--nested menu tags indicates a submenu-->
            <item …/>
        </menu>
    </item>
</menu>
-> in activity’s onCreate…Menu methods (onCreateOptionsMenu() for options/sub menus, onCreateContextMenu() for context menus), use a menu inflater to create menu layout;
//e.g. called when user invokes the menu
@Override
public Boolean onCreateOptionsMenu(Menu menu) {
    MenuInflater inflater=getMenuInflater();
    inflater.inflate(R.menu.top_menu, menu);
    return true; //true indicates we want to display this menu item now
}
@Override
public void onCreateContextMenu(ContextMenu menu, View v, ContextMenuInfo menuInfo) {
    super.onCreateContextMenu(menu, v, menuInfo);
    MenuInflater inflater=getMenuInflater();
    Inflater.inflate(R.menu.context_menu, menu);
}
-> in activity’s on…ItemSelected methods (onOptionsMenuItemSelected() for options/sub menus, onContextMenuItemSelected() for context menus), handle item selections.
//e.g. called when user selects one menu item.
@Override
public boolean onOptionItemSelected(MenuItem item) {
    //check the item’s ID, take appropriate action for that item.
    switch (item.getItemId()) {
        case R.id.help:
            …//do sth
            return true;
      …
        default:
            //user action is unrecognized,invoke superclass to handle it
            return super.onOptionsItemSelected(item);
    }
}
Menus support many other advanced features. e.g. grouping menu items; binding shortcut keys to menu items; binding intents to menu items.
ActionBar
ActionBar: enables quick access to common operations (similar to application bar in desktop apps).
add actionbar
-> in app manifest, set <application> to use one of the appcompat's NoActionBar themes. //prevent app using the native Action bar class e.g.
<application
    android:theme="@style/Theme.AppCompat.Light.NoActionBar"
    />
-> add <Toolbar> to activity's layout. e.g.
<layout> ...
    <android.support.v7.widget.Toolbar
       android:id="@+id/my_toolbar".../>
...
</layout>
-> in activity's onCreate(), call setSupportActionBar().
@Override
protected void onCreate(Bundle savedInstanceState) {
    super.onCreate(savedInstanceState);
    setContentView(R.layout.activity_my);
    ...
    Toolbar myToolbar = (Toolbar) findViewById(R.id.my_toolbar);
    setSupportActionBar(myToolbar);
}
-> define contents of the menu in .xml file under /Res/Menu/; //just like as in for context/sub menu
-> in activity’s onCreateOptionsMenu(), use a menu inflater to create menu layout; //just like as in for context/sub menu
-> in activity's onOptionsItemSelected(), handle actions for menu items; //just like as in for context/sub menu
put an item in overflow area.
-> in the menu’s layout file, specify android:showAsAction for that item.
a) “ifRoom”: show this item in the actionBar if there’s room, otherwise put it in overflow area. (“withext” also tells to display the item as text rather than icon)
<menu …>
  <item …
    android:showAsAction="ifRoom|withText"…/>
  …
</menu>
b) “never”: always show this item overflow area, never in action bar.
<menu …>
  <item …
      android:showAsAction="never"…/>
  …
</menu>
add action bar for a fragment
-> in the fragment class, override onCreateOptionsMenu() and onOptionItemSelected() methods; (same as for activity class)
-> in the fragment’s onCreate() method, issue: setHasOptionMenu(true);.
Associate contents with tabs
e.g.
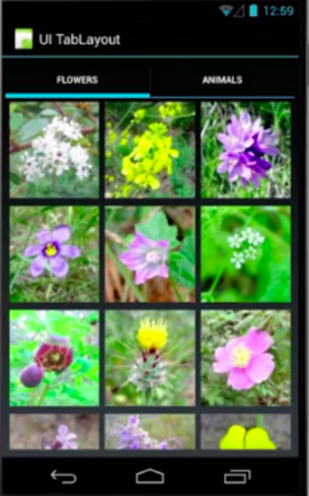
-> in the activity’s onCreate() method:
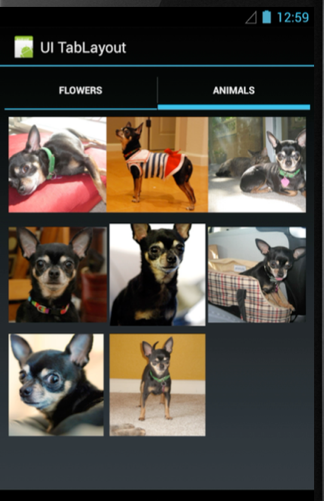
public void onCreate(Bundle savedInstanceState) {
    super.onCreate(savedInstanceState);
    setContentView(R.layout.main);

    final ActionBar tabBar=getActionBar();
    // configure the actionBar as a tab
    tabBar.setNavigationMode(ActionBar.NAVIGATION_MODE_TABS);

    //create the GridFragment that displays flower images
    GridFragment flowerFrag=newGridFragment();
    Bundle args=new Bundle();
    args.putIntegerArrayList(THUMBNAIL_IDS, mThumbIdsFlowers);
    flowerFrag.setArguments(args);

    //configure a tab indicator, attach it to the ActionBar
    tabBar.addTab(tabBar.newTab().setText(FLOWER_TABSTRING)
        .setTabListener(new TabListener(flowerFrag)));

    //same with another tab for displaying animal images
    …
}
-> in the ativity’s class, implement inner class TabListener (called when user selects/unselects a tab):
public static class TabListener implements ActionBar.TabListener {
    private final Fragment mFragment;
    public TabListener(Fragment fragment) {
        mFragment=fragment;

    }
    …
    @Override
    public void onTabSelected(Tab tab, FragmentTransaction ft) {
        //when a tab is selected, add its fragment to the hosting activity
        if (null!=mFragment)
            ft.replace(R.id.fragment_container, mFragment);
    }
    @Override
    public void onTabUnselected(Tab tab, FragmentTransaction ft) {
        /*when a tab is unselected, remove the current fragment from the hosting activity*/
        if (null!=mFragment)
        ft.remove(mFragment);
    }
}
Dialog
Dialog: an independent subwindow used by an activity for short communication with user.
e.g. dialog subclasses: AlertDialog, ProgressDialog, DatePickerDialog, TimePickerDialog.
Show a dialog when press a button
-> In the activity’s onCreate(), set onclick handler for the button:
public void onCreate(Bundle savedInstanceState) {
    …
    mShowDialogButton.setOnClickListener(new OnClickListener() {
        @Override
        public void onClick(View v) {
        showDialogFragment(ALERTTAG);//pass in desired dialog’s id
        }
    });
}
-> in showDialogFragment(), call DialogFragment ‘s show():
void showDialogFragment(int dialogID) {
    switch (dialogID) {
        case ALERTTAG:
            mDialog=AlertDialogFrgment.newInstance();
            mDialog.show(getFragmentManager(), “Alert”);
            break;
        …
    }
}
-> DialogFragment class’s onCreate() responds to its show() being called:
//in the example, AlertDialogFragment is an inner class of the activity
public static class AlertDialogFragment extends DialogFragment {
    public static AlertDialogFragment newInstance() {

        return new AlertDialogFragment();
    }
    @Override
    public Dialog onCreateDialog(Bundle savedInstanceState) {
       //create a dialog builder instance and return
       /builder methods always return the current object, thus can keep calling methods*/
        return new AlertDialog.Builder(getActivity())
           .setMessage(“Do you really want to exit?”)
       .setCancelable(false)
            .setNagativeButton(“No”,new DialogInterface.OnClickListener() {
                public void onClick(DialogInterface dialog, int id) {
                    mShutdownButton.setEnabled(false);
                showDialogFragment(PROGRESSTAG);
                    finishShutdown();//use a thread to do sth then shut down

                }
            })
        .setPositiveButton(“Yes”,new DialogInterface.OnClickListener(){…})
        .create();
        /*.create() effectively puts together all previous calls and returns the final configured object.*/
    }
}
-> ProgessDialogFragment class’s onCreate():
public static class ProgressDialogFragment extends DialogFragment {
    public static Progress DialogFragment new Instance() {…}
    @Override
    public Dialog onCreateDialog(Bundle savedInstanceState) {
        final ProgressDialog dialog=new ProgressDialog(getActivity());
        dialog.setMessage(“Activity Shutting Down.”);
        dialog.setIndeterminate(true)://dialog stays visible until it’s dismissed
        return dialog;
    }
}