之前使用同事遗留代码。代码里面gige相机用“SapAcqDevice”类,采集卡用“SapAcquisition” 。现在需要更改相机增益和曝光。通过组合提升拍摄适应性。然后,因为之前同事留的坑,并且dalsa自带的gui示例没有涉及相机增益和曝光设置。所以一直绕着“SapAcquisition”这个类搜索,只找到
BOOL b = m_Acq->GetParameter(CORACQ_PRM_CONNECTOR_EXPOSURE_INPUT,&exposureTime);
增益没找到“CORACQ_PRM”开头设置。只有最大最小值相关。相反,“SapAcqDevice” 设置曝光和增益很简单。只是前面先入为主,人为是gige用的类。后面问凌云,给出如下说明
以及如下示例:
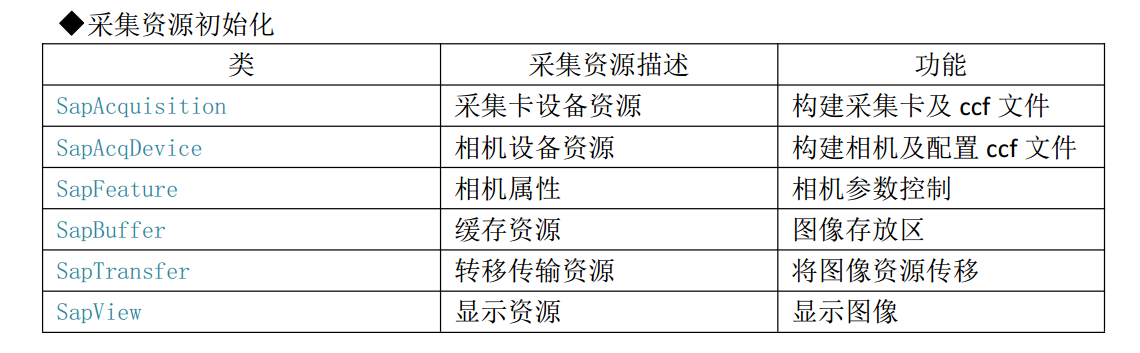
// Allocate acquisition object
SapAcquisition *pAcq = new SapAcquisition(SapLocation (“X64-CL_1”, 0), “FrameGrabber.ccf”);
// Allocate acqDevice object
SapAcqDevice *pAcqDevice = new SapAcqDevice (SapLocation (“CameraLink_1”, 0), “CLCamera.ccf”);
// Allocate buffer object, taking settings directly from the acquisition
SapBuffer *pBuffer = new SapBuffer(2, pAcq);
// Allocate view object, images will be displayed directly on the desktop
SapView *pView = new SapView(pBuffer, SapHwndDesktop);
// Allocate transfer object to link acquisition and buffer
SapTransfer *pTransfer = new SapAcqToBuf(pAcq, pBuffer, XferCallback, pView);// 在该TrasferPair中pAcq代表该源,pBuffer代表目的地;
// Create resources for all objects
BOOL success = pAcq->Create();
success = pAcqDevice->Create();
success = pBuffer->Create();
success = pView->Create();
success = pTransfer->Create();
m_Acq->RegisterCallback(CORACQ_VAL_EVENT_TYPE_FRAME_LOST , frameLostCallback , NULL) ;
m_Acq->RegisterCallback(CORACQ_VAL_EVENT_TYPE_EXTERNAL_TRIGGER , ExtTrigCallback , NULL) ;
success = pAcq-> GetParameter(CORACQ_PRM_CROP_WIDTH , & imageWidth);
success = pAcq-> GetParameter(CORACQ_PRM_CROP_HEIGHT , & imageHeight );
int paramValue ;
success = pAcqDevice -> SetFeature(“ExposureTime”, & paramValue);
// Start a continuous transfer (live grab)
success = pTransfer->Grab();
printf("Press any key to stop grab ");
getch();
// Stop the transfer and wait (timeout = 5 seconds)
success = pTransfer->Freeze();
success = pTransfer->Wait(5000);
success = pTransfer->Abort();
printf("Press any key to terminate ");
getch();
// Release resources for all objects
success = pTransfer->Destroy();
success = pView->Destroy();
success = pBuffer->Destroy();
success = pAcqDevice ->Destroy();
success = pAcq->Destroy();
// Free all objects
delete pTransfer;
delete pView;
delete pBuffer;
delete pAcqDevice;
delete pAcq;
return 0;
俩个同时使用。一个是加载采集卡参数,一个是使用相机名称作为连接。上面的例子都要输入ccf。 采集的ccf来源都清楚。 相机的ccf如图示获得(左上角File-》另存为——》弹出的窗口选择保存文件名和保存路径):

如果不想更改相机配置,使用以下构造函数
SapAcqDevice(SapLocation location = SapLocation::ServerSystem, BOOL readOnly = FALSE);
之类设置曝光(参数名“”)和明场(参数名,"")。
double paramValue=200,gainValue =2;
pAcqDevice -> SetFeature(“ExposureTime”, & paramValue);
pAcqDevice -> SetFeature(“Gain”, & gainValue);
//设置每个通道增益(以下代码来源版权声明:本文为CSDN博主「圆滚熊」的原创文章,  原文链接:https://blog.csdn.net/y459541195/article/details/100706850)
m_AcqDevice->SetFeatureValue("GainSelector","DigitalAll");//设定总增益
m_AcqDevice->SetFeatureValue("Gain", dlg2.m_edit_GainAll);
m_AcqDevice->SetFeatureValue("GainSelector", "DigitalRed");//R通道增益
m_AcqDevice->SetFeatureValue("Gain", dlg2.m_edit_GainRed);
m_AcqDevice->SetFeatureValue("GainSelector", "DigitalGreen");//G通道增益
m_AcqDevice->SetFeatureValue("Gain", (double)1.0);
m_AcqDevice->SetFeatureValue("GainSelector", "DigitalBlue");//B通道增益
m_AcqDevice->SetFeatureValue("Gain", dlg2.m_edit_GainBlue);
————————————————