一、简介
spring事件是观察者设计模式的实现,主要有三个元素:
- 事件 spring事件由ApplicationEvent定义
- 监听者 由ApplicationListener定义
- 发布者 由ApplicationEventPublisher定义,而ApplicationContext继承自ApplicationEventPublisher
简单示例:
自定义事件
public class TestEvent extends ApplicationEvent {

    private String message;

    public TestEvent(Object source) {
        this(source, "default message");
    }

    public TestEvent(Object source, String msg) {
        super(source);
        this.message = msg;
    }

    public String getMessage() {
        return message;
    }
}
监听者
@Component
public class TestListener implements ApplicationListener<ApplicationEvent>  {
    @Override
    public void onApplicationEvent(ApplicationEvent event) {
        if (event instanceof TestEvent) {
        System.out.println(((TestEvent)event).getMessage());
        }
    }
}
XML配置
<context:component-scan base-package="cn.matt.event"/>
测试
public class EventTest {
    @Test
    public void testCustomEvent() {
        ApplicationContext context = new ClassPathXmlApplicationContext("classpath:spring-context.xml");
        context.publishEvent(new TestEvent("", "hello matt"));
    }
}
补充:
定义监听者时,可通过泛型指定监听事件类型,因此,上例监听者可定义如下:
@Component
public class TestListener implements ApplicationListener<TestEvent> {
    @Override
    public void onApplicationEvent(TestEvent event) {
        System.out.println(((TestEvent) event).getMessage());
    }
}
二、spring容器事件
spring为容器启动各阶段定义了相关事件,实现如图:
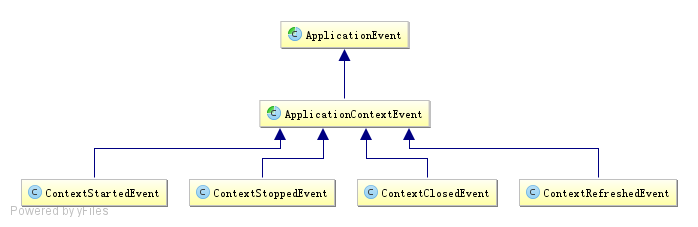
事件说明:
- ContextStartedEvent:ApplicationContext启动后触发的事件(调用start方法)
- ContextStoppedEvent:ApplicationContext停止后触发的事件(调用stop方法)
- ContextClosedEvent:ApplicationContext关闭后触发的事件
- ContextRefreshedEvent:ApplicationContext初始化或刷新完成后触发的事件(容器初始化(如bean的实例化、依赖注入)完成后调用)
使用示例
@Component
public class ApplicationStartUpListener implements ApplicationListener<ContextRefreshedEvent> {
    @Override
    public void onApplicationEvent(ContextRefreshedEvent event) {
        System.out.println("spring context inited");
    }
}
三、事件的执行机制
spring事件的执行机制默认使用单线程同步执行,异步执行可使用@Async注解实现,示例如下(新用户注册):
定义事件
public class RegisterEvent extends ApplicationEvent {
    public RegisterEvent(User user) {
        super(user);
    }
}
定义监听者
// 发生邮件
@Component
public class EmailRegisterListener implements ApplicationListener<RegisterEvent> {
    @Async
    public void onApplicationEvent(final RegisterEvent event) {
        System.out.println(Thread.currentThread().getId() + " **** 注册成功,发送确认邮件给:" + ((User)event.getSource()).getUsername());
    }
}
// 赠送积分
@Component
public class PointRegisterListener implements ApplicationListener<RegisterEvent> {
    @Async
    public void onApplicationEvent(final RegisterEvent event) {
        System.out.println(Thread.currentThread().getId() + " **** 注册成功,赠送积分给:" + ((User)event.getSource()).getUsername());
    }
}
// 赠送大礼包
@Component
public class PresentRegisterListener implements ApplicationListener<RegisterEvent> {
    @Async
    public void onApplicationEvent(final RegisterEvent event) {
        System.out.println(Thread.currentThread().getId() + " **** 注册成功,赠送大礼包给:" + ((User)event.getSource()).getUsername());
    }
}
用户类与业务类
public class User implements Serializable {
    private String username;
    private String password;

    public User(String username, String password) {
        this.username = username;
        this.password = password;
    }

    public String getUsername() {
        return username;
    }
}
@Service
public class RegisterService {
    @Autowired
    private ApplicationContext applicationContext;

    public void register(String username, String password) {
        System.out.println(username + "注册成功!");
        publishRegisterEvent(new User(username, password));
    }

    private void publishRegisterEvent(User user) {
        applicationContext.publishEvent(new RegisterEvent(user));
    }
}
配置
<context:component-scan base-package="com.sishuok"/>

<!-- 任务调度器 -->
<task:scheduler id="scheduler" pool-size="10"/>

<!-- 任务执行器 -->
<task:executor id="executor" pool-size="10"/>

<!--开启注解调度支持 @Async @Scheduled-->
<task:annotation-driven executor="executor" scheduler="scheduler" proxy-target-class="true"/>
测试
@RunWith(SpringJUnit4ClassRunner.class)
@ContextConfiguration(locations={"classpath:spring-config-register.xml"})
public class RegisterServiceIT {
    @Autowired
    private RegisterService registerService;

    @Test
    public void testRegister() {
         registerService.register("long", "123");
    }
}

// 输出:
// long注册成功!
// 15 **** 注册成功,发送确认邮件给:long
// 17 **** 注册成功,赠送积分给:long
// 18 **** 注册成功,赠送大礼包给:long
参考: