如果你想去除一个程序集的强签名(strong name),目前为止可以有两个途径
1 反编译为IL代码,删除签名部分,再编译为程序集
2 应用Re-Sign程序,直接对一个程序集再签名

生成和读取强命名
先来看,如何生成.NET的签名文件,调用命令SN传入参数。

下面的代码读取该文件,
FileStream keyPairFile = File.OpenRead(“key.sn”);
this.byte_2 = new StrongNameKeyPair(keyPairFile).PublicKey;
keyPairFile.Close();
再深究一下,BCL中原来还有一个StrongNameKeyPair的类型,它的构造方法如下
[SecuritySafeCritical, SecurityPermission(SecurityAction.Demand, Flags=SecurityPermissionFlag.UnmanagedCode)]
public StrongNameKeyPair(FileStream keyPairFile)
{
    if (keyPairFile == null)
    {
        throw new ArgumentNullException("keyPairFile");
    }
    int length = (int) keyPairFile.Length;
    this._keyPairArray = new byte[length];
    keyPairFile.Read(this._keyPairArray, 0, length);
    this._keyPairExported = true;
}
这个类型中的方法,用调用BCL的内部帮助函数StrongNameHelpers
namespace Microsoft.Runtime.Hosting
{
    [ComImport, SecurityCritical, Guid("9FD93CCF-3280-4391-B3A9-96E1CDE77C8D"), ComConversionLoss, InterfaceType(ComInterfaceType.InterfaceIsIUnknown)]
    internal interface IClrStrongName

    [ComImport, Guid("9FD93CCF-3280-4391-B3A9-96E1CDE77C8D"), SecurityCritical, ComConversionLoss, InterfaceType(ComInterfaceType.InterfaceIsIUnknown)]
    internal interface IClrStrongNameUsingIntPtr

    internal static class StrongNameHelpers
}
.NET 框架对Strong Name的支持
关于strong name的创建,生成与验证,可以参考StrongNameHelpers的源代码。
为了完成这个任务,先参考几个不常见的BLC中的API
[DllImport("mscoree.dll", CharSet=CharSet.Auto)]
private static extern bool StrongNameKeyInstall([MarshalAs(UnmanagedType.LPWStr)] string wszKeyContainer, [MarshalAs(UnmanagedType.LPArray, SizeParamIndex=2)] byte[] pbKeyBlob, int int_1);
向容器中导入一个公钥/私钥对, 如果成功完成,则为 true;否则为 false。
[DllImport("mscoree.dll", CharSet=CharSet.Auto)]
private static extern bool StrongNameKeyDelete(string string_3);
删除指定的密钥容器。如果成功完成,则为 true;否则为 false。
[DllImport("mscoree.dll", CharSet=CharSet.Auto)]
private static extern bool StrongNameSignatureGeneration(string string_3, string string_4, int int_1, int int_2, int int_3, int int_4);
生成指定程序集的强名称签名。如果成功完成,则为 true;否则为 false。
[DllImport("mscoree.dll", CharSet=CharSet.Auto)]
private static extern bool StrongNameTokenFromAssemblyEx([MarshalAs(UnmanagedType.LPWStr)] string wszFilePath, ref IntPtr intptr_0, [MarshalAs(UnmanagedType.U4)] out int pcbStrongNameToken, ref IntPtr intptr_1, [MarshalAs(UnmanagedType.U4)] out int pcbPublicKeyBlob);
从指定的程序集文件创建强名称标记,并返回标记代表的公钥。强名称标记是公钥的缩写形式。该标记是依据用于对程序集进行签名的公钥创建的 64 位哈希。该标记是程序集的强名称的一部分,并且可以从程序集元数据中读取。
[DllImport("mscoree.dll", CharSet=CharSet.Auto)]
private static extern void StrongNameFreeBuffer(IntPtr intptr_0);
释放上一次调用强名称函数(如 StrongNameGetPublicKey、StrongNameTokenFromPublicKey 或 StrongNameSignatureGeneration)时分配的内存。
[DllImport("mscoree.dll", CharSet=CharSet.Auto)]
private static extern uint StrongNameErrorInfo();
获取由某个强名称函数引发的上一个错误代码。由某一个强名称函数设置的上一个 COM 错误代码。
大部分强名称方法返回简单的 true 或 false 以指示是否成功完成。使用 StrongNameErrorInfo 函数检索指定由强名称函数生成的上一个错误的 HRESULT。
程序中的代码流程分析
先用代码读取一个程序集的strong name
this.byte_1 = AssemblyName.GetAssemblyName("Test.dll").GetPublicKey();
再把整个程序集读取内存中
using (FileStream stream2 = File.OpenRead(“Test.dll"))
{
       this.byte_3 = new byte[stream2.Length];
       stream2.Read(this.byte_3, 0, (int) stream2.Length);
}
下面的代码获取已经签名的程序集的签名信息
int num;
int num2;
StrongNameTokenFromAssemblyEx(string_3, ref ptr2, out num2, ref zero, out num);
byte[] destination = new byte[num2];
Marshal.Copy(ptr2, destination, 0, num2);
读取签名文件的长度,它将是要写入到程序集中的签名
FileStream input = new FileStream(“sn.key”, FileMode.OpenOrCreate, FileAccess.Read);
BinaryReader reader = new BinaryReader(input);
byte[] buffer2 = new byte[(int) reader.BaseStream.Length];
reader.BaseStream.Seek(0L, SeekOrigin.Begin);
reader.Read(buffer2, 0, (int) reader.BaseStream.Length);
int length = (int) reader.BaseStream.Length;
reader.Close();
input.Close();
最后调用方法,添加和生成签名
StrongNameKeyInstall("Test.dll", buffer, length))
StrongNameSignatureGeneration("Test.dll", snKey, 0, 0, 0, 0))
因为这几个方法的调用不会抛出异常,所以要用Win32式的GetLastError函数一样,使用StrongNameErrorInfo()方法来截获错误,
整个过程几乎就是对BCL的API调用,全部代码在百行以内。我在想,Visual Studio内置的给程序集签名的方式,也应该与此有相似之处,毕竟核心的API都已经被
微软封装进BCL类库,只需要调用即可。
这个工具来源于一家专门研究逆向工程的研究小组,你可以通过下面的网址找到他们发布的研究成果。
http://www.reteam.org/index.html
Winform开发框架之权限管理系统的改进
权限管理系统,一直是很多Mis系统和一些常见的管理系统所需要的,所以一般可以作为独立的模块进行开发,需要的时候进行整合即可,不需要每次从头开发,除非特殊的系统需求。我在Winform开发框架介绍中的随笔中,很早之前在《Winform开发框架之权限管理系统》就写过关于我的通用权限管理系统的一些介绍,当时这个版本的还是传统样式的,界面如下所示。

由于我的Winform开发框架需要,我把权限管理系统、字典管理模块、分页控件等都扩展了支持传统样式、DotNetBar控件样式,以及DevExpress控件样式。这些样式的界面之前也已经介绍不少了,本文主要介绍使用DevExpress控件样式的权限管理系统,对一些新的功能扩展以及完善,包括系统类型管理、菜单管理、功能管理、登陆日志管理等模块进行介绍。
本权限管理系统包括用户管理、组织机构管理、角色管理、系统类型定义、功能管理、菜单管理、用户登录日志管理,以及对相应对象的权限控制管理等功能。整个权限管理系统是基于RBAC(基于角色的访问控制)方式进行权限控制,是一个独立的权限管理系统,需要的时候业务系统与之进行整合即可,实现通用模块的高效利用和统一管理等方面。
1、系统类型管理
系统类型,是我们在权限系统中定义的一个系统分类,对于不同的系统,我们通过这个定义进行区分,可以实现多个业务系统的管理(虽然一般情况下,我们只是管理一个系统)。系统类型管理界面如下所示。

这个对象的管理,以前一直在权限系统中,通过修改数据库进行初始化,不过我觉得把它作为一个独立的数据进行维护,然后为功能定义、菜单、登陆日志等和系统类型关联的数据进行设置管理,应该是比较方便的。
因为,功能定义是基于某个系统而增加的一系列功能控制ID的定义,方便实现按钮级别和数据级别的权限控制的基础。
菜单的定义,是用来实现基于动态配置功能模块的菜单,引入该模块的初衷是用来方便动态配置Winform或者Web的功能菜单,这个也是不同的系统肯定有不同的菜单了。
登陆日志管理,是用来方便记录来自业务系统对权限系统接口的重要接口调用的记录,如登陆、修改密码等操作,一般情况下,我们用不同的业务系统来区分它们的数据。
2、菜单管理
刚才说到,这里的菜单管理,是指用来实现基于动态配置功能模块的菜单,用来实现基于Winform、Web菜单的集成统一,对于不同的系统,菜单定义是不同的,因此他们是基于某个系统类型下面的数据管理。
为了有效管理菜单数据,我把菜单的关系用树形控件进行展示,并通过SplitContainer控件实现布局的合理切分,可以实现自由拖动,界面效果如下所示。
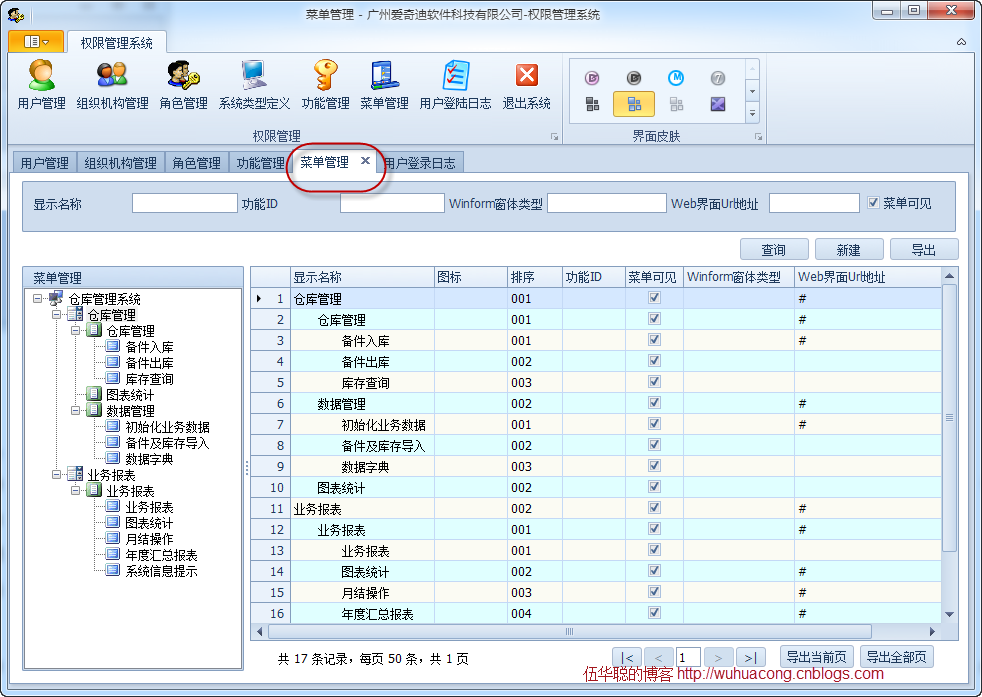
菜单的数据显示,左边使用了树形控件,数据通过递归方式进行绑定。右边数据是通过我的分页控件进行数据绑定,并且绑定的数据是通过了层级的缩进格式化了的。
树菜单绑定的核心递归代码如下所示。

        /// <summary>
        /// 绑定树形数据
        /// </summary>
        private void InitTree()
        {
            treeView1.Nodes.Clear();
            treeView1.BeginUpdate();
            Cursor.Current = Cursors.WaitCursor;

            //先获取系统类型,然后对不同的系统类型下的菜单进行绑定显示
            List<SystemTypeInfo> typeList = BLLFactory<SystemType>.Instance.GetAll();
            foreach (SystemTypeInfo typeInfo in typeList)
            {
                TreeNode pNode = new TreeNode();
                pNode.Text = typeInfo.Name;//系统类型节点
                pNode.Name = typeInfo.OID;
                pNode.ImageIndex = 0;
                pNode.SelectedImageIndex = 0;
                this.treeView1.Nodes.Add(pNode);

                string systemType = typeInfo.OID;//系统标识ID

                //绑定树控件
                //一般情况下,对Ribbon样式而言,一级菜单表示RibbonPage;二级菜单表示PageGroup;三级菜单才是BarButtonItem最终的菜单项。
                List<MenuNodeInfo> menuList = BLLFactory<SysMenu>.Instance.GetTree(systemType);
                foreach (MenuNodeInfo info in menuList)
                {
                    TreeNode item = new TreeNode();
                    item.Name = info.ID;
                    item.Text = info.Name;//一级菜单节点
                    item.Tag = info;//对菜单而言,记录其MenuNodeInfo到Tag中,作为判断依据
                    item.ImageIndex = 1;
                    item.SelectedImageIndex = 1;
                    pNode.Nodes.Add(item);

                    AddChildNode(info.Children, item);
                }
            }

            Cursor.Current = Cursors.Default;
            treeView1.EndUpdate();
            this.treeView1.ExpandAll();
        }

        private void AddChildNode(List<MenuNodeInfo> list, TreeNode fnode)
        {
            foreach (MenuNodeInfo info in list)
            {
                TreeNode item = new TreeNode();
                item.Name = info.ID;
                item.Text = info.Name;//二、三级菜单节点
                item.Tag = info;//对菜单而言,记录其MenuNodeInfo到Tag中,作为判断依据
                int index = (fnode.ImageIndex + 1 > 3) ? 3 : fnode.ImageIndex + 1;
                item.ImageIndex = index;
                item.SelectedImageIndex = index;
                fnode.Nodes.Add(item);

                AddChildNode(info.Children, item);
            }
        }
菜单的列表数据,通过分页控件绑定的代码如下所示。
        /// <summary>
        /// 根据查询条件构造查询语句
        /// </summary>
        private string GetConditionSql()
        {
            SearchCondition condition = new SearchCondition();
            condition.AddCondition("Name", this.txtName.Text, SqlOperator.Like);
            condition.AddCondition("FunctionId", this.txtFunctionId.Text, SqlOperator.Like);
            condition.AddCondition("Visible", this.txtVisible.Checked ? 1 : 0, SqlOperator.Equal);
            condition.AddCondition("WinformType", this.txtWinformType.Text, SqlOperator.Like);
            condition.AddCondition("Url", this.txtUrl.Text, SqlOperator.Like);

            string where = condition.BuildConditionSql().Replace("Where", "");

            return where;
        }

        /// <summary>
        /// 绑定列表数据
        /// </summary>
        private void BindData()
        {
            //entity
            this.winGridViewPager1.DisplayColumns = "Name,Icon,Seq,FunctionId,Visible,WinformType,Url";
            #region 添加别名解析

            this.winGridViewPager1.AddColumnAlias("ID", "");
            this.winGridViewPager1.AddColumnAlias("Name", "显示名称");
            this.winGridViewPager1.AddColumnAlias("Icon", "图标");
            this.winGridViewPager1.AddColumnAlias("Seq", "排序");
            this.winGridViewPager1.AddColumnAlias("FunctionId", "功能ID");
            this.winGridViewPager1.AddColumnAlias("Visible", "菜单可见");
            this.winGridViewPager1.AddColumnAlias("WinformType", "Winform窗体类型");
            this.winGridViewPager1.AddColumnAlias("Url", "Web界面Url地址");

            #endregion

            string where = GetConditionSql();
            List<MenuInfo> list = BLLFactory<SysMenu>.Instance.FindWithPager(where, this.winGridViewPager1.PagerInfo);
            list = CollectionHelper<MenuInfo>.Fill("-1", 0, list, "PID", "ID", "Name");
            this.winGridViewPager1.DataSource = new WHC.Pager.WinControl.SortableBindingList<MenuInfo>(list);
            this.winGridViewPager1.PrintTitle = "功能菜单信息报表";
        }
菜单的编辑界面如下所示。

本篇主要是介绍菜单的管理,对于菜单的动态加载管理,我会在另外一篇Winform开发框架中进行介绍。菜单定义数据里面的功能控件ID,是来自功能模块的功能控件ID,是用来控制不同用户所能访问的菜单资源的。
3、功能管理
功能定义,也是基于某个系统类型下面的,对于不同的业务系统,我们可以集中放在一个权限管理系统里面进行管理,但是功能的定义,根据不同的系统类型进行区分即可,这样的目标是用来实现多种企业应用的有效整合。
功能的管理,是整个权限系统的核心,因为通过对他们的定义,以及权限分配,都会影响各个角色用户可访问的功能;功能定义的数据,其实也是一个树形结构,可以用树控件进行展示出来,如下所示。

4、日志管理
我们知道,一般权限系统,管理用户很常见的,因此用户的登陆日志,一般情况下是由权限管理系统记录即可, 如每次用户登陆的时候,我们记录用户的登陆日志;如果用户修改密码,我们也做一个重要记录,这样对于在业务系统端的管理,我们就不需要管理他们的登陆方面的事件了。
日志管理分为两个部分,一个是通过权限管理系统本身的登录入口进行登录的,一个是通过与之集成的业务系统,通过API调用方式进行登录验证的, 他们的登录接口基本一样,只是部分数据不同。
            try
            {
                //判断用户是否登录成功
                string ip = NetworkUtil.GetLocalIP();
                string macAddr = HardwareInfoHelper.GetMacAddress();

                string identity = BLLFactory<User>.Instance.VerifyUser(this.txtLogin.Text, this.txtPassword.Text, "WareMis", ip, macAddr);
                if (!string.IsNullOrEmpty(identity))
                {
                    //进一步判断用户角色
                    if (BLLFactory<User>.Instance.UserInRole(this.txtLogin.Text, RoleInfo.AdminName))
                    {
                        MessageUtil.ShowTips(string.Format("用户【{0}】身份验证正确", this.txtLogin.Text));
                    }
                    else
                    {
                        MessageUtil.ShowWarning("该用户没有管理员权限");
                        return;
                    }
                }
                else
                {
                    MessageUtil.ShowWarning("用户名或密码错误");
                    return;
                }
            }
            catch (Exception err)
            {
                MessageUtil.ShowError(err.Message);
            }
权限管理系统对日志进行统一管理和展示,具体界面如下所示。

整个权限管理系统,目的提高系统开发速度和效率,因此通过独立开发,模块重用,易于集成等方式实现我们生产效率的最大化。
 主要研究技术:代码生成工具、Visio二次开发、送水管理软件等共享软件开发
专注于Winform开发框架、WCF开发框架的研究及应用。
转载请注明出处:
撰写人:伍华聪 http://www.iqidi.com