一、概述
目前为止,第三方的图片加载框架挺多的,比如UIL , Volley Imageloader等等。但是最好能知道实现原理,所以下面就来看看设计并开发一个加载网络、本地的图片框架。
总所周知,图片框架中肯定需要用到缓存,这里我们和其他框架一样,采用LruCache来管理图片的缓存,当然图片的加载测量使用LIFO比较好点,因为要加载最新的给用户。
我们采用异步消息处理机制来实现图片异步加载任务:用于UI线程当Bitmap加载完成后更新ImageView。
加载网络图片的原理,就是如果启用了硬盘缓存,加载时,先从内存中加载,然后从硬盘加载,最后再从网络下载。下载完成后,写入硬盘和内存缓存。
如果没有启用硬盘缓存,就直接从网络压缩下载获取,最后加入内存缓存即可。
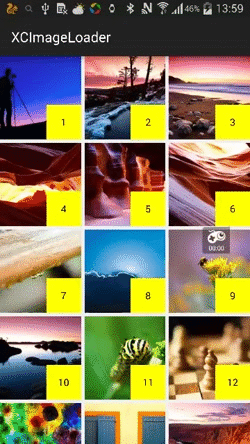
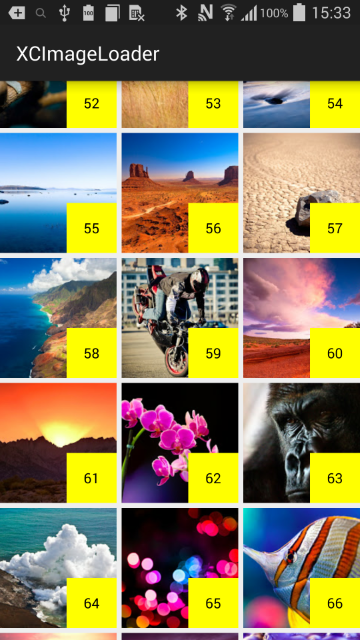
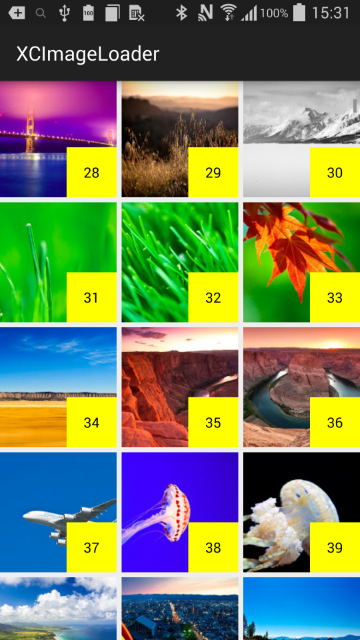
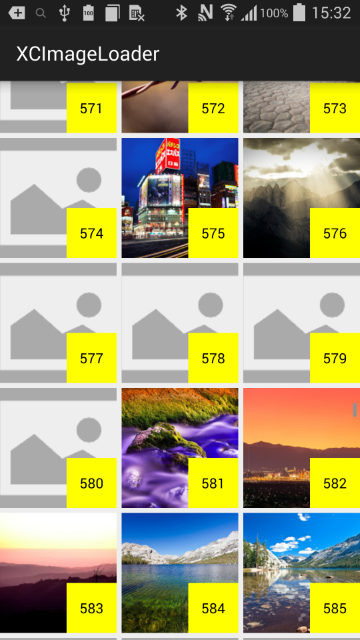
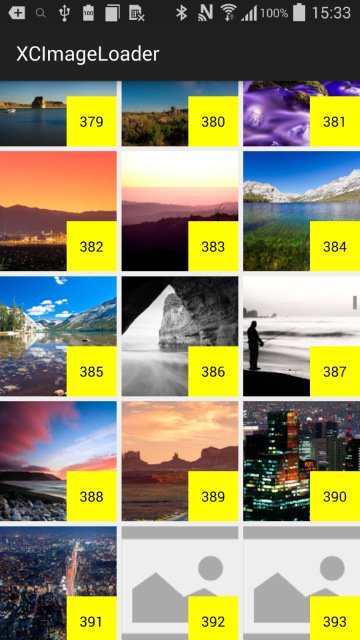
二、实例效果图
下面是个用GridView加载1000张图的实例效果图
三、框架解析
1、图片压缩
很多情况下,网络或者本地的图片都比较大,而我们的ImageView显示大小比较小,这时候就需要我们进行图片的压缩,以显示到ImageView上面去。
1.1、本地图片压缩
(1)获取ImageView所显示的大小
/**
     * 获取ImageView所要显示的宽和高
     */
    public static ImageSize getImageViewSize(ImageView imageView)
    {
        ImageSize imageSize = new ImageSize();
        DisplayMetrics displayMetrics = imageView.getContext().getResources()
                .getDisplayMetrics();
        ViewGroup.LayoutParams lp = imageView.getLayoutParams();
        // 获取imageview的实际宽度
        int width = imageView.getWidth();
        if (width <= 0)
        {// 获取imageview在layout中声明的宽度
            width = lp.width;
        }
        if (width <= 0)
        {// 检查最大值
            width = getImageViewFieldValue(imageView, "mMaxWidth");
        }
        if (width <= 0)
        {
            width = displayMetrics.widthPixels;
        }
        // 获取imageview的实际高度
        int height = imageView.getHeight();
        if (height <= 0)
        {// 获取imageview在layout中声明的宽度
            height = lp.height;
        }
        if (height <= 0)
        {// 检查最大值
            height = getImageViewFieldValue(imageView, "mMaxHeight");
        }
        if (height <= 0)
        {
            height = displayMetrics.heightPixels;
        }
        imageSize.width = width;
        imageSize.height = height;
        return imageSize;
    }
上面代码中最大宽度,没有用getMaxWidth();用的是反射获取的,这是因为getMaxWidth竟然要API 16,没办法,为了兼容问题,只能采用反射机制,所以不太赞同反射。
(2)设置图片的inSampleSize
根据ImageView所要显示的大小和图片的实际大小来计算inSampleSize,实现如下:
/**
     * 根据ImageView的宽高和图片实际的宽高计算SampleSize
     */
    public static int calculateInSampleSize(BitmapFactory.Options options,
          int reqWidth,int reqHeight)
    {
        int width = options.outWidth;
        int height = options.outHeight;
        int inSampleSize = 1;
        if (width > reqWidth || height > reqHeight)
        {
            int widthRadio = Math.round(width * 1.0f / reqWidth);
            int heightRadio = Math.round(height * 1.0f / reqHeight);
            inSampleSize = Math.max(widthRadio, heightRadio);
        }
        return inSampleSize;
    }
1.2、网络压缩
上面是本地的图片的压缩,如果是网络图片的话, 分两种情况,如果硬盘缓存开启的话, 就把图片下载到本地,然后在采用上面本地压缩方法;
如果硬盘缓存没有开启的话,才用BitmapFactory.decodeStream()来获取bitmap,然后和本地压缩一样的方法来计算采样率压缩。如下:
/**
     * 根据url下载图片并压缩
     */
    public static Bitmap downloadImageByUrl(String urlStr, ImageView imageview)
    {
        InputStream is = null;
        try
        {
            URL url = new URL(urlStr);
            HttpURLConnection conn = (HttpURLConnection) url.openConnection();
            is = new BufferedInputStream(conn.getInputStream());
            is.mark(is.available());
            BitmapFactory.Options opts = new BitmapFactory.Options();
            opts.inJustDecodeBounds = true;
            Bitmap bitmap = BitmapFactory.decodeStream(is, null, opts);
            //获取imageview想要显示的宽和高
            ImageSize imageViewSize = ImageUtils.getImageViewSize(imageview);
            opts.inSampleSize = ImageUtils.calculateInSampleSize(opts,
                    imageViewSize.width, imageViewSize.height);
            opts.inJustDecodeBounds = false;
            is.reset();
            bitmap = BitmapFactory.decodeStream(is, null, opts);
            conn.disconnect();
            return bitmap;
        } catch (Exception e)
        {
            e.printStackTrace();
        } finally
        {
            try
            {
                if (is != null)
                    is.close();
            } catch (IOException e)
            {
            }
        }
        return null;
    }
图片压缩差不多就这样了,下面来看看图片加载框架的设计与实现
2、图片加载框架的设计架构
图片压缩完了,就放入我们的LruCache,然后通过setImageBitmap方法设置到我们的ImageView上。
图片加载框架的整体架构如下:
(1)、单例实现,单例默认不传参数,当然也支持传参单例调用框架。
(2)、图片缓存管理:包含一个LruCache用于管理我们的图片。
(3)、任务队列:每来一次新的加载图片的请求,封装成Task添加到的任务队列TaskQueue中去;
(4)、后台轮询线程:该线程在第一次初始化实例的时候启动,然后会一直在后台运行;当每来一次加载图片请求的时候,
除了会创建一个新的任务到任务队列中去,同时发一个消息到后台线程,后台线程去使用线程池去TaskQueue去取一个任务执行;
基本的框架设计架构就是上面这些,下面来看看具体的实现:
3、图片加载框架的具体实现
3.1、单例实现以及构造方法:
public static XCImageLoader getInstance()
    {
        if (mInstance == null)
        {
            synchronized (XCImageLoader.class)
            {
                if (mInstance == null)
                {
                    mInstance = new XCImageLoader(DEAFULT_THREAD_COUNT,Type.LIFO);
                }
            }
        }
        return mInstance;
    }
    public static XCImageLoader getInstance(int threadCount,Type type)
    {
        if (mInstance == null)
        {
            synchronized (XCImageLoader.class)
            {
                if (mInstance == null)
                {
                    mInstance = new XCImageLoader(threadCount,type);
                }
            }
        }
        return mInstance;
    }
    private XCImageLoader(int threadCount,Type type){
        init(threadCount, type);
    }
    /**
     * 初始化信息
     * @param threadCount
     * @param type
     */
    private void init(int threadCount,Type type){
        initBackThread();
        //获取当前应用的最大可用内存
        int maxMemory = (int) Runtime.getRuntime().maxMemory();
        mLruCache = new LruCache<String,Bitmap>(maxMemory/8){
            @Override
            protected int sizeOf(String key, Bitmap value) {
                return value.getRowBytes() * value.getHeight();
            }
        };
        //创建线程池
        mThreadPool = Executors.newFixedThreadPool(threadCount);
        mTaskQueue = new LinkedList<Runnable>();
        mType = type;
        mPoolTThreadSemaphore = new Semaphore(threadCount);
    }
3.2、后台轮询线程:
后台线程中,创建一个Handler用来处理图片加载任务发过来的图片显示消息。
/**
     * 初始化后台轮询线程
     */
    private void initBackThread() {
        //后台轮询线程
        mPoolThread = new Thread(){
            @Override
            public void run() {
                Looper.prepare();
                mPoolThreadHandler = new Handler(){
                    @Override
                    public void handleMessage(Message msg) {
                        //从线程池中取出一个任务开始执行
                        mThreadPool.execute(getTaskFromQueue());
                        try {
                            mPoolTThreadSemaphore.acquire();
                        } catch (InterruptedException e) {
                            e.printStackTrace();
                        }
                    }
                };
                //释放信号量
                mPoolThreadHandlerSemaphore.release();
                Looper.loop();
            }
        };
        mPoolThread.start();
    }
3.3、使用框架显示图片-加载图片并显示到ImageView上
加载显示图片的时候,判断是否有LruCache,如果有的话,就从LruCache中取出来加载显示;
否则的话,就新建一个图片加载任务并添加到任务队列中。
/**
     * 加载图片并显示到ImageView上
     */
    public void displayImage(final String path,final ImageView imageView
        ,final boolean isFromNet){
            imageView.setTag(path);
        if(mUIHandler == null){
            mUIHandler = new Handler(){
                @Override
                public void handleMessage(Message msg) {
                    // 获取得到图片,为imageview回调设置图片
                    ImageHolder holder = (ImageHolder) msg.obj;
                    Bitmap bmp = holder.bitmap;
                    ImageView imageview = holder.imageView;
                    String path = holder.path;
                    // 将path与getTag存储路径进行比较,防止错乱
                    if (imageview.getTag().toString().equals(path))
                    {
                        if(bmp != null){
                            imageview.setImageBitmap(bmp);
                        }
                    }
                }
            };
        }
        // 根据path在缓存中获取bitmap
        Bitmap bm = getBitmapFromLruCache(path);
        if (bm != null)
        {
            refreshBitmap(path, imageView, bm);
        }else{//如果没有LruCache,则创建任务并添加到任务队列中
            addTaskToQueue(createTask(path, imageView, isFromNet));
        }
    }
3.4、创建图片加载任务并添加到任务队列中
图片加载任务首先会判断是否从网络加载,如果是的话,再一次判断是否有LruCache和DiskCache,如果都没有的话, 就从网络下载加载;
如果不从网络加载,就直接从本地加载;最后无论是否网络加载,都要把图片写入到LruCache和DiskCache中去,并且刷新显示Bitmap到
ImageView上。
当然最后添加任务到任务队列后,会通过mPoolThreadHandler.sendEmptyMessage(24)方法来通知后台线程去任务线程池中取出一个
任务线程来执行。
/**
     * 添加任务到任务队列中
     */
    private synchronized void addTaskToQueue(Runnable runnable)
    {
        mTaskQueue.add(runnable);
        try
        {
            if (mPoolThreadHandler == null)
                mPoolThreadHandlerSemaphore.acquire();
        } catch (InterruptedException e)
        {
            e.printStackTrace();
        }
        mPoolThreadHandler.sendEmptyMessage(24);
    }
/**
     * 根据参数,创建一个任务
     */
    private Runnable createTask(final String path, final ImageView imageView,
                                final boolean isFromNet)
    {
        return new Runnable()
        {
            @Override
            public void run()
            {
                Bitmap bm = null;
                if (isFromNet)
                {
                    File file = getDiskCacheDir(imageView.getContext(),
                            Utils.makeMd5(path));
                    if (file.exists())// 如果在缓存文件中发现
                    {
                        Log.v(TAG, "disk cache image :" + path);
                        bm = loadImageFromLocal(file.getAbsolutePath(),
                                imageView);
                    } else
                    {
                        if (mIsDiskCacheEnable)// 检测是否开启硬盘缓存
                        {
                            boolean downloadState = ImageDownloadUtils
                                    .downloadImageByUrl(path, file);
                            if (downloadState)// 如果下载成功
                            {
                                Log.v(TAG,
                                        "download image :" + path
                                                + " to disk cache: "
                                                + file.getAbsolutePath());
                                bm = loadImageFromLocal(file.getAbsolutePath(),
                                        imageView);
                            }
                        } else
                        {// 直接从网络加载
                            bm = ImageDownloadUtils.downloadImageByUrl(path,
                                    imageView);
                        }
                    }
                } else
                {
                    bm = loadImageFromLocal(path, imageView);
                }
                // 3、把图片加入到缓存
                setBitmapToLruCache(path, bm);
                refreshBitmap(path, imageView, bm);
                mPoolTThreadSemaphore.release();
            }
        };
    }
3.4、显示Bitmap到ImageView上
通过UIHandler发消息来显示Bitmap到ImageView上去。
/**
     * 刷新图片到ImageView
     */
    private void refreshBitmap(final String path, final ImageView imageView,
                               Bitmap bm)
    {
        Message message = Message.obtain();
        ImageHolder holder = new ImageHolder();
        holder.bitmap = bm;
        holder.path = path;
        holder.imageView = imageView;
        message.obj = holder;
        mUIHandler.sendMessage(message);
    }
最后,框架中使用到了两个信号量,下面稍微解析下:
第一个:mPoolThreadHandlerSemaphore= new Semaphore(0); 用于控制我们的mPoolThreadHandler的初始化完成,我们在使用mPoolThreadHandler会进行判空,如果为null,会通过mPoolThreadHandlerSemaphore.acquire()进行阻塞;当mPoolThreadHandler初始化结束,我们会调用.release();解除阻塞。
第二个:mPoolTThreadSemaphore= new Semaphore(threadCount);这个信号量的数量和我们加载图片的线程个数一致;每取一个任务去执行,我们会让信号量减一;每完成一个任务,会让信号量+1,再去取任务;目的是什么呢?为什么当我们的任务到来时,如果此时在没有空闲线程,任务则一直添加到TaskQueue中,当线程完成任务,可以根据策略去TaskQueue中去取任务,只有这样,我们的LIFO才有意义。
四、框架的使用实例
这里,我们用一个简单GridView加载显示1000张图片来演示我们的框架使用。
4.1、布局文件实现:
activity_xcimager_loader.xml:
<RelativeLayout xmlns:android="http://schemas.android.com/apk/res/android"
    xmlns:tools="http://schemas.android.com/tools"
    android:layout_width="match_parent"
    android:layout_height="match_parent"

    tools:context=".XCImagerLoaderActivity">

    <GridView
        android:id="@+id/gridview"
        android:layout_width="match_parent"
        android:layout_height="match_parent"
        android:numColumns="3"
        android:horizontalSpacing="5dp"
        android:verticalSpacing="5dp"
        >

    </GridView>

</RelativeLayout>
layout_gridview_item.xml:
<?xml version="1.0" encoding="utf-8"?>
<RelativeLayout xmlns:android="http://schemas.android.com/apk/res/android"
    android:orientation="vertical" android:layout_width="match_parent"
    android:layout_height="120dp">
    <ImageView
        android:id="@+id/image_view"
        android:layout_width="match_parent"
        android:layout_height="120dp"
        android:scaleType="centerCrop"/>
    <TextView
        android:id="@+id/text_pos"
        android:layout_width="50dp"
        android:layout_height="50dp"
        android:layout_alignParentBottom="true"
        android:layout_alignParentRight="true"
        android:text="1"
        android:gravity="center"
        android:textColor="#000000"
        android:background="#FFFF00"
        />
</RelativeLayout>
4.2、实例演示类文件实现:
public class XCImagerLoaderActivity extends AppCompatActivity {

    private GridView mGridView;
    private String[] mUrlStrs = ImageSources.imageUrls;
    private XCImageLoader mImageLoader;
    @Override
    protected void onCreate(Bundle savedInstanceState) {
        super.onCreate(savedInstanceState);
        setContentView(R.layout.activity_xcimager_loader);
        init();
        mImageLoader = XCImageLoader.getInstance(3, XCImageLoader.Type.LIFO);
    }

    private void init() {
        mGridView = (GridView) findViewById(R.id.gridview);
        GridViewAdpter adapter = new GridViewAdpter(this,0,mUrlStrs);
        mGridView.setAdapter(adapter);
    }
    private class GridViewAdpter extends ArrayAdapter<String>
    {
        private Context mContext;
        public GridViewAdpter(Context context, int resource, String[] datas)
        {
            super(context, 0, datas);
            mContext = context;
        }
        @Override
        public View getView(int position, View convertView, ViewGroup parent)
        {
            if (convertView == null)
            {
                convertView = LayoutInflater.from(mContext).inflate(
                        R.layout.layout_gridview_item, parent, false);
            }
            ImageView imageview = (ImageView) convertView
                    .findViewById(R.id.image_view);
            imageview.setImageResource(R.mipmap.img_default);
            TextView textview = (TextView)convertView.findViewById(R.id.text_pos);
            textview.setText(""+(position + 1));
            mImageLoader.displayImage(getItem(position), imageview, true);
            return convertView;
        }
    }
}
框架的开发到此完成。
源码下载:http://download.csdn.net/detail/jczmdeveloper/9098759