数据源配置
本次配置使用的光数据源,其介绍
为什么HikariCP会那么快
1.字节码更加精简,所以可以加载更多代码到缓存。
2.实现了一个无锁的集合类型,来减少并发造成的资源竞争。
3.使用了自定义的数组类型,相对与ArrayList极大地提升了性能。
4.针对CPU的时间片算法进行优化,尽可能在一个时间片里面完成各种操作。

与Druid对比
在github上有网友贴出了阿里巴巴Druid与hikari的对比,认为hikari在性能上是完全秒杀阿里巴巴的Druid连接池的。
对此,阿里的工程师也做了一定的回应,说Druid的性能稍微差点是锁机制的不同,并且Druid提供了更丰富的功能,两者的侧重点不一样。
1、依赖
在父级pom.xml中配置,配置了以后,保险起见最好install一下,打包仓库,不为别的,就为了自己不被气炸出现其他莫名的bug
 <!--配置数据源和mybaties依赖-->
        <!--加入驱动-->
        <dependency>
            <groupId>mysql</groupId>
            <artifactId>mysql-connector-java</artifactId>
            <version>5.1.41</version>
        </dependency>
        <!--mybaties-->
        <dependency>
            <groupId>org.mybatis.spring.boot</groupId>
            <artifactId>mybatis-spring-boot-starter</artifactId>
            <version>2.1.0</version>
        </dependency>
2、数据源
配置一般放在api模块中,application.properties
spring.datasource.type=com.zaxxer.hikari.HikariDataSource
spring.datasource.driver-class-name=com.mysql.jdbc.Driver
spring.datasource.url=jdbc:mysql://192.168.209.137:3306/wtsys?useUnicode=true&characterEncoding=UTF-8&autoReconnect
spring.datasource.username=root
spring.datasource.password=root
#等待连接池分配连接的最大时长,超过之后不发生连接
spring.datasource.hikari.connection-timeout=30000
#最小连接数
spring.datasource.hikari.minimum-idle=5
#最大连接数
spring.datasource.hikari.maximum-pool-size=20
#自动提交配置
spring.datasource.hikari.auto-commit=true
spring.datasource.hikari.idle-timeout=1000000
spring.datasource.hikari.connection-test-query=SELECT 1

#配置mybatis
#指定pojo类所在的包
mybatis.type-aliases-package=com.wt.pojo
#这里扫描mapper的接口地方
mybatis.mapper-locations=classpath:mapper/*.xml
Maven install安装工程 执行出现一个日志报错,将排除依赖的代码先注释,再自动解决异常

逆向工程
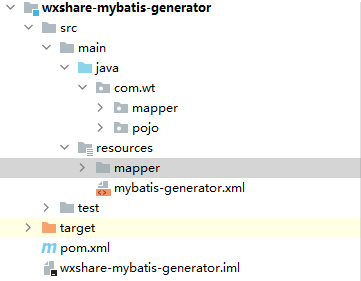
1、演示图

2、创建逆向工程项目
3、修改逆向工程xml文件,mybatis-generator.xml
<?xml version="1.0" encoding="UTF-8"?>
<!DOCTYPE generatorConfiguration
        PUBLIC "-//mybatis.org//DTD MyBatis Generator Configuration 1.0//EN"
        "http://mybatis.org/dtd/mybatis-generator-config_1_0.dtd">
<generatorConfiguration>
    <!--id名字自取,执行版本是mybatis3-->
    <context id="DB2Tables"    targetRuntime="MyBatis3">
        <!--数据库链接地址账号密码   这里需要改一下-->
        <jdbcConnection driverClass="com.mysql.jdbc.Driver" connectionURL="jdbc:mysql://192.168.209.137:3306/wtsys" userId="root" password="root">
        </jdbcConnection>
        <!--生成DataObject类存放位置-->
        <javaModelGenerator targetPackage="com.wt.pojo" targetProject="src/main/java">
            <property name="enableSubPackages" value="true"/>
            <property name="trimStrings" value="true"/>
        </javaModelGenerator>
        <!--生成映射文件存放位置-->
        <sqlMapGenerator targetPackage="mapper" targetProject="src/main/resources">
            <property name="enableSubPackages" value="true"/>
        </sqlMapGenerator>
        <!--生成Dao类存放位置-->
        <!-- 客户端代码,生成易于使用的针对Model对象和XML配置文件 的代码
                type="ANNOTATEDMAPPER",生成Java Model 和基于注解的Mapper对象
                type="MIXEDMAPPER",生成基于注解的Java Model 和相应的Mapper对象
                type="XMLMAPPER",生成SQLMap XML文件和独立的Mapper接口
        -->
        <javaClientGenerator type="XMLMAPPER" targetPackage="com.wt.mapper" targetProject="src/main/java">
            <property name="enableSubPackages" value="true"/>
        </javaClientGenerator>

        <!--生成对应表及类名-->
        <table tableName="user"  domainObjectName="UserPo" enableCountByExample="false"
               enableUpdateByExample="false" enableDeleteByExample="false"
               enableSelectByExample="false" selectByExampleQueryId="false"></table>
        <table tableName="user_password"  domainObjectName="UserPasswordPo" enableCountByExample="false"
        enableUpdateByExample="false" enableDeleteByExample="false"
        enableSelectByExample="false" selectByExampleQueryId="false"></table>

        <table tableName="activity"  domainObjectName="ActivityPo" enableCountByExample="false"
               enableUpdateByExample="false" enableDeleteByExample="false"
               enableSelectByExample="false" selectByExampleQueryId="false"></table>

    </context>
</generatorConfiguration>
4、在父级pom中加入mapper的逆向工具的依赖,同时添加插件plugin
<dependencies>
 <!--加入mybaties逆向工具  这里单词很容易写错-->
        <dependency>
            <groupId>tk.mybatis</groupId>
            <artifactId>mapper-spring-boot-starter</artifactId>
            <version>2.1.5</version>
        </dependency>
</dependencies>
    <!--配置mybatis逆向工具-->
    <build>
        <plugins>
            <!--springboot与maven的插件-->
            <plugin>
                <groupId>org.springframework.boot</groupId>
                <artifactId>spring-boot-maven-plugin</artifactId>
            </plugin>
            <!--配置生成mybatis-mapper的文件-->
            <plugin>
                <groupId>org.mybatis.generator</groupId>
                <artifactId>mybatis-generator-maven-plugin</artifactId>
                <version>1.3.2</version>
                <!--配置实现核心-->
                <dependencies>
                    <dependency>
                        <groupId>org.mybatis.generator</groupId>
                        <artifactId>mybatis-generator-core</artifactId>
                        <version>1.3.5</version>
                    </dependency>
                    <dependency>
                        <groupId>mysql</groupId>
                        <artifactId>mysql-connector-java</artifactId>
                        <version>5.1.41</version>
                    </dependency>
                </dependencies>
                <executions>
                    <execution>
                        <id>mybatis.generator</id>
                        <phase>package</phase>
                        <goals>
                            <goal>generate</goal>
                        </goals>
                    </execution>
                </executions>
                <!--配置xml详情参数-->
                <configuration>
                    <!--允许移动生成的文件-->
                    <verbose>true</verbose>
                    <!--允许自动覆盖文件,项目组中必须设置为false-->
                    <overwrite>true</overwrite>
                    <!--配置生成的xml-->
                    <configurationFile>
                        <!--找到xml中的路径-->
                        src/main/resources/mybatis-generator.xml
                    </configurationFile>
                </configuration>
            </plugin>
        </plugins>
    </build>
5、值得注意的是,在generator中记得依赖api模块,这样才能使用父级的依赖包
    <dependencies>
        <dependency>
            <groupId>com.wt</groupId>
            <artifactId>wxshare-api</artifactId>
            <version>1.0-SNAPSHOT</version>
        </dependency>
    </dependencies>
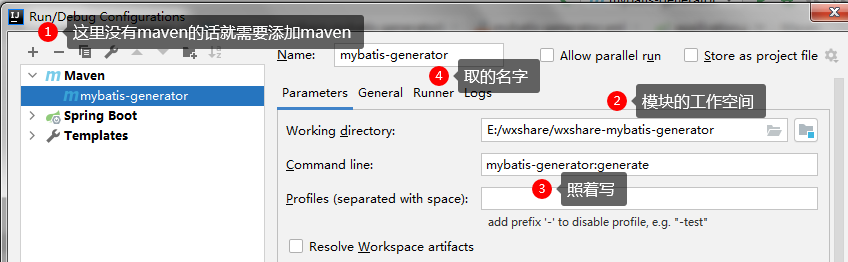
6、需要单独运行generator模块

7.设置模块的运行路径
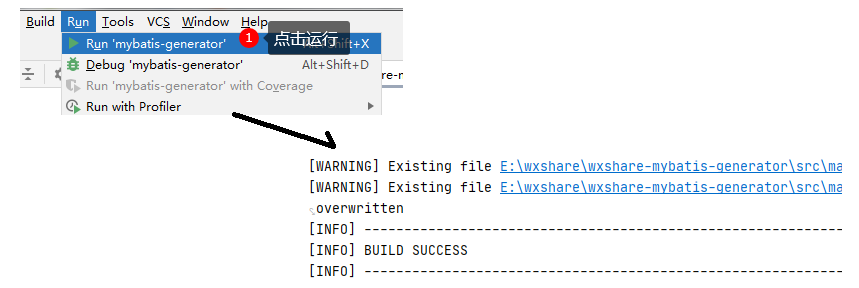
8. 点击run运行,如果出现build success就是成功的
9、逆向工程的效果,生成对应需要的文件
