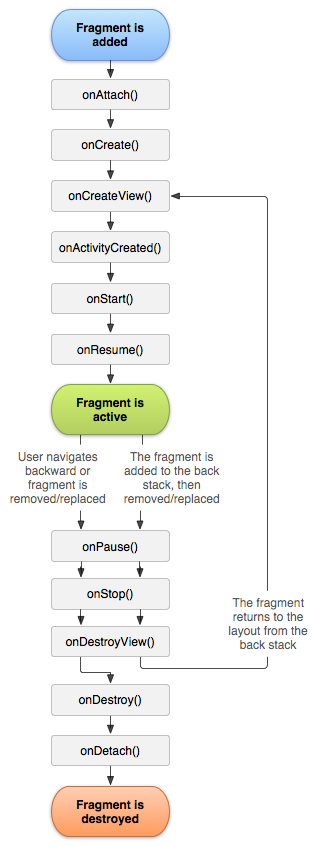
一、Fragment生命周期:
二、动态添加Fragment的三步:
1、获得Fragment的管理者FragmentManager
FragmentManager fragmentManager = getFragmentManager();
2、开启事务:
FragmentTransaction transaction = fragmentManager.beginTransaction();
3、提交事务:
transaction.commit();
下面是四个Fragment的切换:
 1     public void onClick(View view) {
 2         //获得fragment的管理者
 3         android.app.FragmentManager fragmentManager = getFragmentManager();
 4         //开启事物
 5         FragmentTransaction transaction = fragmentManager.beginTransaction();
 6         switch (view.getId()){
 7             case R.id.btn_wx:{//点击类微信
 8                 transaction.replace(R.id.ll,new WxFragment());
 9             }break;
10             case R.id.btn_contact:{//点击了联系人
11                 transaction.replace(R.id.ll,new ContactFragment());
12             }break;
13             case R.id.btn_discover:{//点击了发现
14                 transaction.replace(R.id.ll,new DiscoverFragment());
15             }break;
16             case R.id.btn_me:{//点击了me
17                 transaction.replace(R.id.ll,new MeFragment());
18             }break;
19             default: break;
20         }
21         //最后一步,提交事物
22         transaction.commit();
23     }
以WxFragment为例:
public View onCreateView(LayoutInflater inflater, ViewGroup container, Bundle savedInstanceState) {
        //通过打气筒把一个布局转换成一个view对象
        View view = inflater.inflate(R.layout.fragment_wx,null);
        return view;
    }
三、Fragment之间的通信:
已Fragment1修改Fragment2的TextView的值为例:
MainActivity:
1         android.app.FragmentManager fragmentManager = getFragmentManager();
2         FragmentTransaction transaction = fragmentManager.beginTransaction();
3
4         transaction.replace(R.id.ll1,new Fragment1(),"f1");
5         transaction.replace(R.id.ll2,new Fragment2(),"f2");
6
7         transaction.commit();
Fragment1:
 1 public View onCreateView(LayoutInflater inflater, ViewGroup container, Bundle savedInstanceState) {
 2         View view = inflater.inflate(R.layout.fragment1,null);
 3         view.findViewById(R.id.bnt).setOnClickListener(new View.OnClickListener() {
 4             @Override
 5             public void onClick(View view) {
 6                 //修改TextView的值
 7                 Fragment2 f2 = (Fragment2)getActivity().getFragmentManager().findFragmentByTag("f2");
           //调Fragment2中的setText函数修改TextView的值
 8                 f2.setText("haha");
 9             }
10         });
11         return view;
12     }
Fragment2:
1 public View onCreateView(LayoutInflater inflater, ViewGroup container, Bundle savedInstanceState) {
2         View view = inflater.inflate(R.layout.fragment2,null);
3         tv = (TextView) view.findViewById(R.id.tv);
4         return view;
5     }
6     public void setText(String content){
7         tv.setText(content);
8     }
ps:通过Tag可以得到Fragment2的实例,然后去修改值就行了。