由于没有使用GLFW库,接下来得费一番功夫。
阅读这篇文章前请看一下这个网页:https://learnopengl-cn.github.io/01%20Getting%20started/02%20Creating%20a%20window/
以下,我摘取了一点片段
Windows上的OpenGL库
如果你是Windows平台,opengl32.lib已经包含在Microsoft SDK里了,它在Visual Studio安装的时候就默认安装了。由于这篇教程用的是VS编译器,并且是在Windows操作系统上,我们只需将opengl32.lib添加进连接器设置里就行了。
GLEW
到这里,我们仍然有一件事要做。因为OpenGL只是一个标准/规范,具体的实现是由驱动开发商针对特定显卡实现的。由于OpenGL驱动版本众多,它大多数函数的位置都无法在编译时确定下来,需要在运行时查询。任务就落在了开发者身上,开发者需要在运行时获取函数地址并将其保存在一个函数指针中供以后使用。取得地址的方法因平台而异,在Windows上会是类似这样:
// 定义函数原型
typedef void (*GL_GENBUFFERS) (GLsizei, GLuint*);
// 找到正确的函数并赋值给函数指针
GL_GENBUFFERS glGenBuffers  = (GL_GENBUFFERS)wglGetProcAddress("glGenBuffers");
// 现在函数可以被正常调用了
GLuint buffer;
glGenBuffers(1, &buffer);
你可以看到代码非常复杂,而且很繁琐,我们需要对每个可能使用的函数都要重复这个过程。幸运的是,有些库能简化此过程,其中GLEW是目前最新,也是最流行的库。
编译和链接GLEW
GLEW是OpenGL Extension Wrangler Library的缩写,它能解决我们上面提到的那个繁琐的问题。因为GLEW也是一个库,我们同样需要构建并将其链接进工程。GLEW可以从这里下载,你同样可以选择下载二进制版本,如果你的目标平台列在上面的话,或者下载源码编译,步骤和编译GLFW时差不多。记住,如果不确定的话,选择32位的二进制版本。
我们使用GLEW的静态版本glew32s.lib(注意这里的“s”),将库文件添加到你的库目录,将include内容添加到你的include目录。接下来,在VS的链接器选项里加上glew32s.lib。注意GLFW3(默认)也是编译成了一个静态库。
如果你希望静态链接GLEW,必须在包含GLEW头文件之前定义预处理器宏GLEW_STATIC:
#define GLEW_STATIC
#include <GL/glew.h>
如果你希望动态链接,那么你可以省略这个宏。但是记住使用动态链接的话你需要拷贝一份.DLL文件到你的应用程序目录。
接下来要做的是链接 opengl32.lib 和 glew32s.lib这 两个库进工程

在Windows中,OpenGL命令是通过OpenGL Render Context(以下简称RC)来执行的。这个RC是OpenGL和Windows之间的纽带。
每个RC创建时,必须指定一个DC(Windows Device Context 也就是那个通常用于GDI的设备环境DC)。RC的绘制目标,就是这个DC所对应的窗口。
每次RC创建时,应该设置一下DC的像素格式。
添加一个新类 GraphicsContext 头文件
#pragma once
#define GLEW_STATIC

#include "Common.h"
#include <Windows.h>
#include "GLEWglew.h"

namespace Simple2D
{
    class RenderWindow;

    class DLL_export GraphicsContext
    {
    public:
        GraphicsContext(RenderWindow* renderWindow);
        ~GraphicsContext();

        void createOpenGLContext();
        void flip();

    private:
        RenderWindow* pRenderWindow;

        HGLRC openglContext;
        HDC deviceContext;
    };
}
注意代码中的这个宏 #define GLEW_STATIC,没有它你可能编译错误。
它的实现
#include "GraphicsContext.h"
#include "RenderWindow.h"

namespace Simple2D
{
    GraphicsContext::GraphicsContext(RenderWindow* renderWindow)
        : pRenderWindow(renderWindow)
        , openglRenderContext(0)
        , deviceContext(0)
    {
        this->createOpenGLContext();
    }

    GraphicsContext::~GraphicsContext()
    {
        wglDeleteContext(openglRenderContext);
        ReleaseDC(pRenderWindow->getHwnd(), deviceContext);
    }

    void GraphicsContext::createOpenGLContext()
    {
        if ( openglRenderContext == 0 ) {
            deviceContext = GetDC(pRenderWindow->getHwnd());

            PIXELFORMATDESCRIPTOR pfd = { 0 };
            int color_deep = GetDeviceCaps(deviceContext, BITSPIXEL);

            pfd.nSize = sizeof(PIXELFORMATDESCRIPTOR);
            pfd.nVersion = 1;
            pfd.dwFlags = PFD_DRAW_TO_WINDOW | PFD_SUPPORT_OPENGL | PFD_DOUBLEBUFFER;
            pfd.iPixelType = PFD_TYPE_RGBA;
            pfd.cColorBits = color_deep;
            pfd.cDepthBits = 0;
            pfd.cStencilBits = 0;
            pfd.iLayerType = PFD_MAIN_PLANE;

            int pixle_format = ChoosePixelFormat(deviceContext, &pfd);
            SetPixelFormat(deviceContext, pixle_format, &pfd);

            /* 创建 OpenGL 渲染上下文 */
            openglRenderContext = wglCreateContext(deviceContext);
            if ( openglRenderContext == 0 ) exit(0);

            /* 选择 openglRenderContext 作为当前线程的 openglRenderContext */
            if ( wglMakeCurrent(deviceContext, openglRenderContext) == 0 ) exit(1);

            /* GLEW 是用来管理 OpenGL 的函数指针的,所以在调用任何 OpenGL 的函数之前我们需要初始化GLEW */
            if ( glewInit() != GLEW_OK ) exit(1);

            /* 设置视口,大小为客户区大小 */
            SIZE size = pRenderWindow->getClientSize();
            glViewport(0, 0, size.cx, size.cy);
        }
    }

    void GraphicsContext::flip()
    {
        /* 使用一个自定义的颜色清空屏幕,这里使用红色 */
        glClearColor(1.0f, 0, 0, 1.0f);

        /* 调用glClear函数来清空屏幕的颜色缓冲 */
        glClear(GL_COLOR_BUFFER_BIT);

        // 交换当前缓冲区和后台缓冲区
        SwapBuffers(deviceContext);
    }
}
最后在主函数中创建 GraphicsContext
#pragma once

#include <Windows.h>
#include "RenderWindow.h"
#include "GraphicsContext.h"

using namespace Simple2D;

int WINAPI WinMain(HINSTANCE hInstance, HINSTANCE hPrevInstance, LPSTR lpCmdLine, int nCmdShow)
{
    RenderWindow window(DEFAULT_WIN_W, DEFAULT_WIN_H);
    GraphicsContext graphicsContext(&window);

    MSG msg = { 0 };
    while ( msg.message != WM_QUIT ) {
        if ( PeekMessage(&msg, 0, 0, 0, PM_REMOVE) ) {
            TranslateMessage(&msg);
            DispatchMessage(&msg);
        }
        else {
            graphicsContext.flip();
        }
    }

    return 0;
}
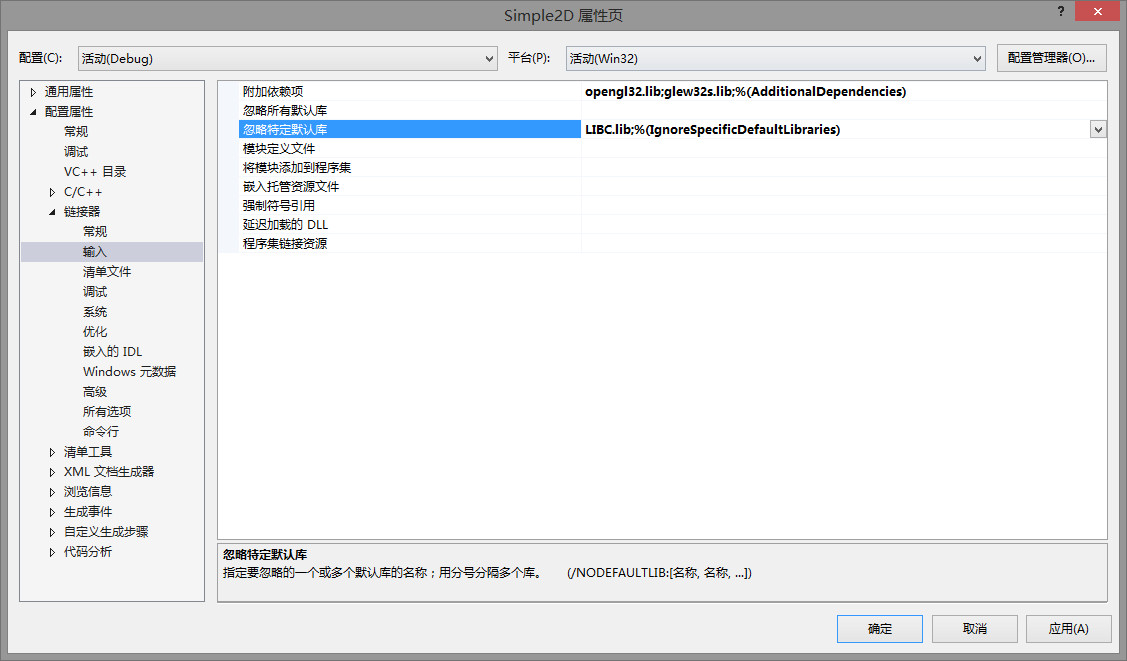
编译代码,如果出现以下错误

可以在项目中忽略这个库
运行后出现这个窗口,显示为红色,证明搭建成功了

需要源码的可以点击这个链接:http://files.cnblogs.com/files/ForEmail5/Simple2D-02.rar