相关资料:
https://blog.csdn.net/qq_40194498/article/details/79849807 怎么创建一个QML工程
https://blog.csdn.net/robertkun/article/details/42007901 QML设置背景图片
https://www.cnblogs.com/surfsky/p/4275346.html 毛玻璃原文章
https://download.csdn.net/download/zhujianqiangqq/13092324 代码包下载
PS:使用C++语法的IsCompositionEnabled函数实现的都是利用系统函数实现的,IsCompositionEnabled中对系统版本做了判断,开启条件必须是WIN8以下系统。具体可查看QT自代实例“Music Player”。
.pro


 1 QT += quick
 2
 3 CONFIG += c++11
 4
 5 # The following define makes your compiler emit warnings if you use
 6 # any Qt feature that has been marked deprecated (the exact warnings
 7 # depend on your compiler). Refer to the documentation for the
 8 # deprecated API to know how to port your code away from it.
 9 DEFINES += QT_DEPRECATED_WARNINGS
10
11 # You can also make your code fail to compile if it uses deprecated APIs.
12 # In order to do so, uncomment the following line.
13 # You can also select to disable deprecated APIs only up to a certain version of Qt.
14 #DEFINES += QT_DISABLE_DEPRECATED_BEFORE=0x060000    # disables all the APIs deprecated before Qt 6.0.0
15
16 SOURCES +=
17         main.cpp
18
19 RESOURCES += qml.qrc
20
21 # Additional import path used to resolve QML modules in Qt Creator's code model
22 QML_IMPORT_PATH =
23
24 # Additional import path used to resolve QML modules just for Qt Quick Designer
25 QML_DESIGNER_IMPORT_PATH =
26
27 # Default rules for deployment.
28 qnx: target.path = /tmp/$${TARGET}/bin
29 else: unix:!android: target.path = /opt/$${TARGET}/bin
30 !isEmpty(target.path): INSTALLS += target
main.cpp
 1 #include <QGuiApplication>
 2 #include <QQmlApplicationEngine>
 3
 4 int main(int argc, char *argv[])
 5 {
 6     QCoreApplication::setAttribute(Qt::AA_EnableHighDpiScaling);
 7
 8     QGuiApplication app(argc, argv);
 9
10     QQmlApplicationEngine engine;
11     const QUrl url(QStringLiteral("qrc:/main.qml"));
12     QObject::connect(&engine, &QQmlApplicationEngine::objectCreated,
13                      &app, [url](QObject *obj, const QUrl &objUrl) {
14         if (!obj && url == objUrl)
15             QCoreApplication::exit(-1);
16     }, Qt::QueuedConnection);
17     engine.load(url);
18
19     return app.exec();
20 }
main.qml
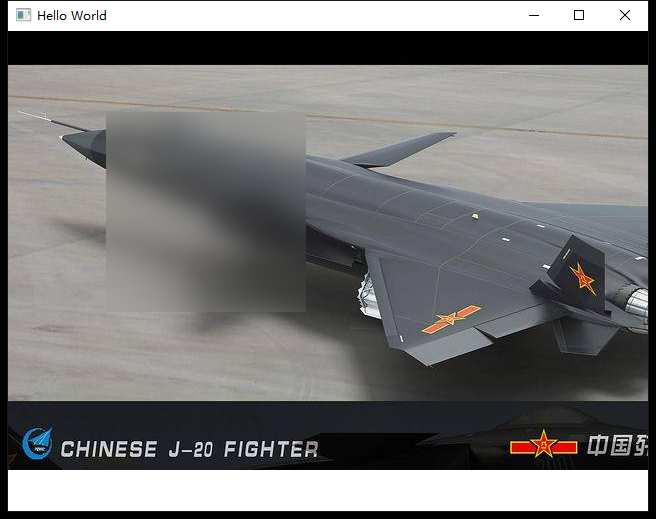
 1 import QtQuick 2.12
 2 import QtQuick.Window 2.12
 3
 4 Window {
 5     visible: true
 6      640
 7     height: 480
 8     title: qsTr("Hello World")
 9
10     Image {
11             id: rocket
12             fillMode: Image.TileHorizontally
13             smooth: true
14             source: 'file:///D:/Image/12954363.jpg'
15         }
16
17
18     FuzzyPanel{
19             id: panel
20              200;
21             height: 200;
22             x: 200
23             y: 200
24             target: rocket
25         }
26 }
FuzzPanel.qml
 1 import QtQuick 2.0
 2 import QtGraphicalEffects 1.0
 3
 4 /**
 5 具有毛玻璃效果的视图
 6     属性target:目标控件。要求与本控件位于同一坐标系
 7     若本视图遮盖住目标控件,遮盖部分显示毛玻璃效果
 8
 9 思路
10     放置一个Blur控件
11     计算本视图与目标视图的重叠部分
12     移动Blur控件到合适的位置
13     依据同样思路,可作出各种不同效果
14
15 Lisence: MIT
16 Author: surfsky.cnblogs.com 2015-01
17 请保留此声明
18 */
19 Rectangle{
20     id: panelFg
21     color: 'lightblue'
22      200
23     height: 200
24     clip: true
25
26     // 属性
27     property Item target : panelBg  // 模糊源
28     property bool dragable : true   // 是否可拖动
29
30     // 毛玻璃效果
31     FastBlur {
32         id: blur
33         source: parent.target
34          source.width;
35         height: source.height
36         radius: 64
37     }
38
39     // 可拖移
40     MouseArea {
41         id: dragArea
42         anchors.fill: parent
43         drag.target: dragable ? parent : null
44     }
45
46     // 设置模糊组件的位置
47     onXChanged: setBlurPosition();
48     onYChanged: setBlurPosition();
49     Component.onCompleted: setBlurPosition();
50     function setBlurPosition(){
51         blur.x = target.x - x;
52         blur.y = target.y - y;
53     }
54 }
TestFuzzPanel.qml
 1 import QtQuick 2.0
 2 import QtQuick.Controls 1.2
 3
 4 /**
 5 Fuzzy Panel test
 6 */
 7 Rectangle {
 8     id: root
 9      600
10     height: 600
11
12     //
13     Row{
14         parent.width
15         height: 100
16         Button{text: 'actionSheet'; onClicked: {animActionSheet.start();}}
17         Button{text: 'reset'; onClicked: {animReset.start();}}
18     }
19
20     // 背景
21     Rectangle{
22         id: panelBg
23          400
24         height: 400
25         anchors.centerIn: parent
26         color: 'lightgreen'
27         Image{
28             id: img
29             source: "bug.png"
30             anchors.centerIn: parent
31         }
32     }
33
34     // 毛玻璃面板
35     FuzzyPanel{
36         id: panel
37          200;
38         height: 200;
39         x: 200
40         y: 200
41         target: panelBg
42     }
43
44     //--------------------------------------------
45     // Animations
46     //--------------------------------------------
47     SequentialAnimation{
48         id: animReset
49         ScriptAction{script:{
50             panel.width = 200;
51             panel.height = 200;
52             panel.x = 100;
53             panel.y = 100;
54             panel.dragable = true;
55         }}
56     }
57
58     SequentialAnimation{
59         id: animActionSheet
60         ScriptAction{script:{
61             panel.width = parent.width;
62             panel.height = 400;
63             panel.x = 0;
64             panel.y = root.height;
65             panel.dragable = false;
66         }}
67         PropertyAnimation{
68             target: panel
69             properties: 'y'
70             from: root.height
71             to: root.height - panel.height
72         }
73     }
74
75 }