ProxySQL在早期版本若需要做高可用,需要搭建两个实例,进行冗余。但两个ProxySQL实例之间的数据并不能共通,在主实例上配置后,仍需要在备用节点上进行配置,对管理来说非常不方便。但是ProxySQl 从1.4.2版本后,ProxySQL支持原生的Cluster集群搭建,实例之间可以互通一些配置数据,大大简化了管理与维护操作。
ProxySQL是一个非中心化代理,在拓扑中,建议将它部署在靠近应用程序服务器的位置处。ProxySQL节点可以很方便地扩展到上百个节点,因为它支持runtime修改配置并立即生效。这意味着可以通过一些配置管理工具来协调、重配置ProxySQL集群中的各实例,例如 Ansible/Chef/Puppet/Salt 等自动化工具,或者Etcd/Consul/ZooKeeper等服务发现软件。这些特性使得可以高度定制ProxySQL的集群。但尽管如此,这些管理方式还是有些缺点:
- 需要且依赖于外部软件(配置管理软件);
- 正因为上面的一点,使得这种管理方式不是原生支持的;
- 管理时间长度不可预测;
- 无法解决网络分区带来的问题;
基于此,ProxySQL 1.4.x 版本尝试支持原生集群功能。集群的搭建有很多种方式,如1+1+1的方式,还可以(1+1)+1的方式。采用(1+1)+1的集群部署方式比较简单,即先将两个节点作为集群启动,然后其他节点选择性加入的方式。
一、ProxySQL Cluster 配置说明
ProxySQL有两个主要的组件实现ProxySQL集群:
- monitoring (集群监控组件)
- re-configuration (remote configuration,远程配置)
这两个组件中都有4张表:
- mysql_query_rules
- mysql_servers
- mysql_users
- proxysql_servers
1、Monitoring
为了监控Cluster,ProxySQL引入了几个新的表、命令、变量。
Admin variables
有几个和Cluster相关的变量,它们是Admin变量,意味着修改它们需要使用load admin variables to runtime使其生效。
1) 用于同步的变量
- admin-checksum_mysql_query_rules
- admin-checksum_mysql_servers
- admin-checksum_mysql_users: 如果有数百万的users,则建议禁用该特性且不要依赖于它,因为它会非常慢。
这几个变量都是布尔值,其中:
admin-checksum_mysql_query_rules 设置为true时,每次执行"LOAD MYSQL QUERY RULES TO RUNTIME"时,proxysql都会生成一个新的配置checksum校验码(configuration checksum)。如果为false时,新的配置不会自动被广播出去,也不会从其它节点同步配置到本机;
admin-checksum_mysql_servers 设置为true时,每次执行"LOAD MYSQL SERVERS TO RUNTIME"时,proxysql都会生成一个新的配置checksum。如果为false时,新的配置不会自动被广播出去,也不会从其它节点同步配置到本机;
admin-checksum_mysql_users 设置为true时,每次执行"LOAD MYSQL USERS TO RUNTIME"时,proxysql都会生成一个新的配置checksum。如果为false时,新的配置不会自动被广播出去,也不会从其它节点同步配置到本机;
2) 集群认证凭据相关的变量
- admin-cluster_username 和 admin-cluster_password:该凭据用于监控其它ProxySQL实例。需要注意,这个用户/密码必须是admin-admin_credentials中已经存在的,否则将会连接失败。如果没有定义集群凭据,ProxySQL集群将不会做任何检查。
ProxySQL Cluster集群间,ProxySQL 为了监控其他ProxySQL 实例需要认证参数:admin-cluster_username 和 admin-cluster_password。而且这2个参数指定的用户名/密码还必须配置到参数 admin-admin_credentials 中,否则会无法连接到其他ProxySQL
admin_credentials="admin:admin;cluster1:secret1pass"
3) 检查时间间隔/频率相关变量
- admin-cluster_check_interval_ms:定义校验码检查(checksum check)时间间隔。默认值1000(即1秒),最小值10,最大值300000。
- admin-cluster_check_status_frequency:该变量定义做了多少次checksum检查后,就执行一次状态检查(status check)。默认值10,最小0,最大10000。
4) 同步到磁盘相关的变量
在远程同步配置之后,通常最好的做法是立即将新的更改保存到磁盘。这样重启时,更改的配置不会丢失。
- admin-cluster_mysql_query_rules_save_to_disk
- admin-cluster_mysql_servers_save_to_disk
- admin-cluster_mysql_users_save_to_disk
- admin-cluster_proxysql_servers_save_to_disk
这几个变量都是布尔值。当设置为true(默认值)时,在远程同步并load到runtime后,新的mysql_query_rules、mysql_servers、mysql_users、proxysql_servers配置会持久化到磁盘中。
5) 是否要远程同步的变量
由于某些原因,可能多个ProxySQL实例会在同一时间进行重新配置。
例如,每个ProxySQL实例都在监控MySQL的replication,且自动探测到MySQL的故障转移,在一个极短的时间内(可能小于1秒),这些ProxySQL实例可能会自动调整新的配置,而无需通过其它ProxySQL实例来同步新配置。
类似的还有,当所有ProxySQL实例都探测到了和某实例的临时的网络问题,或者某个MySQL节点比较慢(replication lag, 拖后腿),这些ProxySQL实例都会自动地避开这些节点。这时各ProxySQL实例也无需从其它节点处同步配置,而是同时自动完成新的配置。
基于此,可以配置ProxySQL集群,让各ProxySQL实例暂时无需从其它实例处同步某些配置,而是等待一定次数的检查之后,再触发远程同步。但是,如果本地和远程节点的这些变量阈值不同,则还是会触发远程同步。
- admin-cluster_mysql_query_rules_diffs_before_sync:
- admin-cluster_mysql_servers_diffs_before_sync:
- admin-cluster_mysql_users_diffs_before_sync:
- admin-cluster_proxysql_servers_diffs_before_sync:
分别定义经过多少次的"无法匹配"检查之后,触发mysql_query_rules、mysql_servers、mysql_users、proxysql_servers配置的远程同步。默认值3次,最小值0,表示永不远程同步,最大值1000。
比如各实例监控mysql_servers配置并做校验码检查,如果某实例和本地配置不同,当多次检测到都不同时,将根据load to runtime的时间戳决定是否要从远端将mysql_servers同步到本地。
6) 延迟同步
ProxySQL Cluster 可以定义达到多少个checksum 不同之后,才在集群内部进行配置同步。
query rules, servers, users 和proxysql servers 分别有admin-cluster_XXX_diffs_before_sync 相关的参数,取值范围0 ~ 1000,0 代表从不同步。默认3。
Configuration tables
1) proxysql_servers 表
proxysql_servers表定义了ProxySQL集群中各ProxySQL实例列表。ProxySQL 集群有哪些实例,可以查看proxysql_servers 表。在新增ProxySQL 实例时,也需要 insert 该表,或者修改cnf 文件中的 proxysql_servers 部分的配置。该表的定义语句如下:
CREATE TABLE proxysql_servers (
    hostname VARCHAR NOT NULL,
    port INT NOT NULL DEFAULT 6032,
    weight INT CHECK (weight >= 0) NOT NULL DEFAULT 0,
    comment VARCHAR NOT NULL DEFAULT '',
    PRIMARY KEY (hostname, port) )
各字段的意义如下:
- hostname:ProxySQL实例的主机名或IP地址;
- port:ProxySQL实例的端口 (译注:这个端口是ProxySQL示例的admin管理端口);
- weight:目前未启用该功能。定义集群中各ProxySQL的权重值;
- comment:注释字段,可随意填写;
proxysql_servers的配置项可以从传统配置文件中加载,即支持配置文件。以下是传统配置文件中定义proxysql_servers的示例:
proxysql_servers =
(
    {
        hostname="172.16.0.101"
        port=6032
        weight=0
        comment="proxysql1"
    },
    {
        hostname="172.16.0.102"
        port=6032
        weight=0
        comment="proxysql2"
    }
)
特别注意:ProxySQL只有在磁盘数据库文件不存在,或者使用了--initial选项时才会读取传统配置文件。
- 配置文件暂时还不支持该表。
- 因为该ProxySQL Cluster功能仍处于试验阶段,不会自动从磁盘配置文件中读取到该表中。也就是说,目前阶段,不支持在配置文件中配置proxysql server表的内容!
2) runtime_proxysql_servers 表
正如其它runtime_表一样,runtime_proxysql_servers表和proxysql_servers的结构完全一致,只不过它是runtime数据结构中的配置,也就是当前正在生效的配置。该表的定义语句如下:
CREATE TABLE runtime_proxysql_servers (
    hostname VARCHAR NOT NULL,
    port INT NOT NULL DEFAULT 6032,
    weight INT CHECK (weight >= 0) NOT NULL DEFAULT 0,
    comment VARCHAR NOT NULL DEFAULT '',
    PRIMARY KEY (hostname, port) )
3)runtime_checksums_values 表
runtime_checksums_values表是目前第一个不基于内存数据库中的runtime_表(译注:换句话说,没有checksums_values表)。该表的定义语句如下:
CREATE TABLE runtime_checksums_values (
    name VARCHAR NOT NULL,
    version INT NOT NULL,
    epoch INT NOT NULL,
    checksum VARCHAR NOT NULL,
    PRIMARY KEY (name))
该表用于显示在执行load to runtime命令时的一些信息:
- name:模块的名称
- version:执行了多少次load to runtime操作,包括所有隐式和显式执行的(某些事件会导致ProxySQL内部自动执行load to runtime命令)
- epoch:最近一次执行load to runtime的时间戳
- checksum:执行load to runtime时生成的配置校验码(checksum)
该表的一个实例
Admin> SELECT * FROM runtime_checksums_values;
+-------------------+---------+------------+--------------------+
| name              | version | epoch      | checksum           |
+-------------------+---------+------------+--------------------+
| admin_variables   | 0       | 0          |                    |
| mysql_query_rules | 5       | 1503442167 | 0xD3BD702F8E759B1E |
| mysql_servers     | 1       | 1503440533 | 0x6F8CEF0F4BD6456E |
| mysql_users       | 1       | 1503440533 | 0xF8BDF26C65A70AC5 |
| mysql_variables   | 0       | 0          |                    |
| proxysql_servers  | 2       | 1503442214 | 0x89768E27E4931C87 |
+-------------------+---------+------------+--------------------+
6 rows in set (0,00 sec)
特别注意: 目前6个组件中只有4种模块的配置会生成对应的校验码(checksum),不能生成的组件是:admin_variables,mysql_variables。 checnsum 只有在执行了load to run ,并且admin-checksum_XXX = true 时,才可以正常生成。即:
- LOAD MYSQL QUERY RULES TO RUNTIME:当admin-checksum_mysql_query_rules=true时生成一个新的mysql_query_rules配置校验码
- LOAD MYSQL SERVERS TO RUNTIME:当admin-checksum_mysql_servers=true时生成一个新的mysql_servers配置校验码
- LOAD MYSQL USERS TO RUNTIME:当admin-checksum_mysql_users=true时生成一个新的mysql_users配置校验码
- LOAD PROXYSQL SERVERS TO RUNTIME:总是会生成一个新的proxysql_servers配置校验码
- LOAD ADMIN VARIABLES TO RUNTIME:不生成校验码
- LOAD MYSQL VARIABLES TO RUNTIME:不生产校验码
New commands (新命令):
- LOAD PROXYSQL SERVERS FROM MEMORY / LOAD PROXYSQL SERVERS TO RUNTIME
从内存数据库中加载proxysql servers配置到runtime数据结构
- SAVE PROXYSQL SERVERS TO MEMORY / SAVE PROXYSQL SERVERS FROM RUNTIME
将proxysql servers配置从runtime数据结构持久化保存到内存数据库中
- LOAD PROXYSQL SERVERS TO MEMORY / LOAD PROXYSQL SERVERS FROM DISK
从磁盘数据库中加载proxysql servers配置到内存数据库中
- LOAD PROXYSQL SERVERS FROM CONFIG
从传统配置文件中加载proxysql servers配置到内存数据库中
- SAVE PROXYSQL SERVERS FROM MEMORY / SAVE PROXYSQL SERVERS TO DISK
将proxysql servers配置从内存数据库中持久化保存到磁盘数据库中
state tables
有三个表被加入到stat 表中。
1)stats_proxysql_servers_checksums 表
该表记录集群中各个实例的组件checksum 信息。
Admin> SHOW CREATE TABLE stats.stats_proxysql_servers_checksumsG
*************************** 1. row ***************************
       table: stats_proxysql_servers_checksums
Create Table: CREATE TABLE stats_proxysql_servers_checksums (
    hostname VARCHAR NOT NULL,
    port INT NOT NULL DEFAULT 6032,
    name VARCHAR NOT NULL,
    version INT NOT NULL,
    epoch INT NOT NULL,
    checksum VARCHAR NOT NULL,
    changed_at INT NOT NULL,
    updated_at INT NOT NULL,
    diff_check INT NOT NULL,
    PRIMARY KEY (hostname, port, name) )
各字段意义如下:
- hostname:ProxySQL实例的主机名
- port:ProxySQL实例的端口
- name:对端runtime_checksums_values中报告的模块名称
- version:对端runtime_checksum_values中报告的checksum的版本
注意,ProxySQL实例刚启动时version=1:ProxySQL实例将永远不会从version=1的实例处同步配置数据,因为一个刚刚启动的ProxyQL实例不太可能是真相的来源,这可以防止新的连接节点破坏当前集群配置
- epoch:对端runtime_checksums_values中报告的checksum的时间戳epoch值
- checksum:对端runtime_checksums_values中报告的checksum值
- changed_at:探测到checksum发生变化的时间戳
- updated_at:最近一次更新该类配置的时间戳
- diff_check:一个计数器,用于记录探测到的对端和本地checksum值已有多少次不同
需要等待达到阈值后,才会触发重新配置。前面已经说明,在多个ProxySQL实例同时或极短时间内同时更改配置时,可以让ProxySQL等待多次探测之后再决定是否从远端同步配置。这个字段正是用于记录探测到的配置不同次数。如果diff_checks不断增加却仍未触发同步操作,这意味着对端不是可信任的同步源,例如对端的version=1。另一方面,如果某对端节点不和ProxySQL集群中的其它实例进行配置同步,这意味着集群没有可信任的同步源。这种情况可能是因为集群中所有实例启动时的配置都不一样,它们无法自动判断哪个配置才是正确的。可以在某个节点上执行load to runtime,使该节点被选举为该类配置的可信任同步源。
2)stats_proxysql_servers_metrics 表
该表用来显示群集模块在各个实例中执行 SHOW MYSQL STATUS 时,当前系统的部分指标。目前该表只是用来debug 的,在未来该表的各个指标将用来反映各个实例的健康状态。
Admin> SHOW CREATE TABLE stats.stats_proxysql_servers_metricsG
*************************** 1. row ***************************
       table: stats_proxysql_servers_metrics
Create Table: CREATE TABLE stats_proxysql_servers_metrics (
    hostname VARCHAR NOT NULL,
    port INT NOT NULL DEFAULT 6032,
    weight INT CHECK (weight >= 0) NOT NULL DEFAULT 0,
    comment VARCHAR NOT NULL DEFAULT '',
    response_time_ms INT NOT NULL,
    Uptime_s INT NOT NULL,
    last_check_ms INT NOT NULL,
    Queries INT NOT NULL,
    Client_Connections_connected INT NOT NULL,
    Client_Connections_created INT NOT NULL,
    PRIMARY KEY (hostname, port) )
当执行show mysql status语句时,显示一些已检索到的指标。字段意义如下:
- hostname:ProxySQL实例主机名
- port:ProxySQL实例端口
- weight:报告结果同proxysql_servers.weight字段
- comment:报告结果同proxysql_servers.comment字段
- response_time_ms:执行show mysql status的响应时长,单位毫秒
- Uptime_s:ProxySQL实例的uptime,单位秒
- last_check_ms:最近一次执行check距现在已多久,单位毫秒
- Queries:该实例已执行query的数量
- Client_Connections_connected:number of client's connections connected
- Client_Connections_created:number of client's connections created
注意:当前这些状态只为debug目的,但未来可能会作为远程实例的健康指标。
3)stats_proxysql_servers_status
在目前的1.4.6 版本中,该表还未启用。
2、Re-configuration
因为集群间,所有节点都是相互监控的。每个ProxySQL节点都监控集群中的其它实例,它们可以快速探测到某个实例的配置是否发生改变。如果某实例的配置发生改变,其它实例会检查这个配置和自身的配置是否相同,因为其它节点的配置可能和本节点的配置同时(或在极短时间差范围)发生了改变。
由于相互监控,所以当配置发生变动时,它们可以立即发现。当其他节点的配置发生变动时,本节点会先去检查一次它自身的配置,因为有可能remote instance 和local instance 同时发生配置变动。
如果比较结果不同:
- 如果它们自身的 version = 1,就去找集群内从version > 1的节点处找出epoch最大值的节点,并从该节点拉取配置应用到本地,并立即同步。
- 如果version >1, 该节点开始统计和其他节点间的differ 数。即开始对探测到的不同配置进行计数。
- 当 differ 大于 cluster__name___diffs_before_sync , 并且cluster__name__diffs_before_sync > 0, 就去找集群内 version >1, 并且epoch 最高的节点,并立即同步。也就是说当探测到不同配置的次数超过cluster_name_diffs_before_sync,且cluster_name_diffs_before_sync大于0时,找出version > 1且epoch值最大的节点,并从该节点拉取配置禁用应用。
同步配置的过程如下:
- 用于健康检查的连接,也用来执行一系列类似于select _list_of_columns from runtime_module的select语句。例如:
SELECT hostgroup_id, hostname, port, status, weight, compression, max_connections, max_replication_lag, use_ssl, max_latency_ms, comment FROM runtime_mysql_servers;
SELECT writer_hostgroup, reader_hostgroup, comment FROM runtime_mysql_replication_hostgroups;
删除本地配置。例如:
DELETE FROM mysql_servers;
DELETE FROM mysql_replication_hostgroups;
- 向本地配置表中插入已从远端节点检索到的新配置。
- 在内部执行LOAD module_name TO RUNTIME:这会递增版本号,并创建一个新的checksum。
- 如果cluster_name_save_to_disk=true,再在内部执行SAVE module_name TO DISK。
3、 网络消耗
在上述描述的架构模式中,每个ProxySQL节点都监控集群中其它所有节点,这是一个很典型并完整的点对点网络。
为了减少网络开销,节点间并不总是交换所有的checksum 信息,而是将所有version 、所有checksum (注意:是每个节点都有一个全局checksum,而不是所有节点共有一个全局checksum)。相结合产生的单个新的 checksum 进行交换。所以一旦这个新的checksum 发生变动,当全局checksum改变,将检索该全局checksum对应的checksum列表,那么得到详细的各个模块的checksum。 通过该技术,200个节点的ProxySQL集群中,如果每个节点的监控时间间隔为1000ms,每个节点的进/出流量只需50KB的带宽
1) ProxySQL 目前实现的功能
- 支持MySQL组复制(add support for MySQL Group Replication)
- 支持Scheduler(add support for Scheduler)
2) ProxySQL 未来可能要实现的功能
未来可能要实现的Cluster不完整特性列表。这些特性目前都还未实现,且实现后有可能会与此处描述的有所区别。
- 支持master选举:ProxySQL内部将使用master关键字替代leader
- 只有master节点是可写/可配置的
- 实现类似于MySQL复制的功能:从master复制到slave。这将允许实时推送配置内容,而非现在使用的主动pull机制
- 实现类似于MySQL复制的功能:从master复制到候选master
- 实现类似于MySQL复制的功能:从候选master复制到slave
- 将候选master定义为法定票数节点,slave不参与投票
3) 问题:如果不同节点在同一时刻加载了不同配置会如何,最后一个才生效吗?
目前还未实现master和master选举的机制。这意味着多个节点上可能会潜在地同时执行load命令(就像是多个master一样),每个实例都会基于时间戳来检测配置冲突,然后再触发自动重新配置。如果所有节点在同一时刻加载的是相同的配置,则不会出现问题;如果所有节点在不同时刻加载了不同的配置,则最后一个配置生效。如果所有节点在同一时刻加载了不同配置,这些不同配置会正常进行传播。直到出现冲突,然后回滚。庆幸的是,每个ProxySQL节点都知道其它每个节点的checksum,因此很容易监控并探测到不同的配置。
4)谁负责向所有节点写入配置?
目前,ProxySQL集群使用拉取(pull)机制,因此当探测到节点自身需要重新配置时,会从拥有最新配置的节点处拉取配置到本地并应用。
5)何实现选举?Raft协议吗?
关于选举,正在实现计划中,但应该不会采用Raft共识协议。ProxySQL使用表来存储配置信息,使用MySQL协议来执行对端健康检查、配置信息的查询请求,以及使用MySQL协议实现心跳等等。所以对于ProxySQL来说,MySQL协议本身相比Raft协议要更多才多艺。
6)某些原因下,如果某个节点无法从远端抓取新的配置会发生什么?
配置更改是异步传播的。因此,某个ProxySQL节点可能暂时会无法获取新的配置,例如网络问题。但是,当该实例探测到新的配置时,它会自动去抓取新配置。
7)跨DC的ProxySQL集群是否实现?最佳实践是怎样的,每个DC一个ProxySQL集群吗?
ProxySQL集群没有边界限制,因此一个ProxySQL集群可以跨多个DC,一个DC内也可以有多个ProxySQL集群。这依赖于实际应用场景。唯一的限制是,每个ProxySQL实例只能属于单个ProxySQL集群。ProxySQL集群没有名称,为了确保ProxySQL实例不会加入到错误的集群中,可以让每个ProxySQL集群采用不同的集群认证凭据。
8)如何引导启动一个ProxySQL集群?
很简单:只需让proxysql_servers表中多于一个节点即可。
9)ProxySQL集群中的其它节点如何知道有新节点?
这个无法自动知道,这是为了防止新节点破坏集群。一个新节点在加入集群时,会立刻从集群中拉取配置,但不会将自己作为可信任的配置源通告出去。要让其它节点知道有一个新的节点,只需向这些节点的proxysql_servers中加入新的节点信息,然后执行load proxysql servers to runtime即可。
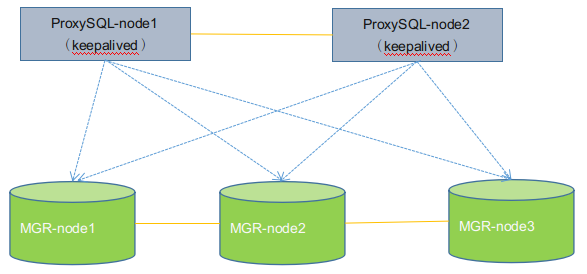
二、ProxySQL Cluster + MGR 高可用集群方案部署记录
这里针对MGR模式 (GTID模式也是一样的) 部署ProxySQL Cluster双节点集群环境。可以结合keepalived,利用vip漂移实现ProxySQL节点故障无感知切换的高可用集群方案。
1、环境准备
172.16.60.211       MGR-node1 (master1)
172.16.60.212       MGR-node2 (master2)
172.16.60.213       MGR-node3 (master3)
172.16.60.214       ProxySQL-node1
172.16.60.220       ProxySQL-node2

[root@MGR-node1 ~]# cat /etc/redhat-release
CentOS Linux release 7.5.1804 (Core)

为了方便实验,关闭所有节点的防火墙
[root@MGR-node1 ~]# systemctl stop firewalld
[root@MGR-node1 ~]# firewall-cmd --state
not running

[root@MGR-node1 ~]# cat /etc/sysconfig/selinux |grep "SELINUX=disabled"
SELINUX=disabled
[root@MGR-node1 ~]# setenforce 0
setenforce: SELinux is disabled
[root@MGR-node1 ~]# getenforce
Disabled

特别要注意一个关键点: 必须设置好各个mysql节点的主机名,并且保证能通过主机名找到各成员!

则必须要在每个节点的/etc/hosts里面做主机名绑定,否则后续将节点加入group组会失败!报错RECOVERING!!
[root@MGR-node1 ~]# cat /etc/hosts
........
172.16.60.211    MGR-node1
172.16.60.212    MGR-node2
172.16.60.213    MGR-node3
2、在三个MGR节点安装Mysql5.7
在三个mysql节点机上使用yum方式安装Mysql5.7,参考:https://www.cnblogs.com/kevingrace/p/8340690.html

安装MySQL yum资源库
[root@MGR-node1 ~]# yum localinstall https://dev.mysql.com/get/mysql57-community-release-el7-8.noarch.rpm

安装MySQL 5.7
[root@MGR-node1 ~]# yum install -y mysql-community-server

启动MySQL服务器和MySQL的自动启动
[root@MGR-node1 ~]# systemctl start mysqld.service
[root@MGR-node1 ~]# systemctl enable mysqld.service

设置登录密码
由于MySQL从5.7开始不允许首次安装后使用空密码进行登录!为了加强安全性,系统会随机生成一个密码以供管理员首次登录使用,
这个密码记录在/var/log/mysqld.log文件中,使用下面的命令可以查看此密码:
[root@MGR-node1 ~]# cat /var/log/mysqld.log|grep 'A temporary password'
2019-01-11T05:53:17.824073Z 1 [Note] A temporary password is generated for root@localhost: TaN.k:*Qw2xs

使用上面查看的密码TaN.k:*Qw2xs 登录mysql,并重置密码为123456
[root@MGR-node1 ~]# mysql -p                 #输入默认的密码:TaN.k:*Qw2xs
.............
mysql> set global validate_password_policy=0;
Query OK, 0 rows affected (0.00 sec)

mysql> set global validate_password_length=1;
Query OK, 0 rows affected (0.00 sec)

mysql> set password=password("123456");
Query OK, 0 rows affected, 1 warning (0.00 sec)

mysql> flush privileges;
Query OK, 0 rows affected (0.00 sec)

查看mysql版本
[root@MGR-node1 ~]# mysql -p123456
........
mysql> select version();
+-----------+
| version() |
+-----------+
| 5.7.24    |
+-----------+
1 row in set (0.00 sec)

=====================================================================
温馨提示
mysql5.7通过上面默认安装后,执行语句可能会报错:
ERROR 1819 (HY000): Your password does not satisfy the current policy requirements

这个报错与Mysql 密码安全策略validate_password_policy的值有关,validate_password_policy可以取0、1、2三个值:
解决办法:
set global validate_password_policy=0;
set global validate_password_length=1;
3、MGR组复制环境部署 (多写模式)
可以参考:https://www.cnblogs.com/kevingrace/p/10260685.html

由于之前做了其他测试,这里需要将三个节点的mysql环境抹干净:
# systemctl  stop  mysqld
# rm -rf /var/lib/mysql
# systemctl start mysqld

然后重启密码
# cat /var/log/mysqld.log|grep 'A temporary password'
# mysql -p123456
mysql> set global validate_password_policy=0;
mysql> set global validate_password_length=1;
mysql> set password=password("123456");
mysql> flush privileges;

=======================================================
1) MGR-node1节点操作
[root@MGR-node1 ~]# mysql -p123456
.........
mysql> select uuid();
+--------------------------------------+
| uuid()                               |
+--------------------------------------+
| ae09faae-34bb-11e9-9f91-005056ac6820 |
+--------------------------------------+
1 row in set (0.00 sec)

[root@MGR-node1 ~]# cp /etc/my.cnf /etc/my.cnf.bak
[root@MGR-node1 ~]# >/etc/my.cnf
[root@MGR-node1 ~]# vim /etc/my.cnf
[mysqld]
datadir = /var/lib/mysql
socket = /var/lib/mysql/mysql.sock

symbolic-links = 0

log-error = /var/log/mysqld.log
pid-file = /var/run/mysqld/mysqld.pid

#GTID:
server_id = 1
gtid_mode = on
enforce_gtid_consistency = on

master_info_repository=TABLE
relay_log_info_repository=TABLE
binlog_checksum=NONE

#binlog
log_bin = mysql-bin
log-slave-updates = 1
binlog_format = row
sync-master-info = 1
sync_binlog = 1

#relay log
skip_slave_start = 1

transaction_write_set_extraction=XXHASH64
loose-group_replication_group_name="5db40c3c-180c-11e9-afbf-005056ac6820"
loose-group_replication_start_on_boot=off
loose-group_replication_local_address= "172.16.60.211:24901"
loose-group_replication_group_seeds= "172.16.60.211:24901,172.16.60.212:24901,172.16.60.213:24901"
loose-group_replication_bootstrap_group=off
loose-group_replication_single_primary_mode=off
loose-group_replication_enforce_update_everywhere_checks=on
loose-group_replication_ip_whitelist="172.16.60.0/24,127.0.0.1/8"

重启mysql服务
[root@MGR-node1 ~]# systemctl restart mysqld

登录mysql进行相关设置操作
[root@MGR-node1 ~]# mysql -p123456
............
mysql> SET SQL_LOG_BIN=0;
Query OK, 0 rows affected (0.00 sec)

mysql> GRANT REPLICATION SLAVE ON *.* TO rpl_slave@'%' IDENTIFIED BY 'slave@123';
Query OK, 0 rows affected, 1 warning (0.00 sec)

mysql> FLUSH PRIVILEGES;
Query OK, 0 rows affected (0.01 sec)

mysql> reset master;
Query OK, 0 rows affected (0.19 sec)

mysql> SET SQL_LOG_BIN=1;
Query OK, 0 rows affected (0.00 sec)

mysql> CHANGE MASTER TO MASTER_USER='rpl_slave', MASTER_PASSWORD='slave@123' FOR CHANNEL 'group_replication_recovery';
Query OK, 0 rows affected, 2 warnings (0.33 sec)

mysql> INSTALL PLUGIN group_replication SONAME 'group_replication.so';
Query OK, 0 rows affected (0.03 sec)

mysql> SHOW PLUGINS;
+----------------------------+----------+--------------------+----------------------+---------+
| Name                       | Status   | Type               | Library              | License |
+----------------------------+----------+--------------------+----------------------+---------+
...............
...............
| group_replication          | ACTIVE   | GROUP REPLICATION  | group_replication.so | GPL     |
+----------------------------+----------+--------------------+----------------------+---------+
46 rows in set (0.00 sec)

mysql> SET GLOBAL group_replication_bootstrap_group=ON;
Query OK, 0 rows affected (0.00 sec)

mysql> START GROUP_REPLICATION;
Query OK, 0 rows affected (2.34 sec)

mysql> SET GLOBAL group_replication_bootstrap_group=OFF;
Query OK, 0 rows affected (0.00 sec)

mysql> SELECT * FROM performance_schema.replication_group_members;
+---------------------------+--------------------------------------+-------------+-------------+--------------+
| CHANNEL_NAME              | MEMBER_ID                            | MEMBER_HOST | MEMBER_PORT | MEMBER_STATE |
+---------------------------+--------------------------------------+-------------+-------------+--------------+
| group_replication_applier | 42ca8591-34bb-11e9-8296-005056ac6820 | MGR-node1   |        3306 | ONLINE       |
+---------------------------+--------------------------------------+-------------+-------------+--------------+
1 row in set (0.00 sec)

比如要保证上面的group_replication_applier的状态为"ONLINE"才对!

创建一个测试库
mysql> CREATE DATABASE kevin CHARACTER SET utf8 COLLATE utf8_general_ci;
Query OK, 1 row affected (0.03 sec)

mysql> use kevin;
Database changed
mysql> create table if not exists haha (id int(10) PRIMARY KEY AUTO_INCREMENT,name varchar(50) NOT NULL);
Query OK, 0 rows affected (0.24 sec)

mysql> insert into kevin.haha values(1,"wangshibo"),(2,"guohuihui"),(3,"yangyang"),(4,"shikui");
Query OK, 4 rows affected (0.07 sec)
Records: 4  Duplicates: 0  Warnings: 0

mysql> select * from kevin.haha;
+----+-----------+
| id | name      |
+----+-----------+
|  1 | wangshibo |
|  2 | guohuihui |
|  3 | yangyang  |
|  4 | shikui    |
+----+-----------+
4 rows in set (0.00 sec)

=====================================================================
2) MGR-node2节点操作
[root@MGR-node2 ~]# cp /etc/my.cnf /etc/my.cnf.bak
[root@MGR-node2 ~]# >/etc/my.cnf
[root@MGR-node2 ~]# vim /etc/my.cnf
[mysqld]
datadir = /var/lib/mysql
socket = /var/lib/mysql/mysql.sock

symbolic-links = 0

log-error = /var/log/mysqld.log
pid-file = /var/run/mysqld/mysqld.pid

#GTID:
server_id = 2
gtid_mode = on
enforce_gtid_consistency = on

master_info_repository=TABLE
relay_log_info_repository=TABLE
binlog_checksum=NONE

#binlog
log_bin = mysql-bin
log-slave-updates = 1
binlog_format = row
sync-master-info = 1
sync_binlog = 1

#relay log
skip_slave_start = 1

transaction_write_set_extraction=XXHASH64
loose-group_replication_group_name="5db40c3c-180c-11e9-afbf-005056ac6820"
loose-group_replication_start_on_boot=off
loose-group_replication_local_address= "172.16.60.212:24901"
loose-group_replication_group_seeds= "172.16.60.211:24901,172.16.60.212:24901,172.16.60.213:24901"
loose-group_replication_bootstrap_group=off
loose-group_replication_single_primary_mode=off
loose-group_replication_enforce_update_everywhere_checks=on
loose-group_replication_ip_whitelist="172.16.60.0/24,127.0.0.1/8"

重启mysql服务
[root@MGR-node2 ~]# systemctl restart mysqld
登录mysql进行相关设置操作
[root@MGR-node2 ~]# mysql -p123456
.........
mysql> SET SQL_LOG_BIN=0;
Query OK, 0 rows affected (0.00 sec)

mysql> GRANT REPLICATION SLAVE ON *.* TO rpl_slave@'%' IDENTIFIED BY 'slave@123';
Query OK, 0 rows affected, 1 warning (0.00 sec)

mysql> FLUSH PRIVILEGES;
Query OK, 0 rows affected (0.00 sec)

mysql> reset master;
Query OK, 0 rows affected (0.17 sec)

mysql> SET SQL_LOG_BIN=1;
Query OK, 0 rows affected (0.00 sec)

mysql> CHANGE MASTER TO MASTER_USER='rpl_slave', MASTER_PASSWORD='slave@123' FOR CHANNEL 'group_replication_recovery';
Query OK, 0 rows affected, 2 warnings (0.21 sec)

mysql> INSTALL PLUGIN group_replication SONAME 'group_replication.so';
Query OK, 0 rows affected (0.20 sec)

mysql> SHOW PLUGINS;
+----------------------------+----------+--------------------+----------------------+---------+
| Name                       | Status   | Type               | Library              | License |
+----------------------------+----------+--------------------+----------------------+---------+
.............
.............
| group_replication          | ACTIVE   | GROUP REPLICATION  | group_replication.so | GPL     |
+----------------------------+----------+--------------------+----------------------+---------+
46 rows in set (0.00 sec)

mysql> START GROUP_REPLICATION;
Query OK, 0 rows affected (6.25 sec)

mysql> SELECT * FROM performance_schema.replication_group_members;
+---------------------------+--------------------------------------+-------------+-------------+--------------+
| CHANNEL_NAME              | MEMBER_ID                            | MEMBER_HOST | MEMBER_PORT | MEMBER_STATE |
+---------------------------+--------------------------------------+-------------+-------------+--------------+
| group_replication_applier | 4281f7b7-34bb-11e9-8949-00505688047c | MGR-node2   |        3306 | ONLINE       |
| group_replication_applier | 42ca8591-34bb-11e9-8296-005056ac6820 | MGR-node1   |        3306 | ONLINE       |
+---------------------------+--------------------------------------+-------------+-------------+--------------+
2 rows in set (0.00 sec)

查看下,发现已经将MGR-node1节点添加的数据同步过来了
mysql> show databases;
+--------------------+
| Database           |
+--------------------+
| information_schema |
| kevin              |
| mysql              |
| performance_schema |
| sys                |
+--------------------+
5 rows in set (0.00 sec)

mysql> select * from kevin.haha;
+----+-----------+
| id | name      |
+----+-----------+
|  1 | wangshibo |
|  2 | guohuihui |
|  3 | yangyang  |
|  4 | shikui    |
+----+-----------+
4 rows in set (0.00 sec)

=====================================================================
3) MGR-node3节点操作
[root@MGR-node3 ~]# cp /etc/my.cnf /etc/my.cnf.bak
[root@MGR-node3 ~]# >/etc/my.cnf
[root@MGR-node3 ~]# vim /etc/my.cnf
[mysqld]
datadir = /var/lib/mysql
socket = /var/lib/mysql/mysql.sock

symbolic-links = 0

log-error = /var/log/mysqld.log
pid-file = /var/run/mysqld/mysqld.pid

#GTID:
server_id = 3
gtid_mode = on
enforce_gtid_consistency = on

master_info_repository=TABLE
relay_log_info_repository=TABLE
binlog_checksum=NONE

#binlog
log_bin = mysql-bin
log-slave-updates = 1
binlog_format = row
sync-master-info = 1
sync_binlog = 1

#relay log
skip_slave_start = 1

transaction_write_set_extraction=XXHASH64
loose-group_replication_group_name="5db40c3c-180c-11e9-afbf-005056ac6820"
loose-group_replication_start_on_boot=off
loose-group_replication_local_address= "172.16.60.213:24901"
loose-group_replication_group_seeds= "172.16.60.211:24901,172.16.60.212:24901,172.16.60.213:24901"
loose-group_replication_bootstrap_group=off
loose-group_replication_single_primary_mode=off
loose-group_replication_enforce_update_everywhere_checks=on
loose-group_replication_ip_whitelist="172.16.60.0/24,127.0.0.1/8"

重启mysql服务
[root@MGR-node3 ~]# systemctl restart mysqld

登录mysql进行相关设置操作
[root@MGR-node3 ~]# mysql -p123456
..........
mysql> SET SQL_LOG_BIN=0;
Query OK, 0 rows affected (0.00 sec)

mysql> GRANT REPLICATION SLAVE ON *.* TO rpl_slave@'%' IDENTIFIED BY 'slave@123';
Query OK, 0 rows affected, 1 warning (0.00 sec)

mysql> FLUSH PRIVILEGES;
Query OK, 0 rows affected (0.01 sec)

mysql> reset master;
Query OK, 0 rows affected (0.10 sec)

mysql> SET SQL_LOG_BIN=1;
Query OK, 0 rows affected (0.00 sec)

mysql> CHANGE MASTER TO MASTER_USER='rpl_slave', MASTER_PASSWORD='slave@123' FOR CHANNEL 'group_replication_recovery';
Query OK, 0 rows affected, 2 warnings (0.27 sec)

mysql> INSTALL PLUGIN group_replication SONAME 'group_replication.so';
Query OK, 0 rows affected (0.04 sec)

mysql> SHOW PLUGINS;
+----------------------------+----------+--------------------+----------------------+---------+
| Name                       | Status   | Type               | Library              | License |
+----------------------------+----------+--------------------+----------------------+---------+
.............
| group_replication          | ACTIVE   | GROUP REPLICATION  | group_replication.so | GPL     |
+----------------------------+----------+--------------------+----------------------+---------+
46 rows in set (0.00 sec)

mysql> START GROUP_REPLICATION;
Query OK, 0 rows affected (4.54 sec)

mysql> SELECT * FROM performance_schema.replication_group_members;
+---------------------------+--------------------------------------+-------------+-------------+--------------+
| CHANNEL_NAME              | MEMBER_ID                            | MEMBER_HOST | MEMBER_PORT | MEMBER_STATE |
+---------------------------+--------------------------------------+-------------+-------------+--------------+
| group_replication_applier | 4281f7b7-34bb-11e9-8949-00505688047c | MGR-node2   |        3306 | ONLINE       |
| group_replication_applier | 42ca8591-34bb-11e9-8296-005056ac6820 | MGR-node1   |        3306 | ONLINE       |
| group_replication_applier | 456216bd-34bb-11e9-bbd1-005056880888 | MGR-node3   |        3306 | ONLINE       |
+---------------------------+--------------------------------------+-------------+-------------+--------------+
3 rows in set (0.00 sec)

查看下,发现已经将在其他节点上添加的数据同步过来了
mysql> show databases;
+--------------------+
| Database           |
+--------------------+
| information_schema |
| kevin              |
| mysql              |
| performance_schema |
| sys                |
+--------------------+
5 rows in set (0.00 sec)

mysql> select * from kevin.haha;
+----+-----------+
| id | name      |
+----+-----------+
|  1 | wangshibo |
|  2 | guohuihui |
|  3 | yangyang  |
|  4 | shikui    |
+----+-----------+
4 rows in set (0.00 sec)

=====================================================================
4) 组复制数据同步测试
在任意一个节点上执行
mysql> SELECT * FROM performance_schema.replication_group_members;
+---------------------------+--------------------------------------+-------------+-------------+--------------+
| CHANNEL_NAME              | MEMBER_ID                            | MEMBER_HOST | MEMBER_PORT | MEMBER_STATE |
+---------------------------+--------------------------------------+-------------+-------------+--------------+
| group_replication_applier | 2658b203-1565-11e9-9f8b-005056880888 | MGR-node3   |        3306 | ONLINE       |
| group_replication_applier | 2c1efc46-1565-11e9-ab8e-00505688047c | MGR-node2   |        3306 | ONLINE       |
| group_replication_applier | 317e2aad-1565-11e9-9c2e-005056ac6820 | MGR-node1   |        3306 | ONLINE       |
+---------------------------+--------------------------------------+-------------+-------------+--------------+
3 rows in set (0.00 sec)

如上,说明已经在MGR-node1、MGR-node2、MGR-node3 三个节点上成功部署了基于GTID的组复制同步环境。
现在在三个节点中的任意一个上面更新数据,那么其他两个节点的数据库都会将新数据同步过去的!

1)在MGR-node1节点数据库更新数据
mysql> delete from kevin.haha where id>2;
Query OK, 2 rows affected (0.14 sec)

接着在MGR-node2、MGR-node3节点数据库查看,发现更新后数据已经同步过来了!
mysql> select * from kevin.haha;
+----+-----------+
| id | name      |
+----+-----------+
|  1 | wangshibo |
|  2 | guohuihui |
+----+-----------+
2 rows in set (0.00 sec)

2)在MGR-node2节点数据库更新数据
mysql> insert into kevin.haha values(11,"beijing"),(12,"shanghai"),(13,"anhui");
Query OK, 3 rows affected (0.06 sec)
Records: 3  Duplicates: 0  Warnings: 0

接着在MGR-node1、MGR-node3节点数据库查看,发现更新后数据已经同步过来了!
mysql> select * from kevin.haha;
+----+-----------+
| id | name      |
+----+-----------+
|  1 | wangshibo |
|  2 | guohuihui |
| 11 | beijing   |
| 12 | shanghai  |
| 13 | anhui     |
+----+-----------+
5 rows in set (0.00 sec)

3)在MGR-node3节点数据库更新数据
mysql> update kevin.haha set id=100 where name="anhui";
Query OK, 1 row affected (0.16 sec)
Rows matched: 1  Changed: 1  Warnings: 0

mysql> delete from kevin.haha where id=12;
Query OK, 1 row affected (0.22 sec)

接着在MGR-node1、MGR-node2节点数据库查看,发现更新后数据已经同步过来了!
mysql> select * from kevin.haha;
+-----+-----------+
| id  | name      |
+-----+-----------+
|   1 | wangshibo |
|   2 | guohuihui |
|  11 | beijing   |
| 100 | anhui     |
+-----+-----------+
4 rows in set (0.00 sec)
四、ProxySQL 安装、读写分离配置、集群部署
1) 两个ProxySQL节点均安装mysql客户端,用于在本机连接到ProxySQL的管理接口
[root@ProxySQL-node1 ~]# vim /etc/yum.repos.d/mariadb.repo
[mariadb]
name = MariaDB
baseurl = http://yum.mariadb.org/10.3.5/centos6-amd64
gpgkey=https://yum.mariadb.org/RPM-GPG-KEY-MariaDB
gpgcheck=1

安装mysql-clinet客户端
[root@ProxySQL-node1 ~]# yum install -y MariaDB-client

============================================================================
如果遇到报错:
Error: MariaDB-compat conflicts with 1:mariadb-libs-5.5.60-1.el7_5.x86_64
 You could try using --skip-broken to work around the problem
 You could try running: rpm -Va --nofiles --nodigest

解决办法:
[root@ProxySQL-node1 ~]# rpm -qa|grep mariadb
mariadb-libs-5.5.60-1.el7_5.x86_64

[root@ProxySQL-node1 ~]# rpm -e mariadb-libs-5.5.60-1.el7_5.x86_64 --nodeps
[root@ProxySQL-node1 ~]# yum install -y MariaDB-client
2) 两个ProxySQL实例节点均安装ProxySQL
proxysql的rpm包下载地址: https://pan.baidu.com/s/1S1_b5DKVCpZSOUNmtCXrrg
提取密码: 5t1c

proxysql各版本下载:https://github.com/sysown/proxysql/releases

[root@ProxySQL-node ~]# yum install -y perl-DBI perl-DBD-MySQL
[root@ProxySQL-node ~]# rpm -ivh proxysql-1.4.8-1-centos7.x86_64.rpm --force

启动proxysql  (或者使用"/etc/init.d/proxysql start"命令启动)
[root@ProxySQL-node ~]# systemctl start proxysql
[root@ProxySQL-node ~]# systemctl restart proxysql

[root@ProxySQL-node ~]# ss -lntup|grep proxy
tcp    LISTEN     0      128       *:6080                  *:*                   users:(("proxysql",pid=29931,fd=11))
tcp    LISTEN     0      128       *:6032                  *:*                   users:(("proxysql",pid=29931,fd=28))
tcp    LISTEN     0      128       *:6033                  *:*                   users:(("proxysql",pid=29931,fd=27))
tcp    LISTEN     0      128       *:6033                  *:*                   users:(("proxysql",pid=29931,fd=26))
tcp    LISTEN     0      128       *:6033                  *:*                   users:(("proxysql",pid=29931,fd=25))
tcp    LISTEN     0      128       *:6033                  *:*                   users:(("proxysql",pid=29931,fd=24))

[root@ProxySQL-node ~]# mysql -uadmin -padmin -h127.0.0.1 -P6032
............
............
MySQL [(none)]> show databases;
+-----+---------------+-------------------------------------+
| seq | name          | file                                |
+-----+---------------+-------------------------------------+
| 0   | main          |                                     |
| 2   | disk          | /var/lib/proxysql/proxysql.db       |
| 3   | stats         |                                     |
| 4   | monitor       |                                     |
| 5   | stats_history | /var/lib/proxysql/proxysql_stats.db |
+-----+---------------+-------------------------------------+
5 rows in set (0.000 sec)

接着初始化Proxysql,将之前的proxysql数据都删除

MySQL [(none)]> delete from scheduler ;
Query OK, 0 rows affected (0.000 sec)

MySQL [(none)]> delete from mysql_servers;
Query OK, 3 rows affected (0.000 sec)

MySQL [(none)]> delete from mysql_users;
Query OK, 1 row affected (0.000 sec)

MySQL [(none)]> delete from mysql_query_rules;
Query OK, 0 rows affected (0.000 sec)

MySQL [(none)]> delete from mysql_group_replication_hostgroups ;
Query OK, 1 row affected (0.000 sec)

MySQL [(none)]> LOAD MYSQL VARIABLES TO RUNTIME;
Query OK, 0 rows affected (0.000 sec)

MySQL [(none)]> SAVE MYSQL VARIABLES TO DISK;
Query OK, 94 rows affected (0.175 sec)

MySQL [(none)]> LOAD MYSQL SERVERS TO RUNTIME;
Query OK, 0 rows affected (0.003 sec)

MySQL [(none)]> SAVE MYSQL SERVERS TO DISK;
Query OK, 0 rows affected (0.140 sec)

MySQL [(none)]> LOAD MYSQL USERS TO RUNTIME;
Query OK, 0 rows affected (0.000 sec)

MySQL [(none)]> SAVE MYSQL USERS TO DISK;
Query OK, 0 rows affected (0.050 sec)

MySQL [(none)]> LOAD SCHEDULER TO RUNTIME;
Query OK, 0 rows affected (0.000 sec)

MySQL [(none)]> SAVE SCHEDULER TO DISK;
Query OK, 0 rows affected (0.096 sec)

MySQL [(none)]> LOAD MYSQL QUERY RULES TO RUNTIME;
Query OK, 0 rows affected (0.000 sec)

MySQL [(none)]> SAVE MYSQL QUERY RULES TO DISK;
Query OK, 0 rows affected (0.156 sec)

MySQL [(none)]>
3)配置ProxySQL Cluster
1)首先在172.16.60.214、172.16.60.220两个实例节点上均配置proxysql.cnf文件
[root@ProxySQL-node1 ~]# cp /etc/proxysql.cnf /etc/proxysql.cnf.bak
[root@ProxySQL-node1 ~]# vim /etc/proxysql.cnf
...............
...............
# 需要更改的部分
admin_variables=
{
        admin_credentials="admin:admin;cluster_kevin:123456"                 #配置用于proxysql cluster实例节点间通讯的账号
#       mysql_ifaces="127.0.0.1:6032;/tmp/proxysql_admin.sock"
        mysql_ifaces="0.0.0.0:6032"                                                                #全网开放登录
#       refresh_interval=2000
#       debug=true
        cluster_username="cluster_kevin"                                                     #集群用户名称,与最上面的相同
        cluster_password="123456"                                                                #集群用户密码,与最上面的相同
        cluster_check_interval_ms=200
        cluster_check_status_frequency=100
        cluster_mysql_query_rules_save_to_disk=true
        cluster_mysql_servers_save_to_disk=true
        cluster_mysql_users_save_to_disk=true
        cluster_proxysql_servers_save_to_disk=true
        cluster_mysql_query_rules_diffs_before_sync=3
        cluster_mysql_servers_diffs_before_sync=3
        cluster_mysql_users_diffs_before_sync=3
        cluster_proxysql_servers_diffs_before_sync=3
}

proxysql_servers =                                                                                    #在这个部分提前定义好集群的成员
(
        {
                hostname="172.16.60.214"
                port=6032
                weight=1
                comment="ProxySQL-node1"
        },
        {
                hostname="172.16.60.220"
                port=6032
                weight=1
                comment="ProxySQL-node2"
        }
)
...............
...............

将proxysql.cnf配置文件拷贝覆盖到另外一个实例节点上
[root@ProxySQL-node1 ~]# rsync -e "ssh -p22" -avpgolr /etc/proxysql.cnf root@172.16.60.220:/etc/

2)重启172.16.60.214和172.16.60.220两个实例节点的proxysql服务 (注意:暂且不要重启172.16.60.221实例节点的proxysql服务)

这里要特别注意:
如果存在如果存在"proxysql.db"文件(在/var/lib/proxysql目录下),则ProxySQL服务只有在第一次启动时才会去读取proxysql.cnf文件并解析;
后面启动会就不会读取proxysql.cnf文件了!如果想要让proxysql.cnf文件里的配置在重启proxysql服务后生效(即想要让proxysql重启时读取并
解析proxysql.cnf配置文件),则需要先删除/var/lib/proxysql/proxysql.db数据库文件,然后再重启proxysql服务。这样就相当于初始化启动
proxysql服务了,会再次生产一个纯净的proxysql.db数据库文件(如果之前配置了proxysql相关路由规则等,则就会被抹掉)。

重启第一个实例节点172.16.60.214的proxysql服务,重启时要读取并解析proxysql.cnf配置文件
[root@ProxySQL-node1 ~]# rm -rf /var/lib/proxysql/proxysql.db
[root@ProxySQL-node1 ~]# ll /var/lib/proxysql/proxysql.db
ls: cannot access /var/lib/proxysql/proxysql.db: No such file or directory
[root@ProxySQL-node1 ~]# systemctl restart proxysql
[root@ProxySQL-node1 ~]# ll /var/lib/proxysql/proxysql.db
-rw------- 1 root root 122880 Feb 25 14:42 /var/lib/proxysql/proxysql.db

重启第二个实例节点172.16.60.220的proxysql服务,重启时要读取并解析proxysql.cnf配置文件
[root@ProxySQL-node2 ~]# rm -rf /var/lib/proxysql/proxysql.db
[root@ProxySQL-node2 ~]# ll /var/lib/proxysql/proxysql.db
ls: cannot access /var/lib/proxysql/proxysql.db: No such file or directory
[root@ProxySQL-node2 ~]# systemctl restart proxysql
[root@ProxySQL-node2 ~]# ll /var/lib/proxysql/proxysql.db
-rw------- 1 root root 122880 Feb 25 14:43 /var/lib/proxysql/proxysql.db

3)观察集群状况 (在172.16.60.214和172.16.60.220节点上都可以查看)
[root@ProxySQL-node1 ~]# mysql -uadmin -padmin -h127.0.0.1 -P6032
.............
MySQL [(none)]> select * from proxysql_servers;
+---------------+------+--------+----------------+
| hostname      | port | weight | comment        |
+---------------+------+--------+----------------+
| 172.16.60.214 | 6032 | 1      | ProxySQL-node1 |
| 172.16.60.220 | 6032 | 1      | ProxySQL-node2 |
+---------------+------+--------+----------------+
2 rows in set (0.000 sec)

MySQL [(none)]> select * from stats_proxysql_servers_metrics;
+---------------+------+--------+----------------+------------------+----------+---------------+---------+------------------------------+----------------------------+
| hostname      | port | weight | comment        | response_time_ms | Uptime_s | last_check_ms | Queries | Client_Connections_connected | Client_Connections_created |
+---------------+------+--------+----------------+------------------+----------+---------------+---------+------------------------------+----------------------------+
| 172.16.60.220 | 6032 | 1      | ProxySQL-node2 | 1                | 82       | 1226          | 0       | 0                            | 0                          |
| 172.16.60.214 | 6032 | 1      | ProxySQL-node1 | 1                | 80       | 675           | 0       | 0                            | 0                          |
+---------------+------+--------+----------------+------------------+----------+---------------+---------+------------------------------+----------------------------+
2 rows in set (0.001 sec)

MySQL [(none)]> select hostname,port,comment,Uptime_s,last_check_ms from stats_proxysql_servers_metrics;
+---------------+------+----------------+----------+---------------+
| hostname      | port | comment        | Uptime_s | last_check_ms |
+---------------+------+----------------+----------+---------------+
| 172.16.60.220 | 6032 | ProxySQL-node2 | 102      | 9064          |
| 172.16.60.214 | 6032 | ProxySQL-node1 | 100      | 8526          |
+---------------+------+----------------+----------+---------------+
2 rows in set (0.000 sec)

MySQL [(none)]> select hostname,name,checksum,updated_at from stats_proxysql_servers_checksums;
+---------------+-------------------+--------------------+------------+
| hostname      | name              | checksum           | updated_at |
+---------------+-------------------+--------------------+------------+
| 172.16.60.220 | admin_variables   |                    | 1551109910 |
| 172.16.60.220 | mysql_query_rules | 0x0000000000000000 | 1551109910 |
| 172.16.60.220 | mysql_servers     | 0x0000000000000000 | 1551109910 |
| 172.16.60.220 | mysql_users       | 0x0000000000000000 | 1551109910 |
| 172.16.60.220 | mysql_variables   |                    | 1551109910 |
| 172.16.60.220 | proxysql_servers  | 0x7D769422A4719C2F | 1551109910 |
| 172.16.60.214 | admin_variables   |                    | 1551109910 |
| 172.16.60.214 | mysql_query_rules | 0x0000000000000000 | 1551109910 |
| 172.16.60.214 | mysql_servers     | 0x0000000000000000 | 1551109910 |
| 172.16.60.214 | mysql_users       | 0x0000000000000000 | 1551109910 |
| 172.16.60.214 | mysql_variables   |                    | 1551109910 |
| 172.16.60.214 | proxysql_servers  | 0x7D769422A4719C2F | 1551109910 |
+---------------+-------------------+--------------------+------------+
12 rows in set (0.001 sec)
4)在第一个实例节点 172.16.60.214 上配置MGR的读写分离和主节点故障无感知环境
参考:https://www.cnblogs.com/kevingrace/p/10384691.html

1)在数据库端建立proxysql登入需要的帐号 (在三个MGR任意一个节点上操作,会自动同步到其他节点)
[root@MGR-node1 ~]# mysql -p123456
.........
mysql> CREATE USER 'proxysql'@'%' IDENTIFIED BY 'proxysql';
Query OK, 0 rows affected (0.07 sec)

mysql> GRANT ALL ON * . * TO  'proxysql'@'%';
Query OK, 0 rows affected (0.06 sec)

mysql> create user 'sbuser'@'%' IDENTIFIED BY 'sbpass';
Query OK, 0 rows affected (0.05 sec)

mysql> GRANT ALL ON * . * TO 'sbuser'@'%';
Query OK, 0 rows affected (0.08 sec)

mysql> FLUSH PRIVILEGES;
Query OK, 0 rows affected (0.07 sec)

2)创建检查MGR节点状态的函数和视图 (在三个MGR任意一个节点上操作,会自动同步到其他节点)
在MGR-node1节点上,创建系统视图sys.gr_member_routing_candidate_status,该视图将为ProxySQL提供组复制相关的监控状态指标。
下载addition_to_sys.sql脚本,在MGR-node1节点执行如下语句导入MySQL即可 (在mgr-node1节点的mysql执行后,会同步到其他两个节点上)。

下载地址: https://pan.baidu.com/s/1bNYHtExy2fmqwvEyQS3sWg
提取密码:wst7

导入addition_to_sys.sql文件数据
[root@MGR-node1 ~]# mysql -p123456 < /root/addition_to_sys.sql
mysql: [Warning] Using a password on the command line interface can be insecure.

在三个mysql节点上可以查看该视图:
[root@MGR-node1 ~]# mysql -p123456
............
mysql> select * from sys.gr_member_routing_candidate_status;
+------------------+-----------+---------------------+----------------------+
| viable_candidate | read_only | transactions_behind | transactions_to_cert |
+------------------+-----------+---------------------+----------------------+
| YES              | NO        |                   0 |                    0 |
+------------------+-----------+---------------------+----------------------+
1 row in set (0.01 sec)

3)在proxysql中增加帐号
[root@ProxySQL-node ~]# mysql -uadmin -padmin -h127.0.0.1 -P6032
...........
MySQL [(none)]> INSERT INTO MySQL_users(username,password,default_hostgroup) VALUES ('proxysql','proxysql',1);
Query OK, 1 row affected (0.000 sec)

MySQL [(none)]> UPDATE global_variables SET variable_value='proxysql' where variable_name='mysql-monitor_username';
Query OK, 1 row affected (0.001 sec)

MySQL [(none)]> UPDATE global_variables SET variable_value='proxysql' where variable_name='mysql-monitor_password';
Query OK, 1 row affected (0.002 sec)

MySQL [(none)]> LOAD MYSQL SERVERS TO RUNTIME;
Query OK, 0 rows affected (0.006 sec)

MySQL [(none)]> SAVE MYSQL SERVERS TO DISK;
Query OK, 0 rows affected (0.387 sec)

4) 配置proxysql
[root@ProxySQL-node ~]# mysql -uadmin -padmin -h127.0.0.1 -P6032
.............
MySQL [(none)]> delete from mysql_servers;
Query OK, 3 rows affected (0.000 sec)

MySQL [(none)]> insert into mysql_servers (hostgroup_id, hostname, port) values(1,'172.16.60.211',3306);
Query OK, 1 row affected (0.001 sec)

MySQL [(none)]> insert into mysql_servers (hostgroup_id, hostname, port) values(1,'172.16.60.212',3306);
Query OK, 1 row affected (0.000 sec)

MySQL [(none)]> insert into mysql_servers (hostgroup_id, hostname, port) values(1,'172.16.60.213',3306);
Query OK, 1 row affected (0.000 sec)

MySQL [(none)]> insert into mysql_servers (hostgroup_id, hostname, port) values(2,'172.16.60.211',3306);
Query OK, 1 row affected (0.000 sec)

MySQL [(none)]> insert into mysql_servers (hostgroup_id, hostname, port) values(2,'172.16.60.212',3306);
Query OK, 1 row affected (0.000 sec)

MySQL [(none)]> insert into mysql_servers (hostgroup_id, hostname, port) values(2,'172.16.60.213',3306);
Query OK, 1 row affected (0.000 sec)

MySQL [(none)]> select * from  mysql_servers ;
+--------------+---------------+------+--------+--------+-------------+-----------------+---------------------+---------+----------------+---------+
| hostgroup_id | hostname      | port | status | weight | compression | max_connections | max_replication_lag | use_ssl | max_latency_ms | comment |
+--------------+---------------+------+--------+--------+-------------+-----------------+---------------------+---------+----------------+---------+
| 1            | 172.16.60.211 | 3306 | ONLINE | 1      | 0           | 1000            | 0                   | 0       | 0              |         |
| 1            | 172.16.60.212 | 3306 | ONLINE | 1      | 0           | 1000            | 0                   | 0       | 0              |         |
| 1            | 172.16.60.213 | 3306 | ONLINE | 1      | 0           | 1000            | 0                   | 0       | 0              |         |
| 2            | 172.16.60.211 | 3306 | ONLINE | 1      | 0           | 1000            | 0                   | 0       | 0              |         |
| 2            | 172.16.60.212 | 3306 | ONLINE | 1      | 0           | 1000            | 0                   | 0       | 0              |         |
| 2            | 172.16.60.213 | 3306 | ONLINE | 1      | 0           | 1000            | 0                   | 0       | 0              |         |
+--------------+---------------+------+--------+--------+-------------+-----------------+---------------------+---------+----------------+---------+
6 rows in set (0.001 sec)

需要确认一下没有使用proxysql的读写分离规则(因为之前测试中配置了这个地方,所以需要删除,以免影响后面的测试)。
MySQL [(none)]> delete from mysql_query_rules;
Query OK, 2 rows affected (0.000 sec)

MySQL [(none)]> commit;
Query OK, 0 rows affected (0.000 sec)

最后需要将global_variables,mysql_servers、mysql_users表的信息加载到RUNTIME,更进一步加载到DISK:
MySQL [(none)]> LOAD MYSQL VARIABLES TO RUNTIME;
Query OK, 0 rows affected (0.001 sec)

MySQL [(none)]> SAVE MYSQL VARIABLES TO DISK;
Query OK, 94 rows affected (0.080 sec)

MySQL [(none)]> LOAD MYSQL SERVERS TO RUNTIME;
Query OK, 0 rows affected (0.003 sec)

MySQL [(none)]> SAVE MYSQL SERVERS TO DISK;
Query OK, 0 rows affected (0.463 sec)

MySQL [(none)]> LOAD MYSQL USERS TO RUNTIME;
Query OK, 0 rows affected (0.001 sec)

MySQL [(none)]> SAVE MYSQL USERS TO DISK;
Query OK, 0 rows affected (0.134 sec)

接着测试一下能否正常登入数据库 (测试命令执行多次,则会登录到不同的mysql节点上)
[root@ProxySQL-node1 ~]# mysql -uproxysql -pproxysql -h 127.0.0.1 -P6033 -e"select @@hostname"
+------------+
| @@hostname |
+------------+
| MGR-node1  |
+------------+

5)配置scheduler
首先,请在Github地址https://github.com/ZzzCrazyPig/proxysql_groupreplication_checker下载相应的脚本
这个地址有三个脚本可供下载:
proxysql_groupreplication_checker.sh:用于multi-primary模式,可以实现读写分离,以及故障切换,同一时间点多个节点可以多写;
gr_mw_mode_cheker.sh:用于multi-primary模式,可以实现读写分离,以及故障切换,不过在同一时间点只能有一个节点能写;
gr_sw_mode_checker.sh:用于single-primary模式,可以实现读写分离,以及故障切换;
由于这里实验的环境是multi-primary模式,所以选择proxysql_groupreplication_checker.sh脚本。

三个脚本我已打包放在了百度云盘上,下载地址:https://pan.baidu.com/s/1lUzr58BSA_U7wmYwsRcvzQ
提取密码:9rm7

将下载的脚本proxysql_groupreplication_checker.sh放到目录/var/lib/proxysql/下,并增加可以执行的权限:
[root@ProxySQL-node ~]# chmod a+x /var/lib/proxysql/proxysql_groupreplication_checker.sh
[root@ProxySQL-node ~]# ll /var/lib/proxysql/proxysql_groupreplication_checker.sh
-rwxr-xr-x 1 root root 6081 Feb 20 14:25 /var/lib/proxysql/proxysql_groupreplication_checker.sh

====================================================================
特别注意:
proxysql_groupreplication_checker.sh 监控脚本要在三个节点上都要下载,并各自放到/var/lib/proxysql目录下


MySQL [(none)]> INSERT INTO scheduler(id,interval_ms,filename,arg1,arg2,arg3,arg4, arg5) VALUES (1,'10000','/var/lib/proxysql/proxysql_groupreplication_checker.sh','1','2','1','0','/var/lib/proxysql/proxysql_groupreplication_checker.log');
Query OK, 1 row affected (0.000 sec)

MySQL [(none)]> select * from scheduler;
+----+--------+-------------+--------------------------------------------------------+------+------+------+------+---------------------------------------------------------+---------+
| id | active | interval_ms | filename                                               | arg1 | arg2 | arg3 | arg4 | arg5                                                    | comment |
+----+--------+-------------+--------------------------------------------------------+------+------+------+------+---------------------------------------------------------+---------+
| 1  | 1      | 10000       | /var/lib/proxysql/proxysql_groupreplication_checker.sh | 1    | 2    | 1    | 0    | /var/lib/proxysql/proxysql_groupreplication_checker.log |         |
+----+--------+-------------+--------------------------------------------------------+------+------+------+------+---------------------------------------------------------+---------+
1 row in set (0.000 sec)

MySQL [(none)]> LOAD SCHEDULER TO RUNTIME;
Query OK, 0 rows affected (0.001 sec)

MySQL [(none)]> SAVE SCHEDULER TO DISK;
Query OK, 0 rows affected (0.118 sec)

==============================================================================
scheduler各column的说明:
active : 1: enable scheduler to schedule the script we provide
interval_ms : invoke one by one in cycle (eg: 5000(ms) = 5s represent every 5s invoke the script)
filename: represent the script file path
arg1~arg5: represent the input parameters the script received

脚本proxysql_groupreplication_checker.sh对应的参数说明如下:
arg1 is the hostgroup_id for write
arg2 is the hostgroup_id for read
arg3 is the number of writers we want active at the same time
arg4 represents if we want that the member acting for writes is also candidate for reads
arg5 is the log file

schedule信息加载后,就会分析当前的环境,mysql_servers中显示出当前只有172.16.60.211是可以写的,
172.16.60.212以及172.16.60.213是用来读的。

MySQL [(none)]> select * from  mysql_servers ;              //上面操作后,稍等一会儿后执行此命令才会有下面的结果
+--------------+---------------+------+--------------+--------+-------------+-----------------+---------------------+---------+----------------+---------+
| hostgroup_id | hostname      | port | status       | weight | compression | max_connections | max_replication_lag | use_ssl | max_latency_ms | comment |
+--------------+---------------+------+--------------+--------+-------------+-----------------+---------------------+---------+----------------+---------+
| 1            | 172.16.60.211 | 3306 | ONLINE       | 1      | 0           | 1000            | 0                   | 0       | 0              |         |
| 1            | 172.16.60.212 | 3306 | OFFLINE_SOFT | 1      | 0           | 1000            | 0                   | 0       | 0              |         |
| 1            | 172.16.60.213 | 3306 | OFFLINE_SOFT | 1      | 0           | 1000            | 0                   | 0       | 0              |         |
| 2            | 172.16.60.211 | 3306 | OFFLINE_SOFT | 1      | 0           | 1000            | 0                   | 0       | 0              |         |
| 2            | 172.16.60.212 | 3306 | ONLINE       | 1      | 0           | 1000            | 0                   | 0       | 0              |         |
| 2            | 172.16.60.213 | 3306 | ONLINE       | 1      | 0           | 1000            | 0                   | 0       | 0              |         |
+--------------+---------------+------+--------------+--------+-------------+-----------------+---------------------+---------+----------------+---------+
6 rows in set (0.000 sec)

因为schedule的arg4,我这里设为了0,就表示可写的节点不能用于读。那我将arg4设置为1试一下:
MySQL [(none)]> update scheduler set arg4=1;
Query OK, 1 row affected (0.000 sec)

MySQL [(none)]> select * from scheduler;
+----+--------+-------------+--------------------------------------------------------+------+------+------+------+---------------------------------------------------------+---------+
| id | active | interval_ms | filename                                               | arg1 | arg2 | arg3 | arg4 | arg5                                                    | comment |
+----+--------+-------------+--------------------------------------------------------+------+------+------+------+---------------------------------------------------------+---------+
| 1  | 1      | 10000       | /var/lib/proxysql/proxysql_groupreplication_checker.sh | 1    | 2    | 1    | 1    | /var/lib/proxysql/proxysql_groupreplication_checker.log |         |
+----+--------+-------------+--------------------------------------------------------+------+------+------+------+---------------------------------------------------------+---------+
1 row in set (0.000 sec)

MySQL [(none)]> SAVE SCHEDULER TO DISK;
Query OK, 0 rows affected (0.286 sec)

MySQL [(none)]> LOAD SCHEDULER TO RUNTIME;
Query OK, 0 rows affected (0.000 sec)

MySQL [(none)]> select * from  mysql_servers;          //上面操作后,稍微等一会儿执行此命令才会有下面的结果
+--------------+---------------+------+--------------+--------+-------------+-----------------+---------------------+---------+----------------+---------+
| hostgroup_id | hostname      | port | status       | weight | compression | max_connections | max_replication_lag | use_ssl | max_latency_ms | comment |
+--------------+---------------+------+--------------+--------+-------------+-----------------+---------------------+---------+----------------+---------+
| 1            | 172.16.60.211 | 3306 | ONLINE       | 1      | 0           | 1000            | 0                   | 0       | 0              |         |
| 1            | 172.16.60.212 | 3306 | OFFLINE_SOFT | 1      | 0           | 1000            | 0                   | 0       | 0              |         |
| 1            | 172.16.60.213 | 3306 | OFFLINE_SOFT | 1      | 0           | 1000            | 0                   | 0       | 0              |         |
| 2            | 172.16.60.211 | 3306 | ONLINE       | 1      | 0           | 1000            | 0                   | 0       | 0              |         |
| 2            | 172.16.60.212 | 3306 | ONLINE       | 1      | 0           | 1000            | 0                   | 0       | 0              |         |
| 2            | 172.16.60.213 | 3306 | ONLINE       | 1      | 0           | 1000            | 0                   | 0       | 0              |         |
+--------------+---------------+------+--------------+--------+-------------+-----------------+---------------------+---------+----------------+---------+
6 rows in set (0.000 sec)

arg4设置为1之后,172.16.60.211节点用来写的同时,也可以被用来读。

便于下面的测试还是将arg4设为0:
MySQL [(none)]> update scheduler set arg4=0;
Query OK, 1 row affected (0.000 sec)

MySQL [(none)]> SAVE SCHEDULER TO DISK;
Query OK, 0 rows affected (0.197 sec)

MySQL [(none)]> LOAD SCHEDULER TO RUNTIME;
Query OK, 0 rows affected (0.000 sec)

MySQL [(none)]> select * from  mysql_servers;             //稍微等一会儿执行此命令,才会有下面的结果
+--------------+---------------+------+--------------+--------+-------------+-----------------+---------------------+---------+----------------+---------+
| hostgroup_id | hostname      | port | status       | weight | compression | max_connections | max_replication_lag | use_ssl | max_latency_ms | comment |
+--------------+---------------+------+--------------+--------+-------------+-----------------+---------------------+---------+----------------+---------+
| 1            | 172.16.60.211 | 3306 | ONLINE       | 1      | 0           | 1000            | 0                   | 0       | 0              |         |
| 1            | 172.16.60.212 | 3306 | OFFLINE_SOFT | 1      | 0           | 1000            | 0                   | 0       | 0              |         |
| 1            | 172.16.60.213 | 3306 | OFFLINE_SOFT | 1      | 0           | 1000            | 0                   | 0       | 0              |         |
| 2            | 172.16.60.211 | 3306 | OFFLINE_SORT | 1      | 0           | 1000            | 0                   | 0       | 0              |         |
| 2            | 172.16.60.212 | 3306 | ONLINE       | 1      | 0           | 1000            | 0                   | 0       | 0              |         |
| 2            | 172.16.60.213 | 3306 | ONLINE       | 1      | 0           | 1000            | 0                   | 0       | 0              |         |
+--------------+---------------+------+--------------+--------+-------------+-----------------+---------------------+---------+----------------+---------+
6 rows in set (0.000 sec)

各个节点的gr_member_routing_candidate_status视图也显示了当前节点是否是正常状态的,
proxysql就是读取的这个视图的信息来决定此节点是否可用。


[root@MGR-node1 ~]# mysql -p123456
...........
mysql> select * from sys.gr_member_routing_candidate_statusG;
*************************** 1. row ***************************
    viable_candidate: YES
           read_only: NO
 transactions_behind: 0
transactions_to_cert: 0
1 row in set (0.00 sec)

ERROR:
No query specified

6)设置读写分离
MySQL [(none)]> insert into mysql_query_rules (active, match_pattern, destination_hostgroup, apply) values (1,"^SELECT",2,1);
Query OK, 1 row affected (0.001 sec)

MySQL [(none)]> LOAD MYSQL QUERY RULES TO RUNTIME;
Query OK, 0 rows affected (0.001 sec)

MySQL [(none)]> SAVE MYSQL QUERY RULES TO DISK;
Query OK, 0 rows affected (0.264 sec)

对于for update需要在gruop1上执行,可以加上规则:
MySQL [(none)]> insert into mysql_query_rules(active,match_pattern,destination_hostgroup,apply) values(1,'^SELECT.*FOR UPDATE$',1,1);
Query OK, 1 row affected (0.001 sec)

在proxysql本机或其他客户机上检查下,select 语句,一直连接的是172.16.60.212和172.16.60.213
[root@MGR-node3 ~]# mysql -uproxysql -pproxysql -h172.16.60.214 -P6033 -e "select @@hostname"
mysql: [Warning] Using a password on the command line interface can be insecure.
+------------+
| @@hostname |
+------------+
| MGR-node3  |
+------------+
[root@MGR-node3 ~]# mysql -uproxysql -pproxysql -h172.16.60.214 -P6033 -e "select @@hostname"
mysql: [Warning] Using a password on the command line interface can be insecure.
+------------+
| @@hostname |
+------------+
| MGR-node2  |
+------------+
[root@MGR-node3 ~]# mysql -uproxysql -pproxysql -h172.16.60.214 -P6033 -e "select @@hostname"
mysql: [Warning] Using a password on the command line interface can be insecure.
+------------+
| @@hostname |
+------------+
| MGR-node2  |
+------------+
[root@MGR-node3 ~]# mysql -uproxysql -pproxysql -h172.16.60.214 -P6033 -e "select @@hostname"
mysql: [Warning] Using a password on the command line interface can be insecure.
+------------+
| @@hostname |
+------------+
| MGR-node3  |
+------------+

7)验证数据的读写分离效果
[root@ProxySQL-node ~]# mysql -uproxysql -pproxysql -h172.16.60.214 -P6033 -e "select @@hostname"
+------------+
| @@hostname |
+------------+
| MGR-node2  |
+------------+
[root@ProxySQL-node ~]# mysql -uproxysql -pproxysql -h172.16.60.214 -P6033 -e "select * from kevin.haha"
+-----+-----------+
| id  | name      |
+-----+-----------+
|   1 | wangshibo |
|   2 | guohuihui |
|  11 | beijing   |
| 100 | anhui     |
+-----+-----------+

[root@ProxySQL-node ~]# mysql -uproxysql -pproxysql -h172.16.60.214 -P6033 -e "delete from kevin.haha where id=1;"
[root@ProxySQL-node ~]# mysql -uproxysql -pproxysql -h172.16.60.214 -P6033 -e "delete from kevin.haha where id=2;"
[root@ProxySQL-node ~]# mysql -uproxysql -pproxysql -h172.16.60.214 -P6033 -e "select * from kevin.haha"
+-----+---------+
| id  | name    |
+-----+---------+
|  11 | beijing |
| 100 | anhui   |
+-----+---------+

[root@ProxySQL-node ~]# mysql -uproxysql -pproxysql -h172.16.60.214 -P6033 -e 'insert into kevin.haha values(21,"zhongguo"),(22,"xianggang"),(23,"taiwan");'

[root@ProxySQL-node ~]# mysql -uproxysql -pproxysql -h172.16.60.214 -P6033 -e "select * from kevin.haha"                                +-----+-----------+
| id  | name      |
+-----+-----------+
|  11 | beijing   |
|  21 | zhongguo  |
|  22 | xianggang |
|  23 | taiwan    |
| 100 | anhui     |

最后在proxysql管理端查看读写分离情况
[root@ProxySQL-node ~]# mysql -uadmin -padmin -h 127.0.0.1 -P6032
..........
MySQL [(none)]> select hostgroup,username,digest_text,count_star from stats_mysql_query_digest;
+-----------+----------+------------------------------------------------------+------------+
| hostgroup | username | digest_text                                          | count_star |
+-----------+----------+------------------------------------------------------+------------+
| 1         | proxysql | insert into kevin.haha values(?,?),(?,?),(?,?)       | 1          |
| 1         | proxysql | insert into kevin.haha values(?,yangyang)            | 1          |
| 1         | proxysql | delete from kevin.haha where id=?                    | 2          |
| 1         | proxysql | select @@version_comment limit ?                     | 120        |
| 1         | proxysql | KILL ?                                               | 8          |
| 1         | proxysql | select @@hostname                                    | 11         |
| 1         | proxysql | KILL QUERY ?                                         | 10         |
| 2         | proxysql | select @@hostname, sleep(?)                          | 53         |
| 1         | proxysql | insert into kevin.haha values(?,yangyang),(?,shikui) | 2          |
| 1         | proxysql | show databases                                       | 1          |
| 2         | proxysql | select @@hostname                                    | 31         |
| 2         | proxysql | select * from kevin.haha                             | 4          |
| 1         | proxysql | insert into kevin.haha values(?,wawa)                | 3          |
+-----------+----------+------------------------------------------------------+------------+
13 rows in set (0.002 sec)

MySQL [(none)]> select * from  mysql_servers;
+--------------+---------------+------+--------------+--------+-------------+-----------------+---------------------+---------+----------------+---------+
| hostgroup_id | hostname      | port | status       | weight | compression | max_connections | max_replication_lag | use_ssl | max_latency_ms | comment |
+--------------+---------------+------+--------------+--------+-------------+-----------------+---------------------+---------+----------------+---------+
| 1            | 172.16.60.211 | 3306 | ONLINE       | 1      | 0           | 1000            | 0                   | 0       | 0              |         |
| 1            | 172.16.60.212 | 3306 | OFFLINE_SOFT | 1      | 0           | 1000            | 0                   | 0       | 0              |         |
| 1            | 172.16.60.213 | 3306 | OFFLINE_SOFT | 1      | 0           | 1000            | 0                   | 0       | 0              |         |
| 2            | 172.16.60.211 | 3306 | OFFLINE_SOFT | 1      | 0           | 1000            | 0                   | 0       | 0              |         |
| 2            | 172.16.60.212 | 3306 | ONLINE       | 1      | 0           | 1000            | 0                   | 0       | 0              |         |
| 2            | 172.16.60.213 | 3306 | ONLINE       | 1      | 0           | 1000            | 0                   | 0       | 0              |         |
+--------------+---------------+------+--------------+--------+-------------+-----------------+---------------------+---------+----------------+---------+
6 rows in set (0.000 sec)

通过上面可以看到:
写操作都分配到了group1组内,即写操作分配到172.16.60.211节点上。
读操作都分配到了group2组内,即读操作分配到172.16.60.212、172.16.60.213节点上。

8)设置故障应用无感应
在上面的读写分离规则中,我设置了172.16.60.211为可写节点,172.16.60.212,172.16.60.213为只读节点
如果此时172.16.60.211变成只读模式的话,应用能不能直接连到其它的节点进行写操作?

现手动将172.16.60.211变成只读模式:
[root@MGR-node1 ~]# mysql -p123456
........
mysql> set global read_only=1;
Query OK, 0 rows affected (0.00 sec)

接着观察一下mysql_servers的状态,自动将group1的172.16.60.212改成了online,group2的172.16.60.211,
172.16.60.213变成online了,就表示将172.16.60.212变为可写节点,其它两个节点变为只读节点了。

[root@ProxySQL-node ~]# mysql -uadmin -padmin -h 127.0.0.1 -P6032
........
MySQL [(none)]> select * from  mysql_servers;
+--------------+---------------+------+--------------+--------+-------------+-----------------+---------------------+---------+----------------+---------+
| hostgroup_id | hostname      | port | status       | weight | compression | max_connections | max_replication_lag | use_ssl | max_latency_ms | comment |
+--------------+---------------+------+--------------+--------+-------------+-----------------+---------------------+---------+----------------+---------+
| 1            | 172.16.60.211 | 3306 | OFFLINE_SOFT | 1      | 0           | 1000            | 0                   | 0       | 0              |         |
| 1            | 172.16.60.212 | 3306 | ONLINE       | 1      | 0           | 1000            | 0                   | 0       | 0              |         |
| 1            | 172.16.60.213 | 3306 | OFFLINE_SOFT | 1      | 0           | 1000            | 0                   | 0       | 0              |         |
| 2            | 172.16.60.211 | 3306 | ONLINE       | 1      | 0           | 1000            | 0                   | 0       | 0              |         |
| 2            | 172.16.60.212 | 3306 | OFFLINE_SOFT | 1      | 0           | 1000            | 0                   | 0       | 0              |         |
| 2            | 172.16.60.213 | 3306 | ONLINE       | 1      | 0           | 1000            | 0                   | 0       | 0              |         |
+--------------+---------------+------+--------------+--------+-------------+-----------------+---------------------+---------+----------------+---------+
6 rows in set (0.001 sec)

通过模拟的连接也可以看到select语句都连接到172.16.60.211和172.16.60.213进行了。 (模拟时可以稍微间隔一段时间,快速测试可能会连接同一个读节点)
[root@MGR-node3 ~]# mysql -uproxysql -pproxysql -h172.16.60.214 -P6033 -e "select @@hostname"
mysql: [Warning] Using a password on the command line interface can be insecure.
+------------+
| @@hostname |
+------------+
| MGR-node3  |
+------------+
[root@MGR-node3 ~]# mysql -uproxysql -pproxysql -h172.16.60.214 -P6033 -e "select @@hostname"
mysql: [Warning] Using a password on the command line interface can be insecure.
+------------+
| @@hostname |
+------------+
| MGR-node1  |
+------------+
[root@MGR-node3 ~]# mysql -uproxysql -pproxysql -h172.16.60.214 -P6033 -e "select @@hostname"
mysql: [Warning] Using a password on the command line interface can be insecure.
+------------+
| @@hostname |
+------------+
| MGR-node1  |
+------------+

然后再将将172.16.60.211变为可写模式后,mysql_servers也恢复过来了。
[root@MGR-node1 ~]# mysql -p123456
........
mysql> set global read_only=0;
Query OK, 0 rows affected (0.00 sec)

接着观察一下mysql_servers的状态
[root@ProxySQL-node ~]# mysql -uadmin -padmin -h 127.0.0.1 -P6032
.........
MySQL [(none)]> select * from  mysql_servers;
+--------------+---------------+------+--------------+--------+-------------+-----------------+---------------------+---------+----------------+---------+
| hostgroup_id | hostname      | port | status       | weight | compression | max_connections | max_replication_lag | use_ssl | max_latency_ms | comment |
+--------------+---------------+------+--------------+--------+-------------+-----------------+---------------------+---------+----------------+---------+
| 1            | 172.16.60.211 | 3306 | ONLINE       | 1      | 0           | 1000            | 0                   | 0       | 0              |         |
| 1            | 172.16.60.212 | 3306 | OFFLINE_SOFT | 1      | 0           | 1000            | 0                   | 0       | 0              |         |
| 1            | 172.16.60.213 | 3306 | OFFLINE_SOFT | 1      | 0           | 1000            | 0                   | 0       | 0              |         |
| 2            | 172.16.60.211 | 3306 | OFFLINE_SOFT | 1      | 0           | 1000            | 0                   | 0       | 0              |         |
| 2            | 172.16.60.212 | 3306 | ONLINE       | 1      | 0           | 1000            | 0                   | 0       | 0              |         |
| 2            | 172.16.60.213 | 3306 | ONLINE       | 1      | 0           | 1000            | 0                   | 0       | 0              |         |
+--------------+---------------+------+--------------+--------+-------------+-----------------+---------------------+---------+----------------+---------+
6 rows in set (0.000 sec)

经过测试将172.16.60.211节点停止组复制(stop group_replication)或者该节点宕机(mysql服务挂掉)后,mysql_servers表的信息也会正常的切换新的节点。
待172.16.60.211恢复再加入到组复制后,mysql_servers也会正常的将172.16.60.211改成online状态。
5)观察以上配置的ProxySQL集群中两个实例之间(172.16.60.214和271.16.60.220)的数据同步
1) 登录到172.16.60.220实例节点的proxysql管理端口。 会发现上面在172.16.60.214实例节点上配置的mysql规则都同步到自己上面来了。 [root@ProxySQL-node2 ~]# mysql -uadmin -padmin -h127.0.0.1 -P6032 .......... MySQL [(none)]> select * from mysql_servers; +--------------+---------------+------+--------------+--------+-------------+-----------------+---------------------+---------+----------------+---------+ | hostgroup_id | hostname | port | status | weight | compression | max_connections | max_replication_lag | use_ssl | max_latency_ms | comment | +--------------+---------------+------+--------------+--------+-------------+-----------------+---------------------+---------+----------------+---------+ | 1 | 172.16.60.211 | 3306 | OFFLINE_SOFT | 1 | 0 | 1000 | 0 | 0 | 0 | | | 2 | 172.16.60.213 | 3306 | OFFLINE_SOFT | 1 | 0 | 1000 | 0 | 0 | 0 | | | 2 | 172.16.60.212 | 3306 | OFFLINE_SOFT | 1 | 0 | 1000 | 0 | 0 | 0 | | | 2 | 172.16.60.211 | 3306 | OFFLINE_SOFT | 1 | 0 | 1000 | 0 | 0 | 0 | | | 1 | 172.16.60.213 | 3306 | OFFLINE_SOFT | 1 | 0 | 1000 | 0 | 0 | 0 | | | 1 | 172.16.60.212 | 3306 | OFFLINE_SOFT | 1 | 0 | 1000 | 0 | 0 | 0 | | +--------------+---------------+------+--------------+--------+-------------+-----------------+---------------------+---------+----------------+---------+ 6 rows in set (0.000 sec) 2) 由于集群配置里没有scheduler配置,所以这里需要在172.16.60.220节点上手动配置下: proxysql_groupreplication_checker.sh 文件已经提前下载放到了/var/lib/proxysql目录下了 [root@ProxySQL-node2 ~]# mysql -uadmin -padmin -h127.0.0.1 -P6032 .......... MySQL [(none)]> INSERT INTO scheduler(id,interval_ms,filename,arg1,arg2,arg3,arg4, arg5) VALUES (1,'10000','/var/lib/proxysql/proxysql_groupreplication_checker.sh','1','2','1','0','/var/lib/proxysql/proxysql_groupreplication_checker.log'); Query OK, 1 row affected (0.000 sec) MySQL [(none)]> select * from scheduler; +----+--------+-------------+--------------------------------------------------------+------+------+------+------+---------------------------------------------------------+---------+ | id | active | interval_ms | filename | arg1 | arg2 | arg3 | arg4 | arg5 | comment | +----+--------+-------------+--------------------------------------------------------+------+------+------+------+---------------------------------------------------------+---------+ | 1 | 1 | 10000 | /var/lib/proxysql/proxysql_groupreplication_checker.sh | 1 | 2 | 1 | 0 | /var/lib/proxysql/proxysql_groupreplication_checker.log | | +----+--------+-------------+--------------------------------------------------------+------+------+------+------+---------------------------------------------------------+---------+ 1 row in set (0.000 sec) MySQL [(none)]> LOAD SCHEDULER TO RUNTIME; Query OK, 0 rows affected (0.001 sec) MySQL [(none)]> SAVE SCHEDULER TO DISK; Query OK, 0 rows affected (0.099 sec) 这样在第二个实例节点172.16.60.220上也可以实现mysql节点的故障无感应切换了 这样一个简单的"1+1"模式的proxy cluster集群环境就配置好了。在集群中的172.16.60.214、172.16.60.220两个实例节点的任意一个节点上添加 读写分离规则,则配置信息都会被同步到集群中的其他实例节点上!! 3) 比如测试下在集群中第二个实例节点172.16.60.220上添加测试数据 [root@ProxySQL-node2 ~]# mysql -uadmin -padmin -h127.0.0.1 -P6032 ............ ............ #原有数据 MySQL [(none)]> select * from mysql_servers; +--------------+---------------+------+--------------+--------+-------------+-----------------+---------------------+---------+----------------+---------+ | hostgroup_id | hostname | port | status | weight | compression | max_connections | max_replication_lag | use_ssl | max_latency_ms | comment | +--------------+---------------+------+--------------+--------+-------------+-----------------+---------------------+---------+----------------+---------+ | 1 | 172.16.60.211 | 3306 | OFFLINE_SOFT | 1 | 0 | 1000 | 0 | 0 | 0 | | | 2 | 172.16.60.213 | 3306 | OFFLINE_SOFT | 1 | 0 | 1000 | 0 | 0 | 0 | | | 2 | 172.16.60.212 | 3306 | OFFLINE_SOFT | 1 | 0 | 1000 | 0 | 0 | 0 | | | 2 | 172.16.60.211 | 3306 | OFFLINE_SOFT | 1 | 0 | 1000 | 0 | 0 | 0 | | | 1 | 172.16.60.213 | 3306 | OFFLINE_SOFT | 1 | 0 | 1000 | 0 | 0 | 0 | | | 1 | 172.16.60.212 | 3306 | OFFLINE_SOFT | 1 | 0 | 1000 | 0 | 0 | 0 | | +--------------+---------------+------+--------------+--------+-------------+-----------------+---------------------+---------+----------------+---------+ 6 rows in set (0.001 sec) #插入新测试数据 MySQL [(none)]> insert into mysql_servers (hostgroup_id, hostname, port) values(1,'172.16.60.202',3306); Query OK, 1 row affected (0.000 sec) MySQL [(none)]> insert into mysql_servers (hostgroup_id, hostname, port) values(2,'172.16.60.202',3306); Query OK, 1 row affected (0.000 sec) # 持久化,并加载到运行环境中 MySQL [(none)]> save mysql servers to disk; Query OK, 0 rows affected (0.197 sec) MySQL [(none)]> load mysql servers to runtime; Query OK, 0 rows affected (0.006 sec) 4) 然后到另一台节点172.16.60.214上观察数据 [root@ProxySQL-node1 ~]# mysql -uadmin -padmin -h 127.0.0.1 -P6032 ............ ............ MySQL [(none)]> select * from mysql_servers; +--------------+---------------+------+--------------+--------+-------------+-----------------+---------------------+---------+----------------+---------+ | hostgroup_id | hostname | port | status | weight | compression | max_connections | max_replication_lag | use_ssl | max_latency_ms | comment | +--------------+---------------+------+--------------+--------+-------------+-----------------+---------------------+---------+----------------+---------+ | 1 | 172.16.60.211 | 3306 | ONLINE | 1 | 0 | 1000 | 0 | 0 | 0 | | | 2 | 172.16.60.202 | 3306 | OFFLINE_SOFT | 1 | 0 | 1000 | 0 | 0 | 0 | | | 2 | 172.16.60.211 | 3306 | OFFLINE_SOFT | 1 | 0 | 1000 | 0 | 0 | 0 | | | 2 | 172.16.60.212 | 3306 | ONLINE | 1 | 0 | 1000 | 0 | 0 | 0 | | | 2 | 172.16.60.213 | 3306 | ONLINE | 1 | 0 | 1000 | 0 | 0 | 0 | | | 1 | 172.16.60.202 | 3306 | OFFLINE_SOFT | 1 | 0 | 1000 | 0 | 0 | 0 | | | 1 | 172.16.60.212 | 3306 | OFFLINE_SOFT | 1 | 0 | 1000 | 0 | 0 | 0 | | | 1 | 172.16.60.213 | 3306 | OFFLINE_SOFT | 1 | 0 | 1000 | 0 | 0 | 0 | | +--------------+---------------+------+--------------+--------+-------------+-----------------+---------------------+---------+----------------+---------+ 8 rows in set (0.001 sec) MySQL [(none)]> select * from runtime_mysql_servers; +--------------+---------------+------+--------------+--------+-------------+-----------------+---------------------+---------+----------------+---------+ | hostgroup_id | hostname | port | status | weight | compression | max_connections | max_replication_lag | use_ssl | max_latency_ms | comment | +--------------+---------------+------+--------------+--------+-------------+-----------------+---------------------+---------+----------------+---------+ | 1 | 172.16.60.211 | 3306 | ONLINE | 1 | 0 | 1000 | 0 | 0 | 0 | | | 2 | 172.16.60.202 | 3306 | OFFLINE_SOFT | 1 | 0 | 1000 | 0 | 0 | 0 | | | 2 | 172.16.60.213 | 3306 | ONLINE | 1 | 0 | 1000 | 0 | 0 | 0 | | | 2 | 172.16.60.212 | 3306 | ONLINE | 1 | 0 | 1000 | 0 | 0 | 0 | | | 2 | 172.16.60.211 | 3306 | OFFLINE_SOFT | 1 | 0 | 1000 | 0 | 0 | 0 | | | 1 | 172.16.60.202 | 3306 | OFFLINE_SOFT | 1 | 0 | 1000 | 0 | 0 | 0 | | | 1 | 172.16.60.213 | 3306 | OFFLINE_SOFT | 1 | 0 | 1000 | 0 | 0 | 0 | | | 1 | 172.16.60.212 | 3306 | OFFLINE_SOFT | 1 | 0 | 1000 | 0 | 0 | 0 | | +--------------+---------------+------+--------------+--------+-------------+-----------------+---------------------+---------+----------------+---------+ 8 rows in set (0.003 sec) # 可以看到在172.16.60.220节点上新插入的测试数据,已经被更新到172.16.60.214实例中的memory和runtime环境中。 # 注意:数据差异检查是根据runtime进行检查的,只对memory和disk进行更改,并不触发同步操作。 5) 查看172.16.60.214实例节点的ProxySQL日志 [root@ProxySQL-node1 ~]# tail -10000 /var/lib/proxysql/proxysql.log ........... ........... #检测到172.16.60.220实例传来的新配置文件校验值 2019-02-25 15:31:24 [INFO] Cluster: detected a new checksum for mysql_servers from peer 172.16.60.214:6032, version 841, epoch 1551079884, checksum 0x8C28F2C5130ACBAE . Not syncing yet ... #根据传来的配置校验值,版本号,时间戳,与自己的版本进行比较,决定进行同步操作 2019-02-25 15:31:24 [INFO] Cluster: checksum for mysql_servers from peer 172.16.60.214:6032 matches with local checksum 0x8C28F2C5130ACBAE , we won't sync. .......... .......... #从远端获取新的差异配置信息 2019-02-25 15:32:26 [INFO] Cluster: Fetching MySQL Servers from peer 172.16.60.220:6032 completed 2019-02-25 15:32:26 [INFO] Cluster: Fetching checksum for MySQL Servers from peer 172.16.60.220:6032 before proceessing #获取完信息后,本地进行校验,并请求远端校验值进行比较 2019-02-25 15:32:26 [INFO] Cluster: Fetching checksum for MySQL Servers from peer 172.16.60.220:6032 successful. Checksum: 0xC18FFC0511F726C9 ........... ........... #开始写mysql_servers表 2019-02-25 15:32:26 [INFO] Cluster: Writing mysql_servers table 2019-02-25 15:32:26 [INFO] Cluster: Writing mysql_replication_hostgroups table #将刚刚接收并保存到memory的配置加载到runtime环境中 2019-02-25 15:32:47 [INFO] Cluster: Loading to runtime MySQL Servers from peer 172.16.60.220:6032 2019-02-25 15:32:47 [INFO] Cluster: Saving to disk MySQL Servers from peer 172.16.60.220:6032 ........... ........... #先输出之前自己的配置信息 2019-02-25 15:36:13 [INFO] Dumping mysql_servers +--------------+---------------+------+--------+--------+-------------+-----------------+---------------------+---------+----------------+---------+-----------------+ | hostgroup_id | hostname | port | weight | status | compression | max_connections | max_replication_lag | use_ssl | max_latency_ms | comment | mem_pointer | +--------------+---------------+------+--------+--------+-------------+-----------------+---------------------+---------+----------------+---------+-----------------+ | 1 | 172.16.60.211 | 3306 | 1 | 0 | 0 | 1000 | 0 | 0 | 0 | | 139810134116992 | | 2 | 172.16.60.213 | 3306 | 1 | 0 | 0 | 1000 | 0 | 0 | 0 | | 139810134117760 | | 2 | 172.16.60.212 | 3306 | 1 | 0 | 0 | 1000 | 0 | 0 | 0 | | 139810134117632 | | 2 | 172.16.60.211 | 3306 | 1 | 2 | 0 | 1000 | 0 | 0 | 0 | | 139810134117504 | | 1 | 172.16.60.213 | 3306 | 1 | 0 | 0 | 1000 | 0 | 0 | 0 | | 139810134117376 | | 1 | 172.16.60.212 | 3306 | 1 | 0 | 0 | 1000 | 0 | 0 | 0 | | 139810134117248 | +--------------+---------------+------+--------+--------+-------------+-----------------+---------------------+---------+----------------+---------+-----------------+ ................... ................... #再输出一遍更新传来的的配置信息 2019-02-25 15:36:13 [INFO] Dumping mysql_servers_incoming +--------------+---------------+------+--------+--------+-------------+-----------------+---------------------+---------+----------------+---------+ | hostgroup_id | hostname | port | weight | status | compression | max_connections | max_replication_lag | use_ssl | max_latency_ms | comment | +--------------+---------------+------+--------+--------+-------------+-----------------+---------------------+---------+----------------+---------+ | 1 | 172.16.60.211 | 3306 | 1 | 0 | 0 | 1000 | 0 | 0 | 0 | | | 2 | 172.16.60.202 | 3306 | 1 | 2 | 0 | 1000 | 0 | 0 | 0 | | | 2 | 172.16.60.211 | 3306 | 1 | 0 | 0 | 1000 | 0 | 0 | 0 | | | 2 | 172.16.60.212 | 3306 | 1 | 0 | 0 | 1000 | 0 | 0 | 0 | | | 2 | 172.16.60.213 | 3306 | 1 | 0 | 0 | 1000 | 0 | 0 | 0 | | | 1 | 172.16.60.202 | 3306 | 1 | 2 | 0 | 1000 | 0 | 0 | 0 | | | 1 | 172.16.60.212 | 3306 | 1 | 0 | 0 | 1000 | 0 | 0 | 0 | | | 1 | 172.16.60.213 | 3306 | 1 | 0 | 0 | 1000 | 0 | 0 | 0 | | +--------------+---------------+------+--------+--------+-------------+-----------------+---------------------+---------+----------------+---------+ 2019-02-25 15:36:13 [INFO] New mysql_replication_hostgroups table 2019-02-25 15:36:13 [INFO] New mysql_group_replication_hostgroups table 2019-02-25 15:36:13 [INFO] Dumping current MySQL Servers structures for hostgroup ALL HID: 1 , address: 172.16.60.211 , port: 3306 , weight: 1 , status: ONLINE , max_connections: 1000 , max_replication_lag: 0 , use_ssl: 0 , max_latency_ms: 0 , comment: HID: 1 , address: 172.16.60.212 , port: 3306 , weight: 1 , status: ONLINE , max_connections: 1000 , max_replication_lag: 0 , use_ssl: 0 , max_latency_ms: 0 , comment: HID: 1 , address: 172.16.60.213 , port: 3306 , weight: 1 , status: ONLINE , max_connections: 1000 , max_replication_lag: 0 , use_ssl: 0 , max_latency_ms: 0 , comment: HID: 1 , address: 172.16.60.202 , port: 3306 , weight: 1 , status: OFFLINE_SOFT , max_connections: 1000 , max_replication_lag: 0 , use_ssl: 0 , max_latency_ms: 0 , comment: HID: 2 , address: 172.16.60.211 , port: 3306 , weight: 1 , status: ONLINE , max_connections: 1000 , max_replication_lag: 0 , use_ssl: 0 , max_latency_ms: 0 , comment: HID: 2 , address: 172.16.60.212 , port: 3306 , weight: 1 , status: ONLINE , max_connections: 1000 , max_replication_lag: 0 , use_ssl: 0 , max_latency_ms: 0 , comment: HID: 2 , address: 172.16.60.213 , port: 3306 , weight: 1 , status: ONLINE , max_connections: 1000 , max_replication_lag: 0 , use_ssl: 0 , max_latency_ms: 0 , comment: HID: 2 , address: 172.16.60.202 , port: 3306 , weight: 1 , status: OFFLINE_SOFT , max_connections: 1000 , max_replication_lag: 0 , use_ssl: 0 , max_latency_ms: 0 , comment: #最后输出一遍自己更新后的信息 2019-02-25 15:36:13 [INFO] Dumping mysql_servers +--------------+---------------+------+--------+--------+-------------+-----------------+---------------------+---------+----------------+---------+-----------------+ | hostgroup_id | hostname | port | weight | status | compression | max_connections | max_replication_lag | use_ssl | max_latency_ms | comment | mem_pointer | +--------------+---------------+------+--------+--------+-------------+-----------------+---------------------+---------+----------------+---------+-----------------+ | 1 | 172.16.60.211 | 3306 | 1 | 0 | 0 | 1000 | 0 | 0 | 0 | | 139810134116992 | | 2 | 172.16.60.202 | 3306 | 1 | 2 | 0 | 1000 | 0 | 0 | 0 | | 139810132824192 | | 2 | 172.16.60.213 | 3306 | 1 | 0 | 0 | 1000 | 0 | 0 | 0 | | 139810134117760 | | 2 | 172.16.60.212 | 3306 | 1 | 0 | 0 | 1000 | 0 | 0 | 0 | | 139810134117632 | | 2 | 172.16.60.211 | 3306 | 1 | 0 | 0 | 1000 | 0 | 0 | 0 | | 139810134117504 | | 1 | 172.16.60.202 | 3306 | 1 | 2 | 0 | 1000 | 0 | 0 | 0 | | 139810132824320 | | 1 | 172.16.60.213 | 3306 | 1 | 0 | 0 | 1000 | 0 | 0 | 0 | | 139810134117376 | | 1 | 172.16.60.212 | 3306 | 1 | 0 | 0 | 1000 | 0 | 0 | 0 | | 139810134117248 | +--------------+---------------+------+--------+--------+-------------+-----------------+---------------------+---------+----------------+---------+-----------------+ 2019-02-25 15:36:13 [INFO] Cluster: detected a new checksum for mysql_servers from peer 172.16.60.214:6032, version 1031, epoch 1551080173, checksum 0x9715B5645359B3BD . Not syncing yet ... 2019-02-25 15:36:13 [INFO] Cluster: checksum for mysql_servers from peer 172.16.60.214:6032 matches with local checksum 0x9715B5645359B3BD , we won't sync. 6) 由于上面在172.16.60.220实例插入的是测试数据。 这里在172.16.60.214实例上删除这个测试数据,同样也是同步到172.16.60.220实例上 (或是在172.16.60.220节点上删除这个测试数据,也是会同步到另一个节点上) [root@ProxySQL-node1 ~]# mysql -uadmin -padmin -h 127.0.0.1 -P6032 .................. .................. MySQL [(none)]> select * from mysql_servers; +--------------+---------------+------+--------------+--------+-------------+-----------------+---------------------+---------+----------------+---------+ | hostgroup_id | hostname | port | status | weight | compression | max_connections | max_replication_lag | use_ssl | max_latency_ms | comment | +--------------+---------------+------+--------------+--------+-------------+-----------------+---------------------+---------+----------------+---------+ | 1 | 172.16.60.211 | 3306 | OFFLINE_SOFT | 1 | 0 | 1000 | 0 | 0 | 0 | | | 2 | 172.16.60.202 | 3306 | OFFLINE_SOFT | 1 | 0 | 1000 | 0 | 0 | 0 | | | 2 | 172.16.60.211 | 3306 | ONLINE | 1 | 0 | 1000 | 0 | 0 | 0 | | | 2 | 172.16.60.212 | 3306 | OFFLINE_SOFT | 1 | 0 | 1000 | 0 | 0 | 0 | | | 2 | 172.16.60.213 | 3306 | OFFLINE_SOFT | 1 | 0 | 1000 | 0 | 0 | 0 | | | 1 | 172.16.60.202 | 3306 | OFFLINE_SOFT | 1 | 0 | 1000 | 0 | 0 | 0 | | | 1 | 172.16.60.212 | 3306 | ONLINE | 1 | 0 | 1000 | 0 | 0 | 0 | | | 1 | 172.16.60.213 | 3306 | OFFLINE_SOFT | 1 | 0 | 1000 | 0 | 0 | 0 | | +--------------+---------------+------+--------------+--------+-------------+-----------------+---------------------+---------+----------------+---------+ 8 rows in set (0.000 sec) MySQL [(none)]> delete from mysql_servers where hostname="172.16.60.202"; Query OK, 2 rows affected (0.000 sec) MySQL [(none)]> save mysql servers to disk; Query OK, 0 rows affected (0.233 sec) MySQL [(none)]> load mysql servers to runtime; Query OK, 0 rows affected (0.004 sec) 7) 到172.16.60.220实例上查看,发现删除的数据也同步过来了 [root@ProxySQL-node2 ~]# mysql -uadmin -padmin -h127.0.0.1 -P603 ............... ............... MySQL [(none)]> select * from mysql_servers; +--------------+---------------+------+--------------+--------+-------------+-----------------+---------------------+---------+----------------+---------+ | hostgroup_id | hostname | port | status | weight | compression | max_connections | max_replication_lag | use_ssl | max_latency_ms | comment | +--------------+---------------+------+--------------+--------+-------------+-----------------+---------------------+---------+----------------+---------+ | 1 | 172.16.60.211 | 3306 | OFFLINE_SOFT | 1 | 0 | 1000 | 0 | 0 | 0 | | | 2 | 172.16.60.213 | 3306 | OFFLINE_SOFT | 1 | 0 | 1000 | 0 | 0 | 0 | | | 2 | 172.16.60.212 | 3306 | OFFLINE_SOFT | 1 | 0 | 1000 | 0 | 0 | 0 | | | 2 | 172.16.60.211 | 3306 | OFFLINE_SOFT | 1 | 0 | 1000 | 0 | 0 | 0 | | | 1 | 172.16.60.213 | 3306 | OFFLINE_SOFT | 1 | 0 | 1000 | 0 | 0 | 0 | | | 1 | 172.16.60.212 | 3306 | OFFLINE_SOFT | 1 | 0 | 1000 | 0 | 0 | 0 | | +--------------+---------------+------+--------------+--------+-------------+-----------------+---------------------+---------+----------------+---------+ 6 rows in set (0.000 sec) 同样可以查看172.16.60.220实例的proxysql日志 [root@ProxySQL-node2 ~]# tail -f /var/lib/proxysql/proxysql.log ............. ............. ========================================================================================== 注意上面的一个问题: 第二个实例节点172.16.60.220上查看的"status"状态都是"OFFLINE_SOFT"。 查看它的proxysql.log日志: [root@ProxySQL-node2 ~]# tail -f /var/lib/proxysql/proxysql.log|grep -i error|grep -v 172.16.60.214 2019-02-26 00:27:44 MySQL_Monitor.cpp:408:monitor_connect_thread(): [ERROR] Server 172.16.60.211:3306 is returning "Access denied" for monitoring user 2019-02-26 00:27:44 MySQL_Monitor.cpp:408:monitor_connect_thread(): [ERROR] Server 172.16.60.212:3306 is returning "Access denied" for monitoring user 2019-02-26 00:27:44 MySQL_Monitor.cpp:408:monitor_connect_thread(): [ERROR] Server 172.16.60.213:3306 is returning "Access denied" for monitoring user [root@ProxySQL-node2 ~]# mysql -uadmin -padmin -h127.0.0.1 -P603 ............... ............... MySQL [(none)]> SELECT * FROM monitor.mysql_server_connect_log ORDER BY time_start_us DESC LIMIT 10; +---------------+------+------------------+-------------------------+------------------------------------------------------------------------+ | hostname | port | time_start_us | connect_success_time_us | connect_error | +---------------+------+------------------+-------------------------+------------------------------------------------------------------------+ | 172.16.60.213 | 3306 | 1551112664169293 | 0 | Access denied for user 'monitor'@'172.16.60.220' (using password: YES) | | 172.16.60.212 | 3306 | 1551112664161534 | 0 | Access denied for user 'monitor'@'172.16.60.220' (using password: YES) | | 172.16.60.211 | 3306 | 1551112664153844 | 0 | Access denied for user 'monitor'@'172.16.60.220' (using password: YES) | | 172.16.60.213 | 3306 | 1551112604169034 | 0 | Access denied for user 'monitor'@'172.16.60.220' (using password: YES) | | 172.16.60.212 | 3306 | 1551112604161305 | 0 | Access denied for user 'monitor'@'172.16.60.220' (using password: YES) | | 172.16.60.211 | 3306 | 1551112604153591 | 0 | Access denied for user 'monitor'@'172.16.60.220' (using password: YES) | | 172.16.60.213 | 3306 | 1551112544169298 | 0 | Access denied for user 'monitor'@'172.16.60.220' (using password: YES) | | 172.16.60.212 | 3306 | 1551112544161558 | 0 | Access denied for user 'monitor'@'172.16.60.220' (using password: YES) | +---------------+------+------------------+-------------------------+------------------------------------------------------------------------+ 10 rows in set (0.000 sec) 从上面的错误日志上看出是权限的问题,proxysql的monitoring user用户没有足够的权限读取数据。解决办法如下: MySQL [(none)]> select * from global_variables; ......... ......... | mysql-monitor_username | monitor | | mysql-monitor_password | monitor | .......... .......... MySQL [(none)]> select * from MySQL_users; +----------+-------------------------------------------+--------+---------+-------------------+----------------+---------------+------------------------+--------------+---------+----------+-----------------+ | username | password | active | use_ssl | default_hostgroup | default_schema | schema_locked | transaction_persistent | fast_forward | backend | frontend | max_connections | +----------+-------------------------------------------+--------+---------+-------------------+----------------+---------------+------------------------+--------------+---------+----------+-----------------+ | proxysql | *BF27B4C7AAD278126E228AA8427806E870F64F39 | 1 | 0 | 1 | | 0 | 1 | 0 | 0 | 1 | 10000 | | proxysql | *BF27B4C7AAD278126E228AA8427806E870F64F39 | 1 | 0 | 1 | | 0 | 1 | 0 | 1 | 0 | 10000 | +----------+-------------------------------------------+--------+---------+-------------------+----------------+---------------+------------------------+--------------+---------+----------+-----------------+ 2 rows in set (0.000 sec) 原来同步到第二个实例节点172.16.60.220上的proxysql帐号没有生效!! [root@ProxySQL-node2 ~]# mysql -uadmin -padmin -h127.0.0.1 -P603 ............... ............... MySQL [(none)]> UPDATE global_variables SET variable_value='proxysql' where variable_name='mysql-monitor_username'; Query OK, 1 row affected (0.002 sec) MySQL [(none)]> UPDATE global_variables SET variable_value='proxysql' where variable_name='mysql-monitor_password'; Query OK, 1 row affected (0.002 sec) MySQL [(none)]> LOAD MYSQL SERVERS TO RUNTIME; Query OK, 0 rows affected (0.006 sec) MySQL [(none)]> SAVE MYSQL SERVERS TO DISK; Query OK, 0 rows affected (0.418 sec) MySQL [(none)]> select * from global_variables; .......... .......... | mysql-monitor_username | proxysql | | mysql-monitor_password | proxysql | .......... .......... 再次看出172.16.60.220实例节点上的数据状态,发现就会出现"ONLINE"了 [root@ProxySQL-node2 ~]# mysql -uadmin -padmin -h127.0.0.1 -P603 ............... ............... MySQL [(none)]> select * from mysql_servers; +--------------+---------------+------+--------------+--------+-------------+-----------------+---------------------+---------+----------------+---------+ | hostgroup_id | hostname | port | status | weight | compression | max_connections | max_replication_lag | use_ssl | max_latency_ms | comment | +--------------+---------------+------+--------------+--------+-------------+-----------------+---------------------+---------+----------------+---------+ | 1 | 172.16.60.211 | 3306 | ONLINE | 1 | 0 | 1000 | 0 | 0 | 0 | | | 2 | 172.16.60.213 | 3306 | ONLINE | 1 | 0 | 1000 | 0 | 0 | 0 | | | 2 | 172.16.60.212 | 3306 | ONLINE | 1 | 0 | 1000 | 0 | 0 | 0 | | | 2 | 172.16.60.211 | 3306 | OFFLINE_SOFT | 1 | 0 | 1000 | 0 | 0 | 0 | | | 1 | 172.16.60.213 | 3306 | OFFLINE_SOFT | 1 | 0 | 1000 | 0 | 0 | 0 | | | 1 | 172.16.60.212 | 3306 | OFFLINE_SOFT | 1 | 0 | 1000 | 0 | 0 | 0 | | +--------------+---------------+------+--------------+--------+-------------+-----------------+---------------------+---------+----------------+---------+ 8 rows in set (0.000 sec)
以上就实现了简单的ProxySQL Cluster双节点集群环境,两个节点间数据自动同步。最后就可以结合Keepalived,利用VIP资源漂移来实现ProxySQL双节点的无感知故障切换,即对外提供一个统一的vip地址,并且在keepalived.conf文件中配置proxysql服务的监控脚本,当宕机或proxysql服务挂掉时就将vip资源漂移到另一个正常的节点上,从而使proxysql的代理层持续无感应地提供服务。