介绍
不久前,我试图找到一个不错的圆形按钮控件。但是我找不到一个符合我需要的,所以像一个无聊的程序员一样,我决定写我自己的。我“几乎”完成了它,我猜它可以有更多的功能,但它对我的特殊情况有效,所以我决定利用那个传统,即“如果它有效,就不要碰它”。
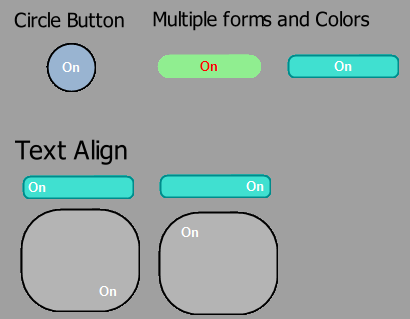
虽然我自己说过,但我觉得这些扣子看起来不错——你得自己判断!
它是如何工作的
我的类“RoundedButton”继承自“System.Windows.Forms”。包含一个新属性列表,用于自定义按钮的外观,并且覆盖了一些方法。
新特性:
- “边框半径”-按钮的边缘有多圆润。
- " -指定边缘的宽度。"
- " -指定边缘的颜色。"
- 属性在鼠标上: “-指定当鼠标在按钮上时边缘的宽度。”“-指定当鼠标在按钮上时边缘的颜色。” 鼠标点击属性: 当按钮触发事件“OnMouseDown”时,指定边缘的颜色
此外,继承属性“BackColor”、“FlatAppearance”。MouseDownBackColor”或FlatAppearance。可用于指定按钮可能状态下的背景颜色。
值得注意的代码部分
有三种方法值得一看:
- 首先“GetRoundPath”: 隐藏,复制CodeGraphicsPath GetRoundPath(矩形矩形,int半径,浮动宽度) 考虑到边缘的厚度为“宽度”,此方法返回一个适合“Rect”的GraphicsPath,该路径具有指定的“半径”。 隐藏,缩小
 ,复制CodeGraphicsPath GetRoundPath(矩形矩形,int半径,浮动宽度) { //修复半径rect大小 radius = (int) Math.Max( (Math.Min(半径, Math.Min(矩形。宽度,矩形高度))-宽度),1); 浮动r2 =半径/ 2f; float w2 = width / 2f; GraphicsPath GraphPath = new GraphicsPath(); / /左上的弧 GraphPath.AddArc(矩形。X + w2, Rect.Y + w2,半径,半径,180,90); / /右上的弧 GraphPath.AddArc(矩形。X +矩形。宽度-半径- w2,矩形。y + w2,半径, 半径、270、90); / /右下角弧 GraphPath.AddArc(矩形。X +矩形。宽度- w2 -半径, 矩形。y +矩形。高度- w2 -半径,半径,半径,0,90); / /左下侧弧 GraphPath.AddArc(矩形。X + w2,矩形y - w2 +矩形高度-半径, 半径、90、90); //关闭线(左) GraphPath.AddLine(矩形。X + w2 = y +高度- r2 - w2 = X + w2,矩形。Y + r2 + w2); 返回GraphPath; } 首先,我使用了GraphicsPath的方法“CloseFigure()”,但其行为远远超出了我的预期。增加边缘厚度的措施是靠近中心的,我不知道原因。
 - 其次,“DrawText”: 隐藏,(Graphics g,RectangleF Rect) 当我试图通过base.OnPaint()绘制背景颜色时,它没有像我预期的那样工作,所以我决定自己绘制背景颜色,但随后我被迫编写这个方法,目的是绘制按钮内的文本。 隐藏,缩小,(Graphics g,RectangleF Rect) { float r2 = BorderRadius / 4f; float w2 = BorderWidth / 2f; Point = new Point(); StringFormat format = new StringFormat(); 开关(TextAlign) { 案例ContentAlignment.TopLeft: 点。X = (int)(矩形。X + r2/2 + w2 + Padding.Left); 点。Y = (int)(矩形。Y + r2/2 + w2 + Padding.Top); 格式。LineAlignment = StringAlignment.Center; 打破; 案例ContentAlignment.TopCenter: 点。X = (int)(矩形。X + Rect.Width / 2 f); 点。Y = (int)(矩形。Y + r2/2 + w2 + Padding.Top); 格式。LineAlignment = StringAlignment.Center; 格式。对齐= StringAlignment.Center; 打破; 案例ContentAlignment.TopRight: 点。X = (int)(矩形。X + Rect.Width - r2/2 - w2 - Padding.Right); 点。Y = (int)(矩形。(Y + r2 / 2 + w2 + Padding.Top); 格式。LineAlignment = StringAlignment.Center; 格式。对齐= StringAlignment.Far; 打破; 案例ContentAlignment.MiddleLeft: 点。X = (int)(矩形。(X + r2 / 2 + w2 + padding .左); 点。Y = (int)(矩形。Y + Rect.Height / 2); 格式。LineAlignment = StringAlignment.Center; 打破; 案例ContentAlignment.MiddleCenter: 点。X = (int)(矩形。X +矩形。宽/ 2); 点。Y = (int)(矩形。Y +矩形. height / 2); 格式。LineAlignment = StringAlignment.Center; 格式。对齐= StringAlignment.Center; 打破; 案例ContentAlignment.MiddleRight: 点。X = (int)(矩形。X + Rect.Width - r2 / 2 - w2 - paddent . right); 点。Y = (int)(矩形。Y +矩形. height / 2); 格式。LineAlignment = StringAlignment.Center; 格式。对齐= StringAlignment.Far; 打破; 案例ContentAlignment.BottomLeft: 点。X = (int)(矩形。(X + r2 / 2 + w2 + padding .左); 点。Y = (int)(矩形。Y + Rect.Height - r2 / 2 - w2 - Padding.Bottom); 格式。LineAlignment = StringAlignment.Center; 打破; 案例ContentAlignment.BottomCenter: 点。X = (int)(矩形。X + Rect.Width / 2); 点。Y = (int)(矩形。Y + Rect.Height - r2 / 2 - w2 - Padding.Bottom); 格式。LineAlignment = StringAlignment.Center; 格式。对齐= StringAlignment.Center; 打破; 案例ContentAlignment.BottomRight: 点。X = (int)(矩形。X + Rect.Width - r2 / 2 - w2 - paddent . right); 点。Y = (int)(矩形。Y + Rect.Height - r2 / 2 - w2 - Padding.Bottom); 格式。LineAlignment = StringAlignment.Center; 格式。对齐= StringAlignment.Far; 打破; 默认值: 打破; } / *调试 使用钢笔钢笔=新钢笔(颜色)。黑色,1)) { g。划线(笔,新点(0,0),点); g。画直线(笔、点。X 0点。X, point.Y); g。画直线(笔,0点。Y,点。X, point.Y); } * / 使用(Brush Brush = new SolidBrush(ForeColor)) g。拉绳(文本、字体、笔刷、点、格式); }
- 最后也是最重要的“OnPaint”是: 此方法被System.Windows.Forms覆盖。按钮,并负责绘制按钮。 隐藏,缩小,Copy Codeprotected override void OnPaint(PaintEventArgs e) { e.Graphics。SmoothingMode = SmoothingMode.HighQuality; RectangleF Rect = new RectangleF(0,0, this)宽度,this.Height); new SolidBrush(this.BackColor); GraphicsPath GraphPath = GetRoundPath(Rect, BorderRadius); 这一点。新建区域(GraphPath); / /画颜色 如果(IsMouseDown,,! FlatAppearance.MouseDownBackColor.IsEmpty) 使用(Brush mouseDownBrush = new SolidBrush(FlatAppearance.MouseDownBackColor)) e.Graphics。FillPath (mouseDownBrush GraphPath); 否则如果(悬停)! FlatAppearance.MouseOverBackColor.IsEmpty) 使用(Brush overBrush = new SolidBrush(FlatAppearance.MouseOverBackColor)) e.Graphics。FillPath (overBrush GraphPath); 其他的 e.Graphics。FillPath(刷,GraphPath); / /画边界 #地区DrawBorder GraphicsPath GraphInnerPath; 钢笔笔; 如果(IsMouseDown,,! BorderDownColor.IsEmpty) { GraphInnerPath = GetRoundPath(Rect, BorderRadius, BorderDownWidth); (BorderDownColor, BorderDownWidth); } 否则如果(悬停)! BorderOverColor.IsEmpty) { GraphInnerPath = GetRoundPath(Rect, BorderRadius, BorderOverWidth); (BorderOverColor, BorderOverWidth); } 其他的 { GraphInnerPath = GetRoundPath(矩形,边界半径,边界宽度); 钢笔=新钢笔(边框颜色,边框宽度); } 钢笔。对齐= PenAlignment.Inset; 如果(pen.Width> 0) e.Graphics。DrawPath(笔,GraphInnerPath); # endregion / /绘制文本 DrawText (e.Graphics矩形); }
如何使用
使用Visual Studio:
- 将“圆形按钮”从工具箱拖放到控件中,在属性面板上对其进行自定义
如果你想通过代码使用它,它和System.Windows中的按钮是一样的。表单,只需使用包含在RoundedButton中的属性来定制它。
本文转载于:http://www.diyabc.com/frontweb/news14662.html