介绍
从CodeProject一开始,我就以各种形式加入了它,并且想要发表一篇文章已经有一段时间了,这是一个很棒的站点,我很高兴我终于可以回馈一些东西了。
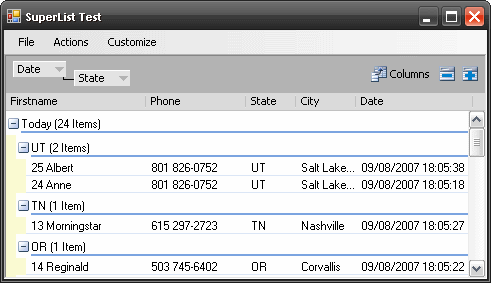
我在开发一个名为FeedGhost的RSS阅读器时构建了Superlist控件。虽然有很多可用的商业分组列表控件,但我希望完全控制代码及其可用性。超级列表支持拖放列定制,分组以及处理数千项顺利。如果你想改变它的外观和感觉,它也是高度可定制的。在本文中,我将解释如何在演示项目中使用和扩展控件。如果您下载了源代码,您可以在Tests/SuperListTest目录下找到演示项目。
背景
在决定开发我自己的列表控件之前,我花了几个星期的时间与标准列表视图进行斗争,试图让它按照我想要的方式工作,但我最终放弃了,因为我不能以分组的视觉顺序获得选中的项目。我们在FeedGhost中需要这个,这样用户多选择的文章将在相应的HTML视图中以相同的顺序显示。
我决定从头开始编写控件,而不是以网格控件为基础。在以前的项目中,我工作过,我看到了网格弯曲和翘曲,以做其创造者的投标,只是一个维护磨石周围的项目脖子后;没有完全按照你想要的方式工作,有大量的补丁代码来获得它。最终,你会得到一堆人们不敢碰的脆弱代码。
我用了两周的时间开发了Superlist,这差不多是我花在Listview工作上的时间,不可否认的是,我花了接下来的两周来修复bug
使用的代码
首先要注意的是,我没有对这个控件进行任何窗体设计器兼容性工作。我倾向于使用设计器来布局控件,然后直接进入代码来完成其余的工作,因此在添加列和配置列等方面没有设计器支持Superlist。要使用控件,你当然需要添加它到一个表单或用户控件,然后在代码中,你将需要创建它的列如下例:
 ,复制代码
,复制代码public SuperListTestForm() { InitializeComponent(); Column surnameColumn = new Column( "surname", "Surname", 120, delegate( object item ) { return ((Person)item).Surname; } ); Column firstnameColumn = new Column( "firstname", "Firstname", 120, delegate( object item ) { return ((Person)item).Firstname; } ); Column phoneColumn = new Column( "phone", "Phone", 100, delegate( object item ) { return ((Person)item).Phone; } ); Column cityColumn = new Column( "city", "City", 60, delegate( object item ) { return ((Person)item).City; } ); Column stateColumn = new Column( "state", "State", 70, delegate( object item ) { return ((Person)item).State; } ); Column dateColumn = new Column( "date", "Date", 110, delegate( object item ) { return ((Person)item).Date.ToString(); } ); dateColumn.GroupItemAccessor = new ColumnItemValueAccessor( GroupValueFromItem ); dateColumn.MoveBehaviour = Column.MoveToGroupBehaviour.Copy; dateColumn.GroupSortOrder = SortOrder.Descending; surnameColumn.SortOrder = SortOrder.Ascending; _superList.Columns.Add( firstnameColumn ); _superList.Columns.Add( phoneColumn ); _superList.Columns.Add( stateColumn ); _superList.Columns.Add( cityColumn ); _superList.Columns.Add( dateColumn ); _superList.Columns.GroupedItems.Add( dateColumn ); _superList.Columns.GroupedItems.Add( stateColumn ); _superList.SelectedItems.DataChanged += new SelectedItemsCollection.DataChangedHandler( SelectedItems_DataChanged ); int tickStart = Environment.TickCount; const int iterationCount = 1; // Change this if you want to increase // the number of items in the list for( int i = 0; i < iterationCount; i++ ) { _superList.Items.AddRange( Person.GetData() ); } }
列对象
列对象是你的大部分工作在获得控制和运行方面,你创建它与以下构造函数:
public Column( string name, string caption, int width,
    ColumnItemValueAccessor columnItemValueAccessor )
name参数用于唯一地标识要序列化的列,等等。参数columnItemValueAccessor是一个你需要提供的委托,用于返回在关联的单元格中呈现的对象(通常是一个字符串):
public delegate object ColumnItemValueAccessor( object rowItem );
一旦定义了列,就可以通过columns属性将它们添加到列表中。
分组
分组就像将列添加到列中一样简单。GroupedItems财产。默认情况下,用于分组的值与在列构造函数中传递的columnItemValueAccessor参数相同。但是,您可以通过向列提供一个新的ColumnItemValueAccessor委托来覆盖它。GroupItemAccessor财产。在我的示例程序中,我覆盖了这个属性来提供分组日期列值‘Today’,‘Yesterday’,‘Last Week’等等。
排序
默认情况下,columnItemValueAccessor参数返回的值必须支持icom寓言,否则在应用排序时将抛出异常。或者,您可以重写列。Comparitor和列。如果您想手动处理比较,可以使用GroupComparitor。您可以通过设置列来设置列的初始排序样式。排序方式属性。还有一个列。GroupSortOrder属性,用于在分组模式下设置组排序。
行为
在过去,我看到的性能瓶颈之一就是应用程序在控件中添加了很多项,导致它在视觉上变慢,因为控件每次添加新项时都会更新自己。这些问题很容易解决,通常需要在添加操作进行时告诉控件禁用呈现。当超级列表在后台处理列表更改时,我们绕过了这些潜在的问题,如果你想让UI直接与更改同步,那么你可以调用ListControl.Items.SynchroniseWithUINow()。默认情况下,后台处理是在应用程序空闲时完成的,您可以通过设置ListControl.Items在单独的线程中更改这一点,从而使部分处理在单独的线程中完成。ProcessingStyle = BinaryComponents.SuperList.ItemLists.ProcessingStyle。线程,这将把处理的排序部分转移到线程中。在设置线程模式时,列对象上的任何属性都可能在单独的线程中调用。
设计
控件的每个可视化方面,如标题、行和单元格都派生自Section, Section在语义上类似于control,但没有后者的资源开销。它具有矩形区域、焦点、鼠标和拖放支持。

section由SectionContainer对象包含,该对象将键盘、鼠标和拖放信息传递给它们。在超列表的情况下,列表控件(不在上面的图中)从SectionContainerControl派生,当列表控件被构造时,它将CustomiseListSection和ListSection添加到它的画布上。CustomiseListSection包含分组列以及用于列表命令的工具条。ListSection包含列表标题、组和行。
定制
列表控件公开属性列表控件。SectionFactory,当用您自己的SectionFactory设置时,您可以覆盖任何列表部分。我们在FeedGhost中使用这个给列表一个光滑的外观(点击图片看大图):

重写section时,您感兴趣的两个主要方法是void section。布局(GraphicsSettings gs, Size maximumSize)和void Section。绘制(GraphicsSettings gs, Rectangle clipRect)。当父部分想要知道你的部分的大小和高度时,将调用布局。要在我的演示中看到一个覆盖行,如果你点击“自定义”菜单项,然后点击“Toggle row Paint Override”,你可以看到行是渐变填充的。代码可以看到下面从演示应用程序表格:
 ,复制代码
,复制代码#region Example of overriding rows /// <spanclass="code-SummaryComment"><summary/></span> /// Storage area for the row override. /// <spanclass="code-SummaryComment"></summary/></span> private RowOverrideExample _rowOverride; private void toggleRowPaintingOverrideToolStripMenuItem_Click( object sender, EventArgs e ) { if( _rowOverride == null ) { // // Start overrride. _rowOverride = new RowOverrideExample( _superList ); } else { // // Clear override. _rowOverride.Dispose(); _rowOverride = null; } } /// <spanclass="code-SummaryComment"><summary/></span> /// Example of overriding rows giving a gradient fill look. /// <spanclass="code-SummaryComment"></summary/></span> private class RowOverrideExample: IDisposable { public RowOverrideExample( BinaryComponents.SuperList.ListControl listControl ) { _oldFactory = listControl.SectionFactory; // store old factory as we // want to leave as we came. _listControl = listControl; // // Replace the current SectionFactory with our override. listControl.SectionFactory = new MySectionFactory(); // _listControl.LayoutSections(); } public void Dispose() { if( _oldFactory != null ) // put things back as they were { _listControl.SectionFactory = _oldFactory; _listControl.LayoutSections(); } } private class MySectionFactory : SectionFactory { public override RowSection CreateRowSection( BinaryComponents.SuperList.ListControl listControl, RowIdentifier rowIdenifier, HeaderSection headerSection, int position ) { return new MyRowSection( listControl, rowIdenifier, headerSection, position ); } } private class MyRowSection : RowSection { public MyRowSection( BinaryComponents.SuperList.ListControl listControl, RowIdentifier rowIdentifier, HeaderSection headerSection, int position ) : base( listControl, rowIdentifier, headerSection, position ) { _position = position; } public override void PaintBackground( Section.GraphicsSettings gs, Rectangle clipRect ) { Color from, to; if( _position % 2 == 0 ) { from = Color.White; to = Color.LightBlue; } else { to = Color.White; from = Color.LightBlue; } using( LinearGradientBrush lgb = new LinearGradientBrush( this.Rectangle, from, to, LinearGradientMode.Horizontal ) ) { gs.Graphics.FillRectangle( lgb, this.Rectangle ); } } public override void Paint( Section.GraphicsSettings gs, Rectangle clipRect ) { base.Paint( gs, clipRect ); } private int _position; } private BinaryComponents.SuperList.ListControl _listControl; private SectionFactory _oldFactory; } #endregion
在定制部分有一个工具条,它是在ToolStripOptionsToolbarSection对象中创建的:
你也可以通过覆盖ToolStripOptionsToolbarSection类并通过你自己的SectionFactory传入你的版本来添加你自己的toolstripitem到它。或者,你可以替换整个区域,如果你想通过OptionsToolbarSection派生;我们在FeedGhost中使用我们自己的带状带代替。
加载和保存状态
Superlist的状态可以用void列表控件保存和加载。SerializeState(先。TextWriter writer)和void列表控件。DeSerializeState(先。TextReader阅读器)分别。
储蓄的例子
using( System.IO.TextWriter textWriter = File.CreateText( ofd.FileName ) )
{
    _superList.SerializeState( textWriter );
}
加载示例
using( System.IO.TextReader textReader = File.OpenText( fileName ) )
{
    _superList.DeSerializeState( textReader );
}
包装起来
我希望你发现这个控制有用,如果你有任何想法,bug或建议,请在这里留言。我还将在这里发布更新,以及在我的公司网站二进制组件。
本文转载于:http://www.diyabc.com/frontweb/news13584.html