一般有三种方式处理旋转时的布局:
1. 使用Interface Builder创建可旋转和调整大小的界面
2. 旋转时调整控件的位置与大小
3. 旋转时切换视图
4个基本的屏幕朝向常量:
UIInterfaceOrientationPortrait -- 纵向(Home键在下)
UIInterfaceOrientationPortraitUpsideDown -- 纵向倒转(Home键在上)
UIInterfaceOrientationLandscapeLeft -- Home键在左边的横向
UIInterfaceOrientationLandscapeRight -- Home键在右边的横向
iPhone默认支持除了纵向倒转(Home键在上)的所有朝向。iPad默认支持所有朝向。
当iOS设备要确定是否应旋转界面时,它向视图控制器发送消息shouldAutorotateToInterfaceOrientation,并提供一个当前旋转朝向的参数。
- (BOOL)shouldAutorotateToInterfaceOrientation:(UIInterfaceOrientation)interfaceOrientation
{
    // Return YES for supported orientations
    return (interfaceOrientation != UIInterfaceOrientationPortraitUpsideDown);
}
上面的代码表示:只要不是纵向倒转(Home键在上)的旋转朝向,都返回YES通过。如果直接return YES,则所有朝向的旋转都通过。
使用Interface Builder创建可旋转和调整大小的界面
主要通过Size inspector下的Origin(原点)与Autosizing(自适应尺寸)来实现

关于Origin的理解参考下图,每个控件都有一个隐式的frame,默认的原点是左上角的圆点(0,0),通过Origin模型可以修改原点位置,修改后将影响控件在父容器中的坐标值。

上图的控件宽度为70,高度为35,坐标为(100,50)。假设我们将原点改为右下角,产生的结果是高宽不变,坐标变为了(100+70, 50+35);而当我们将原点设置为正中间,坐标则为(100+(70/2), 50+(35)/2)。
Autosizing模型标识了控件的停靠与自增长规则,方框外围有上下左右的标尺,假设你只点亮了左边和上边的标尺,则当父容器大小变化时,控件将始终维持原有左边距与上边距;方框里面有两个标尺,分别为水平方向和垂直方向,当你只点亮了水平方向标尺,则当父容器大小变化时,控件将相应增加宽度;反之只点亮垂直方向标尺,则会增加高度。
这种方式主要是依靠Xcode的可视化编程实现,只适用于一些较简单的界面。
旋转时调整控件的位置与大小
每个UI元素都由屏幕上的一个矩形区域定义,这个矩形区域就是UI元素的frame属性。要调整UI元素的大小或位置,可使用Core Graphics中的C语言函数CGRectMake(x, y, width, height)来重新定义frame属性。
- (void)willRotateToInterfaceOrientation:(UIInterfaceOrientation)toInterfaceOrientation duration:(NSTimeInterval)duration
{
    [super willRotateToInterfaceOrientation:toInterfaceOrientation duration:duration];

    if(toInterfaceOrientation == UIInterfaceOrientationLandscapeRight ||
        toInterfaceOrientation == UIInterfaceOrientationLandscapeLeft)
    {
        self.lblMessage.frame = CGRectMake(175.0,140.0,130.0,20.0);
    }
    else
    {
        self.lblMessage.frame = CGRectMake(95.0,250.0,110.0,25.0);
    }
}
旋转时切换视图
可以定义多个UIView,当设备旋转时,当前视图将替换为另一个视图。具体做法是从对象库中拖曳一个UIView实例到文档大纲中,并将它放在与试图控制器同一级的地方,而不要将其放在现有视图中,如图所示:
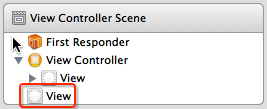
需要注意的是在Interface Builder中,只能编辑被分配给视图控制器的视图,所以如果需要编辑与视图控制器同级的UIView,可以将它先拖到视图控制器下,编辑完后再拖出去。
下面的代码演示了旋转时切换视图的操作方式(假设有两个UIView,输出口分别为portraitView和landscapeView):
- (void)willRotateToInterfaceOrientation:(UIInterfaceOrientation)toInterfaceOrientation duration:(NSTimeInterval)duration
{
    [super willRotateToInterfaceOrientation:toInterfaceOrientation duration:duration];

    if(toInterfaceOrientation==UIInterfaceOrientationLandscapeRight)
    {
        self.view = self.landscapeView;
        self.view.transform = CGAffineTransformMakeRotation(3.1415926/180*90);
        self.view.bounds = CGRectMake(0, 0, 480, 300);
    }
    else if(toInterfaceOrientation==UIInterfaceOrientationLandscapeLeft)
    {
        self.view = self.landscapeView;
        self.view.transform = CGAffineTransformMakeRotation(3.1415926/180*-90);
        self.view.bounds = CGRectMake(0, 0, 480, 300);
    }
    else
    {
        self.view = self.portraitView;
        self.view.transform = CGAffineTransformMakeRotation(0);
        self.view.bounds = CGRectMake(0, 0, 480, 300);
    }
}
每次改变朝向时,都需要执行3个步骤:切换视图--通过属性transform将视图旋转到合适的朝向--通过属性bounds设置视图的原点和大小。
1. 切换视图
设置self.view即可,例如:self.view = self.landscapeView;
2. 设置视图的transform属性
该属性决定了在显示视图前应如何变换,它的定义是:
@property(nonatomic) CGAffineTransform transform; // default is CGAffineTransformIdentity.animatable
可以调用Core Graphics的C语言函数CGAffineTransformMakeRotation来给transform赋值,该函数接受一个以弧度为单位的参数。将角度转换成弧度公式是:π/180*度数,例如顺时针旋转90°,换算成弧度是3.1415926/180*90;逆时针旋转90°,换算成弧度是3.1415926/180*-90。
3. 设置视图的bounds属性
该属性指定了视图变换后的原点和大小。iPhone纵向视图的原点坐标为(0, 0),而宽度和高度分别是320和460(iPad为768和1004);横向视图的原点坐标也是(0,0),但宽度和高度分别为480和300(iPad为1024和748)。与属性frame一样,调用CGRectMake来设置bounds属性,例如:self.view.bounds = CGRectMake(0, 0, 480, 300);