前言:
Thymeleaf 官网:https://www.thymeleaf.org/
Thymeleaf 在Github 的主页:https://github.com/thymeleaf/thymeleaf
前端交给页面,以前开发,需要把他们转成jsp,好处:当查出一些数据转发到JSP页面以后,我可以用jsp轻松实现数据的显示,和交互。jsp支持非常强大 的功能,比如,能写jsp页面
但是,我们现在的这种情况,SpringBoot这个项目首先是以jar的方式,不是war,像第二,我们用的还是嵌入式的Tomcat,所以,他现在默认是不支持jsp的,
因此,springboot推荐使用模板引擎,
什么是模板引擎?
我们其实大家听到很多,其实jsp就是一个模板引擎,还有用的比较多的freemarker,包括SpringBoot给我们推荐的Thymeleaf,模板引擎有非常多,但再多的模板引擎,他们的思想都是一样的。
模板一引擎执行过程:
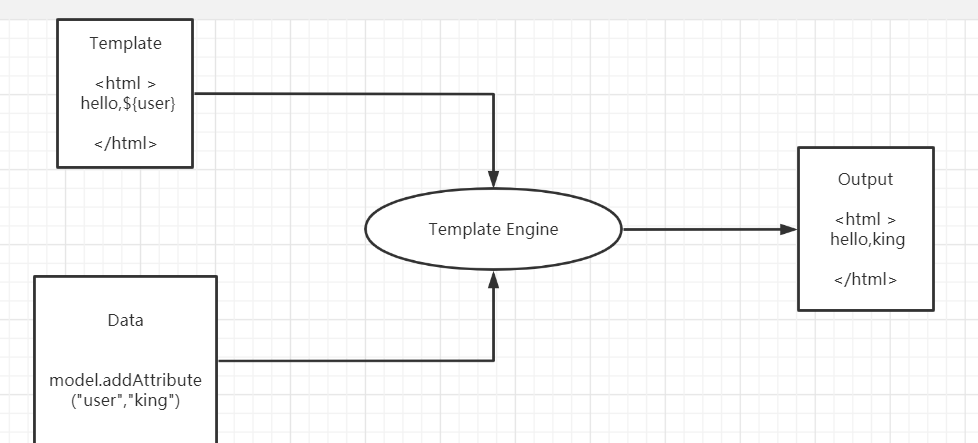
初步使用thymelea模板
starter开启thymelea,(自动装配)
        <dependency>
            <groupId>org.springframework.boot</groupId>
            <artifactId>spring-boot-starter-thymeleaf</artifactId>
        </dependency>
手动diy导入thymeleaf
        <dependency>
            <groupId>org.thymeleaf</groupId>
            <artifactId>thymeleaf-spring5</artifactId>
        </dependency>
        <dependency>
            <groupId>org.thymeleaf.extras</groupId>
            <artifactId>thymeleaf-extras-java8time</artifactId>
        </dependency>
测试
<!DOCTYPE html>
<html lang="en">
<head>
    <meta charset="UTF-8">
    <title>Title</title>
</head>
<body>
<h1>test</h1>
</body>
</html>


============Controller===============
package com.king.Controller;

import org.springframework.stereotype.Controller;
import org.springframework.web.bind.annotation.RequestMapping;

@Controller
public class IndexController {

    @RequestMapping("/test")
    public String test(){
        return "test";
    }
}
小结:
在template目录下的所有页面,只能通过controller来跳转
这个需要模板引擎的支持,thymeleaf,在这个引擎return的字符串会被加上前缀和后缀
找到ThymeleafProperties源文件会发现:
  private String prefix = "classpath:/templates/";
  private String suffix = ".html";
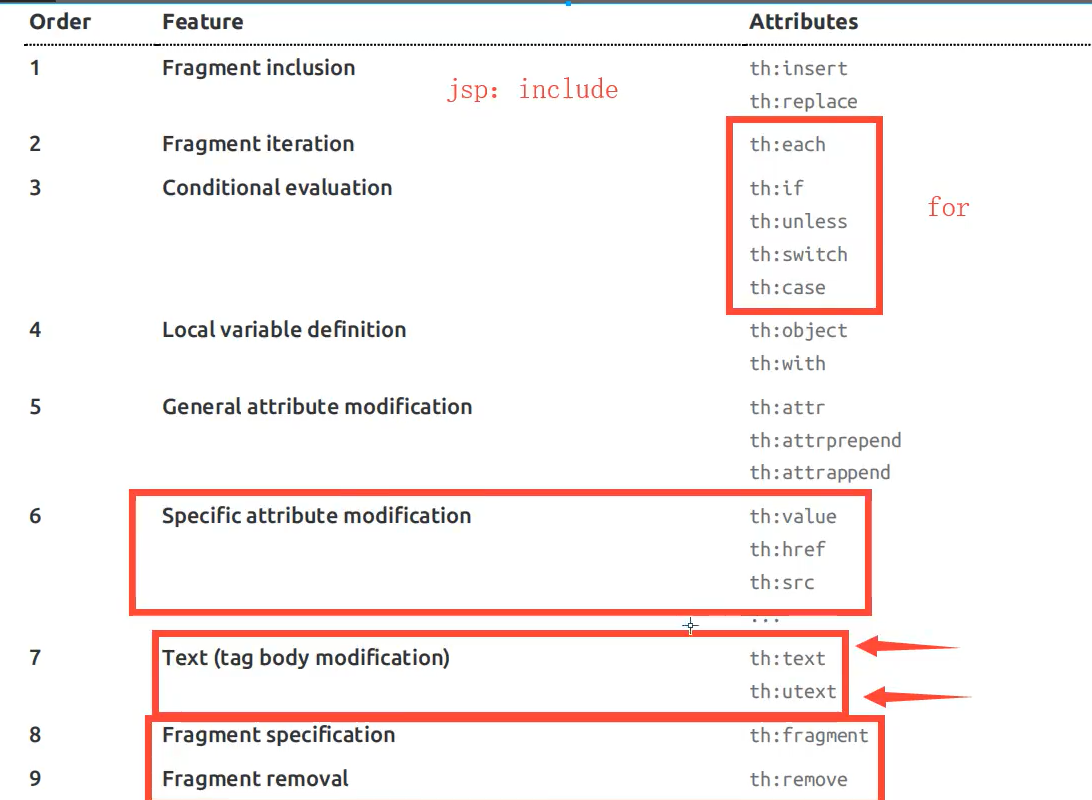
thymeleaf语法
1.首先,来看如何利用thymleaf传参 ,xmlns:th="http://www.thymeleaf.org"
<!DOCTYPE html>
<html lang="en" xmlns:th="http://www.thymeleaf.org">
<head>
    <meta charset="UTF-8">
    <title>Title</title>
</head>
<body>
<h1 th:text="${msg}"></h1>
</body>
</html>


===========Controller=============
@Controller
public class IndexController {

    @RequestMapping("/test")
    public String test(Model model){
        model.addAttribute("msg","hello,test");
        return "test";
    }
}
注意:在使用thymeleaf时用链接作用域:<html lang="en" xmlns:th="http://www.thymeleaf.org">
2,语法
官网:
简单的测试:
<!DOCTYPE html>
<html lang="en" xmlns:th="http://www.thymeleaf.org">
<head>
    <meta charset="UTF-8">
    <title>Title</title>
</head>
<body>
<div th:text="${msg}"></div>
<!--th:utext不转义-->
<div th:utext="${msg}"></div>
<hr>
<!--遍历-->
<div th:each="arr:${arrs}" th:text="${arr}"></div>

</body>
</html>


==========Controller=============

@Controller
public class IndexController {

    @RequestMapping("/test")
    public String test(Model model){
        model.addAttribute("msg","<h1>hello,test</h1>");
        model.addAttribute("arrs", Arrays.asList("king","king2","king3"));
        return "test";
    }
}
这里仅接受如何使用thymeleaf的html如何操作
其他基操请参考官文,那是最准确的
Thymeleaf 官网:https://www.thymeleaf.org/
Thymeleaf 在Github 的主页:https://github.com/thymeleaf/thymeleaf