SpringBoot + RabbitMQ 入门
RabbitMQ 是比较传统的消息中间件,采用 erlang 语言开发,在中小型企业欢迎度较高。
1、流程概述
如果没有RabbitMQ的,请先安装 RabbitMQ。安装完成后访问 http://localhost:15672/,输入账号名和密码,界面如下:
在这个界面,我们可以手动创建虚拟host,创建用户,分配权限,创建交换机,创建队列等等,还有查看队列消息,消费效率,推送效率等等。
1.1、消息流程图
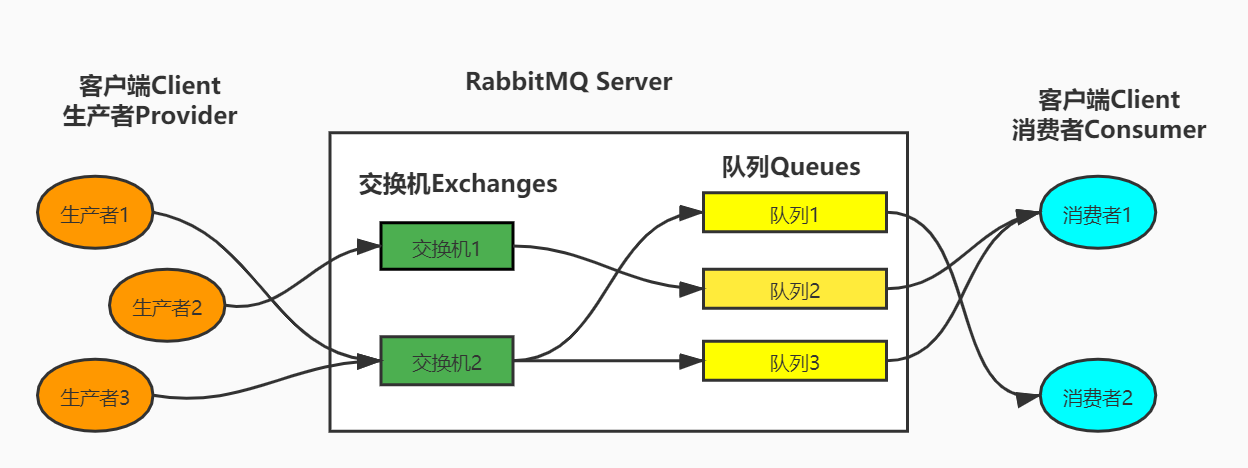
橙色的圈圈就是我们的消息推送服务,将消息推送到 中间方框里面也就是 rabbitMq的服务器,然后经过服务器里面的交换机、队列等各种关系将数据处理入列后,最终右边的蓝色圈圈消费者获取对应监听的消息。
1.2、交换机分类
常用的交换机有以下三种,因为消费者是从队列获取信息的,队列是绑定交换机的(一般),所以对应的消息推送/接收模式也会有以下几种:
Direct Exchange
直连型交换机,根据消息携带的路由键将消息投递给对应队列。
大致流程,有一个队列绑定到一个直连交换机上,同时赋予一个路由键 routing key 。
然后当一个消息携带着路由值为X,这个消息通过生产者发送给交换机时,交换机就会根据这个路由值X去寻找绑定值也是X的队列。
Fanout Exchange
扇型交换机,这个交换机没有路由键概念,就算你绑了路由键也是无视的。 这个交换机在接收到消息后,会直接转发到绑定到它上面的所有队列。
Topic Exchange
主题交换机,这个交换机其实跟直连交换机流程差不多,但是它的特点就是在它的路由键和绑定键之间是有规则的。
简单地介绍下规则:
*(星号) 用来表示一个单词 (必须出现的)
#(井号) 用来表示任意数量(零个或多个)单词
通配的绑定键是跟队列进行绑定的,例如:
队列Q1 绑定键为 *.TT.* 队列Q2绑定键为 TT.#
如果一条消息携带的路由键为 A.TT.B,那么队列Q1将会收到;如果一条消息携带的路由键为TT.AA.BB,那么队列Q2将会收到。
2、Springboot 整合 RabbitMQ
需要创建2个springboot项目,一个 rabbitmq-provider (生产者),一个rabbitmq-consumer(消费者)。
首先创建 rabbitmq-provider。
2.1、创建 rabbitmq-provider
首先 pom.xml 引入依赖:
<!--rabbitmq-->
<dependency>
    <groupId>org.springframework.boot</groupId>
    <artifactId>spring-boot-starter-amqp</artifactId>
</dependency>
接着配置 application.properties
server.port=8081
# 项目名称
spring.application.name=rabbitmq-provider
# 配置rabbitmq
spring.rabbitmq.host=localhost
spring.rabbitmq.port=5672
spring.rabbitmq.username=guest
spring.rabbitmq.password=guest
接着我们先使用 direct exchange(直连型交换机),创建 DirectRabbitConfig.java
import org.springframework.amqp.core.Binding;
import org.springframework.amqp.core.BindingBuilder;
import org.springframework.amqp.core.DirectExchange;
import org.springframework.amqp.core.Queue;
import org.springframework.context.annotation.Bean;
import org.springframework.context.annotation.Configuration;

/**
 * @Description: 直连交换机配置
 */
@Configuration
public class DirectRabbitConfig {

    //队列起名:testDirectQueue
    // durable:是否持久化,默认是false,持久化队列:会被存储在磁盘上,当消息代理重启时仍然存在,暂存队列:当前连接有效
    // exclusive:默认也是false,只能被当前创建的连接使用,而且当连接关闭后队列即被删除。此参考优先级高于durable
    // autoDelete:是否自动删除,当没有生产者或者消费者使用此队列,该队列会自动删除。
    @Bean
    public Queue testDirectQueue() {
        return new Queue("testDirectQueue",true);
    }

    //Direct交换机 起名testDirectExchange
    @Bean
    DirectExchange testDirectExchange() {
        return new DirectExchange("testDirectExchange", true, false);
    }

    //绑定  将队列和交换机绑定, 并设置用于路由键:testDirectRouting
    @Bean
    Binding bindingDirect() {
        return BindingBuilder.bind(testDirectQueue()).to(testDirectExchange()).with("testDirectRouting");
    }

    @Bean
    DirectExchange testConfirmExchange() {
        return new DirectExchange("testConfirmExchange", true, false);
    }
}
以上就配置完了,创建 SendMessageController, 编写简单的测试接口:
import org.springframework.amqp.rabbit.core.RabbitTemplate;
import org.springframework.beans.factory.annotation.Autowired;
import org.springframework.web.bind.annotation.GetMapping;
import org.springframework.web.bind.annotation.RequestMapping;
import org.springframework.web.bind.annotation.RestController;
import java.time.LocalDateTime;
import java.util.HashMap;
import java.util.Map;

@RequestMapping("/lin/provider")
@RestController
public class SendMessageController {

    @Autowired
    private RabbitTemplate rabbitTemplate;

    @GetMapping("/sendMessage")
    public String sendMessage() {
        Map<String, Object> map = new HashMap<>();
        map.put("messageId", "123");
        map.put("messages", "hello, rabbitmq");
        map.put("createTime", LocalDateTime.now().toString());
        rabbitTemplate.convertAndSend("testDirectExchange", "testDirectRouting", map);
        return "success";
    }
}
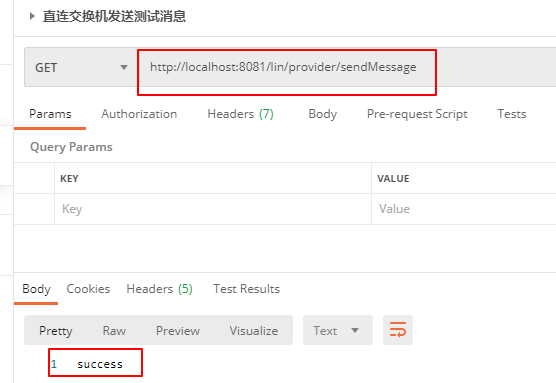
postman 调用 测试接口,如下:
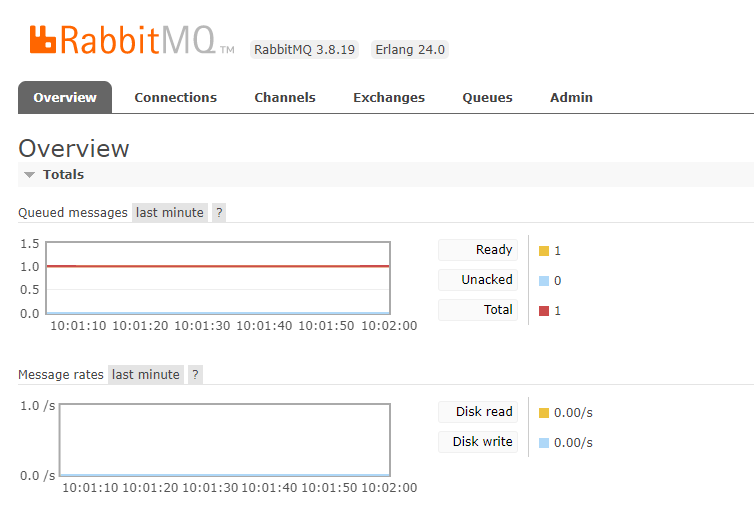
接着我们来看 RabbitMQ Server,可以看到消息已经推送上去了:
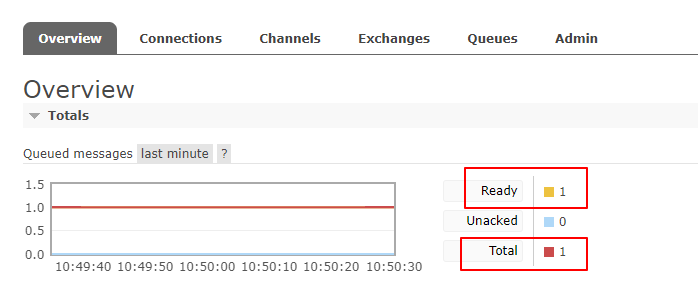
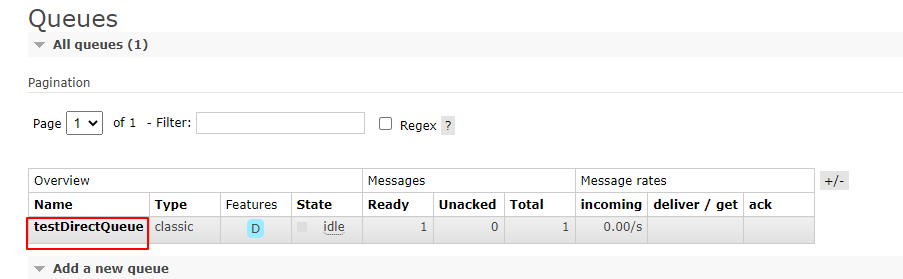
查看队列, 消息已经存在:
到这里,rabbitmq-provider 配置好了,接下来就创建 rabbitmq-consumer:
2.2、创建rabbitmq-consumer
pom.xml 的依赖同 rabbitmq-consumer 一样,application.properties 配置如下:
server.port=8082
# 项目名称
spring.application.name=rabbitmq-consumer
# 配置rabbitmq
spring.rabbitmq.host=localhost
spring.rabbitmq.port=5672
spring.rabbitmq.username=guest
spring.rabbitmq.password=guest
这里的配置可有可无,当然如果想让消费者也是生产者,就必须加上了。
接着创建 DirectReceiver 消息监听类:
import org.springframework.amqp.rabbit.annotation.RabbitHandler;
import org.springframework.amqp.rabbit.annotation.RabbitListener;
import org.springframework.stereotype.Component;

import java.util.Map;

@Component
@RabbitListener(queues = "testDirectQueue")
public class DirectReceiver {

    @RabbitHandler
    public void process(Map<String, Object> message) {
        System.out.println("第一个DirectReceiver消费者收到消息:" + message.toString());
    }
}
启动项目,查看控制台,可以看到消息已经被消费了:

那么直连交换机既然是一对一,那如果咱们配置多台监听绑定到同一个直连交互的同一个队列,会怎么样?
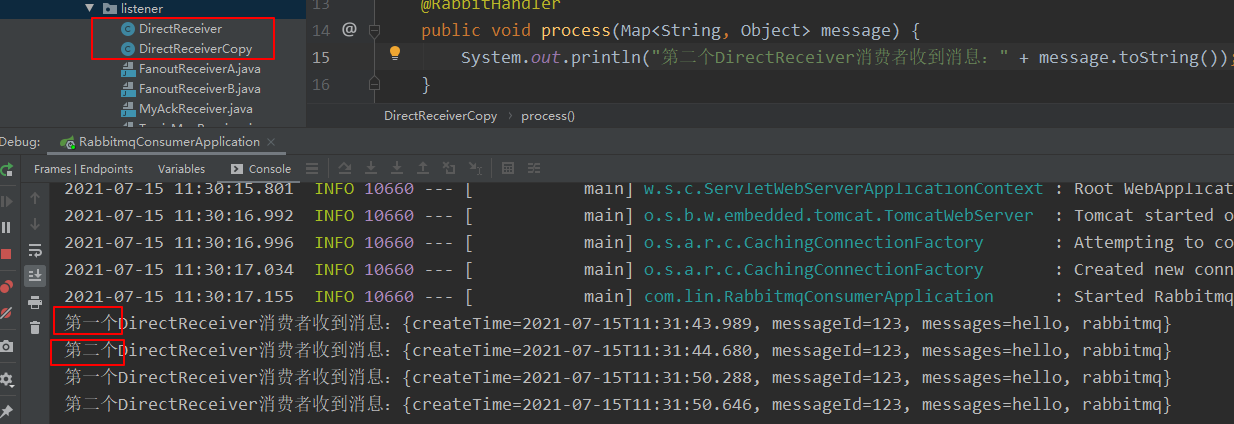
可以看到是实现了轮询的方式对消息进行消费,而且不存在重复消费。
2.3、Topic Exchange 主题交换机
在 rabbitmq-provider 项目里面创建 TopicRabbitConfig.java:
import org.springframework.amqp.core.Binding;
import org.springframework.amqp.core.BindingBuilder;
import org.springframework.amqp.core.Queue;
import org.springframework.amqp.core.TopicExchange;
import org.springframework.context.annotation.Bean;
import org.springframework.context.annotation.Configuration;

/**
 * @Description: 主题交换机配置
 */
@Configuration
public class TopicRabbitConfig {
    //绑定键
    public static final String MAN = "topic.man";
    public static final String WOMAN = "topic.woman";

    @Bean
    public Queue firstQueue() {
        return new Queue(this.MAN);
    }

    @Bean
    public Queue secondQueue() {
        return new Queue(this.WOMAN);
    }


    //只要是消息携带的路由键是topic.man,才会分发到该队列
    @Bean
    TopicExchange topicExchange() {
        return new TopicExchange("topicExchange");
    }

    //只要是消息携带的路由键是topic.man,才会分发到该队列
    @Bean
    Binding bindingExchangeMessage1() {
        return BindingBuilder.bind(firstQueue()).to(topicExchange()).with(this.MAN);
    }

    // 这样只要是消息携带的路由键是以topic.开头,都会分发到该队列
    @Bean
    Binding bindingExchangeMessage2() {
        return BindingBuilder.bind(secondQueue()).to(topicExchange()).with("topic.#");
    }
}
然后添加多2个测试接口,用于推送消息到主题交换机:
@GetMapping("/sendTopicMessage1")
public String sendTopicMessage1() {
    Map<String, Object> map = new HashMap<>();
    map.put("messageId", "123");
    map.put("message", "hello, rabbitmq");
    map.put("createTime", LocalDateTime.now());
    rabbitTemplate.convertAndSend("topicExchange", "topic.man", map);
    return "success";
}

@GetMapping("/sendTopicMessage2")
public String sendTopicMessage2() {
    Map<String, Object> map = new HashMap<>();
    map.put("messageId", "123");
    map.put("message", "hello, rabbitmq");
    map.put("createTime", LocalDateTime.now());
    rabbitTemplate.convertAndSend("topicExchange", "topic.woman", map);
    return "success";
}
生产者配置完毕,接着在 rabbitmq-consumer 消费者这边配置,创建TopicManReceiver 消息监听类:
package com.lin.listener;

import org.springframework.amqp.rabbit.annotation.RabbitHandler;
import org.springframework.amqp.rabbit.annotation.RabbitListener;
import org.springframework.stereotype.Component;

import java.util.Map;

@Component
@RabbitListener(queues = "topic.man")
public class TopicManReceiver {
    @RabbitHandler
    public void process(Map<String, Object> message) {
        System.out.println("TopicManReceiver消费者收到消息:" + message.toString());
    }
}
再创建 TopicTotalReceiver 消息监听类:
import org.springframework.amqp.rabbit.annotation.RabbitHandler;
import org.springframework.amqp.rabbit.annotation.RabbitListener;
import org.springframework.stereotype.Component;

import java.util.Map;

@Component
@RabbitListener(queues = "topic.woman")
public class TopicTotalReceiver {
    @RabbitHandler
    public void process(Map<String, Object> message) {
        System.out.println("TopicWomanReceiver消费者收到消息:" + message.toString());
    }
}
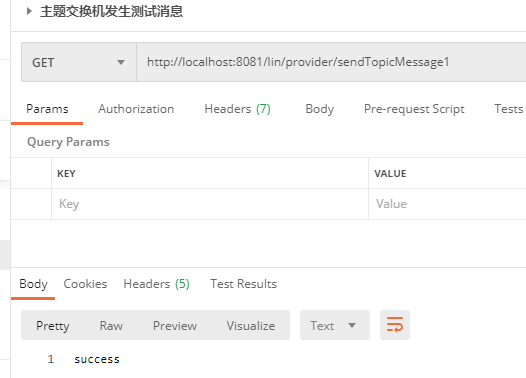
重新启动 rabbitmq-provider,先调用 /sendTopicMessage1 接口:
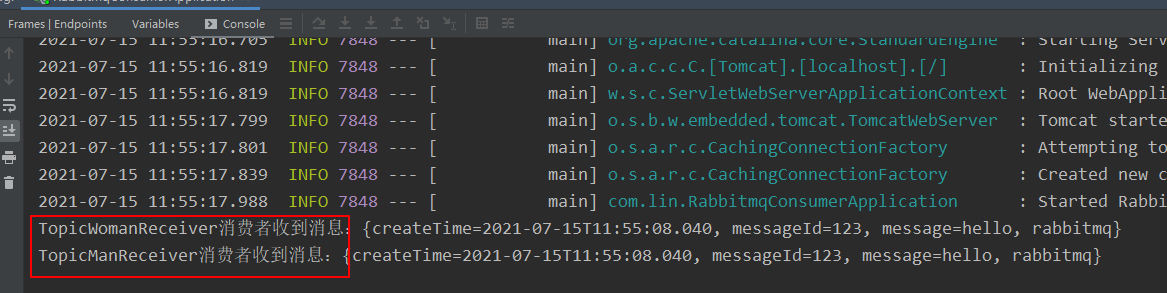
再启动 rabbitmq-consumer,看输出信息:
TopicManReceiver 监听队列1,绑定键为:topic.man;
TopicTotalReceiver 监听队列2,绑定键为:topic.#;
而当前推送的消息,携带的路由键为:topic.man。
所以可以看到两个监听消费者 receiver 都成功消费到了消息,因为这两个 recevier 监听的队列的绑定键都能与这条消息携带的路由键匹配上。
接下来 调用接口/sendTopicMessage2, 然后同样看输出信息:
当前推送的消息,携带的路由键为:topic.woman,而
TopicManReceiver 监听队列1,绑定键为:topic.man;
TopicTotalReceiver 监听队列2,绑定键为:topic.#;
所以可以看到两个监听消费者只有 TopicTotalReceiver 成功消费到了消息。
2.4、Fanout Exchang 扇型交换机
同样的,在 rabbitmq-provider 生产者上创建 FanoutRabbitConfig.java:
import org.springframework.amqp.core.*;
import org.springframework.context.annotation.Bean;
import org.springframework.context.annotation.Configuration;

/**
 * @Description: 扇形交换机配置
 */
@Configuration
public class FanoutRabbitConfig {

    /**
     *  创建三个队列 :fanout.A  fanout.B
     *  将三个队列都绑定在交换机 fanoutExchange 上
     *  因为是扇x交换机, 路由键无需配置,配置也不起作用
     */

    @Bean
    public Queue QueueA() {
        return new Queue("fanout.A");
    }

    @Bean
    public Queue QueueB() {
        return new Queue("fanout.B");
    }

    @Bean
    FanoutExchange fanoutExchange() {
        return new FanoutExchange("fanoutExchange");
    }

    @Bean
    Binding bindingExchangeA() {
        return BindingBuilder.bind(QueueA()).to(fanoutExchange());
    }

    @Bean
    Binding bindingExchangeB() {
        return BindingBuilder.bind(QueueB()).to(fanoutExchange());
    }
}
添加一个测试接口:
@GetMapping("/sendFanoutMessage")
public String sendFanoutMessage() {
    Map<String, Object> map = new HashMap<>();
    map.put("messageId", "123");
    map.put("message", "hello, rabbitmq");
    map.put("createTime", LocalDateTime.now());
    rabbitTemplate.convertAndSend("fanoutExchange", null, map);
    return "success";
}
然后配置 rabbitmq-consumer 消费者,增加两个消息监听类 FanoutReceiverA:
package com.lin.listener;

import org.springframework.amqp.rabbit.annotation.RabbitHandler;
import org.springframework.amqp.rabbit.annotation.RabbitListener;
import org.springframework.stereotype.Component;

import java.util.Map;

@Component
@RabbitListener(queues = "fanout.A")
public class FanoutReceiverA {
    @RabbitHandler
    public void process(Map<String, Object> message) {
        System.out.println("FanoutReceiverA消费者收到消息:" + message.toString());
    }
}
以及 FanoutReceiverB:
package com.lin.listener;

import org.springframework.amqp.rabbit.annotation.RabbitHandler;
import org.springframework.amqp.rabbit.annotation.RabbitListener;
import org.springframework.stereotype.Component;

import java.util.Map;

@Component
@RabbitListener(queues = "fanout.B")
public class FanoutReceiverB {
    @RabbitHandler
    public void process(Map<String, Object> message) {
        System.out.println("FanoutReceiverB消费者收到消息:" + message.toString());
    }
}
同样调用接口,消费者打印出如下消息:

可以看到只要发送到 fanoutExchange 这个扇型交换机的消息, 两个队列都绑定这个交换机,所以两个消息接收类都监听到了这条消息。
2.5、生产者消息确认
消息确认:即生产者推送消息成功,消费者接收消息成功。
下面先对 rabbitmq-provider 生产者进行配置,application.properties 添加配置:
server.port=8081
# 项目名称
spring.application.name=rabbitmq-provider
# 配置rabbitmq
spring.rabbitmq.host=localhost
spring.rabbitmq.port=5672
spring.rabbitmq.username=guest
spring.rabbitmq.password=guest
# 确认消息发送到交换机
spring.rabbitmq.publisher-confirm-type=correlated
# 确认消息发送到队列
spring.rabbitmq.publisher-returns=true
然后是配置相关的消息确认回调函数,RabbitConfig.java:
import org.springframework.amqp.core.ReturnedMessage;
import org.springframework.amqp.rabbit.connection.ConnectionFactory;
import org.springframework.amqp.rabbit.connection.CorrelationData;
import org.springframework.amqp.rabbit.core.RabbitTemplate;
import org.springframework.context.annotation.Bean;
import org.springframework.context.annotation.Configuration;

/**
 * RabbitMQ配置
 */
@Configuration
public class RabbitConfig {

    @Bean
    public RabbitTemplate createRabbitTemplate(ConnectionFactory connectionFactory) {
        RabbitTemplate rabbitTemplate = new RabbitTemplate();
        rabbitTemplate.setConnectionFactory(connectionFactory);
        //开启Mandatory,无论消息推送结果如何都会强制调用回调函数
        rabbitTemplate.setMandatory(true);

        rabbitTemplate.setConfirmCallback(new RabbitTemplate.ConfirmCallback() {
            @Override
            public void confirm(CorrelationData correlationData, boolean b, String s) {
                System.out.println("ConfirmCallback---相关数据:" + correlationData);
                System.out.println("ConfirmCallback---确认情况:" + b);
                System.out.println("ConfirmCallback---原因:" + s);
            }
        });

        rabbitTemplate.setReturnsCallback(new RabbitTemplate.ReturnsCallback() {
            @Override
            public void returnedMessage(ReturnedMessage returnedMessage) {
                System.out.println("ReturnCallback----消息:" + returnedMessage.getMessage());
                System.out.println("ReturnCallback----回应码:" + returnedMessage.getReplyCode());
                System.out.println("ReturnCallback----回应消息:" + returnedMessage.getReplyText());
                System.out.println("ReturnCallback----交换机:" + returnedMessage.getExchange());
                System.out.println("ReturnCallback----路由键:" + returnedMessage.getRoutingKey());
            }
        });
        return rabbitTemplate;
    }
}
到这里,生产者推送消息的消息确认调用回调函数已经完毕。
可以看到上面写了两个回调函数,一个叫 ConfirmCallback ,一个叫 RetrunCallback;
那么以上这两种回调函数都是在什么情况会触发呢?
先从总体的情况分析,推送消息存在四种情况:
- 消息推送到server,但是在server里找不到交换机
- 消息推送到server,找到交换机了,但是没找到队列
- 消息推送到sever,交换机和队列啥都没找到
- 消息推送成功
2.5.1、消息推送到server,但是在server里找不到交换机
写个测试接口,把消息推送到名为 ‘non-existent-exchange’ 的交换机上(这个交换机是没有创建没有配置的):
//交换机不存在的消息确认
@GetMapping("/testMessageConfirm1")
public String testMessageConfirm1() {
    Map<String, Object> map = new HashMap<>();
    map.put("messageId", "123");
    map.put("message", "hello, rabbitmq");
    map.put("createTime", LocalDateTime.now());
    rabbitTemplate.convertAndSend("non-existent-exchange", "testDirectRouting", map);
    return "success";
}
调用接口,查看 rabbitmq-provuder 项目的控制台输出情况:

这种情况触发的是 ConfirmCallback 回调函数。
2.5.2、消息推送到server,找到交换机了,但是没找到队列
这种情况就是需要新增一个交换机,但是不给这个交换机绑定队列,简单地在 DirectRabitConfig 里面新增一个直连交换机,名叫 testConfirmExchange,但没给它做任何绑定配置操作:
@Bean
DirectExchange testConfirmExchange() {
    return new DirectExchange("testConfirmExchange", true, false);
}
添加一个测试接口:
//交换机存在,队列不存在的消息确认
@GetMapping("/testMessageConfirm2")
public String testMessageConfirm2() {
    Map<String, Object> map = new HashMap<>();
    map.put("messageId", "123");
    map.put("message", "hello, rabbitmq");
    map.put("createTime", LocalDateTime.now());
    rabbitTemplate.convertAndSend("testConfirmExchange", "testDirectRouting", map);
    return "success";
}
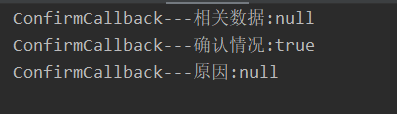
调用接口,查看控制台的输出情况;

可以看到这种情况,两个函数都被调用了;
这种情况下,消息是推送成功到服务器了的,所以 ConfirmCallback 对消息确认情况是 true;
而在 RetrunCallback 回调函数的打印参数里面可以看到,消息是推送到了交换机成功了,但是在路由分发给队列的时候,找不到队列,所以报了错误 NO_ROUTE 。
触发的是 ConfirmCallback 和 RetrunCallback 两个回调函数。
2.5.3、消息推送到sever,交换机和队列啥都没找到
这种情况其实一看就觉得跟①很像,没错 ,③和①情况回调是一致的,所以不做结果说明了。
触发的是 ConfirmCallback 回调函数。
2.5.4、消息推送成功
那么测试下,按照正常调用之前消息推送的接口就行,就调用下 /sendMessage 接口,可以看到控制台输出:
触发的是 ConfirmCallback 回调函数。
2.6、消费者消息确认
消费者默认是自动消息确认的,这里进行手动确认的配置。
在 rabbitmq-consumer 消费者 创建 MessageListenConfig 配置类:
import com.lin.listener.MyAckReceiver;
import org.springframework.amqp.core.AcknowledgeMode;
import org.springframework.amqp.rabbit.connection.CachingConnectionFactory;
import org.springframework.amqp.rabbit.listener.SimpleMessageListenerContainer;
import org.springframework.beans.factory.annotation.Autowired;
import org.springframework.context.annotation.Bean;
import org.springframework.context.annotation.Configuration;

@Configuration
public class MessageListenerConfig {
    @Autowired
    private CachingConnectionFactory connectionFactory;

    @Autowired
    private MyAckReceiver myAckReceiver;

    @Bean
    public SimpleMessageListenerContainer simpleMessageListenerContainer() {
        SimpleMessageListenerContainer container = new SimpleMessageListenerContainer(connectionFactory);
        container.setConcurrentConsumers(1);
        container.setMaxConcurrentConsumers(1);
        //默认是自动确认,改成手动
        container.setAcknowledgeMode(AcknowledgeMode.MANUAL);
        //设置队列,可以同时设置多个
        container.setQueueNames("testDirectQueue");
        //加入消息确认
        container.setMessageListener(myAckReceiver);
        return container;
    }
}
创建消息监听确认类 MyAckReceiver.java,需要实现 ChannelAwareMessageListener。之前的相关监听器可以先注释掉,以免造成多个同类型监听器都监听同一个队列
import com.rabbitmq.client.Channel;
import org.apache.commons.lang3.SerializationUtils;
import org.springframework.amqp.core.Message;
import org.springframework.amqp.rabbit.listener.api.ChannelAwareBatchMessageListener;
import org.springframework.stereotype.Component;
import java.util.List;
import java.util.Map;

/**
 * @Description:消息监听确认
 */
@Component
public class MyAckReceiver implements ChannelAwareBatchMessageListener {
    @Override
    public void onMessage(Message message, Channel channel) throws Exception {
        long deliveryTag = message.getMessageProperties().getDeliveryTag();
        try {
            //反序列化map
            Map<String, String> map = SerializationUtils.deserialize(message.getBody());
            String messageId = map.get("messageId");
            String messages = map.get("messages");
            String createTime = map.get("createTime");
            System.out.println("MyAckReceiver----messageId:" + messageId + "   message:" + messages + "   createTime:" + createTime);
            System.out.println("消费的主题消息来自:" + message.getMessageProperties().getConsumerQueue());
            channel.basicAck(deliveryTag, true); //第二个参数,手动确认可以被批处理,当该参数为 true 时,则可以一次性确认 delivery_tag 小于等于传入值的所有消息
//			channel.basicReject(deliveryTag, true);//第二个参数,true会重新放回队列,所以需要自己根据业务逻辑判断什么时候使用拒绝
        } catch (Exception e) {
            channel.basicReject(deliveryTag, false);
            e.printStackTrace();
        }
    }

    @Override
    public void onMessageBatch(List<Message> list, Channel channel) {
    }
}
这时,先调用接口 /sendMessage, 给直连交换机 testDirectExchange 的队列 testDirectQueue 推送一条消息,可以看到监听器正常消费了下来:

到这里,消息的手动确认就完成了。
根据博客按流程一步步走下来,基本能完成 RabbitMQ 的入门了。