准备工作
1.首先下载NHibernate ,这里我下载的版本是3.1.0;
2.使用VS新建名为“TestNHibernate”的解决方案,并添加Domain类库项目(使用WinForm测试);
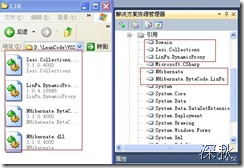
3.在解决方案目录下新建名称为LIB的文件夹,并将压缩包中Required_Bins和Required_For_LazyLoading\LinFu中的dll文件解压到LIB文件夹;
4.将Required_Bins中的两个xsd文件放在"VS路径\xml\Schemas”,以便在编辑映射文件是获得提示;
5.为TestNHibernate引入Iesi.Collections.dll、NHibernate.dll、LinFu.DynamicProxy.dll、NHibernate.ByteCode.LinFu.dll。
编写持久类和配置文件
在Domain项目中添加类Product,代码如下:
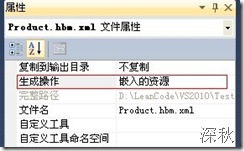
using System; using System.Collections.Generic; using System.Linq; using System.Text; namespace Domain { public class Product { public Guid ID { get; set; } public virtual string Name { get; set; } public virtual string Spec { get; set; } } }virtual关键字是必须地,否则将出现类型为NHibernate.InvalidProxyTypeException的异常。下面就为Product类创建映射文件。然后再该文件夹中新建一个Product.hbm.xml文件:<?xml version="1.0" encoding="utf-8" ?> <hibernate-mapping xmlns="urn:nhibernate-mapping-2.2" assembly="Domain" namespace="Domain"> <class name="Product" table="T_Product"> <id name="ID" column="ID" type="Guid" > <generator class="assigned" /> </id> <property name="Name"/> <property name="Spec" /> </class> </hibernate-mapping>设置Product.hbm.xml文件的生成操作为嵌入式资源。注意:name属性的值是大小写敏感的!
配置NHibernate
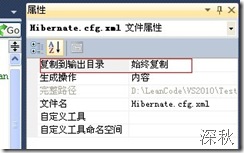
在TestNHibernate项目下新建Hibernate.cfg.xml。找到压缩包Configuration_Templates中的MSSQL.cfg.xml文件,并将里面的内容拷贝到Hibernate.cfg.xml。修改数据库连接参数后如下:<?xml version="1.0" encoding="utf-8"?> <hibernate-configuration xmlns="urn:nhibernate-configuration-2.2" > <session-factory> <property name="connection.driver_class">NHibernate.Driver.SqlClientDriver</property> <property name="connection.connection_string"> Data Source=.;Initial Catalog=nhibernate; Integrated Security=True;Pooling=False </property> <property name="adonet.batch_size">10</property> <property name="show_sql">true</property> <property name="dialect">NHibernate.Dialect.MsSql2000Dialect</property> <property name="use_outer_join">true</property> <property name="command_timeout">10</property> <property name="hbm2ddl.auto">update</property> <property name="query.substitutions">true 1, false 0, yes 'Y', no 'N'</property> <property name="proxyfactory.factory_class">NHibernate.ByteCode.LinFu.ProxyFactoryFactory, NHibernate.ByteCode.LinFu</property> <mapping assembly="Domain"/> </session-factory> </hibernate-configuration>
修改复制到输出目录为始终复制
添加测试代码
在Form1窗体中添加一个类型为ISessionFactory的变量:
private ISessionFactory sessionFactory = null;在窗体Load事件中初始化该变量:var cfg = new Configuration().Configure("hibernate.cfg.xml"); sessionFactory = cfg.BuildSessionFactory();添加一个按钮用于持久话一个Product到数据库中:using (ISession session = sessionFactory.OpenSession()) { Product pt = new Product(); pt.ID = Guid.NewGuid(); pt.Name = "ws"; pt.Spec = "js"; session.Save(pt); session.Flush(); }
启动程序,单击按钮NHibernate将自己创建数据库表。
虽然程序结构不好,但是还是把NHibernate使用起来了,哈哈!!


