Linux Sphinx 安装与使用
一、什么是 Sphinx?
Sphinx 是一个基于SQL的全文检索引擎,可以结合 MySQL,PostgreSQL 做全文搜索,它可以提供比数据库本身更专业的搜索功能,使得应用程序
更容易实现专业化的全文检索。Sphinx 特别为一些脚本语言设计搜索 API 接口,如 PHP,Python,Perl,Ruby 等,同时为 MySQL 也设计了一个存储引擎
插件。
Sphinx 单一索引最大可包含1亿条记录,在 1 千万条记录情况下的查询速度为 0.x 秒(毫秒级)。Sphinx 创建索引的速度为:创建 100万 条记录的
索引只需 3~4 分钟。
二、什么时候使用?
在 MySQL 中当对一个文本类型的字段进行LIKE 并以%开头的查询时,会进行全表扫描。
比如我们商品中有商品 500 万件。如果我们要搜索商品名称中带红色的,如果不用 Sphinx 肯定是这样写:
|
1
|
SELECT * FROM php34_goods WHERE goods_name LIKE '%红色%'; |
这条 SQL 语句会进行全表扫描,所以性能会非常差,查询速度非常慢
三、Sphinx 的使用方式
Sphinx 有两种使用方法:
1.Sphinx 和 MySQL 是两个独立服务器,如下图所示:

使用方法:
(1) PHP 要先把要搜索的短语发送给 Sphinx 服务器,Sphinx 返回的是记录的ID
(2) PHP 再使用 Sphinx 返回的 ID 查询数据库
2.把 Sphinx 集成到 MySQL 里去(没有单独的 Sphinx 服务器),如下图所示:
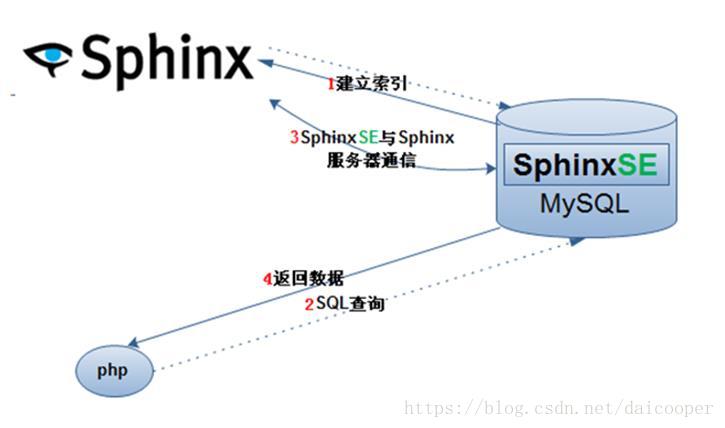
PHP 只需要写一个 SQL 语句,让 MySQL 自己连接 Sphinx 查询,如果要使用这种方式需要在 Linux 下重新编译
MySQL,把 Sphinx 当成插件编译到 MySQL 中去
四、Sphinx 安装
1.通过 wget 方式下载软件包,命令如下:
|
1
|
wget http://sphinxsearch.com/files/sphinx-2.1.6-release.tar.gz |
2.加压该压缩包,命令如下:
|
1
|
tar zxvf sphinx-2.1.6-release.tar.gz |
3.因为使用的是源码包方式安装,需要安装其他支持的相关的类库文件,所以先安装其他类库包文件,命令如下:
|
1
|
yum -y install make gcc g++ gcc-c++ libtool autoconf automake imake mysql-devel libxml2-devel expat-devel |
4.检测一下当前的环境是否满足安装 Sphinx 的要求并指定安装路径,命令如下:
注意:我们先进入解压后的 Sphinx 源码包,再执行下面的这条命令
|
1
|
./configure --prefix=/usr/local/sphinx |
出现下图:
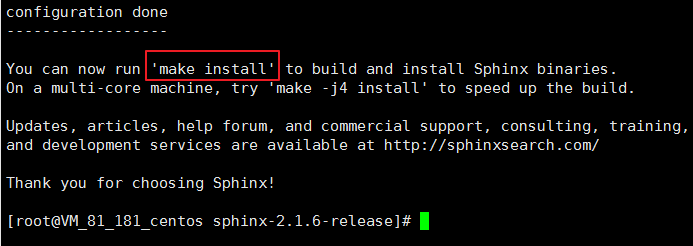
5.使用 make && make install 安装,此时仍然在解压后文件夹中
./configure、make、make install 可以对这三个命令了解下
6.到 /usr/local 目录看下是否有刚才指定的 sphinx 目录
五、使用 Sphinx
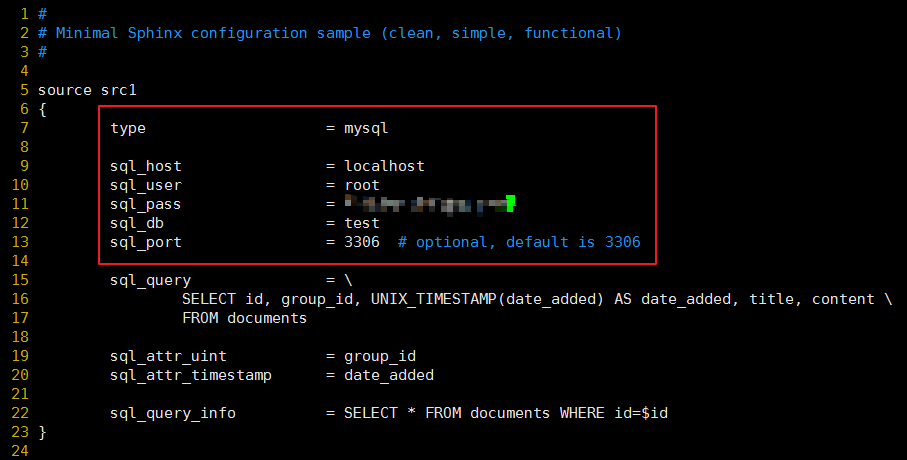
1.编辑配置文件
先进入 sphinx 的 etc 目录
|
1
|
cd /usr/local/sphinx/etc/ |
该目录文件如下图所示:
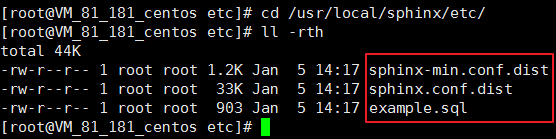
复制默认配置文件,重新创建一个配置文件,sphinx.conf.dist 完整版默认配置一,有很多内容,在这里选择复制的是 sphinx-min.conf.dist 迷你版,
只要满足基本查询即可
|
1
2
|
cp /usr/local/sphinx/etc/sphinx-min.conf.dist /usr/local/sphinx/etc/sphinx.confvim sphinx.con |
Sphinx 的配置文件在配置的时候容易出错,需要先了解一下几个概念:
|
1
2
3
4
5
|
-source:数据源,数据是从什么地方来的-index:索引,当有数据源之后,从数据源处构建索引,索引实际上就是相当于一个字典检索。有了整本字典内容以后,才会有字典检索。 -searchd:提供搜索查询服务,启动 sphinx 服务一般使用 /usr/local/sphinx/bin/searchd -c /usr/local/etc/sphinx.conf-indexer:构建索引,当需要构建索引的时候就调用indexer这个命令:/usr/local/bin/indexer -c /usr/local/etc/sphinx.conf --all --rotate-attr:属性,属性是存在索引中的,它不进行全文索引,但是可以进行过滤和排序 |
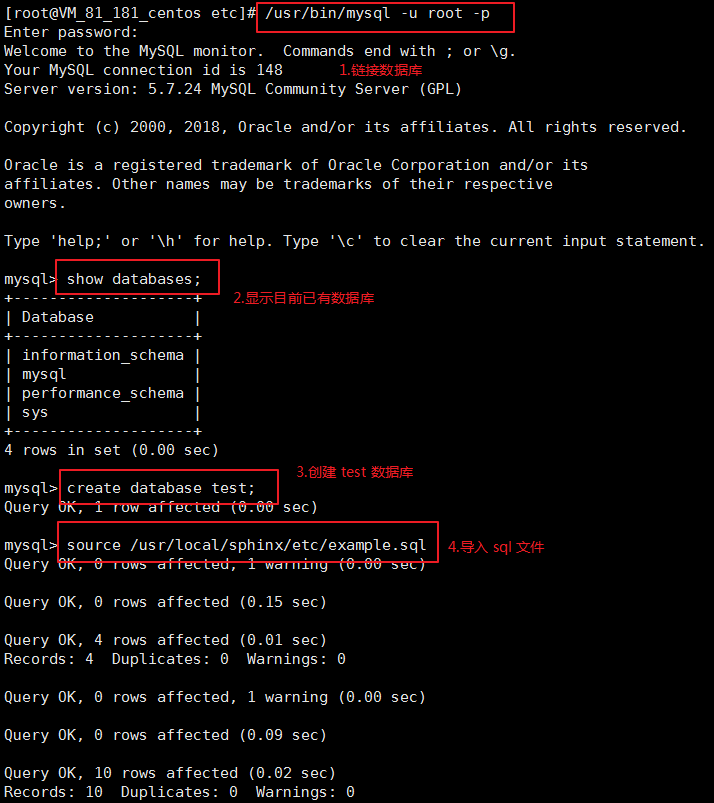
编辑完配置文件之后,创建 test 数据库,并把 /usr/local/sphinx/etc/ 目录下的 example.sql 导入数据库中,如下命令:
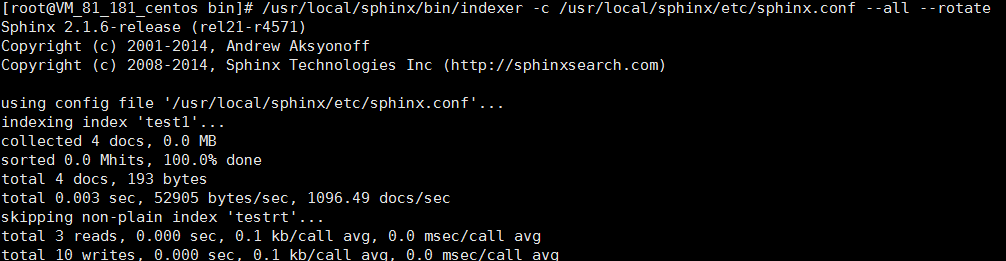
建立 sphinx 的索引文件
|
1
|
/usr/local/sphinx/bin/indexer -c /usr/local/sphinx/etc/sphinx.conf --all --rotate |
如果创建的索引文件比较多而又不需要全部重新生成索引,可以单独生成
|
1
2
|
/usr/local/sphinx/bin/indexer -c /usr/local/sphinx/etc/sphinx.conf test1/usr/local/sphinx/bin/indexer -c /usr/local/sphinx/etc/sphinx.conf testrt |
启动 sphinx 服务
|
1
|
/usr/local/sphinx/bin/searchd -c /usr/local/sphinx/etc/sphinx.conf |

如果以前有运行过这个服务,会报错,可以使用 --stop 参数停止服务
|
1
|
/usr/local/sphinx/bin/searchd -c /usr/local/sphinx/etc/sphinx.conf --stop |
服务端配置完成
六、PHP 安装 sphinx 扩展模块
注意:phpsphinx 模块需要 libsphinxclient 支持,否则会出现错误,所以需要先安装 libsphinxclient
libsphinxclient 文件存在于解压后的源码文件的 api 文件夹内

|
1
2
3
|
cd sphinx-2.1.6-release/api/libsphinxclient/./configure -prefix=/usr/local/sphinx/make && make install |
下载 sphinx , 下载地址:
php7 版本的 sphinx 扩展
https://git.php.net/?p=pecl/search_engine/sphinx.git;a=snapshot;h=339e123acb0ce7beb2d9d4f9094d6f8bcf15fb54;sf=tgz
解压文件
|
1
|
unzip sphinx-339e123.zip |
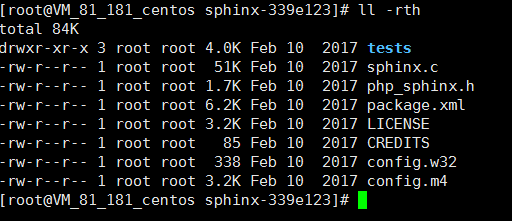
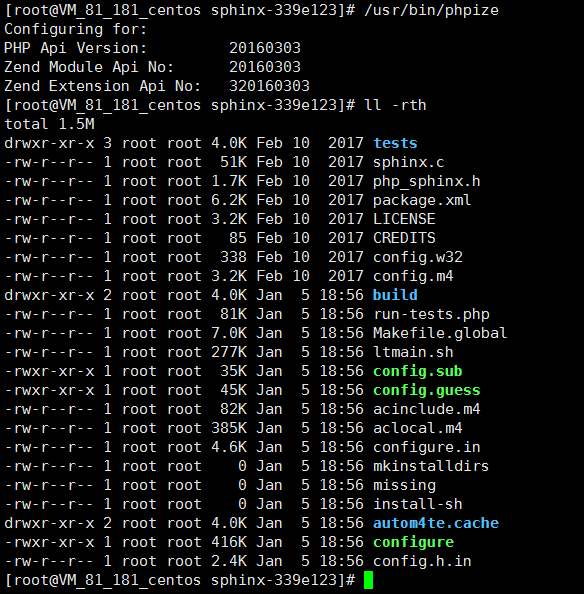
进入扩展模块源码所在文件夹,然后使用 phpize 命令,生成 configure 文件,扩展文件源文件目录如下:
在该目录下运行 phpize ,如果执行 phpize 之后没有生成 configure 文件,说明没有安装 autoconf,需要执行
如下命令:
|
1
|
yum install autoconf |
如果你不知道 phpize 在哪个目录,可以使用 which phpize,如下:

但是在执行这个命令的时候也会出现一些坑,有的可能会出现:
|
1
2
|
Can't find PHP headers in /usr/include/phpThe php-devel packge is required for use of this command |
看字面意思,可能是没有安装 php-devel 这个扩展包。phpize 是用来扩展 php 扩展模块的,通过 phpize 可以建立
php 的外挂模块,phpize 是属于 php-devel 的内容,所以,需要运行 yum install php-devel ,如下:
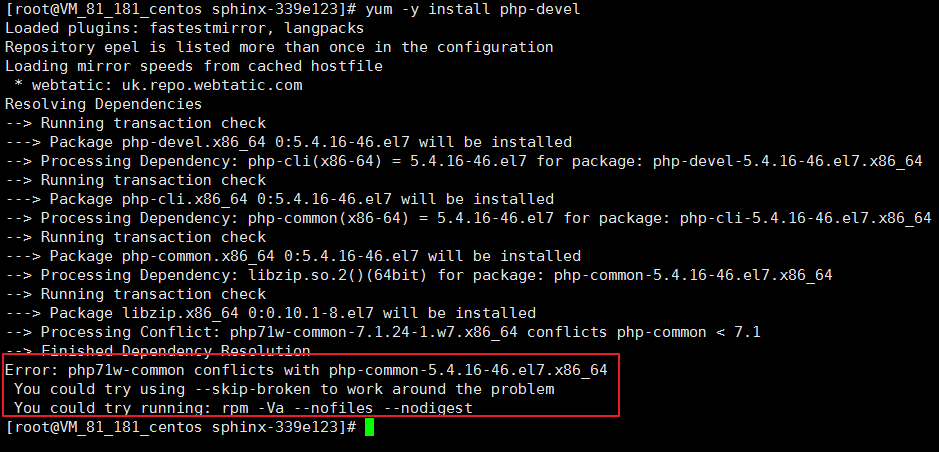
看红框部分说明目前 php 的版本和 phpize 不一致,我们看一下 php-devel 的版本:
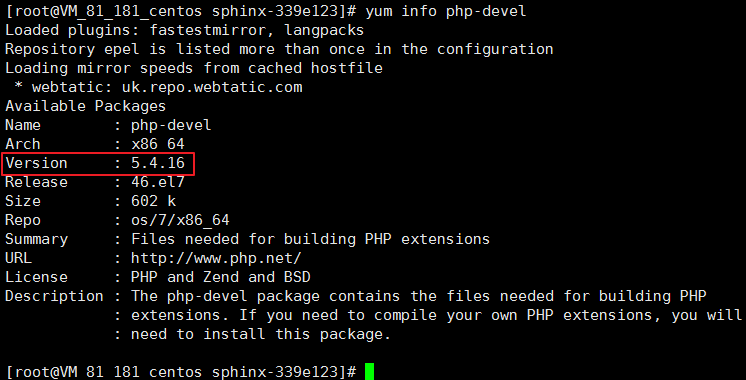
我的 php 版本是 7.1.24 ,需要安装和当前 php 版本一致的 php-devel,运行 yum -y install php71w-devel
在 sphinx-1.3.3 源码包文件夹下运行 /usr/bin/phpize,目录如下:
配置参数
|
1
2
|
./configure --with-php-config=/usr/bin/php-config --with-sphinx=/usr/local/sphinx/make && make install |
到此,扩展模块 sphinx.so 文件生成完成

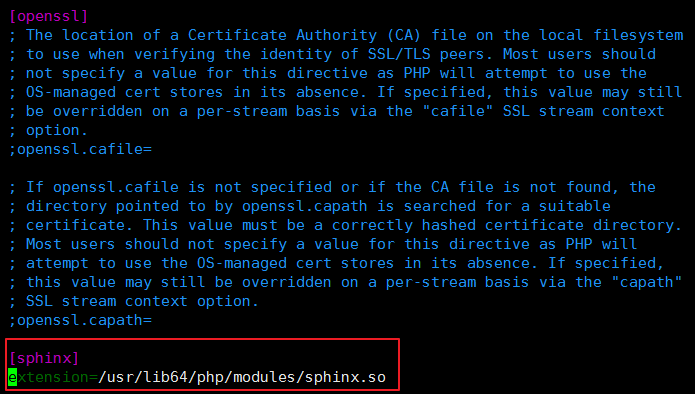
配置 php.ini 文件,加载 sphinx 扩展
|
1
2
|
[sphinx]extension=/usr/lib64/php/modules/sphinx.so |
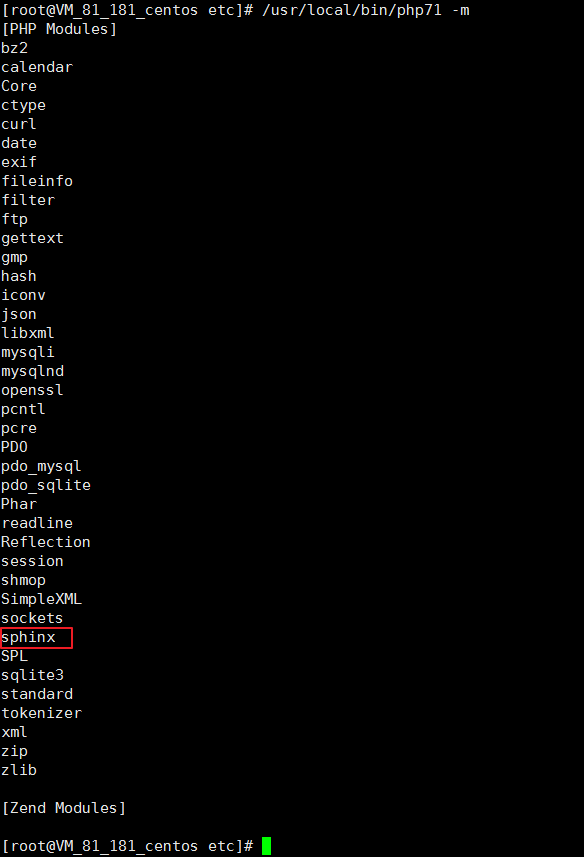
查看 sphinx 模块是否安装成功
重启 apache
编辑文件,查看 phpinfo,验证 sphinx 是否成功安装

七、php 代码测试 sphinx
|
1
2
3
4
5
6
7
8
9
10
11
12
13
14
|
<?php$sphinx = new SphinxClient;$sphinx->setServer("127.0.0.1", 9312);$sphinx->setMatchMode(SPH_MATCH_ANY); $sphinx->SetArrayResult ( true ); $result = $sphinx->query("another","test1"); $err = $sphinx->GetLastError();echo '<pre>';$products = !empty($result['matches'])?$result['matches']:"";print_r($products);if(!empty($err)) { print_r($result);}$result->close(); |
