【Unity Shaders】学习笔记——SurfaceShader(六)混合纹理
转载请注明出处:http://www.cnblogs.com/-867259206/p/5619810.html
写作本系列文章时使用的是Unity5.3。
写代码之前:
-
当然啦,如果Unity都没安装的话肯定不会来学Unity Shaders吧?
-
阅读本系列文章之前你需要有一些编程的概念。
-
在VS里面,Unity Shaders是没有语法高亮显示和智能提示的,VS党可以参考一下这篇文章使代码高亮显示,也可以下载
shaderlabvs或NShader之类的插件使代码高亮显示。 -
这是针对小白的Unity Shaders的基础知识,如果你已经有了基础或者你是大神,那么这些文章不适合你。
-
由于作者水平的局限,文中或许会有谬误之处,恳请指出。
纹理混合就是将几张纹理重合在一起显示。最常见的情形是地形纹理。混合纹理可以优化性能,这样只要渲染一次混合后的纹理即可,而不必渲染多次。
接下来要介绍的就是如何混合纹理制作地形着色器:
先准备几张贴图:


这几张就是要混合图片。
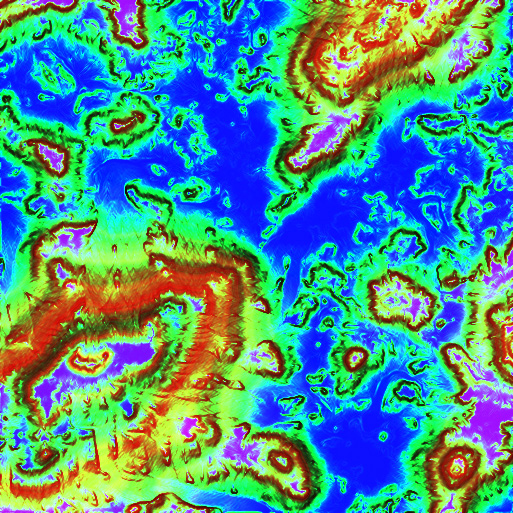
我们还需要下面这张图片,这张图片就决定了图片是如何混合的:
(可以先转到后面看效果)
好了,上代码(我还是直接贴全部吧):
Shader "Custom/Textures" {
Properties {
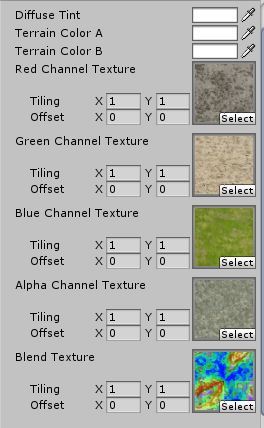
_MainTint ("Diffuse Tint", Color) = (1,1,1,1)
//Add the properties below so we can input all of our textures
_ColorA ("Terrain Color A", Color) = (1,1,1,1)
_ColorB ("Terrain Color B", Color) = (1,1,1,1)
_RTexture ("Red Channel Texture", 2D) = ""{}
_GTexture ("Green Channel Texture", 2D) = ""{}
_BTexture ("Blue Channel Texture", 2D) = ""{}
_ATexture ("Alpha Channel Texture", 2D) = ""{}
_BlendTex ("Blend Texture", 2D) = ""{}
}
SubShader {
Tags { "RenderType"="Opaque" }
LOD 200
CGPROGRAM
#pragma surface surf Lambert
// Important!
#pragma target 4.0
float4 _MainTint;
float4 _ColorA;
float4 _ColorB;
sampler2D _RTexture;
sampler2D _GTexture;
sampler2D _BTexture;
sampler2D _ATexture;
sampler2D _BlendTex;
struct Input {
float2 uv_RTexture;
float2 uv_GTexture;
float2 uv_BTexture;
float2 uv_ATexture;
float2 uv_BlendTex;
};
void surf (Input IN, inout SurfaceOutput o) {
//Get the pixel data from the blend texture
//we need a float 4 here because the texture
//will return R,G,B,and A or X,Y,Z, and W
float4 blendData = tex2D(_BlendTex, IN.uv_BlendTex);
//Get the data from the textures we want to blend
float4 rTexData = tex2D(_RTexture, IN.uv_RTexture);
float4 gTexData = tex2D(_GTexture, IN.uv_GTexture);
float4 bTexData = tex2D(_BTexture, IN.uv_BTexture);
float4 aTexData = tex2D(_ATexture, IN.uv_ATexture);
//No we need to contruct a new RGBA value and add all
//the different blended texture back together
float4 finalColor;
finalColor = lerp(rTexData, gTexData, blendData.g);
finalColor = lerp(finalColor, bTexData, blendData.b);
finalColor = lerp(finalColor, aTexData, blendData.a);
finalColor.a = 1.0;
//Add on our terrain tinting colors
float4 terrainLayers = lerp(_ColorA, _ColorB, blendData.r);
finalColor *= terrainLayers;
finalColor = saturate(finalColor);
o.Albedo = finalColor.rgb * _MainTint.rgb;
o.Alpha = finalColor.a;
}
ENDCG
}
FallBack "Diffuse"
}
-
注意我标注了Important!的那行代码,我们在Input结构体里加入了5个UV坐标,如果没写
#pragma target 4.0,在Input结构体里加入3个以上的UV坐标,会报错Too many texture interpolators would be used for ForwardBase pass。要么就减少Input里面的UV坐标,那么就加上#pragma target 4.0。在这个例子中,几张贴图的纹理坐标是可以共用的,因为它们的Tilling和Offset的一样,坐标是一样的,也可以在后面的代码中使用同一个坐标。不过如果想每张纹理都有自己的UV坐标以便受到更多的控制的话,那就设置目标编译模型为4.0.(不过好像在4.X的版本里加入多个UV坐标不会报错) -
默认你已经看过了前面的文章了,所以大部分代码不需要解释。需要解释的就是lerp函数。lerp就是线性插值。
lerp(a,b,f)返回(1-f)*a+b*f。当f为1的时候,就是b值,当f为0时,就是a值,当f为0.5时,就是0.5a+0.5b,也就是f的值越大,a、b混合的值中b的值越大。 -
明白了lerp函数,颜色混合的那几行代码也就很容易理解了。第一句就是将BlendTexture中的绿色通道当作f值,也就BlendTexture中越绿的地方,gTexture的值越多,表现就是gTexture纹理越明显。剩下的也是同样的道理。
效果
按下面的贴图顺序给纹理赋值:
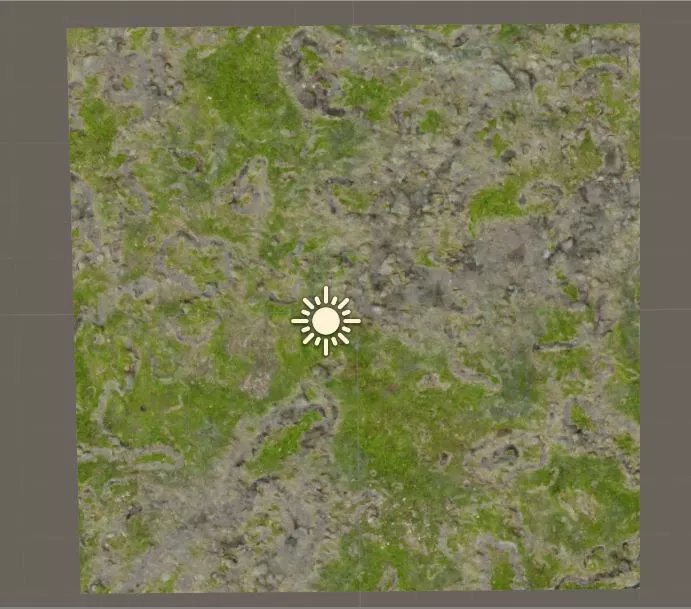
效果是这样的:
当然贴图顺序是可以更换的,那样会得到不同的效果。
我们看到,在BlendTexture中发红的区域,显示的红色通道贴图的石子,发绿的区域显示的是绿色通道的石子加泥土,发蓝的区域则是蓝色通道中的草地,一些带透明的区域显示的则是透明通道中贴图颜色。