客户端代码如下
#include<netdb.h>
#include<errno.h>
#include<sys/socket.h>
#include "apue.h"
#define BUFLEN 128
extern int connet_retry(int,int,int, const struct sockaddr *,socklen_t);
//这个函数就是之前提到的重新连接函数,第一参数domain 第二参数是type,第三个参数是protocol
//这三个参数来重定义 套接字 而后面的地址结构,地址长度用在connect 函数上!
void print_uptime(int sock)//整个函数的意思是从这个sock套接字接收字符并打印到屏幕上!
{ int n;
char buf[BUFLEN];
while( (n=recv(sockfd,buf,BUFLEN,0))>0 )//这里n是接收多少字符意思,每次调用recv接收到0以上字符时就循环!
{ write(STDOUT_FILENO,buf,n);
if( n<0 )err_sys(“recv error”);
}
}
int main(){
struct addrinfo *ailist,*aip;//这是地址结构链表的意思
struct addrinfo hint;//地址结构筛选模板
int sockfd,err
if(argc!=2)err_quit("usage:uptime hostname");
memset(&hint,0,sizeof(hint));//意思是将hint 全部置0先,模板都是先这样的。
hint.ai_socktype=SOCK_STREAM; hint.ai_canonname=NULL; hint.ai_addr=NULL;
hint.ai_next=NULL;
if(err=getaddrinfo(argv[1],"ruptime",&hint,&ailist) != 0 )//这个函数将主机名和服务名一起映射出一个地址链表
err_quit("getaddrinfo error: %s",gai_strerror(err));
for(aip=ailist;aip!=NULL;aip=aip->next){ //然后对地址链表的一个一个地址连接
if(sock=connect_retry(aip->family,SOCK_STREAM,0,aip->ai_addr,aip->addrlen) < 0 )//sock要是返回失败
{err=errno;}else{
print_uptime(sockfd);
exit(0);
}//else
}//地址链表循环完成
err_exit(err,"can't connect to %s",argv[1]);
}
//ps 很可惜是用hostname 和 getaddrinfo函数来获取地址结构的。这样就无法连接远程的服务器。因为远程服务器的地址结构不知道
//在哪输入给客户端。如果希望改一下,就用inet_pton()函数将字符串地址转换成网络二进制形式绑定给sockaddr地址结构
//并去掉地址结构链表循环,连接 绑定好的 sockaddr即可。地址字符串通过 argv[1] 输入!
服务端代码如下:
#include"apue.h"
#include<netdb.h>
#include<errno.h>
#include<syslog.h>
#include<sys/socket.h>
#define BUFLEN 128
#define QLEN 10
#ifndef HOST_NAME_MAX
#define HOST_NAME_MAX
#endif
extern int initserver(int,const struct sockaddr *,socklen_t,int);//第一参数就是套接字
//然后后面的参数就是初始化套接字,并且把服务器地址绑定上去。
void serve(int sockfd){
int clfd; FILE *fp; char buf[BUFLEN];
set_cloexec(sockfd);//这个函数不清楚
for(;;){
if((clfd=accept(sockfd,NULL,NULL) <0 ){//对任何向sockfd 请求连接的套接字 赋值给clfd。
{ syslog(LOG_ERR,"ruptimed:accept error:%s".strerror(errno));
exit(1);
}//所以整个if结构是处理请求连接的套接字
set_cloexec(clfd);
if( (fd=popen("usr/bin/uptime","r")) == NULL){
snprintf(buf,"error: %s ",strerror(errno) );//将错误信息赋给buf
send(clfd,buf,strlen(buf),0);//并且把错误信息发送给来连接的套接字
}//整个if结构处理IO打开读取uptime文件
else{
while(fgets(buf,BUFLEN,fp) != NULL )//不断循环重fp文件描述符读取字符进入buf,每次读取BUFLEN长度
send(clfd,buf,strlen(buf),0);
pclose(fp)l
}//else
close(clfd);
}//for
}//serve
int main(){
struct addrinfo *ailist,*aip;
struct addrinfo hint;
int sockfd,err,n;
char *host;
if(argc != 1){ err_quit("usage: ruptimed "); }//如果有多余的参数
if( (n=sysconf(_SC_HOST_NAME_MAX)) <0 ){ n=HOST_NAME_MAX;}//把主机名的最大值赋给n
if( (host = malloc(n)) == NULL ){ err_sys("malloc error"); }//给host分配空间
if( gethostname(host,n) < 0 )err_sys("gethostname error");//把主机名赋值给host
daemonize("ruptimed");
memset(&hint,0,sizeof(hint) );//把模板hint清零
hint.ai_flags=AI_CANONNAME;//给模板hint 赋值
hint.ai_socktype=SOCK_STREAM;
hint.ai_canonname=NULL;
hint.ai_addr=NULL;
hint.ai_next=NULL;//hint 赋值完毕
if( (err=getaddrinfo(host,“ruptime”,&hint,*ailist)) != 0 ){
syslog(LOG_ERR,"ruptimed: getaddrinfo error :%s", gai_strerror(err) );
exit(1);}//获取 (本主机-ruptime服务) addrinfo失败后 显示错误信息
for(aip=ailist;aip != NULL ;aip=aip->next){
if( (sockfd=initserver(SOCK_STREAM,aip->ai_addr,aip->ai_addrlen,QLEN)) >= 0){
//初始化一个套接字并且让它绑定到本主机的地址上
serve(sockfd);//这个函数就是往听取sockfd 并且往试图连接sockfd 的clfd 写数据
exit(0);
}//if
}//for
exit(1);
}
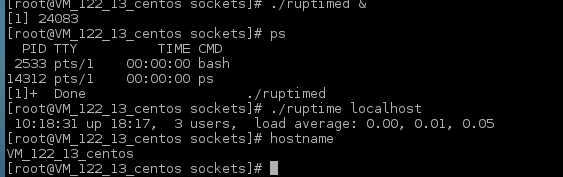
只可惜只能在本地运行!
需要改造一下才能变成真正的远程服务器。并且还可以改造成多线程,无连接的远程ruptime服务器。