element-plus 是一个使用 TypeScript + Composition API 重构的全新项目
- TypeScript 开发
- Composition API 降低耦合,简化逻辑
- Teleport 新特性重构挂载类组件
- Vue 2.0 全局 API 切换为 Vue 3.0 实例API
- 组件库和样式打包
- 使用 Lerna 维护和管理项目
Typescript 相关
1、rollup 插件
配置 eslint 校验规则、插件
定义 tsconfig.json
打包 es-module 格式组件库,用到了一些 rollup 插件
"@rollup/plugin-node-resolve": "^9.0.0", // 打包依赖的 npm 包
"rollup-plugin-terser": "^7.0.2", //  压缩代码
"rollup-plugin-vue": "^6.0.0",  // 打包 vue 文件, css 样式交给了后续会提到的 gulp 来处理
"rollup-plugin-typescript2": "^0.27.3", // 编译 typescript 的,
2、typings/vue-shim.d.ts
编译 typescript,排除了node-modules和测试相关文件,include除了包含组件实现,还包含了 typings/vue-shim.d.ts 文件
插件中使用的 typings/vue-shim.d.ts 类型声明文件( 以 .d.ts 结尾的文件会被自动解析 )
1、定义了一些全局的类型声明,可以直接在 ts 或者 vue 文件中使用这些类型约束变量。
2、还使用扩展模板对 import XX from XX.vue 的引入变量给出类型提示
3、propType
element-plus 中对于 props 的类型声明使用了 vue3 的 propType
Alert 为例, 使用了 PropType 的 props 类型会执行符合我们自定义的规则的构造函数,然后结合 typescript 做类型校验
import { PropType } from 'vue'
export default defineComponent({
  name: 'ElAlert',
  props: {
    type: {
      type: String as PropType<'success' | 'info' | 'error' | 'warning'>,
      default: 'info',
    }
  }
})
Composition API
解决的问题
- 使用传统的option配置方法写组件的时候问题,随着业务复杂度越来越高,代码量会不断的加大;由于相关业务的代码需要遵循option的配置写到特定的区域,导致后续维护非常的复杂,同时代码可复用性不高,而composition-api就是为了解决这个问题而生的
1、setup
setup 函数是 Composition API 的入口函数,我们的变量、方法都是在该函数里定义的
setup 函数有两个参数,分别是 props 、context
- props 存储着定义当前组件允许外界传递过来的参数名称以及对应的值
- context 是一个上下文对象,能从中访问到 attr 、emit 、slots
<template>
  <div id="app">
      <p>{{ number }}</p>
      <button @click="add">增加</button>
  </div>
</template>

<script>
// 1. 从 vue 中引入 ref 函数
import {ref} from 'vue'
export default {
  name: 'App',
  setup() {
      // 2. 用 ref 函数包装一个响应式变量 number
      let number = ref(0)
      // 3. 设定一个方法
      function add() {
          // number是被ref函数包装过了的,其值保存在.value中
          number.value ++
      }
      // 4. 将 number 和 add 返回出去,供template中使用
      return {number, add}
  }

}
</script>
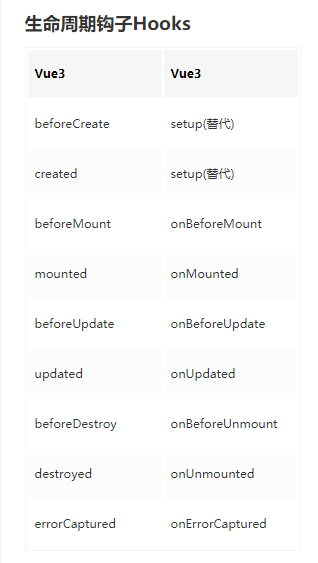
2、生命周期
<template>
  <div id="app"></div>
</template>

<script>
// 1. 从 vue 中引入 多个生命周期函数
import {onBeforeMount, onMounted, onBeforeUpdate, onUpdated, onBeforeUnmount, unMounted} from 'vue'
export default {
  name: 'App',
  setup() {
      onBeforeMount(() => {
          // 在挂载前执行某些代码
      })

      onMounted(() => {
          // 在挂载后执行某些代码
      })

      onBeforeUpdate(() => {
          // 在更新前前执行某些代码
      })

      onUpdated(() => {
          // 在更新后执行某些代码
      })

      onBeforeUnmount(() => {
          // 在组件销毁前执行某些代码
      })

      unMounted(() => {
          // 在组件销毁后执行某些代码
      })

      return {}
  }

}
</script>
3、reactive
reactive 方法是用来创建一个响应式的数据对象
<template>
  <div id="app">
  	<!-- 4. 访问响应式数据对象中的 count  -->
  	{{ state.count }}
  </div>
</template>

<script>
// 1. 从 vue 中导入 reactive
import {reactive} from 'vue'
export default {
  name: 'App',
  setup() {
      // 2. 创建响应式的数据对象
      const state = reactive({count: 3})

      // 3. 将响应式数据对象state return 出去,供template使用
      return {state}
  }
}
</script>
4、ref
ref 函数包装了一个响应式的数据对象,和reactive很像
ref 就是通过 reactive 包装了一个对象 ,然后是将值传给该对象中的 value 属性
简单理解 ref(obj) ---> reactive({value: obj})
<script>
import {ref, reactive} from 'vue'
export default {
  name: 'App',
  setup() {
      const obj = {count: 3}
      const state1 = ref(obj)
      const state2 = reactive(obj)

      console.log(state1.value)
      console.log(state2)
  }

}
</script>
注意:这里指的 .value 是在 setup 函数中访问 ref 包装后的对象时才需要加的,在 template 模板中访问时是不需要的,因为在编译时,会自动识别其是否为 ref 包装过的
建议:
- 基本类型值(String 、Nmuber 、Boolean 等)或单值对象(类似像 {count: 3} 这样只有一个属性值的对象)使用 ref
- 引用类型值(Object 、Array)使用 reactive
5、toRef
toRef 是将某个对象中的某个值转化为响应式数据,其接收两个参数,第一个参数为 obj 对象;第二个参数为对象中的属性名
<script>
// 1. 导入 toRef
import {toRef} from 'vue'
export default {
    setup() {
        const obj = {count: 3}
        // 2. 将 obj 对象中属性count的值转化为响应式数据
        const state = toRef(obj, 'count')

        // 3. 将toRef包装过的数据对象返回供template使用
        return {state}
    }
}
</script>
区别ref:
- ref 是对传入数据的拷贝;toRef 是对传入数据的引用
- ref 的值改变会更新视图;toRef 的值改变不会更新视图
6、toRefs
将传入的对象里所有的属性的值都转化为响应式数据对象,该函数支持一个参数,即 obj 对象
7、shallowReactive
- 浅层的 reactive,原本的 reactive 是深层的,这是一个用于性能优化的API
- 将 obj 作为参数传递给 reactive 生成响应式数据对象时,若 obj 的层级不止一层,那么会将每一层都用 Proxy 包装一次
<script>
import {reactive} from 'vue'
export default {
    setup() {
        const obj = {
            a: 1,
            first: {
                b: 2,
                second: {
                    c: 3
                }
            }
        }

        const state = reactive(obj)

        console.log(state)
        console.log(state.first)
        console.log(state.first.second)
    }
}
</script>
打印结果:

如果一个对象层级比较深,那么每一层都用 Proxy 包装后,对于性能是非常不友好的。
再来看看 shallowReactive
<script>
import {shallowReactive} from 'vue'
export default {
    setup() {
        const obj = {
            a: 1,
            first: {
                b: 2,
                second: {
                    c: 3
                }
            }
        }

        const state = shallowReactive(obj)

        console.log(state)
        console.log(state.first)
        console.log(state.first.second)
    }
}
</script>
打印

只有第一层被 Proxy 处理了,也就是说只有修改第一层的值时,才会响应式更新
8、shallowRef
- 与 shallowReactive 一样是拿来做性能优化的,
- shallowReactive 是监听对象第一层的数据变化用于驱动视图更新
- 那么 shallowRef 则是监听 .value 的值的变化来更新视图的
<template>
	<p>{{ state.a }}</p>
	<p>{{ state.first.b }}</p>
	<p>{{ state.first.second.c }}</p>
	<button @click="change1">改变1</button>
	<button @click="change2">改变2</button>
</template>

<script>
import {shallowRef} from 'vue'
export default {
    setup() {
        const obj = {
            a: 1,
            first: {
                b: 2,
                second: {
                    c: 3
                }
            }
        }

        const state = shallowRef(obj)
        console.log(state);

        function change1() {
            // 直接将state.value重新赋值
            state.value = {
                a: 7,
                first: {
                    b: 8,
                    second: {
                        c: 9
                    }
                }
            }
        }

        function change2() {
            state.value.first.b = 8
            state.value.first.second.c = 9
            console.log(state);
        }

        return {state, change1, change2}
    }
}
</script>
免也太过麻烦了,改个数据还要重新赋值
这个时候使用triggerRef,调用它就可以立马更新视图,其接收一个参数 state ,即需要更新的 ref 对象
<template>
	<p>{{ state.a }}</p>
	<p>{{ state.first.b }}</p>
	<p>{{ state.first.second.c }}</p>
	<button @click="change">改变</button>
</template>

<script>
import {shallowRef, triggerRef} from 'vue'
export default {
    setup() {
        const obj = {
            a: 1,
            first: {
                b: 2,
                second: {
                    c: 3
                }
            }
        }

        const state = shallowRef(obj)
        console.log(state);

        function change() {
            state.value.first.b = 8
            state.value.first.second.c = 9
            // 修改值后立即驱动视图更新
            triggerRef(state)
            console.log(state);
        }

        return {state, change}
    }
}
</script>
9、toRaw
toRaw 方法是用于获取 ref 或 reactive 对象的原始数据的
<template>
	<p>{{ state.name }}</p>
	<p>{{ state.age }}</p>
	<button @click="change">改变</button>
</template>

<script>
import {reactive} from 'vue'
export default {
    setup() {
        const obj = {
            name: '前端印象',
            age: 22
        }

        const state = reactive(obj)

        function change() {
            state.age = 90
            console.log(obj); // 打印原始数据obj
            console.log(state);  // 打印 reactive对象
        }

        return {state, change}
    }
}
</script>
结果:
原始数据 obj 和被 reactive 包装过的对象的值都发生了变化,两者是一个引用关系,
如果直接改变原始数据 obj 的值,会怎么样呢?答案是: reactive 的值也会跟着改变,但是视图不会更新
如果:
当我们想修改数据,但不想让视图更新时,可以选择直接修改原始数据上的值,因此需要先获取到原始数据,我们可以使用 Vue3 提供的 toRaw 方法
toRaw 接收一个参数,即 ref 对象或 reactive 对象
<script>
import {reactive, toRaw} from 'vue'
export default {
    setup() {
        const obj = {
            name: '前端印象',
            age: 22
        }

        const state = reactive(obj)
        const raw = toRaw(state)

        console.log(obj === raw)   // true
    }
}
</script>
可以很方便的通过修改原始数据的值而不更新视图来做一些性能优化了
10、markRaw
markRaw 方法可以将原始数据标记为非响应式的,即使用 ref 或 reactive 将其包装,仍无法实现数据响应式,其接收一个参数,即原始数据,并返回被标记后的数据
<template>
	<p>{{ state.name }}</p>
	<p>{{ state.age }}</p>
	<button @click="change">改变</button>
</template>

<script>
import {reactive, markRaw} from 'vue'
export default {
    setup() {
        const obj = {
            name: '前端印象',
            age: 22
        }
        // 通过markRaw标记原始数据obj, 使其数据更新不再被追踪
        const raw = markRaw(obj)
        // 试图用reactive包装raw, 使其变成响应式数据
        const state = reactive(raw)

        function change() {
            state.age = 90
            console.log(state);
        }

        return {state, change}
    }
}
</script>
11、provide && inject
provide 和 inject 主要为高阶插件/组件库提供用例
以允许一个祖先组件向其所有子孙后代注入一个依赖,不论组件层次有多深
两个方法的作用:
- provide :向子组件以及子孙组件传递数据。接收两个参数,第一个参数是 key,即数据的名称;第二个参数为 value,即数据的值
- inject :接收父组件或祖先组件传递过来的数据。接收一个参数 key,即父组件或祖先组件传递的数据名称
假设这有三个组件,分别是 A.vue 、B.vue 、C.vue,其中 B.vue 是 A.vue 的子组件,C.vue 是 B.vue 的子组件
// A.vue
<script>
import {provide} from 'vue'
export default {
    setup() {
        const obj= {
            name: '前端印象',
            age: 22
        }

        // 向子组件以及子孙组件传递名为info的数据
        provide('info', obj)
    }
}
</script>

// B.vue
<script>
import {inject} from 'vue'
export default {
    setup() {
        // 接收A.vue传递过来的数据
        inject('info')  // {name: '前端印象', age: 22}
    }
}
</script>

// C.vue
<script>
import {inject} from 'vue'
export default {
    setup() {
        // 接收A.vue传递过来的数据
        inject('info')  // {name: '前端印象', age: 22}
    }
}
</script>
12、watch && watchEffect
watch 和 watchEffect 都是用来监视某项数据变化从而执行指定的操作的,但用法上还是有所区别
watch:watch( source, cb, [options] )
参数说明:
- source:可以是表达式或函数,用于指定监听的依赖对象
- cb:依赖对象变化后执行的回调函数
- options:可参数,可以配置的属性有 immediate(立即触发回调函数)、deep(深度监听)
<script>
import {ref, watch} from 'vue'
export default {
    setup() {
        const state1 = ref(0)
				const state2 = reactive({count: 0})
        const state3 = reactive({ count: 0, name: 'zs' })

        // 监听ref类型时
        watch(state1, (newValue, oldValue) => {
            console.log(`原值为${oldValue}`)
            console.log(`新值为${newValue}`)
            /* 1秒后打印结果:
                            原值为0
                            新值为1
            */
        })

      // 监听reactive类型时
        watch(() => state2.count, (newValue, oldValue) => {
            console.log(`原值为${oldValue}`)
            console.log(`新值为${newValue}`)
            /* 1秒后打印结果:
                            原值为0
                            新值为1
            */
        })

      // 同时监听多个值时
       watch(
            [() => state3.count, () => state3.name],
            ([newCount, newName], [oldvCount, oldvName]) => {
                console.log(oldvCount) // 旧的 count 值
                console.log(newCount) // 新的 count 值
                console.log(oldName) // 旧的 name 值
                console.log(newvName) // 新的 name 值
            }
        )


        // 1秒后将state值+1
        setTimeout(() => {
            state1.value ++
            state2.count ++
           	state3.count ++
          	state3.name = 'ls'
        }, 1000)
    }
}
</script>

 const state = reactive({count: 0})

        watch(() => state.count, (newValue, oldValue) => {
            console.log(`原值为${oldValue}`)
            console.log(`新值为${newValue}`)
            /* 1秒后打印结果:
                            原值为0
                            新值为1
            */
        })
1、想让其初始化时就先执行一遍,可以在第三个参数对象中设置:immediate: true
2、watch 方法默认是浅层的监听我们指定的数据,如果监听的数据有多层嵌套,深层的数据变化不会触发监听的回调,对深层数据也进行监听,第三个参数对象中设置** deep: true**
3、watch方法会返回一个stop方法,若想要停止监听,便可直接执行该stop函数
watchEffect
watch 的区别主要有以下几点:
- 不需要手动传入依赖
- 每次初始化时会执行一次回调函数来自动获取依赖
- 无法获取到原值,只能得到变化后的值
<script>
import {reactive, watchEffect} from 'vue'
export default {
    setup() {
        const state = reactive({ count: 0, name: 'zs' })

        watchEffect(() => {
            console.log(state.count)
            console.log(state.name)
            /*  初始化时打印:
                            0
                            zs

                1秒后打印:
                            1
                            ls
            */
        })

        setTimeout(() => {
          state.count ++
          state.name = 'ls'
        }, 1000)
    }
}
</script>
当组件初始化时,将该回调函数执行一次,自动获取到需要检测的数据是 state.count 和 state.name
13、getCurrentInstance
Vue2的任何一个组件中想要获取当前组件的实例可以通过 this 来得到
Vue3使用getCurrentInstance
<template>
	<p>{{ num }}</p>
</template>
<script>
import {ref, getCurrentInstance} from 'vue'
export default {
    setup() {
        const num = ref(3)
        const instance = getCurrentInstance()
        console.log(instance)

        return {num}
    }
}
</script>


14、useStore
Vue2中使用 Vuex,我们都是通过 this.$store 来与获取到Vuex实例
Vue3使用useStore获取到Vuex实例
// store 文件夹下的 index.js
import Vuex from 'vuex'

const store = Vuex.createStore({
    state: {
        name: '前端印象',
        age: 22
    },
    mutations: {
        ……
    },
    ……
})

// example.vue
<script>
// 从 vuex 中导入 useStore 方法
import {useStore} from 'vuex'
export default {
    setup() {
        // 获取 vuex 实例
        const store = useStore()

        console.log(store)
    }
}
</script>

15、获取标签元素
ref 另外的作用,可以获取到标签元素或组件,
在Vue2中,我们获取元素都是通过给元素一个 ref 属性,然后通过 this.$refs.xx 来访问的,但这在Vue3中已经不再适用了
<template>
  <div>
    <div ref="el">div元素</div>
  </div>
</template>

<script>
import { ref, onMounted } from 'vue'
export default {
  setup() {
      // 创建一个DOM引用,名称必须与元素的ref属性名相同
      const el = ref(null)

      // 在挂载后才能通过 el 获取到目标元素
      onMounted(() => {
        el.value.innerHTML = '内容被修改'
      })

      // 把创建的引用 return 出去
      return {el}
  }
}
</script>
获取元素的操作一共分为以下几个步骤:
- 先给目标元素的 ref 属性设置一个值,假设为 el
- 然后在 setup 函数中调用 ref 函数,值为 null,并赋值给变量 el,这里要注意,该变量名必须与我们给元素设置的 ref 属性名相同
- 把对元素的引用变量 el 返回(return)出去
Hooks
除了使用新的 Composition API 来改写组件之外,element-plus 中 packages/hooks 目录下抽取了几个可复用的 hooks 文件

use-attrs 为例,要做的事情是继承绑定的属性和事件,类似于 $attrs 和 $listener 功能,但是做了一些筛选,去掉了一些不需要继承的属性和事件绑定
现在 $attrs 包含传递给组件的所有 attribute,包括 class 和 style
const DEFAULT_EXCLUDE_KEYS = ['class', 'style']
const LISTENER_PREFIX = /^on[A-Z]/

export default (params: Params = {}) => {
  const { excludeListeners = false, excludeKeys = [] } = params
  const instance = getCurrentInstance()
  const attrs = shallowRef({})
  const allExcludeKeys = excludeKeys.concat(DEFAULT_EXCLUDE_KEYS)

  // Since attrs are not reactive, make it reactive instead of doing in `onUpdated` hook for better performance
  instance.attrs = reactive(instance.attrs)

  watchEffect(() => {
    const res = entries(instance.attrs)
      .reduce((acm, [key, val]) => {
        if (
          !allExcludeKeys.includes(key) &&
          !(excludeListeners && LISTENER_PREFIX.test(key))
        ) {
          acm[key] = val
        }

        return acm
      }, {})

    attrs.value = res
  })

  return attrs
}
Vue3 中保留了 mixin,同时也引入了 hooks 来改善 mixin 存在的一些问题:
mixin
好处:使用 mixin 来复用逻辑
问题:
- 渲染上下文中公开的属性的来源不清楚。 例如,当使用多个 mixin 读取组件的模板时,可能很难确定从哪个 mixin 注入了特定的属性。
- 命名空间冲突。 Mixins 可能会在属性和方法名称上发生冲突
Hooks
好处
- 暴露给模板的属性具有明确的来源,因为它们是从 Hook 函数返回的值。
- Hook 函数返回的值可以任意命名,因此不会发生名称空间冲突。
Teleport 的使用
可以帮我们把其包裹的元素移动到我们指定的节点下
Teleport 提供了一种干净的方法,允许我们控制在 DOM 中哪个父节点下呈现 HTML,而不必求助于全局状态或将其拆分为两个组件。-- Vue 官方文档
Dialog,Drawer,以及使用了 Popper 的 Tooltip 和 Popover 都新增了一个 append-to-body 属性,以 Dialog 为例
<template>
  <teleport to="body" :disabled="!appendToBody">
    <transition
      name="dialog-fade"
      @after-enter="afterEnter"
      @after-leave="afterLeave"
      @before-leave="beforeLeave"
    >
      <el-overlay
        v-show="visible"
        :mask="modal"
        :overlay-class="modalClass"
        :z-index="zIndex"
        @click="onModalClick"
      >
        <div
          ref="dialogRef"
          v-trap-focus
          :class="[
            'el-dialog',
            {
              'is-fullscreen': fullscreen,
              'el-dialog--center': center,
            },
            customClass,
          ]"
          aria-modal="true"
          role="dialog"
          :aria-label="title || 'dialog'"
          :style="style"
          @click.stop=""
        >
          <div class="el-dialog__header">
            <slot name="title">
              <span class="el-dialog__title">
                {{ title }}
              </span>
            </slot>
            <button
              v-if="showClose"
              aria-label="close"
              class="el-dialog__headerbtn"
              type="button"
              @click="handleClose"
            >
              <i class="el-dialog__close el-icon el-icon-close"></i>
            </button>
          </div>
          <template v-if="rendered">
            <div class="el-dialog__body">
              <slot></slot>
            </div>
          </template>
          <div v-if="$slots.footer" class="el-dialog__footer">
            <slot name="footer"></slot>
          </div>
        </div>
      </el-overlay>
    </transition>
  </teleport>
</template>
appendToBody 为 false, Teleport 会被 disabled, DOM 还是在当前位置渲染,当为 true 时, dialog 中的内容放到了 body 下面
原来的 element-ui 中,是通过 vue-popper.js 来使用 document.body.appendChild 来添加元素到 body 下的,element-plus 使用 Teleport 来实现相关逻辑。
Vue2.X全局API -Vue3.X 实例 API
安装好组件库,use 方法会执行 install 方法去全局挂载组件
Vue 2.x element-ui 中全局 API 的写法
const install = function(Vue, opts = {}) {
  locale.use(opts.locale);
  locale.i18n(opts.i18n);

  // Vue.component 方法绑定全局组件
  components.forEach(component => {
    Vue.component(component.name, component);
  });

  // Vue.use 绑定全局自定义指令
  Vue.use(InfiniteScroll);
  Vue.use(Loading.directive);

  // Vue.prototype 绑定全局变量和全局方法
  Vue.prototype.$ELEMENT = {
    size: opts.size || '',
    zIndex: opts.zIndex || 2000
  };
  Vue.prototype.$loading = Loading.service;
  Vue.prototype.$msgbox = MessageBox;
  Vue.prototype.$alert = MessageBox.alert;
  Vue.prototype.$confirm = MessageBox.confirm;
  Vue.prototype.$prompt = MessageBox.prompt;
  Vue.prototype.$notify = Notification;
  Vue.prototype.$message = Message;
};
vue 3.X 中,任何全局改变 Vue 行为的 API 现在都会移动到应用实例上,也就是 createApp 产生的 app 上了, 对应的 API 也做了相应的变化
Vue 3.0 的 element-plus 中,全局 API 改写成了实例 API
单个组件
import { App } from 'vue'
import type { SFCWithInstall } from '@element-plus/utils/types'
import Dialog from './src/index.vue'

Dialog.install = (app: App): void => {
  app.component(Dialog.name, Dialog)
}

const _Dialog: SFCWithInstall<typeof Dialog> = Dialog

export default _Dialog
export { default as useDialog } from './src/useDialog'
import type { App } from 'vue'
const plugins = [
  ElInfiniteScroll,
  ElLoading,
  ElMessage,
  ElMessageBox,
  ElNotification,
]
const install = (app: App, opt: InstallOptions): void => {
  const option = Object.assign(defaultInstallOpt, opt)
  use(option.locale)
  app.config.globalProperties.$ELEMENT = option    // 全局设置默认的size属性和z-index属性
  // 全局注册所有除了plugins之外的组件
  components.forEach(component => {
    app.component(component.name, component)
  })
  plugins.forEach(plugin => {
    app.use(plugin as any)
  })
}
export default {
  version,
  install,
}
组件库和样式打包
element-plus 的打包命令
"build": "yarn bootstrap && yarn clean:lib && yarn build:esm-bundle && yarn build:lib && yarn build:lib-full && yarn build:esm && yarn build:utils && yarn build:locale && yarn build:locale-umd && yarn build:theme && yarn build:helper",
使用 rollup 打包组件 bundle
- yarn build:lib 和 yarn build:lib-full 是用到了 webpack 打 umd 格式的全量包
- 其余的则是分别使用到了 rollup 和 gulp
- 除了使用 webpack 来打包组件,还提供了另外一种 es-module 的打包方式,最后发布到 npm 的既有 webpack 打包的成果物,也有 rollup 打包的 es-module bundle
"build:esm-bundle": "rollup --config ./build/rollup.config.bundle.js && yarn build:type",
export default [
  {
    input: path.resolve(__dirname, '../packages/element-plus/index.ts'),
    output: {
      format: 'es', // 打包格式为 es,可选cjs(commonJS) ,umd 等
      file: 'lib/index.esm.js', // 采用 es-module 规范最终打包到 lib/index.esm.js 中
    },
    plugins: [
      terser(),
      nodeResolve(),
      // commonjs(),
      vue({
        target: 'browser',
        css: false,
        exposeFilename: false,
      }),
      typescript({ // 由于打包时使用了 Typescript 插件,最后生成的文件除了全量的 index.esm.js,还有每个组件单独的 lib 文件
        tsconfigOverride: {
          'include': [
            'packages/**/*',
            'typings/vue-shim.d.ts',
          ],
          'exclude': [
            'node_modules',
            'packages/**/__tests__/*',
          ],
        },
        abortOnError: false,
      }),
    ],
    external(id) {
      return /^vue/.test(id)
        || deps.some(k => new RegExp('^' + k).test(id))
    },
  },
]
打包后生成

使用 gulp 打包样式文件和字体图标
- 样式文件和字体图标的打包使用的是 packages/theme-chalk/gulpfile.js
- 把每个 scss 文件打包成单独的 css, 其中包含了通用的 base 样式,还有每个组件的样式文件
- 最终打包后的会放到 lib/theme-chalk 目录下
"build:theme": "rimraf packages/theme-chalk/lib && gulp build --gulpfile packages/theme-chalk/gulpfile.js && cp-cli packages/theme-chalk/lib lib/theme-chalk && rimraf packages/theme-chalk/lib",

使用 Lerna 维护和管理项目
element-plus 采用了 lerna 进行包管理
lerna 可以负责 element-plus 版本和组件版本管理,还可以将每个组件单独发布成 npm 包,
每个组件都有这样一个 package.json
"bootstrap": "yarn --frozen-lockfile && npx lerna bootstrap && yarn gen:version"
{
  "name": "@element-plus/message",
  "version": "0.0.0",
  "main": "dist/index.js",
  "license": "MIT",
  "peerDependencies": {
    "vue": "^3.0.0"
  },
  "devDependencies": {
    "@vue/test-utils": "^2.0.0-beta.3"
  }
}
用了 workspaces 匹配 packages 目录,依赖会统一放在根目录下的 node-modules,而不是每个组件下都有,这样相同的依赖可以复用,目录结构也更加清晰
  // package.json
  "workspaces": [
    "packages/*"
  ]
如果你想开发新组件使用,提供了一个 shell 脚本用于开发新组件的时候生成基础文件
"gen": "bash ./scripts/gc.sh",
可以在 packages 下生成一个基础的组件文件夹
补充:
- Babel 是一个 JavaScript 编译器
- rollup ES Module打包器
- 现使用 commitlint + husky 制定提交规范
- algoliasearch
- 有名的Algolia提供了云搜索的服务。具体办法是我们将数据库的信息以JSON的格式上传到Algolia服务器,然后通过相应的API进行搜索,搜索可以是前端也可以是后端。这里描述的JavaScript的用法,不仅高效,而且对用户友好。Algolia的免费许可允许上传10,000条JSON数据,每月允许100,000次操作(包括上传和搜索),还是相当不错的
- chalk颜色插件
- rimraf 的作用:以包的形式包装rm -rf命令,用来删除文件和文件夹的,不管文件夹是否为空,都可删除;
- webpack 是全套方案,功能齐全但是配置麻烦
- rollup 和 gulp 适用于打包需求比较单一的情况去使用,更轻便和定制化
vue知识点:
https://www.gulpjs.com.cn/docs/api/concepts/
https://www.rollupjs.com/
https://juejin.cn/post/6897030228867022856