做为十分优秀的开源框架,JeeSite拥有着很多实用性的东西。
默认根路径跳转
定义了无Controller的path<->view直接映射
<mvc:view-controller path=”/” view-name=”redirect:${web.ex}” />
登陆login模块
定义了1.sysLogin.jsp
整个jsp可以看做一个表单。主要目的就是接收用户输入的用户名和密码字段信息,然后交给后台处理。Action变量指定了该表达式的提交方式:/a/login所对应的函数来处理。
sysLogin.jsp
<form id="loginForm" action="${ctx}/login" method="post">
账号和密码的属性
<div class="input-row">
<label for="username">账号</label>
<input type="text" name="username" id="username" placeholder="请填写登录账号">
</div>
<div class="input-row">
<label for="password">密码</label>
<input type="password" name="password" id="password" placeholder="请填写登录密码">
</div>
一个username一个password,表单会借由request属性传到函数种,到时候可以通过getUsername和getPassword两个函数从request中取出。但是简单之处必有难点出现。如何对shiro应用确实不易。
LoginController.java控制层的方法
/**
* 管理登录
*/
@RequestMapping(value = "${adminPath}/login", method = RequestMethod.GET)
public String login(HttpServletRequest request, HttpServletResponse response, Model model) {
Principal principal = UserUtils.getPrincipal();
if (logger.isDebugEnabled()){
logger.debug("login, active session size: {}", sessionDAO.getActiveSessions(false).size());
}
// 如果已登录,再次访问主页,则退出原账号。
if (Global.TRUE.equals(Global.getConfig("notAllowRefreshIndex"))){
CookieUtils.setCookie(response, "LOGINED", "false");
}
// 如果已经登录,则跳转到管理首页
if(principal != null && !principal.isMobileLogin()){
return "redirect:" + adminPath;
}
return "modules/sys/sysLogin";
}
/**
* 登录失败,真正登录的POST请求由Filter完成
*/
@RequestMapping(value = "${adminPath}/login", method = RequestMethod.POST)
public String loginFail(HttpServletRequest request, HttpServletResponse response, Model model) {
Principal principal = UserUtils.getPrincipal();
// 如果已经登录,则跳转到管理首页
if(principal != null){
return "redirect:" + adminPath;
}
String username = WebUtils.getCleanParam(request, FormAuthenticationFilter.DEFAULT_USERNAME_PARAM);
boolean rememberMe = WebUtils.isTrue(request, FormAuthenticationFilter.DEFAULT_REMEMBER_ME_PARAM);
boolean mobile = WebUtils.isTrue(request, FormAuthenticationFilter.DEFAULT_MOBILE_PARAM);
String exception = (String)request.getAttribute(FormAuthenticationFilter.DEFAULT_ERROR_KEY_ATTRIBUTE_NAME);
String message = (String)request.getAttribute(FormAuthenticationFilter.DEFAULT_MESSAGE_PARAM);
if (StringUtils.isBlank(message) || StringUtils.equals(message, "null")){
message = "用户或密码错误, 请重试.";
}
model.addAttribute(FormAuthenticationFilter.DEFAULT_USERNAME_PARAM, username);
model.addAttribute(FormAuthenticationFilter.DEFAULT_REMEMBER_ME_PARAM, rememberMe);
model.addAttribute(FormAuthenticationFilter.DEFAULT_MOBILE_PARAM, mobile);
model.addAttribute(FormAuthenticationFilter.DEFAULT_ERROR_KEY_ATTRIBUTE_NAME, exception);
model.addAttribute(FormAuthenticationFilter.DEFAULT_MESSAGE_PARAM, message);
if (logger.isDebugEnabled()){
logger.debug("login fail, active session size: {}, message: {}, exception: {}",
sessionDAO.getActiveSessions(false).size(), message, exception);
}
// 非授权异常,登录失败,验证码加1。
if (!UnauthorizedException.class.getName().equals(exception)){
model.addAttribute("isValidateCodeLogin", isValidateCodeLogin(username, true, false));
}
// 验证失败清空验证码
request.getSession().setAttribute(ValidateCodeServlet.VALIDATE_CODE, IdGen.uuid());
// 如果是手机登录,则返回JSON字符串
if (mobile){
return renderString(response, model);
}
return "modules/sys/sysLogin";
}
我们看到controller是负责接收前台数据,前台from中指定的是/a/login所以定位到相应的controller。细看这俩,只是简单的检查与跳转。这是因为shiro的登陆功能在controller之前加入了一个filter.这个filter被配置在文件Spring-context-shiro.xml文件中。
<!-- Shiro权限过滤过滤器定义 -->
<bean name="shiroFilterChainDefinitions" class="java.lang.String">
<constructor-arg>
<value>
/static/** = anon
/userfiles/** = anon
${adminPath}/cas = cas
${adminPath}/login = authc
${adminPath}/logout = logout
${adminPath}/** = user
/act/editor/** = user
/ReportServer/** = user
</value>
</constructor-arg>
</bean>
<!-- 安全认证过滤器 -->
<bean id="shiroFilter" class="org.apache.shiro.spring.web.ShiroFilterFactoryBean">
<property name="securityManager" ref="securityManager" />
<!--
<property name="loginUrl" value="${cas.server.url}?service=${cas.project.url}${adminPath}/cas" /> -->
<property name="loginUrl" value="${adminPath}/login" />
<property name="successUrl" value="${adminPath}?login" />
<property name="filters">
<map>
<entry key="cas" value-ref="casFilter"/>
<entry key="authc" value-ref="formAuthenticationFilter"/>
</map>
</property>
<property name="filterChainDefinitions">
<ref bean="shiroFilterChainDefinitions"/>
</property>
</bean>
最关键的部分。loginUrl属性所指定的url表示的是所有未通过验证的url所访问的位置。此处就是登陆界面了。successUrl表示成功登陆访问的url位置,也就是主页。Filters是配置具体验证方法的位置。在此处,${adminPath}/login = authc指定了/a/login,登陆页面所需要的验证权限名为authc.并且authc的filter也设置了,在map中:
<entry key="authc" value-ref="formAuthenticationFilter"/>
再来看formAuthenticationFilter中的处理,需要关注的类主要在com.thinkgem.jeesite.modules.sys.security这个包里。通常FormAuthenticationFilter是主要逻辑管理类,SystemAuthorizingRealm这个类则是数据处理类,相当于DAO。
但是并未发现其功能,是因为这俩类都继承于shiro的类。
总得讲,首先request被formAuthenticationFilter接收到,然后传给createToken函数,该函数从request中取出name and password,然后生成自定义的一个token传给了SystemAuthorizingRealm中的doGetAuthenticationInfo验证。其中SystemAuthorizingRealm内有systemService的实例,该实例含有userDAO能取出数据库中的name and password 接着由这俩密码生成SimpleAuthenticationInfo,再由info中的逻辑来验证。
protected AuthenticationToken createToken(ServletRequest request, ServletResponse response) {
String username = getUsername(request);
String password = getPassword(request);
if (password==null){
password = "";
}
boolean rememberMe = isRememberMe(request);
String host = getHost(request);
String captcha = getCaptcha(request);
return new UsernamePasswordToken(username, password.toCharArray(), rememberMe, host, captcha);
}
protected AuthenticationInfo doGetAuthenticationInfo(AuthenticationToken authcToken) throws AuthenticationException {
UsernamePasswordToken token = (UsernamePasswordToken) authcToken;
if (LoginController.isValidateCodeLogin(token.getUsername(), false, false)){
// 判断验证码
Session session = SecurityUtils.getSubject().getSession();
String code = (String)session.getAttribute(ValidateCodeServlet.VALIDATE_CODE);
if (token.getCaptcha() == null || !token.getCaptcha().toUpperCase().equals(code)){
throw new CaptchaException("验证码错误.");
}
}
User user = getSystemService().getUserByLoginName(token.getUsername());
if (user != null) {
byte[] salt = Encodes.decodeHex(user.getPassword().substring(0,16));
return new SimpleAuthenticationInfo(new Principal(user),
user.getPassword().substring(16), ByteSource.Util.bytes(salt), getName());
} else {
return null;
}
}
之后就是service+dao+entity.
首先说下他的一个流程
Jeesite流程
流程
主要是jsp,entity,dao,dao.xml,service,controller)
(1) .MyBatisRegisterDao.xml
这里做的工作便是对数据库语句的撰写。

(2) .MyBatisRegisterDao.java

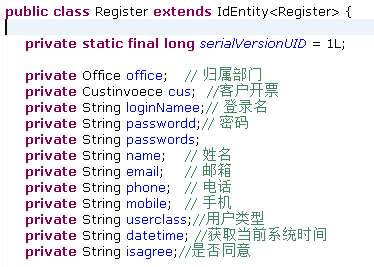
(3) .Register.java实体
一般公共的字段放在相应的实体工具类中,如createBy,createDate,updateBy,updateDate,remarks,del_flag都放在dateEntity.java中。用时只需extends即可
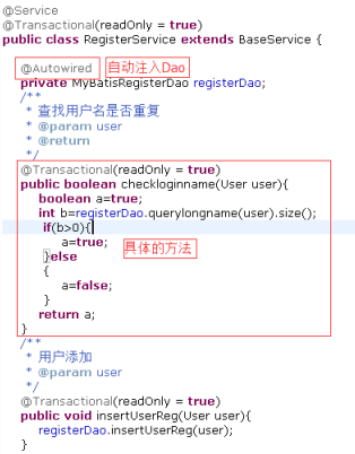
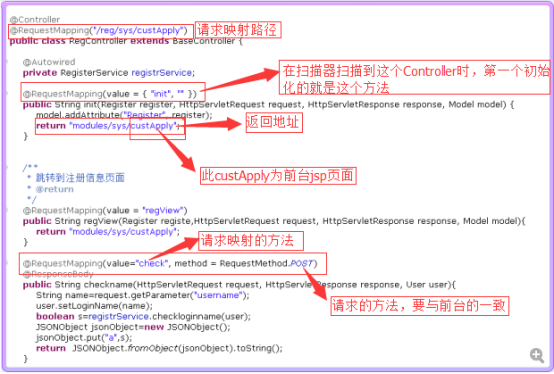
(4).RegisterService.java
其中建议requestMapping注解放在首位,全局注解为好。

(5).RegisterService.java
(6).Register.jsp
Mybatis的总体流程是
1.加载配置并初始化,其触发条件是加载配置文件将SQL 的配置信息加载成为一个个MappingStatement对象(包括传入参数映射配置,执行的sql语句,结果映射配置) 存储在内存中
2.接收调用请求,其触发条件是调用mybatis中的api,将请求传递给下层的请求处理层处理
3.处理操作请求,api接口层传递传递请求过来,传入sql的id和传入参数,根据sql的id查找对应的MappingStatement对象,和传入参数对象解析MappingStatement对象,得到最终要执行的sql和执行传入参数,后获取数据库连接,根据最终得到的sql语句和传入参数到数据库执行,得到最终的处理结果,最后释放资源
4.将最终处理结果返回
关于shiro授权
1.Shiro授权的三要素是:权限,角色,用户
2.三要素的关联:因为通过声明权限我们仅仅能了解这个权限在项目中能做什么,而不能确定谁有这个权限,所以,我们需要在应用程序中对用户和权限建立关系。
3.在项目上: 我们一般将权限分配给某个角色,然后将这个角色分配给一个或多个用户,例如:修改的权限是只有管理员才拥护的,那么,在这个时候,管理员就相当于被设于拥有修改权限的用户,
4.shiro支持三种授权方式:编码实现,注解实现,jsp Tag实现

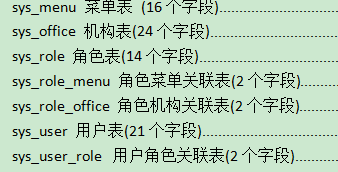
我们看下关于用户权限的几个表:
Orm对象关系映射
1.用于实现面向对象编程语言里不同类型系统的数据之间的转换
2.在jeesite框架中用到的就是mybatis
安全模块
用户密码加密存储
用户密码加密算法:对用户的密码进行sha-1算法加密。迭代1024次,并将salt放在前16位中。
/**
* 生成安全的密码,生成随机的16位salt并经过1024次 sha-1 hash
*/
public static String entryptPassword(String plainPassword) {
String plain = Encodes.unescapeHtml(plainPassword);
byte[] salt = Digests.generateSalt(SALT_SIZE);
byte[] hashPassword = Digests.sha1(plain.getBytes(), salt, HASH_INTERATIONS);
return Encodes.encodeHex(salt)+Encodes.encodeHex(hashPassword);
}
我们可以看到,在SystemService中,加密方式经过1024次迭代,并将salt放在前16位。Return的首先是salt然后+hashPasswordd.
然后看下解密:
/**
* 设定密码校验的Hash算法与迭代次数
*/
@PostConstruct
public void initCredentialsMatcher() {
HashedCredentialsMatcher matcher = new HashedCredentialsMatcher(SystemService.HASH_ALGORITHM);
matcher.setHashIterations(SystemService.HASH_INTERATIONS);
setCredentialsMatcher(matcher);
}
jeesite/src/main/java/com/thinkgem/jeesite/modules/sys/security/SystemAuthorizingRealm.java
解密的过程与加密的过程是一致的。
安全验证码
验证码一般不会出现。但是当用户请求超过三次,此时sysLogin.jsp会向ValidateCodeServlet请求验证图片,而ValidateCodeServlet生成的图片则存入session中。然后进行code的一个验证。
String validateCode = request.getParameter(VALIDATE_CODE);
if (StringUtils.isNotBlank(validateCode)){
response.getOutputStream().print(validate(request, validateCode)?"true":"false");
缓存处理
系统对每个用户所需要用到的资源都用map做了缓存处理。
如果用户不存在则创建一个新的Map<String,Object>对象,如果存在的话则取principal中的Map<String,Object>对象做为缓存,因为principle会随着用户的logout自动释放,每个用户都有了自己的缓存,可以再日志中查询到。并且每个用户的缓存是相互独立的。
UserUtils.java中,
public static Map<String, Object> getCacheMap()
public static Object getCache(String key, Object defaultValue)
public static void putCache(String key, Object value)
public static void removeCache(String key)
主题更换
在head.jsp中通过查询cookie.theme.value的值来替换bootstrap的css文件,从而达到主题更换的效果。我们先看下head.jsp:
<link href="${ctxStatic}/bootstrap/2.3.1/css_${not empty cookie.theme.value ? cookie.theme.value : 'cerulean'}/bootstrap.min.css" type="text/css" rel="stylesheet" />
在LoginController中,主题替换的接口如下:
/**
* 获取主题方案
*/
@RequestMapping(value = "/theme/{theme}")
public String getThemeInCookie(@PathVariable String theme, HttpServletRequest request, HttpServletResponse response){
if (StringUtils.isNotBlank(theme)){
CookieUtils.setCookie(response, "theme", theme);
}else{
theme = CookieUtils.getCookie(request, "theme");
}
return "redirect:"+request.getParameter("url");
}
翻页处理
/jeesite/src/main/java/com/thinkgem/jeesite/common/persistence/Page.java
其中page<T>的toString()方法实现了BootStrap的显示细节,其中数据都放于Page中。
而在前端jsp页面只需要引用即可。
<div class="pagination">${page}</div>
树形目录选择
先说下office的弹出对话框式树形选择。
使用tags:treeselect标签将页面操作逻辑封装。在tags:treeselect中,用JBox来调用/tag/treeselect转向treeselect.jsp页面,并传入相关的参数,其中url,展示的json格式数据来源。当选择的为v时,即确定,这时,id和name就hi传出来。
ajaxData:{selectIds: $("#${id}Id").val()},buttons:{"确定":"ok", ${allowClear?""清除":"clear", ":""}"关闭":true}, submit:function(v, h, f){
$("#${id}Id").val(ids.join(",").replace(/u_/ig,""));
$("#${id}Name").val(names.join(","));
其中tagTreeselect.jsp负责数据展示。
在zNodetree负责选择等操作。
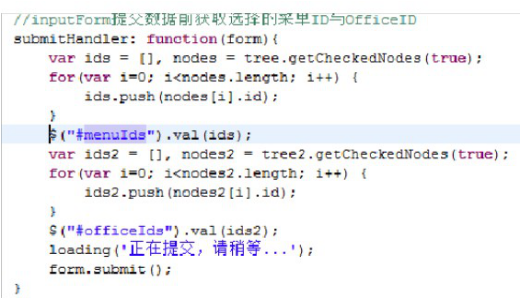
角色授权树型选择操作
先通过后台传过来的数据构建zNodetree
由 zNodetree 来管理数据的选择
在表单提交时(submitHandler )获取选择数据并添加到相应的 input中。然后提交。如下图
这里用了一个小技巧。 SpringMVC 进行前后台数据绑定的时候其实是调用Model 的 set 与 get方法。( 所以只要有这两个方法即可,不用有成员变员也行)
给 Role 模型添加了两个方法,并用 Transient 来标记不写入数据库。如下

这样就可以自动把数据写回到Role 中。
邹邹 邹伟帅