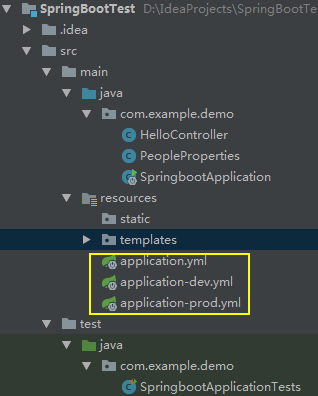
新建一个新建一个SpringBootTest工程
新建一个HelloController.java文件

 1 package com.example.demo;
 2
 3 import org.springframework.web.bind.annotation.RequestMapping;
 4 import org.springframework.web.bind.annotation.RequestMethod;
 5 import org.springframework.web.bind.annotation.RestController;
 6
 7 @RestController
 8 public class HelloController {
 9
10     @RequestMapping(value = "/hello" , method = RequestMethod.GET)
11     public String say() {
12         return "Hello Spring Boot!";
13     }
14 }
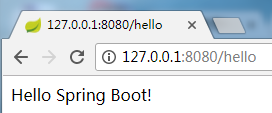
运行,打开浏览器访问127.0.0.1:8080/hello,输出Hello Spring Boot!
spring boot配置文件的使用
使用.properties格式的配置文件
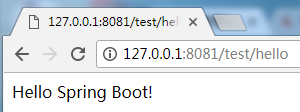
通过修改配置文件修改访问端口和URL前缀,打开配置文件

添加端口号和URL前缀
server.port=8081
server.context-path=/test
重新运行,可见访问的URl已经发生了改变。
使用yml格式的配置文件
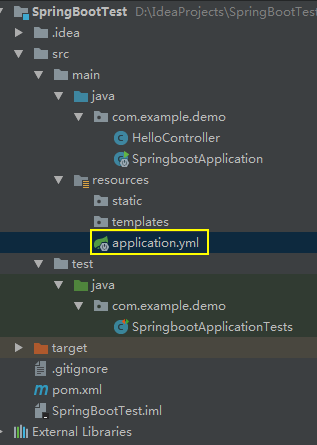
新建一个application.yml的配置文件
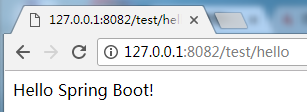
添加端口号和URL前缀
server:
  port: 8082
  context-path: /test
运行,打开浏览器
通过配置文件传递值
在application.yml添加一个值testValue
1 server:
2   port: 8082
3   context-path: /test
4
5
6 testValue: I'm test
使用注解的方式在配置文件中取值
 1 package com.example.demo;
 2
 3 import org.springframework.beans.factory.annotation.Value;
 4 import org.springframework.web.bind.annotation.RequestMapping;
 5 import org.springframework.web.bind.annotation.RequestMethod;
 6 import org.springframework.web.bind.annotation.RestController;
 7
 8 @RestController
 9 public class HelloController {
10
11     @Value("${testValue}")
12     private String testValue;
13
14     @RequestMapping(value = "/hello" , method = RequestMethod.GET)
15     public String say() {
16         return testValue;
17     }
18 }
运行,打开浏览器

可以看到配置文件里面的值通过注解的方式传递到了HelloController中的testValue。
配置属性注入类
一个一个值注入比较麻烦,可以使用注入类的方式,一次性将属性注入。
修改配置文件application.yml
1 server:
2   port: 8081
3   context-path: /test
4
5 testValue: I'm test
6
7 people:
8   name: XiaoMing
9   age: 22
修改PeopleProperties.java
 1 package com.example.demo;
 2
 3 import org.springframework.boot.context.properties.ConfigurationProperties;
 4 import org.springframework.stereotype.Component;
 5
 6 //获取注入还需要加一个@Component注解,@ConfigurationProperties(prefix = "people")获取前缀是people的配置
 7 @Component
 8 @ConfigurationProperties(prefix = "people")
 9 public class PeopleProperties {
10
11     private String name;
12     private Integer age;
13
14
15     public void setName(String name) {
16         this.name = name;
17     }
18     public void setAge(Integer age) {
19         this.age = age;
20     }
21
22     public String getName() { return name; }
23     public Integer getAge() { return age; }
24 }
修改HelloController.java
 1 package com.example.demo;
 2
 3 import org.springframework.beans.factory.annotation.Autowired;
 4 import org.springframework.web.bind.annotation.RequestMapping;
 5 import org.springframework.web.bind.annotation.RequestMethod;
 6 import org.springframework.web.bind.annotation.RestController;
 7
 8 @RestController
 9 public class HelloController {
10
11     //自动装配注解
12     @Autowired
13     private PeopleProperties peopleProperties;
14
15     @RequestMapping(value = "/hello" , method = RequestMethod.GET)
16     public String say() {
17         return peopleProperties.getName();
18     }
19 }
运行,打开浏览器访问输出。

不同的配置文件的切换
我们在实际开发中,常常需要来回来回切换配置,比如经常需要在生产环境和开发环境之间来回切换。
创建三个配置文件application-dev.yml(开发环境配置文件)和application-prod.yml(生产环境配置文件)以及application.yml(默认配置文件)
application-dev.yml(开发环境配置文件)
1 server:
2   port: 8081
3   context-path: /test
4
5 testValue: I'm test
6
7 people:
8   name: XiaoMing
9   age: 22
application-prod.yml(生产环境配置文件)
1 server:
2   port: 8082
3   context-path: /test
4
5 testValue: I'm test
6
7 people:
8   name: Li Lei
9   age: 3
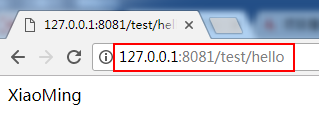
如果我们使用开发环境的配置时
application.yml(默认配置文件),active设置为dev
1 spring:
2   profiles:
3     active: dev
运行,访问本地8081端口
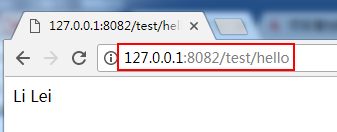
如果我们使用开发环境的配置时
application.yml(默认配置文件),active设置为prod
1 spring:
2   profiles:
3     active: prod
运行,访问本地8082端口
这样只需修改默认配置文件application.yml就可以实现不同配置的来回切换了