在公司完成了一个简单的rest服务的搭建和调用
1.项目需求
- 创建一个java工程。
- 编写一个rest服务,要求入参为json字符串,服务可以解析报文并能实现逻辑对比,最后能够根据对比结果返回正常和异常的情况。
- 通过postman/soapUI工具调用rest服务并进行测试。
标准如下:
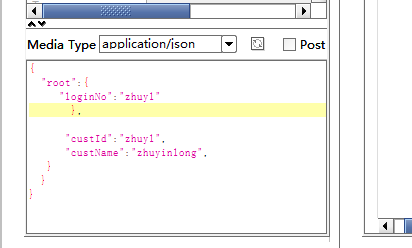
 1  入参:
 2
 3         {
 4
 5             "root":{
 6
 7            "loginNo":"noteId"
 8
 9         },
10
11             "body":{
12
13             "busiInfo"{
14
15             "custId":"noteId",
16
17             "custName":"custName",
18
19          }
20
21      }
22
23    }
24
25           出参:
26
27          {
28
29               "rtnCode":"000000",
30
31               "rtnMsg":"成功"
32
33           }
34
35     注:异常返回 rtnCode=-9999,rtnMsg="程序错误"。
2.具体流程
1.环境的配置
1.创建java动态Web项目或者Maven的Web工程
2.首先需要搭建rest服务,需要一些相应的jar包jersey及相关的依赖如下图:
接下来需要配置web.xml配置文件
<?xml version="1.0" encoding="UTF-8"?>
<web-app xmlns:xsi="http://www.w3.org/2001/XMLSchema-instance" xmlns="http://java.sun.com/xml/ns/javaee" xsi:schemaLocation="http://java.sun.com/xml/ns/javaee http://java.sun.com/xml/ns/javaee/web-app_2_5.xsd" version="2.5">
  <servlet>
    <servlet-name>UserInfoServlet</servlet-name>
    <servlet-class>com.sun.jersey.spi.container.servlet.ServletContainer</servlet-class>
    <init-param>
      <param-name>com.sun.jersey.config.property.packages</param-name>
      <param-value>com.sitech.rest</param-value>
    </init-param>
    <load-on-startup>1</load-on-startup>
  </servlet>
  <servlet-mapping>
    <servlet-name>UserInfoServlet</servlet-name>
    <url-pattern>/rest/*</url-pattern>
  </servlet-mapping>
  <welcome-file-list>
    <welcome-file>index.jsp</welcome-file>
  </welcome-file-list>
</web-app>
注:搭建rest服务需要使用相应的注解,常用的注解及作用如下:
@javax.ws.rs.ApplicationPath 标识应用路径,用于由@Path提供的所有资源uri的基本uri。当发布在一个servlet容器中,它的值可以使用web.xml中的servlet-mapping进行重写。
@javax.ws.rs.Path 标识要请求的资源类或类方法的uri路径。
@javax.ws.rs.PathParam 将uri中指定的路径参数绑定到资源方法参数,资源类的字段,或资源类的bean属性。
@javax.ws.rs.QueryParam 将http请求的Query参数绑定到资源方法参数,资源类的字段,或资源类的bean属性。
@javax.ws.rs.MatrixParam 将uri矩阵参数的值绑定到资源方法参数,资源类的字段,或资源类的bean属性。
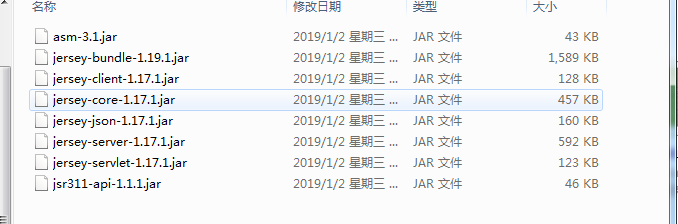
3.本次项目业务逻辑是要解析json报文,所以需要解析json报文的相关jar包及依赖,如下图

4.配置好环境后则需编写代码实现功能,具体代码实现如下
  1 package com.sitech.rest;
  2
  3 import javax.servlet.http.HttpServletResponse;
  4 import javax.ws.rs.GET;
  5 import javax.ws.rs.POST;
  6 import javax.ws.rs.Path;
  7 import javax.ws.rs.Produces;
  8 import javax.ws.rs.QueryParam;
  9 import javax.ws.rs.core.Context;
 10 import javax.ws.rs.core.MediaType;
 11
 12 import net.sf.json.JSON;
 13 import net.sf.json.JSONObject;
 14
 15 /*************************
 16  * @className RestService.java
 17  * @author zyl
 18  * @date 2019年1月3日上午8:48:43
 19  * @version 1.0.1
 20  * @describe 创建一个rest服务,可以解析json对象,分别使用了GET和
 21              Post两种方式进行参数的传递
 22  ***********************/
 23
 24 @Path("jsonChange")
 25 public class RestService {
 26
 27     JSONObject ingredients = new JSONObject();
 28
 29     @Context
 30     HttpServletResponse response;
 31
 32     @GET
 33     @Produces(MediaType.TEXT_PLAIN)
 34     public String getResult(@QueryParam("message") String message) throws Exception {
 35
 36         response.setCharacterEncoding("UTF-8");
 37         try {
 38             JSONObject jsonObj = JSONObject.fromObject(message);
 39
 40             // 解析root
 41             String root = jsonObj.getString("root");
 42             String loginNo = JSONObject.fromObject(root).getString("loginNo");
 43
 44             // 解析body
 45             String body = jsonObj.getString("body");
 46             String busiInfo = JSONObject.fromObject(body).getString("busiInfo");
 47             String custId = JSONObject.fromObject(busiInfo).getString("custId");
 48             String custName = JSONObject.fromObject(busiInfo).getString("custName");
 49
 50             if ("noteId".equalsIgnoreCase(loginNo) && "noteId".equalsIgnoreCase(custId)
 51                     && "custName".equalsIgnoreCase(custName)) {
 52                 ingredients.put("rtnCode", "000000");
 53                 ingredients.put("rtnMsg", "成功");
 54                 System.out.println("成功");
 55             } else {
 56                 ingredients.put("rtnCode", "-9999");
 57                 ingredients.put("rtnMsg", "程序出错");
 58                 System.out.println("错误");
 59             }
 60
 61             return ingredients.toString();
 62         } catch (Exception e) {
 63
 64             e.printStackTrace();
 65             ingredients.put("rtnCode", "-9999");
 66             ingredients.put("rtnMsg", "程序错误");
 67             /*
 68              * response.setContentType("text/html;charset=UTF-8");
 69              * response.getWriter().write("json报文格式不正确,出现异常!!!");;
 70              */
 71             return ingredients.toString();
 72         }
 73     }
 74
 75     @POST
 76     @Produces(MediaType.TEXT_PLAIN)
 77     public String postResult(String userInfo) {
 78
 79         try {
 80
 81             if ("".equals(userInfo)) {
 82                 throw new Exception("报文为空异常!!!");
 83             }
 84             JSONObject jsonObj = JSONObject.fromObject(userInfo);
 85
 86             // 解析root
 87             String root = jsonObj.getString("root");
 88             String loginNo = JSONObject.fromObject(root).getString("loginNo");
 89             System.out.println("loginNo:" + loginNo);
 90
 91             // 解析body
 92             String body = jsonObj.getString("body");
 93             System.out.println("body" + body);
 94             String busiInfo = JSONObject.fromObject(body).getString("busiInfo");
 95             System.out.println("busiInfo" + busiInfo);
 96             String custId = JSONObject.fromObject(busiInfo).getString("custId");
 97             System.out.println("custId:" + custId);
 98             String custName = JSONObject.fromObject(busiInfo).getString("custName");
 99             System.out.println("custName:" + custName);
100
101             if ("zhuyl".equalsIgnoreCase(loginNo) && "zhuyl".equalsIgnoreCase(custId)
102                     && "zhuyinlong".equalsIgnoreCase(custName)) {
103                 ingredients.put("rtnCode", "000000");
104                 ingredients.put("rtnMsg", "正确的");
105             } else {
106                 ingredients.put("rtnCode", "-9999");
107                 ingredients.put("rtnMsg", "错误的报文");
108                 throw new Exception("参数不正确");
109             }
110             return ingredients.toString();
111         } catch (Exception e) {
112             e.printStackTrace();
113             ingredients.put("rtnCode", "-9999");
114             ingredients.put("rtnMsg", "错误的报文");
115             return ingredients.toString();
116         }
117     }
118 }
5.使用SoapUI工具进行测试
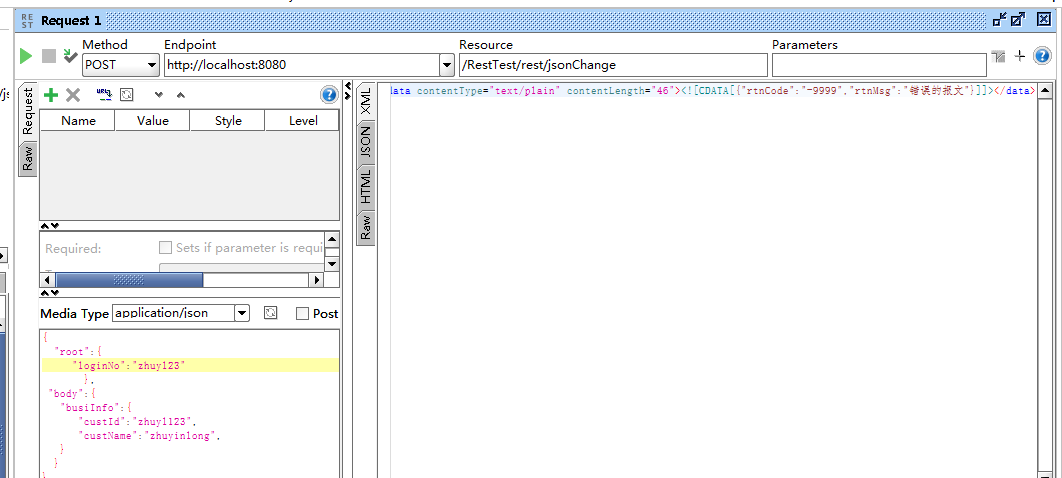
运行该Web项目,将url复制下来,打开SoapUI工具进行测试:project--选择New REST Project,可以给工程起一个名字。选择路径:在新建的Project中选择New REST Service from URI,填写IP地址和端口号,填写路径、选择方法、提交参数,Resource中填写具体路径,在method处选择实现方式(get/put/post),需要提交参数的可以在左边直接添加参数名称和参数值。点击三角号即可运行测试用例,并能看到返回结果。
注意:在使用SoapUI时返回的参数中文出现乱码。解决: 在Request的Encoding位置下拉选择UTF-8编码格式,再注意在以json格式填写参数的时候,必须使用UTF-8编码格式。
正确报文的情况:

参数不正确的情况:
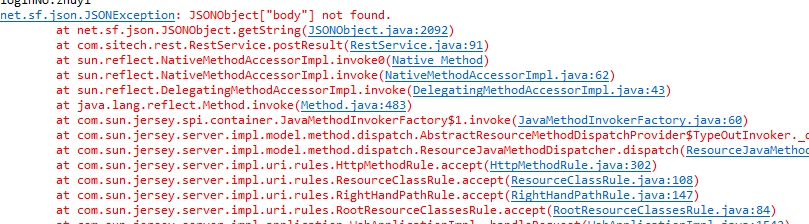
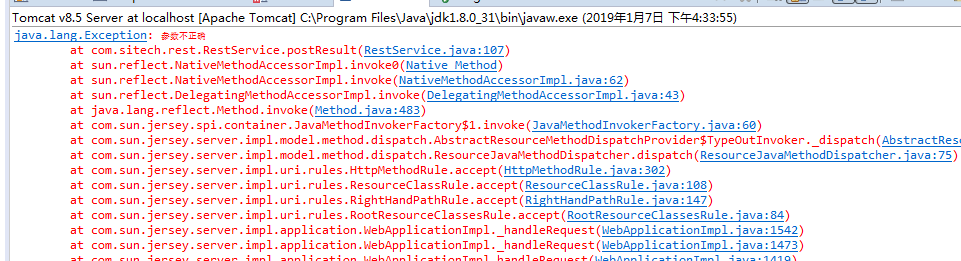
自定义的异常,控制台会捕捉到异常:
输入格式不正确的json报文控制台也会捕捉到异常,显示json解析错误