maven的约定
在maven的目录结构中,规定了src/main/java目录包含了项目的Java源码,src/test/java目录包含了测试代码,pom.xml文件是maven的核心配置文件,是这个项目的Project Object Model
常见的maven标签
<project>:pom.xml的顶层元素
<modelVersion>:POM的版本号
<groupId>:创建项目的公式或者组织
<artifactId>:项目的唯一表示
<packaging>:项目打包的类型
<version>:项目的版本号
<name>:项目用于展示的名称
<url>:项目文档能下载的站点url
<description>:项目的描述
maven命令
mvn package对工程进行构建,可以生成一个可执行的jar包
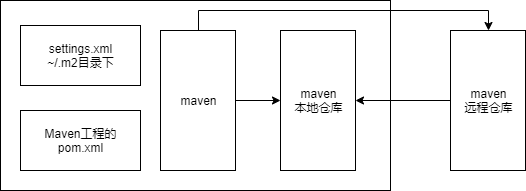
执行流程
-
首先考虑setting.xml配置文件的一些配置
-
解析maven工程的pom.xml,查看声明的依赖,首先去本地仓库寻找依赖,如果本地仓库没有,就去远程仓库中下载依赖包,然后下载完成之后就会放在本地仓库以便以后的使用
dependency引入依赖的原理
dependency引入依赖的语法:
<dependency>
    <groupId></groupId>
    <artifactId></artifactId>
    <version></version>
    <type></type>
    <scope></scope>
    <optional></optional>
</dependency>
依赖声明的三要素
- groupId
- artifactId
- version
编译范围
-
compile:默认引入以来就是compile,对编译、测试和运行的classpath都有效,一般都是采用compile
-
test:仅对测试代码的classpath有用,编译或者运行的时候无效
-
provided:编译和测试的时候有效,运行时无效,因为可能环境已经提供了
-
runtime:测试和运行的classpath有效,但是编译代码无效,比如jdbc的驱动实现类,mysql驱动
传递性依赖
maven的传递性依赖就是maven会自动解析所有的依赖,然后负责将依赖下载下来,接着按层级下载依赖。传递性依赖对依赖范围的影响如下所示:第一列表示一级依赖,第一行是二级依赖
| compile | test | provided | runtime | |
|---|---|---|---|---|
| compile | compile | runtime | ||
| test | test | test | ||
| provided | provided | provided | provided | |
| runtime | runtime | runtime |
依赖调解
碰到一个项目多个版本,会根据就近原则来选择一个最合适的版本来使用
可选依赖
可选依赖就是父依赖是不会自动传递给子依赖,需要子依赖自己去声明
依赖冲突问题
由于maven的就近原则,可能会使得导致依赖选择了不兼容的问题,最后导致class not found等问题。
解决方法
首先使用maven的依赖分析命令mvn depedency:tree查看依赖路径树。然后手动将冲突排除掉,比如我们发现是A依赖C的版本问题,就可以在pom.xml配置如下
<dependency>
    <groupId>A</groupId>
    <artifactId>A</artifactId>
    <version>1.0</version>
    <exclusions>
        <exclusion>
            <groupId>C</groupId>
            <artifactId>C</artifactId>
        </exclusion>
    </exclusions>
</dependency>
maven仓库
maven多仓库工作流程
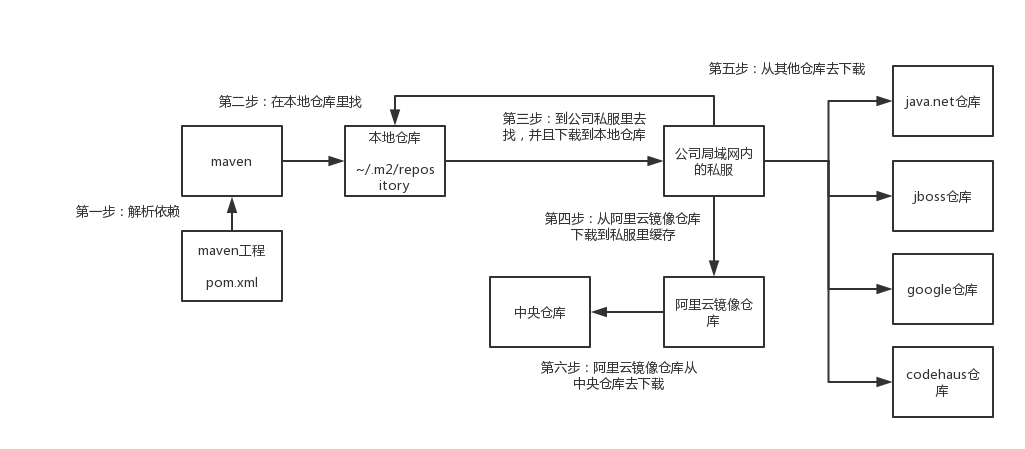
本地仓库
本地仓库子在windows默认路径是~.m2
epository,linux默认路径是/home/root/.m2/repository,可以通过修改settings.xml中的配置
<localRepository>maven 本地仓库的路径</localRepository>
远程仓库
如果maven本地仓库中没有某个依赖,那就maven就会从远程仓库中下载,默认就是从中央仓库中下载
中央仓库
maven自带一个超级pom.xml中配置了中央仓库的地址
<repositories>
    <repository>
        <id>central</id>
        <name>Maven Repository Switchboard</name>
        <url>http://repo1.maven.org/maven2</url>
        <layout>default</layout>
        <snapshots>
            <enabled>false</enabled>
        </snapshots>
    </repository>
</repositories>
如果不做任何配置,如果本地仓库没有对应的依赖就会从maven配置的远程仓库中拉取
私服
一般在公司内部都是会自己部署一个私服,为了安全性。此时就是如果本地仓库中没有依赖就会从私服中寻找,如果私服没有就会去中央仓库中寻找
其他远程仓库
有些依赖可能在中央仓库没有,或者中央仓库的速度太慢,此时可能会用其他的一些远程仓库,比如jboss的仓库。java.net,google,codehaus,jboss。
镜像仓库
镜像仓库是和中央仓库的依赖是一样的,可以提升下载速度
nexus私服中的仓库
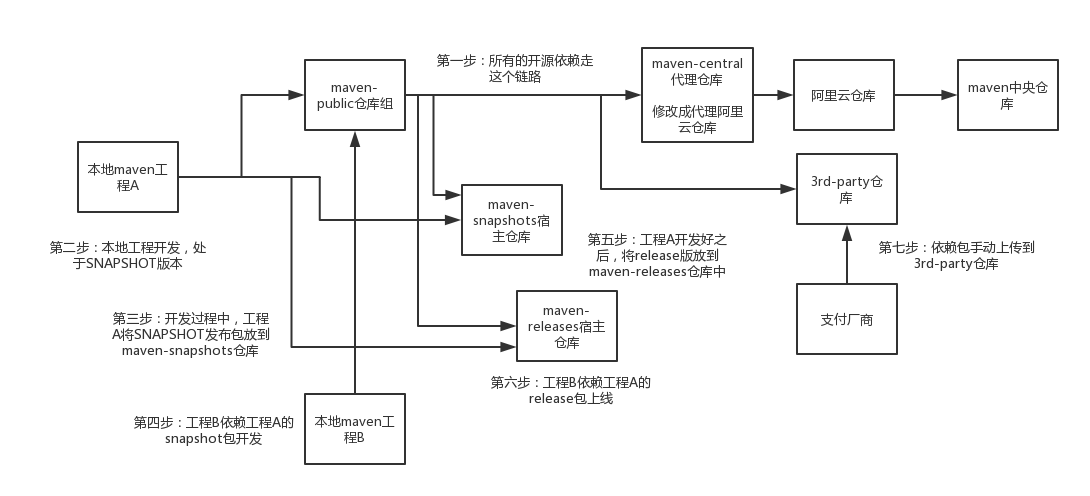
hosted宿主仓库
主要是用来部署公司内部的发布包
proxy代理仓库
代理了外部的中央仓库,比如阿里云仓库、jboss仓库
group仓库组
将各种代理仓库、宿主仓库组成一个虚拟的仓库
仓库的路径和状态
- maven-central:maven中央仓库代理的仓库
- maven-releases:仓库是宿主仓库,用于部署公司内部的release版本的发布包
- maven-snapshots:仓库是宿主仓库,用于部署公司内部的snapshot版本的发布包到这个仓库里
- 3rd party:该仓库是个宿主仓库,主要用来部署没法从公共仓库获取的第三方依赖包
- maven-public:仓库组,上面所有release仓库都在这个仓库组内
nexus私服部署jar包
- 配置发布仓库,是在项目的pom.xml中配置,配置代码如下
<distributionManagement>
    <repository>
        <id>nexus-releases</id>
        <name>Nexus Release Repository</name>
        <url>http://localhost:8081/repository/maven-releases/</url>
    </repository>
    <snapshotRepository>
        <id>nexus-snapshots</id>
        <name>Nexus Snapshot Repository</name>
        <url>http://localhost:8081/repository/maven-snapshots/</url>
    </snapshotRepository>
</distributionManagement>
- 部署账号的配置,在maven安装setting.xml中进行配置
<server>
    <id>nexus-releases</id>
    <username>账号</username>
    <password>密码</password>
</server>
<server>
    <id>nexus-snapshots</id>
    <username>账号</username>
    <password>密码</password>
</server>
maven生命周期
maven有三套独立的生命周期:clean、default、site。每套生命周期都可以独立运行,每个生命周期的独立运行都会包含多个phase,每个phase是由多个插件的goal来完成的,可以认为一个goal是一个功能。大概的示意图如下所示:
clean的生命周期包的phase
-
pre-clean
-
post-clean
default生命周期包的phase
-
validate:校验这个项目的一些配置信息是否正确
-
initialize:初始化构建状态,比如设置一些属性,或者创建一些目录
-
generate-sources:自动生成一些源代码,然后包含在项目代码中一起编译
-
process-sources:处理源代码,比如做一些占位符的替换
-
generate-resources:生成资源文件,才是干的时我说的那些事情,主要是去处理各种xml、properties那种配置文件,去做一些配置文件里面占位符的替换
-
process-resources:将资源文件拷贝到目标目录中,方便后面打包
-
compile:编译项目的源代码
-
process-classes:处理编译后的代码文件,比如对java class进行字节码增强
-
generate-test-sources:自动化生成测试代码
-
process-test-sources:处理测试代码,比如过滤一些占位符
-
generate-test-resources:生成测试用的资源文件
-
process-test-resources:拷贝测试用的资源文件到目标目录中
-
test-compile:编译测试代码
-
process-test-classes:对编译后的测试代码进行处理,比如进行字节码增强
-
test:使用单元测试框架运行测试
-
prepare-package:在打包之前进行准备工作,比如处理package的版本号
-
package:将代码进行打包,比如jar包
-
pre-integration-test:在集成测试之前进行准备工作,比如建立好需要的环境
-
integration-test:将package部署到一个环境中以运行集成测试
-
post-integration-test:在集成测试之后执行一些操作,比如清理测试环境
-
verify:对package进行一些检查来确保质量过关
-
install:将package安装到本地仓库中,这样开发人员自己在本地就可以使用了
-
deploy:将package上传到远程仓库中,这样公司内其他开发人员也可以使用了
site生命周期的phase
-
pre-site
-
site
-
post-site
-
site-deploy
phase和plugin的绑定关系
在我们执行mvn clean package的时候每个phase都是由插件的goal来完成的,默认maven就绑定了一些plugin goal到phase
maven插件
每一个插件都有多个goal,每个goal都是一个具体的功能。将phase绑定到plugin的语法如下
<build>
    <plugins>
        <plugin>
            <groupId>org.apache.maven.plugins</groupId>
            <artifactId>maven-source-plugin</artifactId>
            <version>2.1.1</version>
            <executions>
                <execution>
                    <id>attach-sources</id>
                    <phase>verify</phase>
                    <goals>
                        <goal>jar-no-fork</goal>
                    </goals>
                </execution>
            </executions>
        </plugin>
    </plugins>
</build>
这个插件的作用是会把源码一起打包,运行mvn verify的时候就会生成一个包含源码的jar包。即使不配置绑定phase也可以,大部分插件都默认要绑定phase
配置
使用命令配置插件,通过-Dkey=value来进行插件的配置,比如mvn install -Dmaven.test.skip=true就是surefire插件在测试的时候提供的参数,设置为true就会跳过测试,也可以在pom.xml中配置,配置的语法如下
<build>
    <plugins>
        <plugin>
            <groupId>org.apache.maven.plugins</groupId>
            <artifactId>maven-compiler-plugin</artifactId>
            <version>2.1</version>
            <configuration>
                <source>1.5</source>
                <target>1.8</target>
            </configuration>
        </plugin>
    </plugins>
</build>
寻找
在http://maven.apache.org/plugins/index.html中可以找到所有的插件
聚合
maven支持父子工程,可以通过父工程来管理子工程,只需要对父工程执行mvn clean install此时就会对工程中的所有子项目进行构建。使用<dependencyManagement>来管理项目依赖的版本号,使用pluginManagement来管理项目的中的插件的版本号,然后在pom.xml中统一通过在<properties>中定义版本号
import pom强制约束版本
对于重量级组件,通常会采用这种方式。会对这个工程,开发一个专门的pom包专门用dependencyManagement来约束各个依赖方的版本号,防止和自己的版本号出现冲突,然后在依赖不是直接依赖这个工程的包,而是依赖这个工程的pom类型的包
<dependencyManagement>
    <dependencies>
        <dependency>
            <groupId>com.test</groupId>
            <artifactId>test-bom</artifactId>
            <version>1.2.9</version>
            <type>pom</type>
            <scope>import</scope>
        </dependency>
    </dependencies>
</dependencyManagement>
maven常用插件介绍
surefire插件
使用surefire插件来完成单元测试,和最流行的junit单元测试框架整合非常好,一般是在default生命周期的test阶段运行,会运行surefire插件的test goal,然后执行src/test/java下面的单元测试,surefire插件会根据一定的规则在src/test/java下面找单元测试类,具体规则如下:
**/Test*.java
**/*Test.java
**/*TestCase.java
cobertura插件
使用cobertura插件会生成测试覆盖率报告,依赖
<plugin>
    <groupId>org.codehaus.mojo</groupId>
    <artifactId>cobertura-maven-plugin</artifactId>
    <version>2.5.1</version>
</plugin>
cargo web服务自动化部署插件
<plugin>
    <groupId>org.codehaus.cargo</groupId>
    <artifactId>cargo-maven2-plugin</artifactId>
    <version>1.0</version>
    <configuration>
        <container>
            <containerId>tomcat6x</containerId>
            <type>remote</type>
        </container>
        <configuration>
            <type>runtime</type>
            <properties>
                <cargo.remote.username>admin</cargo.remote.username>
                <cargo.remote.password>admin</cargo.remote.password>
                <cargo.tomcat.manager.url>http://localhost:8080/manager</cargo.tomcat.manager.url>
                <cargo.servlet.port>8080</cargo.servlet.port>
            </properties>
        </configuration>
    </configuration>
</plugin>
根据不同的profile适配不同的环境
修改pom.xml中的配置
<build>
    <resources>
        <resource>
            <directory>src/main/java</directory>
            <includes>
                <include>**/*.xml</include>
            </includes>
            <filtering>true</filtering>
        </resource>
    </resources>
</build>
<profiles>
    <!-- 每个profile对应了一个环境下的一套配置 -->
    <profile>
        <id>dev</id>
        <activation>
            <activeByDefault>true</activeByDefault>
        </activation>
        <build>
            <resources>
                <resource>
                    <directory>src/main/profiles/dev</directory>
                    <includes>
                        <include>**/*.xml</include>
                        <include>**/*.properties</include>
                    </includes>
                    <filtering>true</filtering>
                </resource>
            </resources>
        </build>
    </profile>

    <profile>
        <id>beta</id>
        <build>
            <resources>
                <resource>
                    <directory>src/main/profiles/beta</directory>
                    <includes>
                        <include>**/*.xml</include>
                        <include>**/*.properties</include>
                    </includes>
                    <filtering>true</filtering>
                </resource>
            </resources>
        </build>
    </profile>

    <profile>
        <id>test</id>
        <build>
            <resources>
                <resource>
                    <directory>src/main/profiles/test</directory>
                    <includes>
                        <include>**/*.xml</include>
                        <include>**/*.properties</include>
                    </includes>
                    <filtering>true</filtering>
                </resource>
            </resources>
        </build>
    </profile>

    <profile>
        <id>staging</id>
        <build>
            <resources>
                <resource>
                    <directory>src/main/profiles/staging</directory>
                    <includes>
                        <include>**/*.xml</include>
                        <include>**/*.properties</include>
                    </includes>
                    <filtering>true</filtering>
                </resource>
            </resources>
        </build>
    </profile>

    <profile>
        <id>prod</id>
        <build>
            <resources>
                <resource>
                    <directory>src/main/profiles/prod</directory>
                    <includes>
                        <include>**/*.xml</include>
                        <include>**/*.properties</include>
                    </includes>
                    <filtering>true</filtering>
                </resource>
            </resources>
        </build>
    </profile>
</profiles>
然后创建不同环境的文件夹,然后创建对应的属性文件
-
创建beta环境文件夹,创建相应的配置文件
-
创建dev环境的文件夹,创建相应的配置文件
-
创建prod环境的文件夹,创建相应的配置文件
-
创建staging环境的文件夹,创建相应的配置文件
-
创建test环境的文件夹,创建相应的配置文件