1. Spring入门
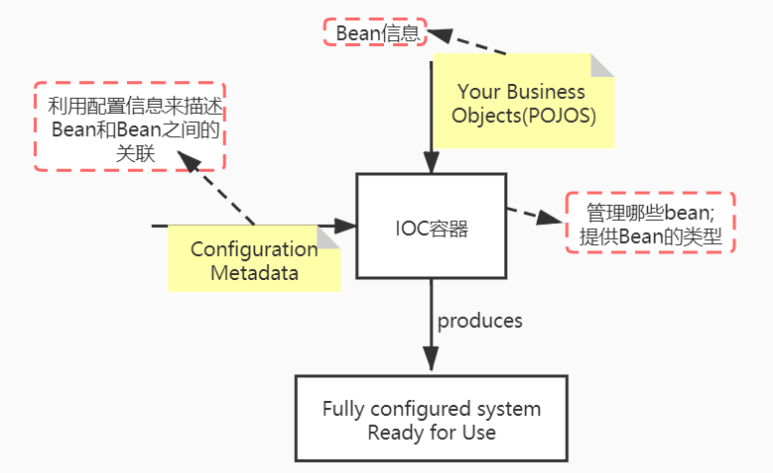
其中ApplicationContext是spring中的IOC容器
2. Spring MVC入门
2.1 HTTP
-
HyperText Transfer Protocol;
-
用于传输HTML等内容的应用层协议;
-
规定了浏览器和服务器之间如何通信、以及通信时的数据格式。
-
问题:一次http请求,底层为什么会有多个请求?

2.2 Spring MVC向浏览器响应数据的三种方式
2.2.1 向浏览器响应json数据
-- 利用ResponseBody注解,是返回的数据以JSON的格式显示在网页上;
-- 主要用于异步请求。
2.2.2 响应HTML数据方法1

- 建立ModelAndView对象;
- 放入数值;
- 使用setViewName方法,放入跳转的视图位置;
- 返回值为ModelAndView对象;
2.2.3 响应HTML数据方法2

- 在方法参数中加入Model对象;
- 放入数值;
- 返回视图位置;
- 方法的返回值是String类型。
补充:
@RequestMapping(path = "/index", method = RequestMethod.GET)
public String getIndexPage(Model model, Page page) {...}
-- 方法调用前,Spring MVC会自动实例化Model和Page,并将Page注入到Model中,因此,在thymeleaf中可以直接访问Page对象中的数据。
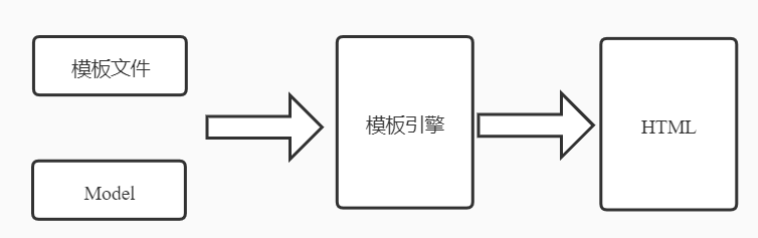
2.3 Thymeleaf模板引擎
- 目的:生成动态的HTML;
- 原理:以HTML文件为模板;
- 与Spring Boot结合图:
3. Mybatis入门
3.1 核心组件
- Mapper接口:即DAO接口;
- Mapper映射器:用于编写SQL,并将SQL和实体类映射的组件,采用XML、注解均可实现。
3.2 引入相关依赖
- Mysql-connector依赖
<dependency>
    <groupId>mysql</groupId>
    <artifactId>mysql-connector-java</artifactId>
    <version>8.0.16</version>
</dependency>
- spring-boot整合mybatis依赖
<dependency>
    <groupId>org.mybatis.spring.boot</groupId>
    <artifactId>mybatis-spring-boot-starter</artifactId>
    <version>2.0.1</version>
</dependency>
-
配置连接池 --application.properties中配置
- mysql配置
spring.datasource.driver-class-name=com.mysql.cj.jdbc.Driver spring.datasource.url=jdbc:mysql://localhost:3306/community?characterEncoding=utf-8&useSSL=false&serverTimezone=Hongkong spring.datasource.username=****** spring.datasource.password=***** spring.datasource.type=com.zaxxer.hikari.HikariDataSource spring.datasource.hikari.maximum-pool-size=15 spring.datasource.hikari.minimum-idle=5 spring.datasource.hikari.idle-timeout=30000- MybatisProperties配置
# 映射文件存放位置 mybatis.mapper-locations=classpath:mapper/*.xml #可修改,对应着mapper存放的位置 mybatis.type-aliases-package=com.nowcoder.community.entity #对应实体类所在包 mybatis.configuration.use-generated-keys=true # header_url 与headerUrl达到自动匹配 mybatis.configuration.map-underscore-to-camel-case=true- sql语句调试配置
logging.level.com.nowcoder.community = debug
3.3 SQL语句的.xml文件配置
- 实体类接口对应的xml配置

<?xml version="1.0" encoding="UTF-8" ?>
<!DOCTYPE mapper
        PUBLIC "-//mybatis.org//DTD Mapper 3.0//EN"
        "http://mybatis.org/dtd/mybatis-3-mapper.dtd">
<mapper namespace="com.nowcoder.community.dao.UserMapper"
★★注意:namespace必须是dao接口的全限定类名>
    <!--共性抽取-->
    <sql id="insertFields">
        username, password, salt, email, type, status, activation_code,
        header_url, create_time
    </sql>
    <sql id="selectFields">
        id, username, password, salt, email, type, status, activation_code,
        header_url, create_time
    </sql>
    -- ★★注意:id属性取值必须是dao接口的方法名
    <select id="selectById" resultType="User">
        select <include refid="selectFields"></include>
        from user
        where id = #{id}
    </select>
    <insert id="insertUser" parameterType="User" keyProperty="id">
        insert into user (
        <include refid="insertFields"/>
        ) values (#{username}, #{password}, #{salt}, #{email}, #{type},
        #{status}, #{activationCode}, #{headerUrl}, #{createTime})
    </insert>
    <update id="updateStatus">
        update user set status = #{status} where id = #{id}
    </update>
</mapper>
4. 异步请求过程

- 点击昵称框时,会隐式访问服务器的数据库,判断昵称是否被占用;
- 整体网页界面并没有被刷新。即为异步请求
5. 开发社区首页
5.1 开发流程
表示1次请求的执行过程;
5.2 分步实现
5.2.1 开发社区首页,显示前10个帖子
-
整体流程:
- 先开发DAO层、然后Service层,最后Controller层。(开发的经典流程)
- 针对分页情况,开发一个Page组件,即Page类。用于计算总页数、每页显示贴子的个数、查询路径(每次点击下一页或上一页,会访问相同的路径,因此课用于分页链接)以及显示的起始页和终止页。【可借鉴开发类似的功能】
@RequestMapping(path = "/index", method = RequestMethod.GET)
public String getIndexPage(Model model, Page page) {
    page.setRows(discussPostService.findDiscussPostRows(0));
    page.setPath("/index");

    List<DiscussPost> list = discussPostService.findDiscussPosts(0, page.getOffset(), page.getLimit());

    List<Map<String, Object>> discussPosts = new ArrayList<>();
    if (list != null) {
        for (DiscussPost post : list) {
            Map<String, Object> map = new HashMap<>();
            map.put("post", post);
            User user = userService.findUserById(post.getUserId());
            map.put("user", user);
            discussPosts.add(map);
        }
    }
    model.addAttribute("discussPosts", discussPosts);

    return "/index";
}

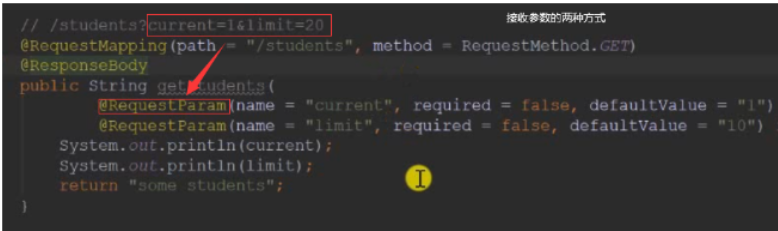
分页需要两个条件:1. 第几页;2. 每页显示多少条
5.2.2 开发分页组件、分页显示所有的帖子
后续会进行开发
5.3 表中的密码设计
- 所有的密码都进行了加密;存在的问题:设置的密码过于简单,虽然加密,仍可被破解;
- 建立一个属性salt,用法:在密码后面随机拼接一个字符串,对拼好字符串的密码再进行加密。
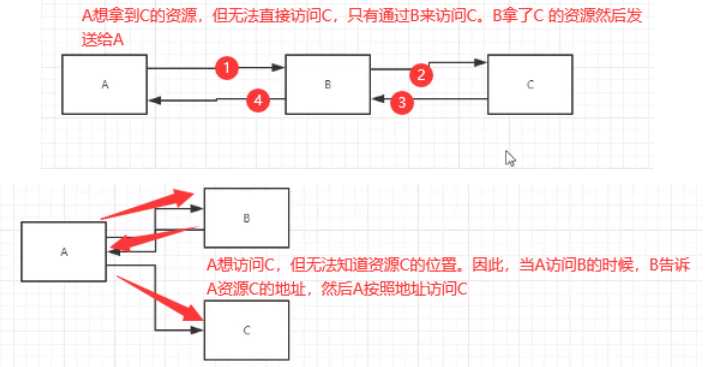
5.4 重定向
- 状态码:302
- 定义:
例:浏览器向服务器发出请求(删除/查询)

6. 项目调试技巧
6.1 问题判断
- 根据响应状态码的含义,判断问题是服务端还是客户端;
6.2 日志级别的设置
6.2.1 将日志打印到文件中
- ApplicationProperties中配置日志文件需要存放的路径
logging.file=e:/tmp/data/nowcoder/community.log
6.2.2 企业级环境中:将日志按照不同的级别存放到不同的文件中
- 配置.xml文件。例如:logback-spring.xml,其中logback名字是固定的
<?xml version="1.0" encoding="UTF-8"?>
<configuration>
    <contextName>community</contextName>
    <!--主目录-->
    <property name="LOG_PATH" value="E:/workspace/data"/>
    <!--子目录-->
    <property name="APPDIR" value="community"/>

    <!-- error file -->
    <appender name="FILE_ERROR" class="ch.qos.logback.core.rolling.RollingFileAppender">
        <file>${LOG_PATH}/${APPDIR}/log_error.log</file>
        <rollingPolicy class="ch.qos.logback.core.rolling.TimeBasedRollingPolicy">
            <fileNamePattern>${LOG_PATH}/${APPDIR}/error/log-error-%d{yyyy-MM-dd}.%i.log</fileNamePattern>
            <timeBasedFileNamingAndTriggeringPolicy class="ch.qos.logback.core.rolling.SizeAndTimeBasedFNATP">
                <maxFileSize>5MB</maxFileSize>
            </timeBasedFileNamingAndTriggeringPolicy>
            <maxHistory>30</maxHistory>
        </rollingPolicy>
        <append>true</append>
        <encoder class="ch.qos.logback.classic.encoder.PatternLayoutEncoder">
            <pattern>%d %level [%thread] %logger{10} [%file:%line] %msg%n</pattern>
            <charset>utf-8</charset>
        </encoder>
        <filter class="ch.qos.logback.classic.filter.LevelFilter">
            <level>error</level>
            <onMatch>ACCEPT</onMatch>
            <onMismatch>DENY</onMismatch>
        </filter>
    </appender>

    <!-- warn file -->
    <appender name="FILE_WARN" class="ch.qos.logback.core.rolling.RollingFileAppender">
        <file>${LOG_PATH}/${APPDIR}/log_warn.log</file>
        <!--滚动策略-->
        <!--用于当日志文件太大无法存储时的处理策略-->
        <rollingPolicy class="ch.qos.logback.core.rolling.TimeBasedRollingPolicy">
            <!--日志存放不下时,新建文件夹的名字-->
            <fileNamePattern>${LOG_PATH}/${APPDIR}/warn/log-warn-%d{yyyy-MM-dd}.%i.log</fileNamePattern>
            <timeBasedFileNamingAndTriggeringPolicy class="ch.qos.logback.core.rolling.SizeAndTimeBasedFNATP">
                <maxFileSize>5MB</maxFileSize>
            </timeBasedFileNamingAndTriggeringPolicy>
            <maxHistory>30</maxHistory>
        </rollingPolicy>
        <!--以追加的方式增加日志,不是覆盖-->
        <append>true</append>
        <encoder class="ch.qos.logback.classic.encoder.PatternLayoutEncoder">
            <pattern>%d %level [%thread] %logger{10} [%file:%line] %msg%n</pattern>
            <charset>utf-8</charset>
        </encoder>
        <filter class="ch.qos.logback.classic.filter.LevelFilter">
            <!--过滤器,什么级别的日志会被处理-->
            <level>warn</level>
            <onMatch>ACCEPT</onMatch>
            <onMismatch>DENY</onMismatch>
        </filter>
    </appender>

    <!-- info file -->
    <appender name="FILE_INFO" class="ch.qos.logback.core.rolling.RollingFileAppender">
        <file>${LOG_PATH}/${APPDIR}/log_info.log</file>
        <rollingPolicy class="ch.qos.logback.core.rolling.TimeBasedRollingPolicy">
            <fileNamePattern>${LOG_PATH}/${APPDIR}/info/log-info-%d{yyyy-MM-dd}.%i.log</fileNamePattern>
            <timeBasedFileNamingAndTriggeringPolicy class="ch.qos.logback.core.rolling.SizeAndTimeBasedFNATP">
                <maxFileSize>5MB</maxFileSize>
            </timeBasedFileNamingAndTriggeringPolicy>
            <maxHistory>30</maxHistory>
        </rollingPolicy>
        <append>true</append>
        <encoder class="ch.qos.logback.classic.encoder.PatternLayoutEncoder">
            <pattern>%d %level [%thread] %logger{10} [%file:%line] %msg%n</pattern>
            <charset>utf-8</charset>
        </encoder>
        <filter class="ch.qos.logback.classic.filter.LevelFilter">
            <level>info</level>
            <onMatch>ACCEPT</onMatch>
            <onMismatch>DENY</onMismatch>
        </filter>
    </appender>

    <!-- console -->
    <appender name="STDOUT" class="ch.qos.logback.core.ConsoleAppender">
        <encoder>
            <pattern>%d %level [%thread] %logger{10} [%file:%line] %msg%n</pattern>
            <charset>utf-8</charset>
        </encoder>
        <filter class="ch.qos.logback.classic.filter.ThresholdFilter">
            <level>debug</level>
        </filter>
    </appender>

    <logger name="com.nowcoder.community" level="debug"/>
    <!--根目录的级别-->
    <root level="info">
        <appender-ref ref="FILE_ERROR"/>
        <appender-ref ref="FILE_WARN"/>
        <appender-ref ref="FILE_INFO"/>
        <appender-ref ref="STDOUT"/>
    </root>
</configuration>
7. Git配置
- Git用户名和邮箱的设置
git config --global user.name "名字"
git config --global user.email "邮箱"
- Git查看配置列表
git config --list
-
将代码提交到本地仓库
-
在git命令行中,跳到代码所在的目录
-
执行初始化命令git init
-
将文件添加到git中
-
git add *; -- 添加所有的文件
git add *.xml; -- 添加xml文件
- 查看Git的状态码
git status
- 提交代码到仓库中
git commit -m 'Test1'; -- m表示提交文件的备注
- 如果进行了修改,则:
-- 6.1 首先查看状态;
-- 6.2 其次添加到git中;
-- 6.3 最后进行提交。
- 将代码存储到远程仓库上
git为了避免代码在传输过程中,代码被窃取,采用了SSL安全连接;
为了启用SSL连接:
2.1 首先进行配置密钥
ssh-keygen -t rsa -C "邮箱名" -- 生成密钥
2.2 将密钥添加到远程仓库上,这样远程仓库可以接收上传的代码
- 在本地声明远程仓库,即起一个别名,方便后续的调用
git remote add origin https://git.nowcoder.com/118294162/community.git
-- origin为别名
- 将代码推送到远程仓库中
git push -u origin master