原创博客:转载请标明出处:http://www.cnblogs.com/zxouxuewei/
时间过去还久了 之前有其他项目的事情耽误了博客的更新,今天有点时间了,打算更新一贴,也是大家比较喜欢的一个贴。就是用自己搭建的机器人移动平台去创建一个地图。
首先要求如下:
1.必须要有一个能够遥控或者自动的移动平台,并且已经经过速度闭环控制。(我的基控制器代码没有开源出来 ,后期会讲到相关的PID控制和基本的boost串口通行问题)
2.校准了角速度和线速度。(http://www.cnblogs.com/zxouxuewei/p/5482302.html)
3.必须可以发布激光数据(可以采用KINECT 或者激光雷达)。
4.必须要发布TF树的转换,odom---->base_link---->laser(基本就可以了,发布时有些直接可以静态发布)。
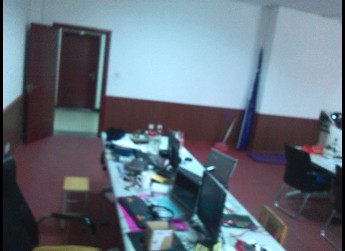
我选取的场地和机器人如下:

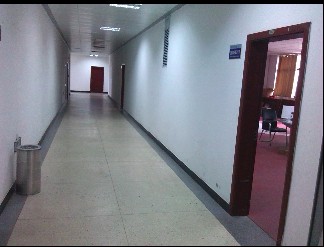

实际建图的效果如下:(一个房间和走廊的地图)

一。操作如下:
1.我的机器人的启动文件如下:
<launch>
    <param name="/use_sim_time" value="$(arg simulation)"/>
    <node name="base_laser_tf" pkg="tf" type="static_transform_publisher" args="0.15 0 0.15 0 0 0 base_link laser 100"/>
    <node pkg="odom_tf_package" type="tf_broadcaster_node" name="tf_broad"/>
    <include file="$(find odom_tf_package)/launch/include/rplidar_ros.launch.xml">
  </include>
</launch>
代码如下:tf_broadcaster_node.cpp
#include <ros/ros.h>
#include <sensor_msgs/JointState.h>
#include <tf/transform_broadcaster.h>
#include <nav_msgs/Odometry.h>
#include <iostream>
#include <iomanip>
#include <boost/asio.hpp>
#include <boost/bind.hpp>
#include <math.h>
#include "string.h"

using namespace std;
using namespace boost::asio;

double x = 0.0;
double y = 0.0;
double th = 0.0;
double vx = 0.0;
double vy = 0.0;
double vth = 0.0;
double dt = 0.0;


//Defines the packet protocol for communication between upper and lower computers
#pragma pack(1)
typedef union _Upload_speed_
{
    unsigned char buffer[16];
    struct _Speed_data_
    {
        float Header;
        float X_speed;
        float Y_speed;
        float Z_speed;
    }Upload_Speed;
}Struct_Union;
#pragma pack(4)

//Initializes the protocol packet data
Struct_Union Reciver_data        = {0,0,0,0,0,0,0,0,0,0,0,0,0,0,0,0};
Struct_Union Transmission_data   = {0,0,0,0,0,0,0,0,0,0,0,0,0,0,0,0};

//Defines the message type to be transmitted geometry_msgs
geometry_msgs::Quaternion odom_quat;

void cmd_velCallback(const geometry_msgs::Twist &twist_aux)
{
    geometry_msgs::Twist twist = twist_aux;

    Transmission_data.Upload_Speed.Header = header_data;
    Transmission_data.Upload_Speed.X_speed = twist_aux.linear.x;
    Transmission_data.Upload_Speed.Y_speed = twist_aux.linear.y;
    Transmission_data.Upload_Speed.Z_speed = twist_aux.angular.z;
}


int main(int argc, char** argv)
{
    unsigned char check_buf[1];
    std::string usart_port,robot_frame_id,smoother_cmd_vel;
    int baud_data;
    float p,i,d;

    ros::init(argc, argv, "base_controller");
    ros::NodeHandle n;
    ros::Time current_time, last_time;

    //Gets the parameters in the launch file
    ros::NodeHandle nh_private("~");
    nh_private.param<std::string>("usart_port", usart_port, "/dev/robot_base");
    nh_private.param<int>("baud_data", baud_data, 115200);
    nh_private.param<std::string>("robot_frame_id", robot_frame_id, "base_link");
    nh_private.param<std::string>("smoother_cmd_vel", smoother_cmd_vel, "/cmd_vel");


    //Create a boot node for the underlying driver layer of the robot base_controller
    ros::Subscriber cmd_vel_sub = n.subscribe(smoother_cmd_vel, 50, cmd_velCallback);
    ros::Publisher odom_pub = n.advertise<nav_msgs::Odometry>("odom", 50);
    tf::TransformBroadcaster odom_broadcaster;

    //Initializes the data related to the boost serial port
    io_service iosev;
    serial_port sp(iosev, usart_port);
    sp.set_option(serial_port::baud_rate(baud_data));
    sp.set_option(serial_port::flow_control(serial_port::flow_control::none));
    sp.set_option(serial_port::parity(serial_port::parity::none));
    sp.set_option(serial_port::stop_bits(serial_port::stop_bits::one));
    sp.set_option(serial_port::character_size(8));

    while(ros::ok())
    {
        ros::spinOnce();
        //Gets the cycle of two time slice rotations. The purpose is to calculate the odom message data
        current_time = ros::Time::now();
        dt = (current_time - last_time).toSec();
        last_time = ros::Time::now();

        //Read the data from the lower computer
        read(sp, buffer(Reciver_data.buffer));
        if(Reciver_data.Upload_Speed.Header > 15.4 && Reciver_data.Upload_Speed.Header < 15.6)
        {
                vx  = Reciver_data.Upload_Speed.X_speed;
                vy  = Reciver_data.Upload_Speed.Y_speed;
                vth = Reciver_data.Upload_Speed.Z_speed;
                //ROS_INFO("%2f    %2f    %2f",vx,vy,vth);
        }
        else
        {
            //ROS_INFO("------Please wait while the robot is connected!-----");
            read(sp, buffer(check_buf));
        }
        //Send the next bit machine under the cmd_val topic to monitor the speed information
        write(sp, buffer(Transmission_data.buffer,16));
        //Calculate odometer data
        double delta_x = (vx * cos(th) - vy * sin(th)) * dt;
        double delta_y = (vx * sin(th) + vy * cos(th)) * dt;
        double delta_th = vth * dt;
        x += delta_x;
        y += delta_y;
        th += delta_th;

        geometry_msgs::Quaternion odom_quat = tf::createQuaternionMsgFromYaw(th);

        geometry_msgs::TransformStamped odom_trans;
        odom_trans.header.stamp = current_time;
        odom_trans.header.frame_id = "odom";
        odom_trans.child_frame_id = robot_frame_id;

        odom_trans.transform.translation.x = x;
        odom_trans.transform.translation.y = y;
        odom_trans.transform.translation.z = 0.0;
        odom_trans.transform.rotation = odom_quat;

        odom_broadcaster.sendTransform(odom_trans);

        nav_msgs::Odometry odom;
        odom.header.stamp = current_time;
        odom.header.frame_id = "odom";

        odom.pose.pose.position.x = x;
        odom.pose.pose.position.y = y;
        odom.pose.pose.position.z = 0.0;
        odom.pose.pose.orientation = odom_quat;


        odom.child_frame_id = robot_frame_id;
        odom.twist.twist.linear.x = vx;
        odom.twist.twist.linear.y = vy;
        odom.twist.twist.angular.z = vth;
        //Release odometer data between odom-> base_link
        odom_pub.publish(odom);
    }
    iosev.run();
}
2.gmapping启动launch文件如下:
<launch>

  <arg name="scan_topic" default="scan" />
  <node pkg="gmapping" type="slam_gmapping" name="slam_gmapping" output="screen" clear_params="true">
    <param name="odom_frame" value="odom"/>
    <param name="map_update_interval" value="2.0"/>
    <!-- Set maxUrange < actual maximum range of the Laser -->
    <param name="maxRange" value="5.0"/>
    <param name="maxUrange" value="4.5"/>
    <param name="sigma" value="0.05"/>
    <param name="kernelSize" value="1"/>
    <param name="lstep" value="0.05"/>
    <param name="astep" value="0.05"/>
    <param name="iterations" value="5"/>
    <param name="lsigma" value="0.075"/>
    <param name="ogain" value="3.0"/>
    <param name="lskip" value="0"/>
    <param name="srr" value="0.01"/>
    <param name="srt" value="0.02"/>
    <param name="str" value="0.01"/>
    <param name="stt" value="0.02"/>
    <param name="linearUpdate" value="0.5"/>
    <param name="angularUpdate" value="0.5"/>
    <param name="temporalUpdate" value="-1.0"/>
    <param name="resampleThreshold" value="0.5"/>
    <param name="particles" value="80"/

<!--
    <param name="xmin" value="-50.0"/>
    <param name="ymin" value="-50.0"/>
    <param name="xmax" value="50.0"/>
    <param name="ymax" value="50.0"/>
  make the starting size small for the benefit of the Android client's memory...
  -->
    <param name="xmin" value="-1.0"/>
    <param name="ymin" value="-1.0"/>
    <param name="xmax" value="1.0"/>
    <param name="ymax" value="1.0"/>

    <param name="delta" value="0.05"/>
    <param name="llsamplerange" value="0.01"/>
    <param name="llsamplestep" value="0.01"/>
    <param name="lasamplerange" value="0.005"/>
    <param name="lasamplestep" value="0.005"/>
    <remap from="scan" to="$(arg scan_topic)"/>
  </node>
</launch>
3.rviz启动文件配置如下:
<launch>
  <node name="rplidarNode"          pkg="rplidar_ros"  type="rplidarNode" output="screen">
  <param name="serial_port"         type="string" value="/dev/ttyUSB0"/>
  <param name="serial_baudrate"     type="int"    value="115200"/>
  <param name="frame_id"            type="string" value="laser"/>
  <param name="inverted"            type="bool"   value="false"/>
  <param name="angle_compensate"    type="bool"   value="true"/>
  </node>
</launch>
二。开始创建地图。
1,首先启动机器人的节点:
roslaunch odom_tf_package ZHXWBOT_start.launch
2.启动机器人控制节点(如果自己有遥控器就没有必要启动)
arbotix_gui
3.启动gmapping
roslaunch odom_tf_package gmapping.launch
4.启动rviz实时查看创建地图的过程
roslaunch odom_tf_package rviz.launch
然后通过机器人控制节点移动你的机器人到达所建场地的每一个角落,尽量走一个闭合的路线,