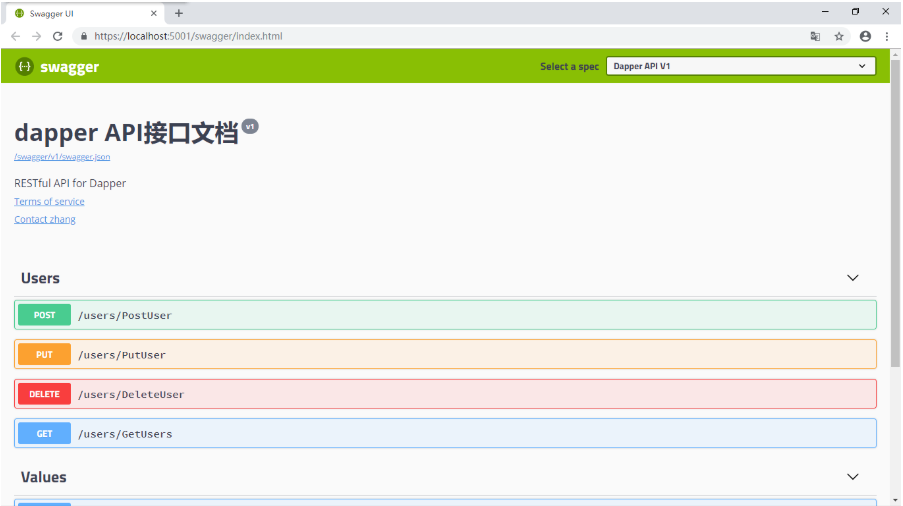
目前有很多项目都用到Swagger,我们讲一下如何在老项目中添加swagger:
- 在.net core 项目中部署:
第一步:首先添加包Swashbuckle.AspNetCore (可通过微软添加包命令Install-Package 包名进行添加,也可以通过管理NuGet程序包进行添加)
第二步:修改launchSettings.json的launchUrl为swagger,即程序启动后进入swagger UI风格页面也可以说Rest风格,如下:
{
  "iisSettings": {
    "windowsAuthentication": false,
    "anonymousAuthentication": true,
    "iisExpress": {
      "applicationUrl": "http://localhost:54834",
      "sslPort": 44359
    }
  },
  "profiles": {
    "IIS Express": {
      "commandName": "IISExpress",
      "launchBrowser": true,
      "environmentVariables": {
        "ASPNETCORE_ENVIRONMENT": "Development"
      }
    },
    "Test": {
      "commandName": "Project",
      "launchBrowser": true,
      "launchUrl": "swagger",
      "environmentVariables": {
        "ASPNETCORE_ENVIRONMENT": "Production"
      },
      "applicationUrl": "https://localhost:5001;http://localhost:5000"
    }
  }
}
第三步:在Startup.cs中的方法ConfigureServices方法中添加swagger 相关代码。
        /// <summary>
        /// 注册服务
        /// </summary>
        /// <param name="services"></param>
        /// <returns></returns>
        public IServiceProvider ConfigureServices(IServiceCollection services)
        {
            services.AddAutoMapper();
            TestContext.ConStr = Configuration.GetConnectionString("SqlServer");
            RedisHelper.RedisConStr = Configuration["RedisConnection"];
            RedisHelper.RedisConId = Configuration["RedisConnectDbId"];
            services.AddDbContext<TestContext>(options =>
            {
                options.UseSqlServer(Configuration.GetConnectionString("SqlServer"),
                    builder =>
                    {
                        builder.EnableRetryOnFailure(
                            maxRetryCount: 5,
                            maxRetryDelay: TimeSpan.FromSeconds(30),
                            errorNumbersToAdd: new int[] { 2 });
                    });
            });
            services.AddMvc().SetCompatibilityVersion(CompatibilityVersion.Version_2_1).AddJsonOptions(options =>
            {
                options.SerializerSettings.DateFormatString = "yyyy-MM-dd HH:mm:ss";
            });
            #region Swagger
            services.AddSwaggerGen(c =>
            {
                c.SwaggerDoc("v1", new Info
                {
                    Version = "v0.1.0",
                    Title = "Test Swagger",
                    Description = "框架说明文档",
                    TermsOfService = "None",
                    Contact = new Swashbuckle.AspNetCore.Swagger.Contact { Name = "Test.Swagger", Email = "test@net.com", Url = "https://www.facai.com" }
                });
                //如果不加入以下两个xml 也是可以的 但是不会对api有中文说明,使用了一下两个xml 就需要对成员使用///注释
                //本webapi的xml
                var basePath = Microsoft.DotNet.PlatformAbstractions.ApplicationEnvironment.ApplicationBasePath;
                var xmlPath = Path.Combine(basePath, "Test.xml");//这个就是刚刚配置的xml文件名
                c.IncludeXmlComments(xmlPath, true);//默认的第二个参数是false,这个是controller的注释,记得修改
                c.ResolveConflictingActions(apiDescriptions => apiDescriptions.First());
                //如果不引用别的类库项目,那么以上就是一个webapi项目添加swagger服务的全部


                //webapi引用model的xml
                //var xmlModelPath = Path.Combine(basePath, "Learn.Swagger.Model.xml");//这个就是Model层的xml文件名
                //c.IncludeXmlComments(xmlPath, true);//默认的第二个参数是false,这个是controller的注释,记得修改
                //c.IncludeXmlComments(xmlModelPath);
            });
            #endregion
        }
第四步:在Startup.cs中的方法Configure方法中添加swagger 相关代码。

        /// <summary>
        /// 设置配置选项
        /// </summary>
        /// <param name="app"></param>
        /// <param name="env"></param>
        /// <param name="loggerFactory"></param>
        public void Configure(IApplicationBuilder app, IHostingEnvironment env, ILoggerFactory loggerFactory)
        {
            if (env.IsDevelopment())
            {
                app.UseDeveloperExceptionPage();

                #region Swagger
                app.UseSwagger();
                app.UseSwaggerUI(c =>
                {
                    c.SwaggerEndpoint("/swagger/v1/swagger.json", "ApiHelp V1");
                });
                #endregion
            }
            else
            {
                app.UseExceptionHandler("/Home/Error");
                app.UseHsts();
            }
        }
最后,生成后界面如下:

- 添加Swagger在本地调试是好的,但是发布到IIS上就会出现很多问题,最多的问题是出现404或者502的错误,解决方案参照如下:
发布后项目往往默认为Production环境,将其修改为Development即可解决。
解决方法
打开发布到iis的文件夹下的web.config文件,添加以下代码:

<environmentVariables>
     <environmentVariable name="ASPNETCORE_ENVIRONMENT" value="Development" />
</environmentVariables>

修改后的web.config结构大致如下:

<?xml version="1.0" encoding="utf-8"?>
<configuration>
  <location path="." inheritInChildApplications="false">
    <system.webServer>
      <handlers>
        <add name="aspNetCore" path="*" verb="*" modules="AspNetCoreModuleV2" resourceType="Unspecified" />
      </handlers>
      <aspNetCore processPath="dotnet" arguments="*.dll" stdoutLogEnabled="false" stdoutLogFile=".logsstdout" hostingModel="InProcess">
      <environmentVariables>
        <environmentVariable name="ASPNETCORE_ENVIRONMENT" value="Development" />
      </environmentVariables>
    </aspNetCore>
	</system.webServer>
  </location>
</configuration>
<!--ProjectGuid: 15af0485-b65a-422a-bf12-5877b85abb6c-->
