阅读须知
全局懒加载
更换Banner
SpringBoot监听启动
获取启动参数
run方法前执行
关闭容器,退出程序
注入外部参数
-
@Value注入配置文件参数
-
注入命令行参数
-
注入随机值
-
配置参数引用另一个配置参数
-
将配置文件映射到bean
-
将配置文件映射到@Bean标签
-
自动加载config目录下的application.properties文件
-
加载任意目录下,任意文件名的properties文件
-
设置指定环境的配置文件
-
根据不同的环境加载不同的Bean
日志记录
阅读须知
本博客使用参考SpringBoot文档。https://docs.spring.io/spring-boot/docs/2.2.4.RELEASE/reference/html/spring-boot-features.html
博客中包含代码片段使用SpringBoot2.2.4.RELEASE、JDK8。SpringBoot简化Spring开发,主要体现到减少XML配置,使用注解开发。SpirngBoot核心配置文件有application.properties和application.yml。两种方式,本博客使用properties文件(个人习惯问题)
全局懒加载
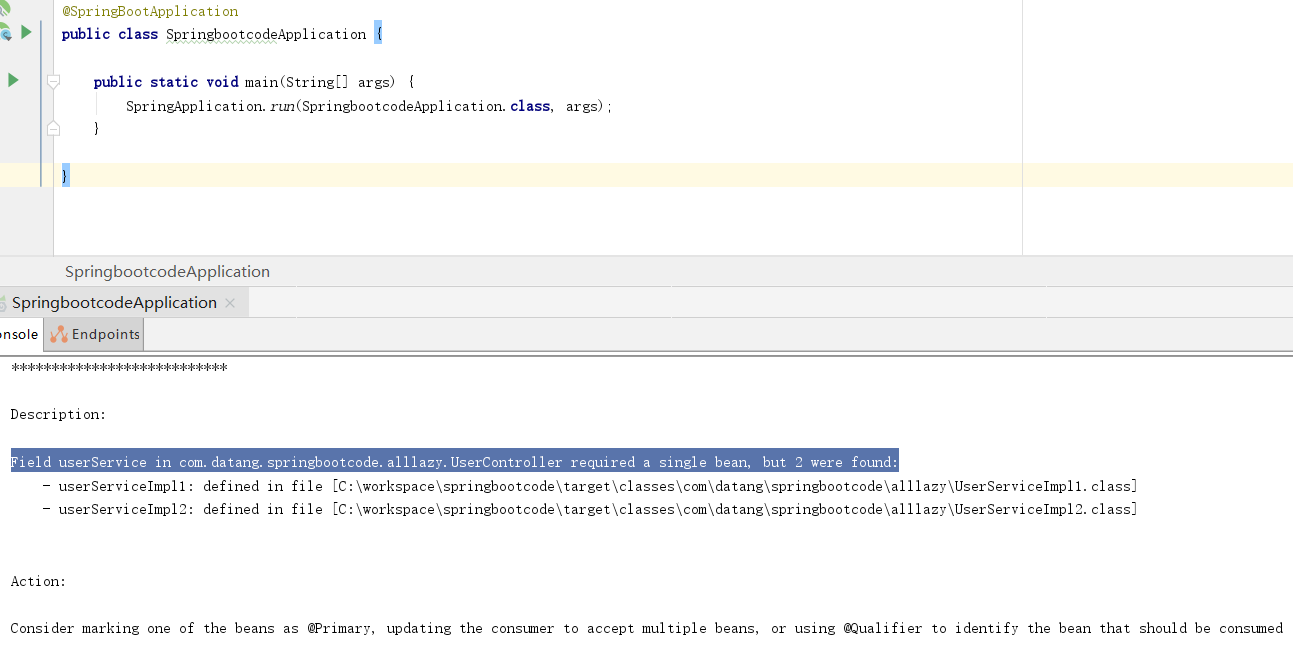
在Spring中@Lazy的注解和xml配置中<bean lazy=''>属性可以指定bean是否是延迟加载。看下面的代码片段。Controller中注入Service接口,但是该接口有两个实现类,Spring根据先byType后byName的原则,找到了类型可用的两个实现类,但是没有一个名称相同,这样会有问题的。SpringBoot启动失败。


package com.datang.springbootcode.alllazy;/*
* @auther 顶风少年
* @mail dfsn19970313@foxmail.com
* @date 2020-02-04 14:27
* @notify
* @version 1.0
*/
public interface UserService {
}
package com.datang.springbootcode.alllazy;/*
* @auther 顶风少年
* @mail dfsn19970313@foxmail.com
* @date 2020-02-04 14:27
* @notify
* @version 1.0
*/

import org.springframework.stereotype.Service;

@Service
public class UserServiceImpl1 implements UserService {
}
package com.datang.springbootcode.alllazy;/*
* @auther 顶风少年
* @mail dfsn19970313@foxmail.com
* @date 2020-02-04 14:27
* @notify
* @version 1.0
*/

import org.springframework.stereotype.Service;

@Service
public class UserServiceImpl2 implements UserService {
}
package com.datang.springbootcode.alllazy;/*
 * @auther 顶风少年
 * @mail dfsn19970313@foxmail.com
 * @date 2020-02-04 14:29
 * @notify
 * @version 1.0
 */

import org.springframework.beans.factory.annotation.Autowired;
import org.springframework.web.bind.annotation.GetMapping;
import org.springframework.web.bind.annotation.RestController;

@RestController
public class UserController {
    @Autowired
    private UserService userService;

    @GetMapping(value = "user")
    public String get() {
        return "ok";
    }
}
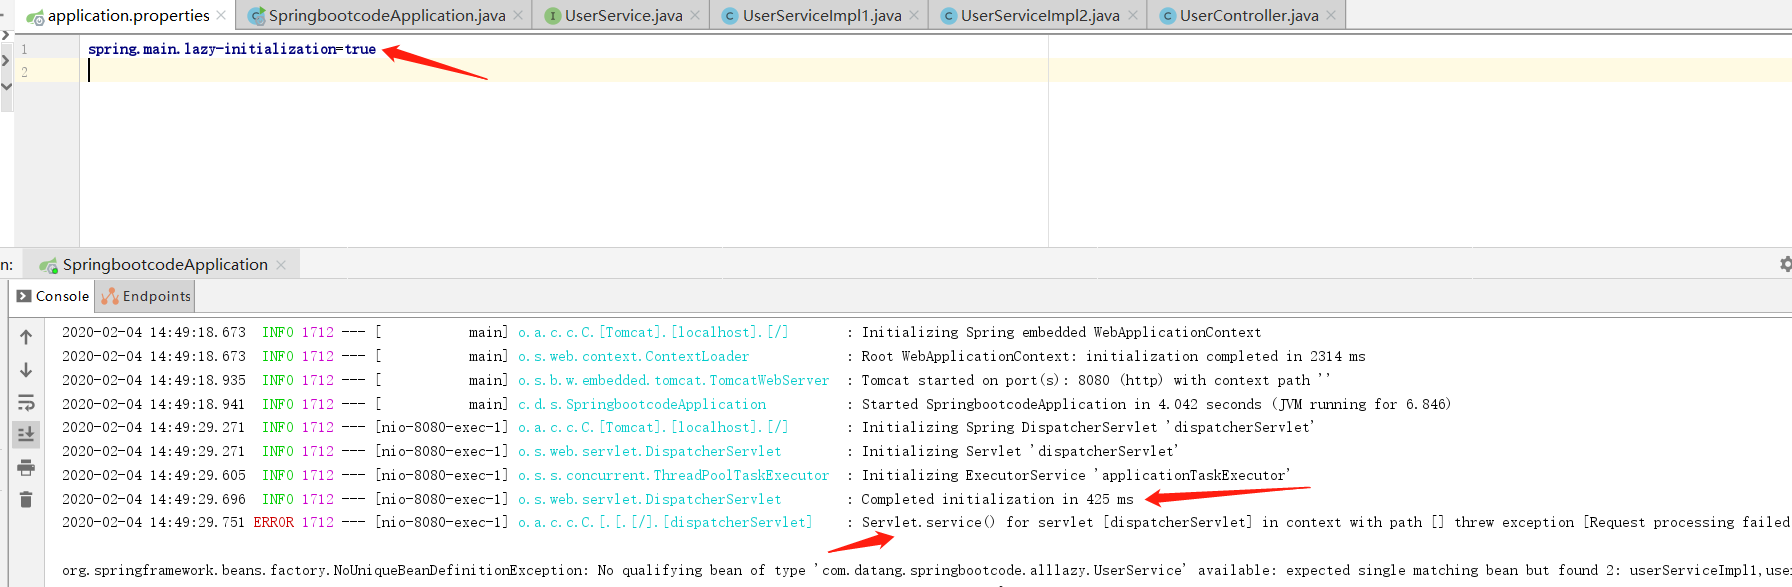
在配置文件中声明全局懒加载,则启动时不会报错,只有在发起请求时,才会报错。
spring.main.lazy-initialization=true
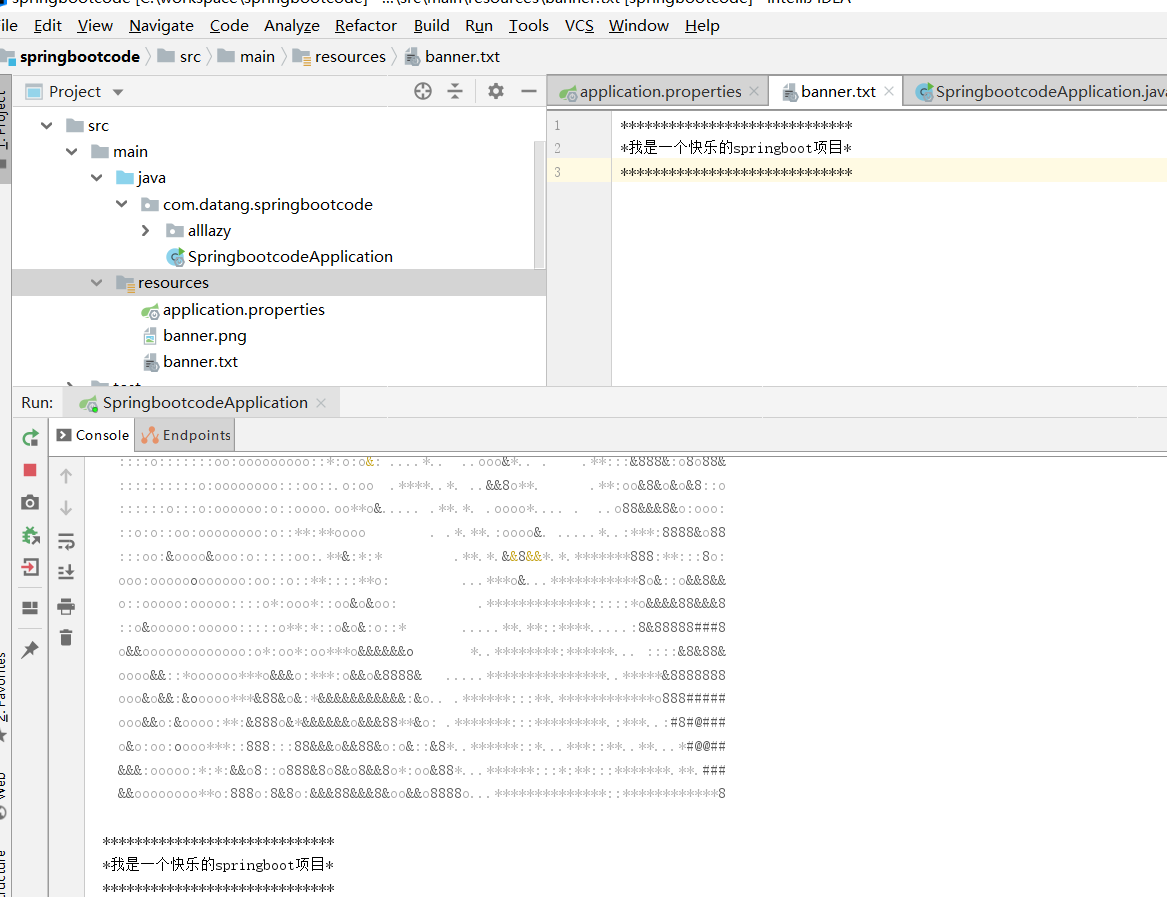
更换Banner
在resource目录下添加banner.txt和banner.png可以在启动时,更改默认的banner。通过配置文件指定banner的图片,会将图片转成ASCII码。这应该是是一个有趣味的功能了。
spring.banner.image.location=banner.png
SpringBoot监听启动
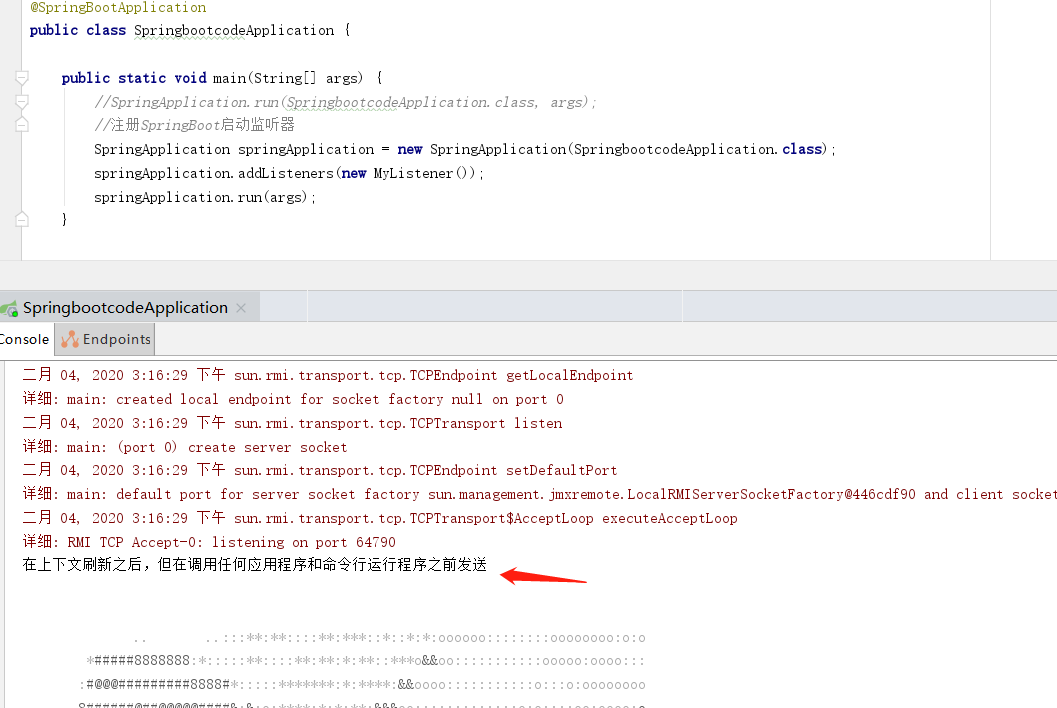
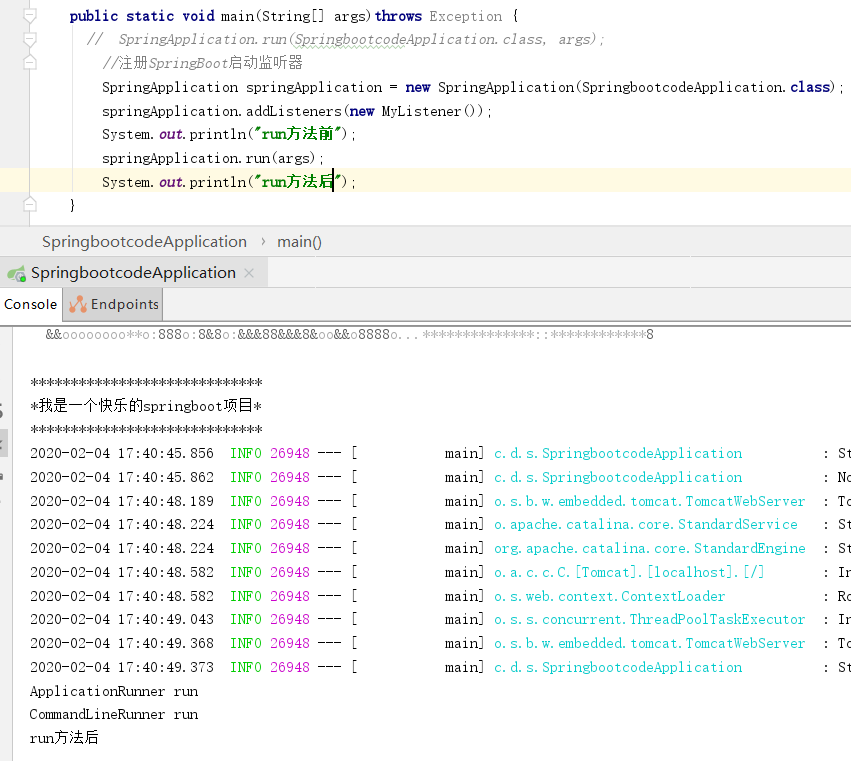
在SpringBoot启动前,我们可以设置监听类,在不同的地方监听SpringBoot。任何实现了ApplicationListener接口的类都可以作为监听类,如果指定了泛型类型,则在指定的位置监听。以下代码片段则是监听Spring上下文刷新。除此之外,还支持另外的8个监听点。注意如果不使用泛型,则会在每一个监听点都监听。另外在SpringBoot启动的main方法内还要添加监听器的对象。
package com.datang.springbootcode.applicationlistener;/*
* @auther 顶风少年
* @mail dfsn19970313@foxmail.com
* @date 2020-02-02 17:41
* @notify
* @version 1.0
*/

import org.springframework.boot.context.event.ApplicationStartingEvent;
import org.springframework.context.ApplicationListener;

//SpringBoot启动监听器
public class MyListener implements ApplicationListener<ApplicationStartingEvent> {

  /*  An ApplicationStartingEvent is sent at the start of a run but before any processing, except for the registration of listeners and initializers.

    An ApplicationEnvironmentPreparedEvent is sent when the Environment to be used in the context is known but before the context is created.

    An ApplicationContextInitializedEvent is sent when the ApplicationContext is prepared and ApplicationContextInitializers have been called but before any bean definitions are loaded.

    An ApplicationPreparedEvent is sent just before the refresh is started but after bean definitions have been loaded.

    An ApplicationStartedEvent is sent after the context has been refreshed but before any application and command-line runners have been called.

    An ApplicationReadyEvent is sent after any application and command-line runners have been called. It indicates that the application is ready to service requests.

    An ApplicationFailedEvent is sent if there is an exception on startup.

    The above list only includes SpringApplicationEvents that are tied to a SpringApplication. In addition to these, the following events are also published after ApplicationPreparedEvent and before ApplicationStartedEvent:

    A ContextRefreshedEvent is sent when an ApplicationContext is refreshed.

    A WebServerInitializedEvent is sent after the WebServer is ready. ServletWebServerInitializedEvent and ReactiveWebServerInitializedEvent are the servlet and reactive variants respectively.*/

    @Override
    public void onApplicationEvent(ApplicationStartingEvent applicationStartingEvent) {
        System.out.println("在上下文刷新之后,但在调用任何应用程序和命令行运行程序之前发送");
    }
}
package com.datang.springbootcode;

import com.datang.springbootcode.applicationlistener.MyListener;
import org.springframework.boot.SpringApplication;
import org.springframework.boot.autoconfigure.SpringBootApplication;

@SpringBootApplication
public class SpringbootcodeApplication {

    public static void main(String[] args) {
        //SpringApplication.run(SpringbootcodeApplication.class, args);
        //注册SpringBoot启动监听器
        SpringApplication springApplication = new SpringApplication(SpringbootcodeApplication.class);
        springApplication.addListeners(new MyListener());
        springApplication.run(args);
    }

}
获取启动参数
ApplicationArguments该bean可以获取系统启动参数。为了测试,我们需要在命令行启动。
package com.datang.springbootcode.arguments;/*
* @auther 顶风少年
* @mail dfsn19970313@foxmail.com
* @date 2020-02-02 20:23
* @notify
* @version 1.0
*/

import org.springframework.beans.factory.annotation.Autowired;
import org.springframework.boot.ApplicationArguments;
import org.springframework.stereotype.Component;

import java.util.List;
import java.util.Set;

@Component
public class ArgumentBean {
    @Autowired
    public ArgumentBean(ApplicationArguments args) {
        List<String> files = args.getNonOptionArgs();
        for (String s:files){
            System.out.println(s);
        }
        Set<String> optionNames = args.getOptionNames();
        for (String s:optionNames){
            System.out.println(s);
        }
        String[] sourceArgs = args.getSourceArgs();
        for (String s:sourceArgs){
            System.out.println(s);
        }
    }
}


run方法前执行
SpringBoot提供两个接口,ApplicationRunner和CommandLineRunner,实现任意一个接口的bean,都可以再run方法执行前执行。
package com.datang.springbootcode.runbefore;/*
* @auther 顶风少年
* @mail dfsn19970313@foxmail.com
* @date 2020-02-03 13:07
* @notify
* @version 1.0
*/

import org.springframework.boot.ApplicationArguments;
import org.springframework.boot.ApplicationRunner;
import org.springframework.boot.CommandLineRunner;
import org.springframework.stereotype.Component;

/*
* 两个接口实现任意一个都行
* */
@Component
public class RunBeforeBean implements ApplicationRunner, CommandLineRunner {
    @Override
    public void run(ApplicationArguments args) throws Exception {
        System.out.println("ApplicationRunner run");
    }

    @Override
    public void run(String... args) throws Exception {
        System.out.println("CommandLineRunner run");
    }
}
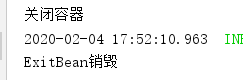
关闭容器,退出程序
讲真这个关闭方法我不知道到底应用在什么场景下,执行该关闭方法,会返回一个状态码,但是这个方法内部会执行SpringContext的close()。也就是说,所有的SpringBean都会执行销毁方法。
package com.datang.springbootcode.exit;/*
 * @auther 顶风少年
 * @mail dfsn19970313@foxmail.com
 * @date 2020-02-03 13:30
 * @notify
 * @version 1.0
 */

import org.springframework.stereotype.Component;

import javax.annotation.PreDestroy;

@Component
public class ExitBean {
    @PreDestroy
    public void destroy() {
        System.out.println("ExitBean销毁");
    }
}
package com.datang.springbootcode.exit;/*
 * @auther 顶风少年
 * @mail dfsn19970313@foxmail.com
 * @date 2020-02-03 13:37
 * @notify
 * @version 1.0
 */

import org.springframework.beans.factory.annotation.Autowired;
import org.springframework.boot.ExitCodeGenerator;
import org.springframework.boot.SpringApplication;
import org.springframework.context.ApplicationContext;
import org.springframework.web.bind.annotation.GetMapping;
import org.springframework.web.bind.annotation.RestController;

@RestController
public class ExitController {

    @Autowired
    private ApplicationContext context;

    @GetMapping("exit")
    public String exit() {
        System.exit(SpringApplication.exit(context, new ExitCodeGenerator() {
            @Override
            public int getExitCode() {
                System.out.println("关闭容器");
                return 5000;
            }
        }));

        return "ok";
    }
}
注入外部参数
@Value注入配置文件参数
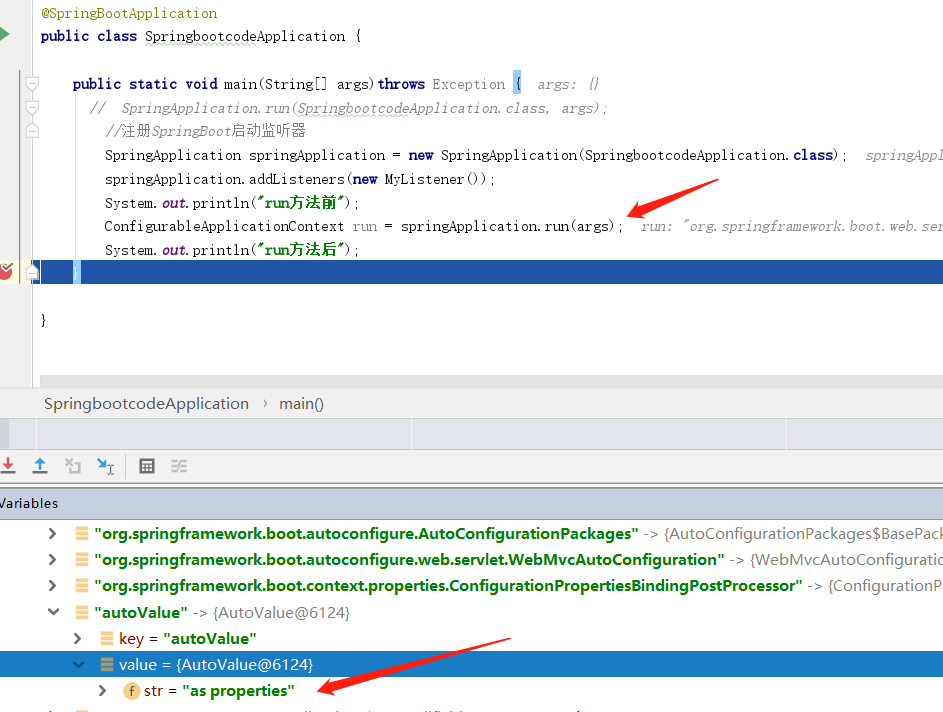
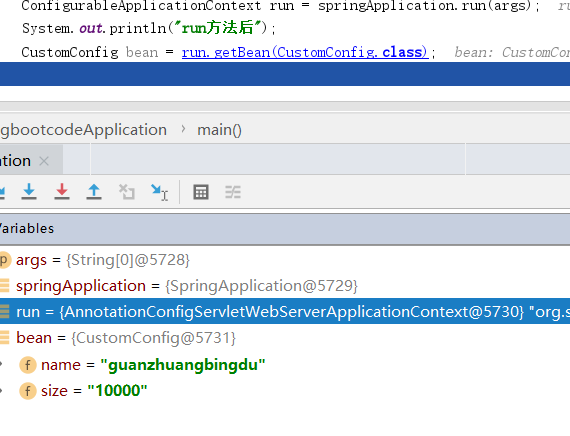
在application.properties中定义参数,这里我们通过run()方法的返回值拿到ConfigurableApplicationContext上下文对象,然后查看beanFactory->singletonObjects里边存储的bean信息。
package com.datang.springbootcode.autoargs;/*
 * @auther 顶风少年
 * @mail dfsn19970313@foxmail.com
 * @date 2020-02-04 18:39
 * @notify
 * @version 1.0
 */

import org.springframework.beans.factory.annotation.Value;
import org.springframework.stereotype.Component;

@Component
public class AutoValue {
    @Value("${my.data1}")
    private String str;
}
my.data1=as properties
注入命令行参数
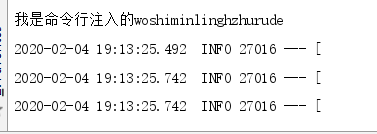
当配置文件中有my.data1参数我们在通过命令行注入到构造函数参数中。可以看出,命令行的注入的参数优先级比配置文件高。
package com.datang.springbootcode.autoargs;/*
 * @auther 顶风少年
 * @mail dfsn19970313@foxmail.com
 * @date 2020-02-03 14:16
 * @notify
 * @version 1.0
 */

import org.springframework.beans.factory.annotation.Value;
import org.springframework.stereotype.Component;

@Component
public class CommandLine {
    public CommandLine(@Value("${my.data1}") String str) {
        System.out.println("我是命令行注入的" + str);
    }
}

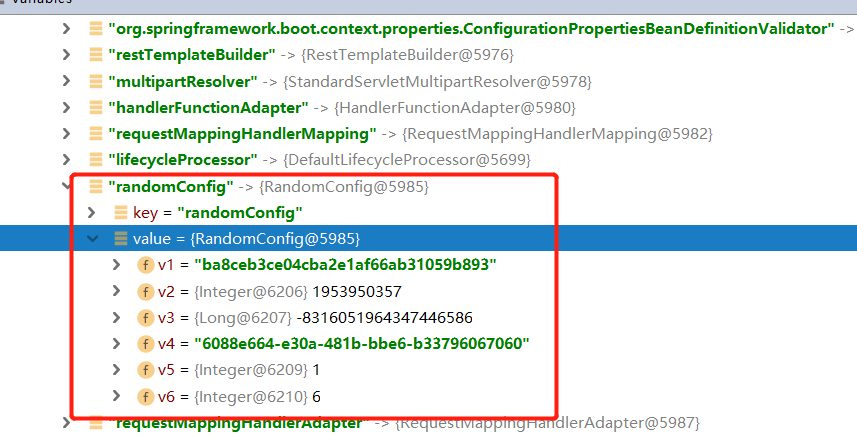
注入随机值
package com.datang.springbootcode.autoargs;/*
 * @auther 顶风少年
 * @mail dfsn19970313@foxmail.com
 * @date 2020-02-03 14:09
 * @notify
 * @version 1.0
 */

import org.springframework.beans.factory.annotation.Value;
import org.springframework.stereotype.Component;

@Component
public class RandomConfig {
    private String v1;
    private Integer v2;
    private Long v3;
    private String v4;
    private Integer v5;
    private Integer v6;

    public RandomConfig(@Value("${my.secret}") String v1, @Value("${my.number}") Integer v2,
                        @Value("${my.bignumber}") Long v3, @Value("${my.uuid}") String v4,
                        @Value("${my.number.less.than.ten}") Integer v5, @Value("${my.number.in.range}") Integer v6) {
        this.v1 = v1;
        this.v2 = v2;
        this.v3 = v3;
        this.v4 = v4;
        this.v5 = v5;
        this.v6 = v6;
    }
}
#提供随机值
my.secret=${random.value}
my.number=${random.int}
my.bignumber=${random.long}
my.uuid=${random.uuid}
my.number.less.than.ten=${random.int(10)}
my.number.in.range=${random.int[5,8]}
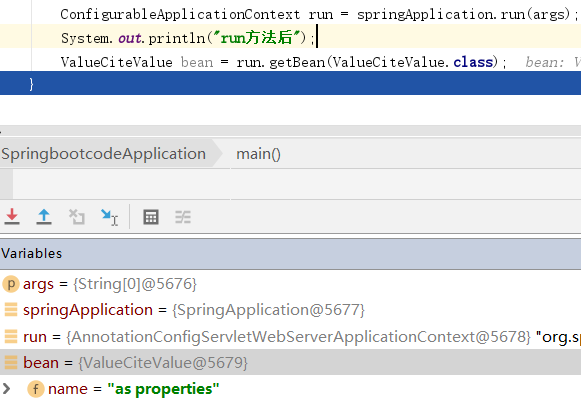
配置参数引用另一个配置参数
package com.datang.springbootcode.autoargs;/*
* @auther 顶风少年
* @mail dfsn19970313@foxmail.com
* @date 2020-02-05 10:58
* @notify
* @version 1.0
*/

import org.springframework.beans.factory.annotation.Value;
import org.springframework.stereotype.Component;

@Component
public class ValueCiteValue {
    @Value("${my.data2}")
    private String name;
}
#配置参数
my.data1=as properties

#引用配置参数
my.data2=${my.data1}
将配置文件映射到bean
基于set方法映射
请注意基于set方法必须显式的声明set()方法。@ConfigurationProperties(value = "my.person")不需要添加${}
#单独的person对象
my.person.name=zhangsan
my.person.age=12
package com.datang.springbootcode.autoargs.autobean;/*
 * @auther 顶风少年
 * @mail dfsn19970313@foxmail.com
 * @date 2020-02-05 11:15
 * @notify
 * @version 1.0
 */

import org.springframework.boot.context.properties.ConfigurationProperties;
import org.springframework.stereotype.Component;

@ConfigurationProperties(value = "my.person")
@Component
public class Person {

    private String name;
    private Integer age;

    public void setName(String name) {
        this.name = name;
    }

    public void setAge(Integer age) {
        this.age = age;
    }
}
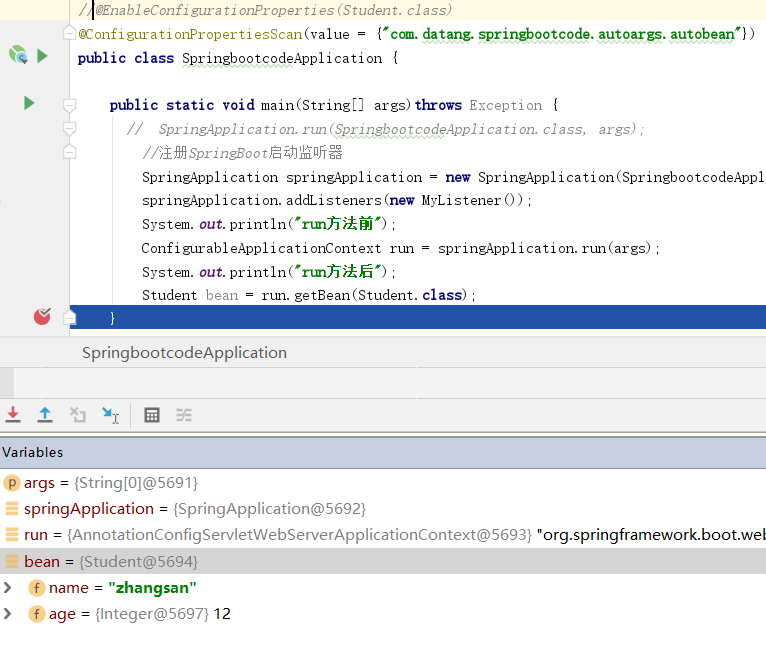
基于构造器映射
请注意,基于构造器映射,不可以使用@Component自动注入系列的注解。首先@ConstructorBinding声明该bean通过构造器映射,然后需要在任意bean上添加@EnableConfigurationProperties(Student.class)。如果有多个构造器映射可以使用@ConfigurationPropertiesScan(value = {"com.datang.springbootcode.autoargs.autobean"})扫描包。建议在SpringBoot启动类上添加。
package com.datang.springbootcode.autoargs.autobean;/*
 * @auther 顶风少年
 * @mail dfsn19970313@foxmail.com
 * @date 2020-02-05 11:26
 * @notify
 * @version 1.0
 */

import org.springframework.boot.context.properties.ConfigurationProperties;
import org.springframework.boot.context.properties.ConstructorBinding;

@ConfigurationProperties(value = "my.person")
@ConstructorBinding
public class Student {
    private String name;
    private Integer age;

    public Student(String name, Integer age) {
        this.name = name;
        this.age = age;
    }
}
注入List
在原有的Person对象中增加hobby属性,类型为List
package com.datang.springbootcode.autoargs.autobean;/*
 * @auther 顶风少年
 * @mail dfsn19970313@foxmail.com
 * @date 2020-02-05 11:15
 * @notify
 * @version 1.0
 */

import org.springframework.boot.context.properties.ConfigurationProperties;
import org.springframework.stereotype.Component;

import java.util.List;

@ConfigurationProperties(value = "my.person")
@Component
public class Person {

    private String name;
    private Integer age;
    private List hobby;

    public void setName(String name) {
        this.name = name;
    }

    public void setAge(Integer age) {
        this.age = age;
    }

    public void setHobby(List hobby) {
        this.hobby = hobby;
    }
}
#单独的person对象
my.person.name=zhangsan
my.person.age=12
my.person.hobby[0]=lanqiu
my.person.hobby[1]=zuqiu

注入Map
在原有的Person对象上添加Map集合
package com.datang.springbootcode.autoargs.autobean;/*
 * @auther 顶风少年
 * @mail dfsn19970313@foxmail.com
 * @date 2020-02-05 11:15
 * @notify
 * @version 1.0
 */

import org.springframework.boot.context.properties.ConfigurationProperties;
import org.springframework.stereotype.Component;

import java.util.List;
import java.util.Map;

@ConfigurationProperties(value = "my.person")
@Component
public class Person {

    private String name;
    private Integer age;
    private List hobby;
    private Map honey;
    public void setName(String name) {
        this.name = name;
    }

    public void setAge(Integer age) {
        this.age = age;
    }

    public void setHobby(List hobby) {
        this.hobby = hobby;
    }

    public void setHoney(Map honey) {
        this.honey = honey;
    }
}
#单独的person对象
my.person.name=zhangsan
my.person.age=12
my.person.hobby[0]=lanqiu
my.person.hobby[1]=zuqiu
my.person.honey.k1=xiaohong
my.person.honey.k2=xiaohong

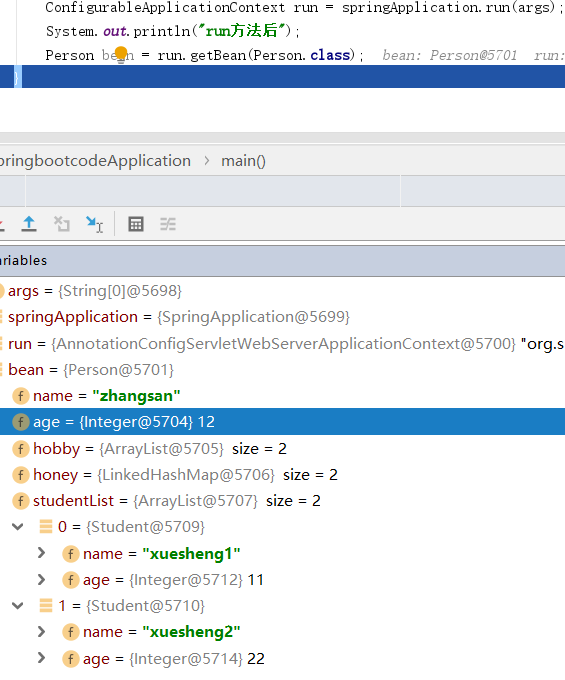
注入复杂属性List包含Pojo
在bean中增加List集合,集合元素为Student
package com.datang.springbootcode.autoargs.autobean;/*
 * @auther 顶风少年
 * @mail dfsn19970313@foxmail.com
 * @date 2020-02-05 11:15
 * @notify
 * @version 1.0
 */

import org.springframework.boot.context.properties.ConfigurationProperties;
import org.springframework.stereotype.Component;

import java.util.List;
import java.util.Map;

@ConfigurationProperties(value = "my.person")
@Component
public class Person {

    private String name;
    private Integer age;
    private List hobby;
    private Map honey;
    private List<Student> studentList;
    public void setName(String name) {
        this.name = name;
    }

    public void setAge(Integer age) {
        this.age = age;
    }

    public void setHobby(List hobby) {
        this.hobby = hobby;
    }

    public void setHoney(Map honey) {
        this.honey = honey;
    }

    public void setStudentList(List<Student> studentList) {
        this.studentList = studentList;
    }
}
#单独的person对象
my.person.name=zhangsan
my.person.age=12
my.person.hobby[0]=lanqiu
my.person.hobby[1]=zuqiu
my.person.honey.k1=xiaohong
my.person.honey.k2=xiaohong
my.person.studentList[0].name=xuesheng1
my.person.studentList[0].age=11
my.person.studentList[1].name=xuesheng2
my.person.studentList[1].age=22
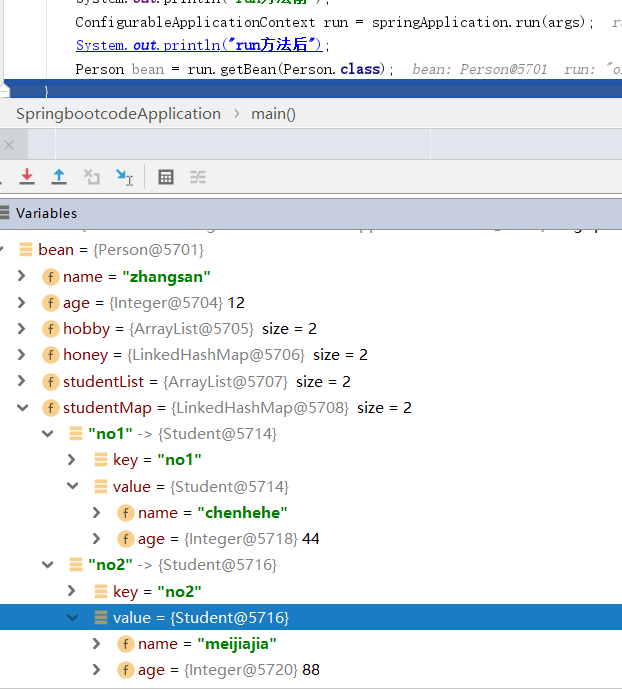
注入复杂属性Map包含Pojo
在bean中增加Map集合,value为Studeng类型
package com.datang.springbootcode.autoargs.autobean;/*
 * @auther 顶风少年
 * @mail dfsn19970313@foxmail.com
 * @date 2020-02-05 11:15
 * @notify
 * @version 1.0
 */

import org.springframework.boot.context.properties.ConfigurationProperties;
import org.springframework.stereotype.Component;

import java.util.List;
import java.util.Map;

@ConfigurationProperties(value = "my.person")
@Component
public class Person {

    private String name;
    private Integer age;
    private List hobby;
    private Map honey;
    private List<Student> studentList;
    private Map<String,Student> studentMap;
    public void setName(String name) {
        this.name = name;
    }

    public void setAge(Integer age) {
        this.age = age;
    }

    public void setHobby(List hobby) {
        this.hobby = hobby;
    }

    public void setHoney(Map honey) {
        this.honey = honey;
    }

    public void setStudentList(List<Student> studentList) {
        this.studentList = studentList;
    }

    public void setStudentMap(Map<String, Student> studentMap) {
        this.studentMap = studentMap;
    }
}
#单独的person对象
my.person.name=zhangsan
my.person.age=12
my.person.hobby[0]=lanqiu
my.person.hobby[1]=zuqiu
my.person.honey.k1=xiaohong
my.person.honey.k2=xiaohong
my.person.studentList[0].name=xuesheng1
my.person.studentList[0].age=11
my.person.studentList[1].name=xuesheng2
my.person.studentList[1].age=22
my.person.studentMap.no1.name=chenhehe
my.person.studentMap.no1.age=44
my.person.studentMap.no2.name=meijiajia
my.person.studentMap.no2.age=88
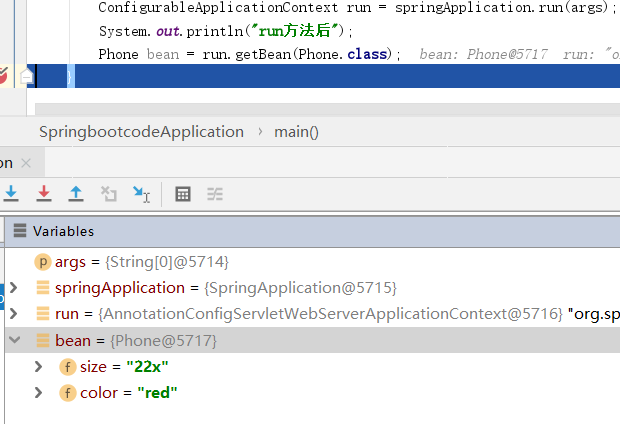
将配置文件映射到@Bean标签
您也可以将配置参数映射到@Bean标签返回的对象上。但是返回的这个pojo也需要遵循有set方法,后者构造器注入。
package com.datang.springbootcode.autoargs.autojavabean;/*
* @auther 顶风少年
* @mail dfsn19970313@foxmail.com
* @date 2020-02-05 14:39
* @notify
* @version 1.0
*/
public class Phone {
    private String size;
    private String color;

    public void setSize(String size) {
        this.size = size;
    }

    public void setColor(String color) {
        this.color = color;
    }
}
package com.datang.springbootcode.autoargs.autojavabean;/*
 * @auther 顶风少年
 * @mail dfsn19970313@foxmail.com
 * @date 2020-02-05 14:38
 * @notify
 * @version 1.0
 */

import com.datang.springbootcode.autoargs.autobean.Student;
import org.springframework.boot.context.properties.ConfigurationProperties;
import org.springframework.context.annotation.Bean;
import org.springframework.context.annotation.Configuration;

@Configuration
public class AutoJavaBean {
    @Bean
    @ConfigurationProperties(value = "my.phone")
    public Phone phone() {
        return new Phone();
    }
}
#手机型号
my.phone.size=22x
my.phone.color=red
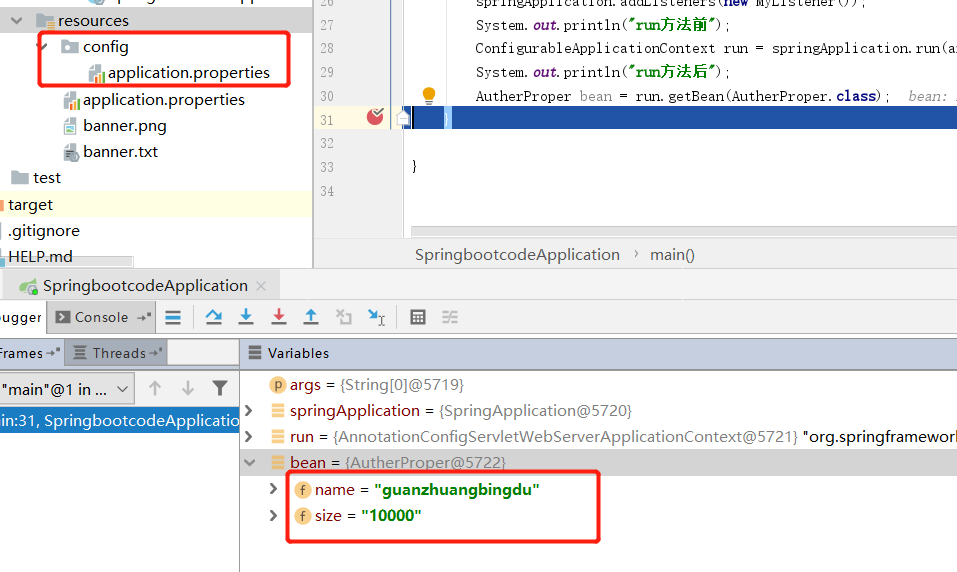
自动加载config目录下的application.properties文件
SpringBoot允许我们在classpath下的config目录下创建application.properties文件,并且会读取该文件。但是,只限于config下,名为application.properties
package com.datang.springbootcode.autoargs;/*
* @auther 顶风少年
* @mail dfsn19970313@foxmail.com
* @date 2020-02-05 14:57
* @notify
* @version 1.0
*/

import org.springframework.boot.context.properties.ConfigurationProperties;
import org.springframework.stereotype.Component;

@ConfigurationProperties(value = "my2.plague")
@Component
public class AutherProper {
    private String name;
    private String size;

    public void setName(String name) {
        this.name = name;
    }

    public void setSize(String size) {
        this.size = size;
    }
}
my2.plague.name=guanzhuangbingdu
my2.plague.size=10000
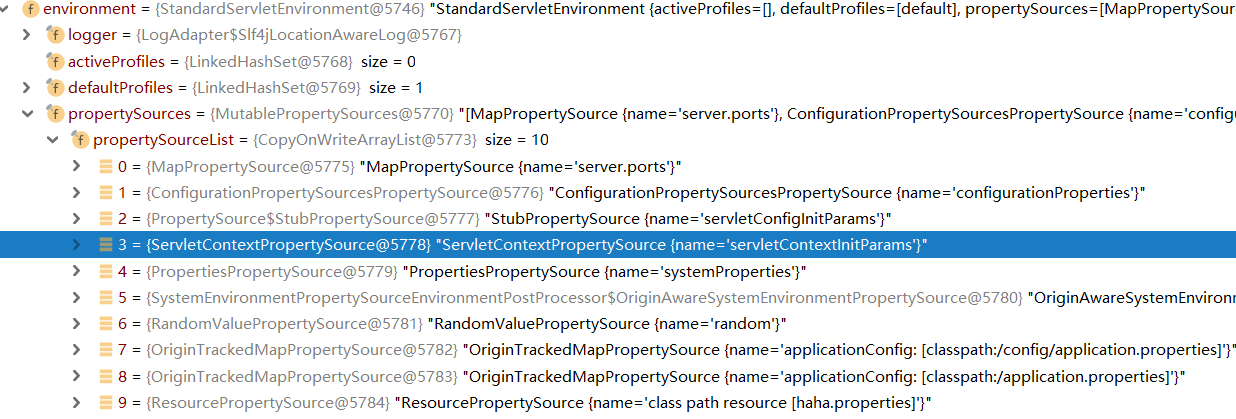
加载任意目录下,任意文件名的properties文件
通过@PropertySource("classpath:haha.properites")注解,声明任意的文件被加入Environment对象中。
my3.plague.name=guanzhuangbingdu
my3.plague.size=10000
package com.datang.springbootcode.autoargs;/*
* @auther 顶风少年
* @mail dfsn19970313@foxmail.com
* @date 2020-02-05 15:05
* @notify
* @version 1.0
*/

import org.springframework.boot.context.properties.ConfigurationProperties;
import org.springframework.context.annotation.PropertySource;
import org.springframework.stereotype.Component;

@Component
@PropertySource("classpath:haha.properties")
@ConfigurationProperties(value = "my3.plague")
public class CustomConfig {
    private String name;
    private String size;

    public void setName(String name) {
        this.name = name;
    }

    public void setSize(String size) {
        this.size = size;
    }
}
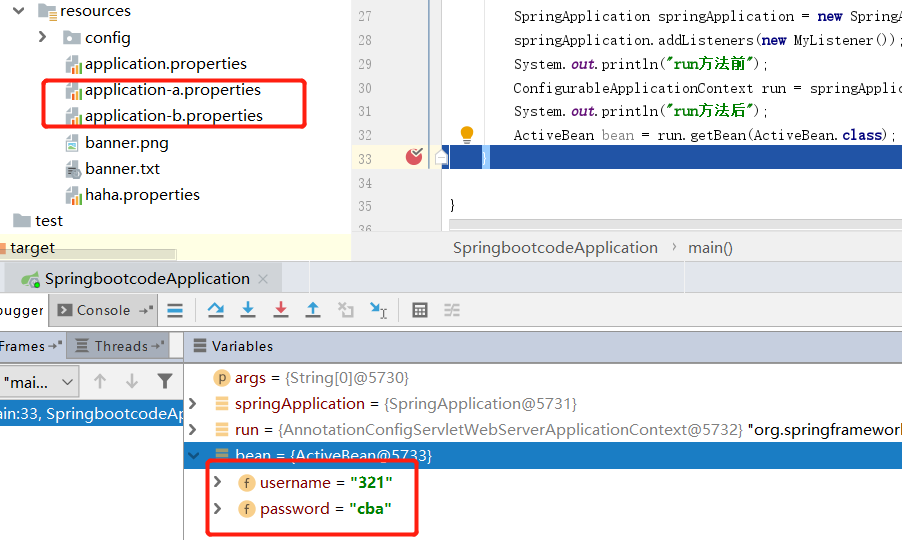
设置指定环境的配置文件
通过使用spring.profiles.active可以指定加载不同环境的配置文件。但是不同环境的文件名必须按照application-xxx.properties的格式。
#设置环境
spring.profiles.active=b
my.database.username=123
my.database.password=abc
my.database.username=321
my.database.password=cba
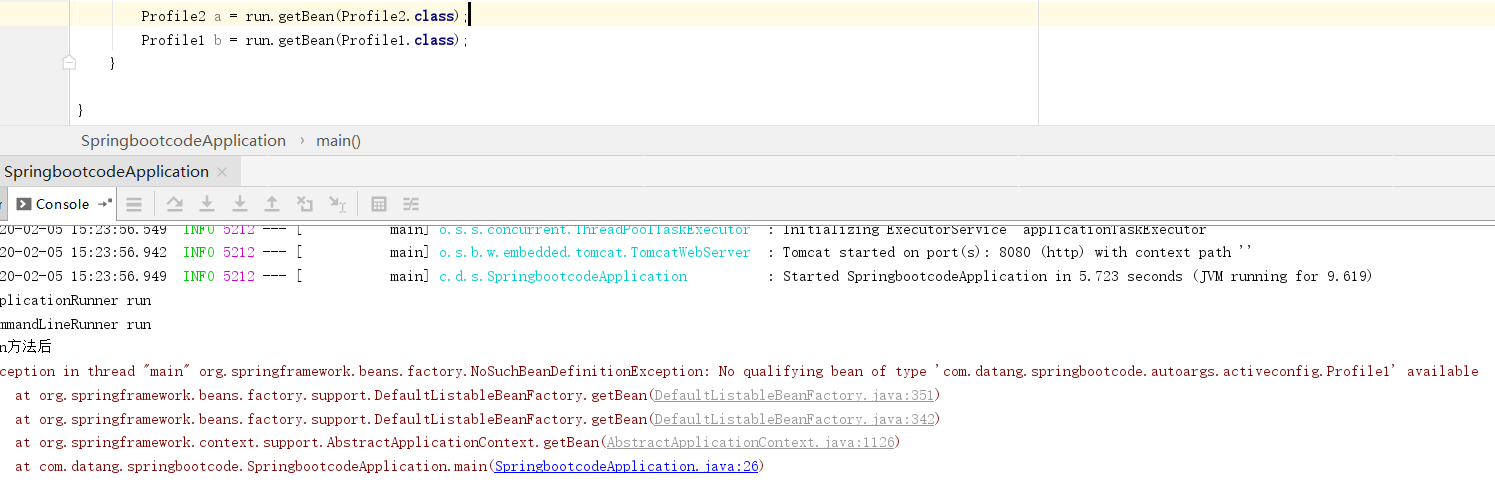
根据不同的环境加载不同的Bean
在一个bean上添加@Profile("a")可根据不同的环境选择是否注入该bean。当前的环境是b则只有Profile2被成功注入。
package com.datang.springbootcode.autoargs.activeconfig;/*
* @auther 顶风少年
* @mail dfsn19970313@foxmail.com
* @date 2020-02-05 15:20
* @notify
* @version 1.0
*/

import org.springframework.context.annotation.Profile;
import org.springframework.stereotype.Component;

@Profile("a")
@Component
public class Profile1 {
}
package com.datang.springbootcode.autoargs.activeconfig;/*
* @auther 顶风少年
* @mail dfsn19970313@foxmail.com
* @date 2020-02-05 15:20
* @notify
* @version 1.0
*/

import org.springframework.context.annotation.Profile;
import org.springframework.stereotype.Component;

@Profile("b")
@Component
public class Profile2 {
}
日志记录
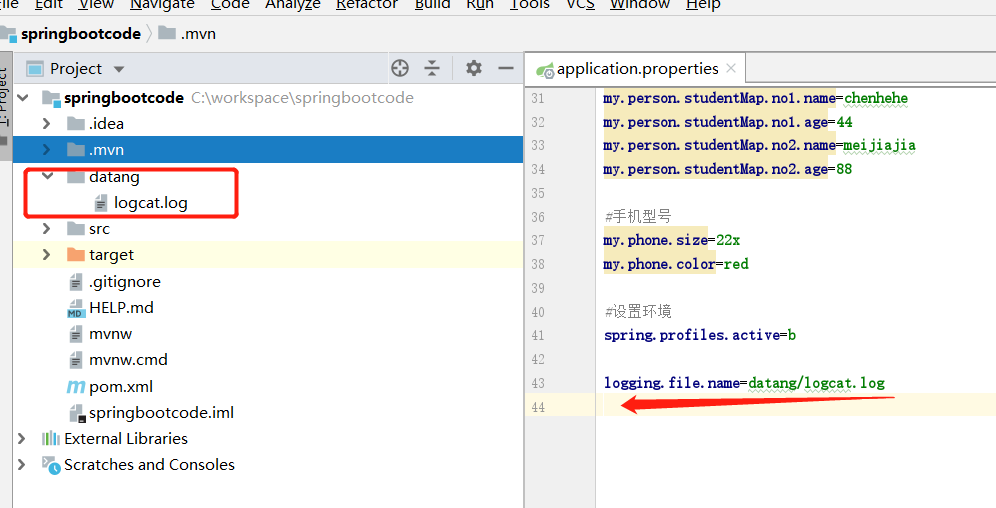
日志位置
logging.file.name
基于项目路径
基于绝对路径

logging.file.path
基于项目路径
文件名它自己设置的spring.log。

基于绝对路径
也是自己搞了个spring.log

日志级别
可以设置全局日志级别,也可以分包设置日志级别。
#TRACE,DEBUG,INFO,WARN,ERROR,FATAL或OFF
#设置全局的日志级别
logging.level.root=trace
#设置包的日志级别
logging.level.com.datang.springbootcode=debug
日志分组
可以把几个包或者一个包分成一组,给这一组设置日志级别。
#设置日志组
logging.group.server=com.datang.springbootcode.alllazy,com.datang.springbootcode.exit
#设置日志组的日志级别
logging.level.server=error
整合其他日志框架
默认的SpringBoot使用的是Logback日志框架。如果想要使用其他的日志框架如Log4j或者Log4j2。只需要引入相关jar。在配置文件中引用日志配置即可。
logging.config=classpath:xxx.xml
SpringBoot自带LogBack日志记录的其他设置
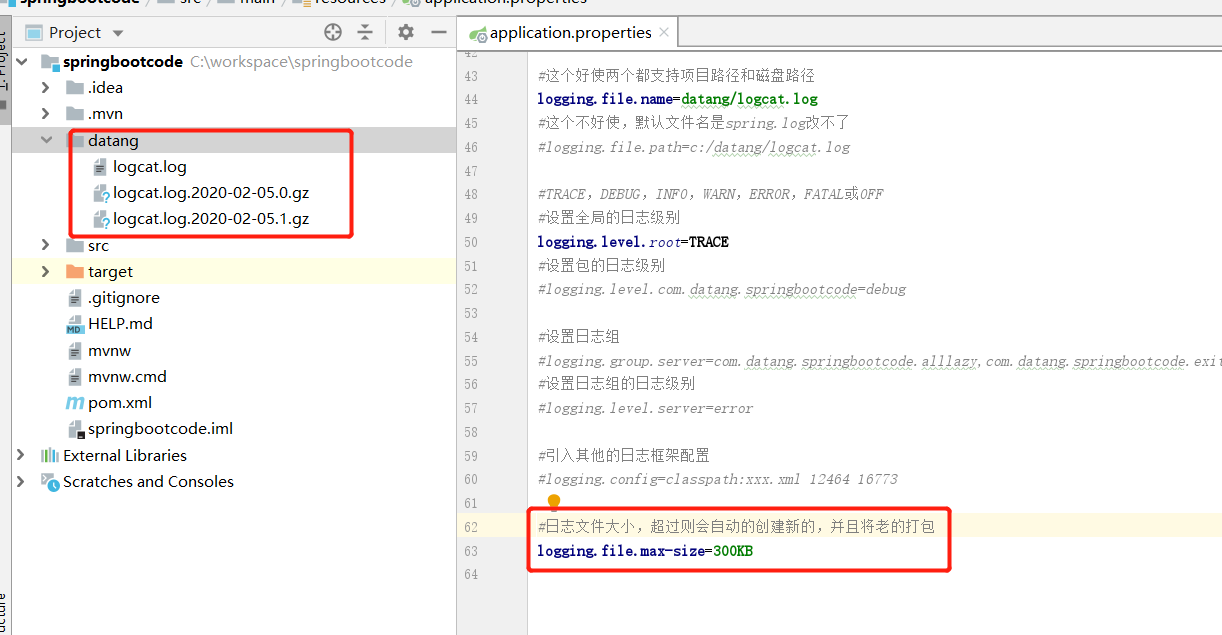
文件大小
当前我的项目启动大概需要800+KB,这里我设置每一个文件最大300KB,他自动分成了三个。
打包文件名格式

归档文件最大天数
这个天数目前没有测试出来,我觉得(if我不要你觉得,我要我觉得else自己测试)需要服务器连续启动才可以。
#归档文件最大天数。
logging.file.max-history=1
关于日志配置经过测试的只有上边的部分,一下附带一个完整的配置 https://docs.spring.io/spring-boot/docs/2.2.4.RELEASE/reference/html/spring-boot-features.html#boot-features-custom-log-configuration