http://marketing.processmaker.com/acton/ct/3812/s-04f9-1507/Bct/l-024e/l-024e:5ee2/ct1_0/1?sid=MW8acpyWJ
Overview
The Enterprise Trial is designed to allow you to try out ProcessMaker's Enterprise Edition for a 30 day period on the cloud. After signing up for an account, you will receive a workspace, where you can login and work with sample processes and case data to better evaluate ProcessMaker's features. In addition, the Enterprise Trial includes integrations with Knowledge Tree, Pentaho Reporting and Advanced LDAP so you can test some of the advanced feature in the Enterprise Edition.
Using your Enterprise Trial Account
Four sample processes have been preinstalled in your workspace, so you can immediately begin running cases and trying out ProcessMaker's functions. The four processes are:
Feel free to study and modify these processes to better learn how to design your own processes.
To run a case, see the documentation for each process to find out which group has been assigned to its starting task. Then, login as one of the members of that group. Go to the CASES menu and click on New Case in the sidebar. After selecting the process, a new case will begin.
Understanding Processes
In ProcessMaker, a process consists of a series of tasks. A task is a collection of work which is assigned to users or groups of users.
The tasks are connected by routing rules (also known as derivation rules), which control which task(s) are executed next in the process. There are routing rules which select the next task based upon a manual selection, the evaluation of a condition or an automatic flow. The workflow generally flows down one path, but it can be split into multiple paths with a parallel (fork) and it can be joined into a single path with a parallel (join).
Only one person at a time can be designated to work on a task, so Designation Rules are used to select one user from the pool of available users who are assigned to a task. Users can be selected to work on a task based upon a cycle, manual selection, the value in a variable, who they report to in their department, or self selection (self-service).
Each task consists of a series of steps, which are discrete units of work such as DynaForms, Input Documents and Output Documents. Triggers, which are custom PHP code, can be fired before or after any step to add custom logic and functionality to the process.
A case is an individual instance when a process is executed. Think of a process as the path, and a case as the one time walking down that path. Only users who are assigned to the initial task in a process are allowed to start a case in that process. The user who starts the case is automatically assigned to the initial task in the process. After completing the initial task, the case is routed (also known as derivated) to the next task in the process. Each time a user is designated to work on a task, the case will appear in the user's Inbox under the CASES menu. Once that user starts working on the case, its status will change to "DRAFT" and it will be moved to the Drafts box.
By default, users can only access cases to which they are the designated user, meaning that they have to be currently assigned to work on the case. Once a user has completed his/her task or the case has been reassigned to a different user, the first user will no longer be able to open the case. Process Permissions can be assigned to give users read-only access to cases, so they can see the data for cases, even when they are not the currently the designated user. In addition, users can be selected as Process Supervisors to give them write access to DynaForms and/or Input Documents in a case, so they can review and change case data.
Sample Users
Your workspace includes dozens of sample users, who are organized into groups and departments. To see the profiles of any of these users, go to ADMIN > Users > Users and click on the Edit link for a particular user.
At the login screen, enter the username of the sample user and the password which is the same as the admin user. This password was provided when subscribing to the enterprise edition.
Sample Groups
In ProcessMaker, users are organized inside groups and departments.
Groups are non-hierarchical collections of users, which can be assigned to tasks in processes. Users can be members of multiple groups.
The following groups have been created in your workspace:
- Manager: This group includes all users designated as managers.
- Warehouse Users: This group includes all users from the warehouse.
- Supervisor: This group includes eleven users that have been designated as supervisors.
- Finance: This group includes users from the Financial Division and Planning and Research Department.
- Employees: This group includes users from all departments. Refer to the graphic below.
To create additional groups, see the documentation for Managing Users > Groups.
Sample Departments
Departments are hierarchical collections of users, which represent the organizational structure of a company or organization and its chain of command. Each department has a supervisor/manager, to whom the members of the department report. Departments can have unlimited levels of subdepartments. Departments can not be assigned to tasks in a process, but they can be used in routing rules to determine which user is assigned to the next task in the process.
Each member reports to his/her superior in the chain of command. For example, a member of a sub-sub-department reports to his/her supervisor, who in turn report to the manager of a sub-department, who then reports to the manager of the top-level department in the organization.
The following sample groups and departments have been created in your workspace, so you can use them in your processes:
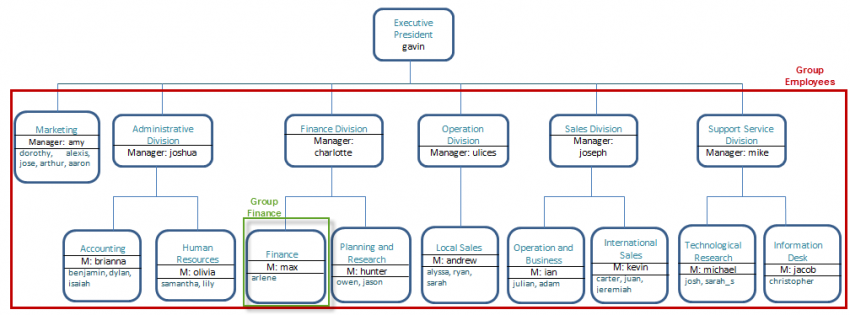
The departments are represented in blue boxes in the Organizational Chart above. To see the departments' structure inside ProcessMaker, login as the "admin" user and go to ADMIN > Users > Departments. To create additional departments, see the documentation for Managing Users > Departments.
Expense Report Process v2
This process allows an employee to report expenses to his/her supervisor, and then receive approval for reimbursement. It also allows an employee to ask for credit in advance and receive the cash in advance. The Process Map is the following:
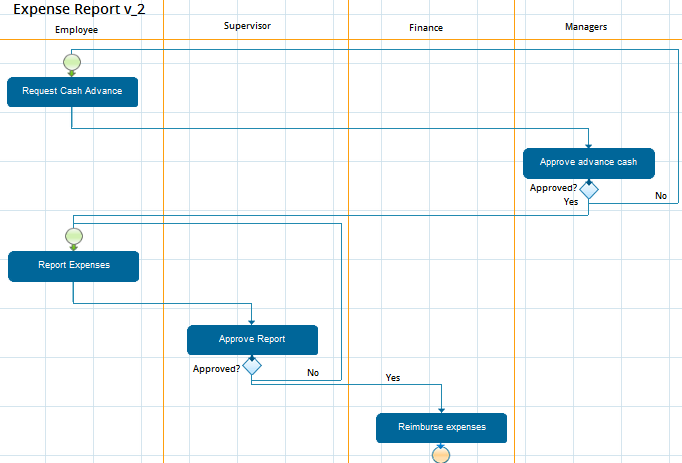
Request Cash Advance
With this process an employee can request cash in advance, report expenses to his/her supervisor, and then receive approval for reimbursement. Log in as a user from the Employees group such as "sarah" and start a case of the Expense Report v_2 (Request Cash Advance) process.
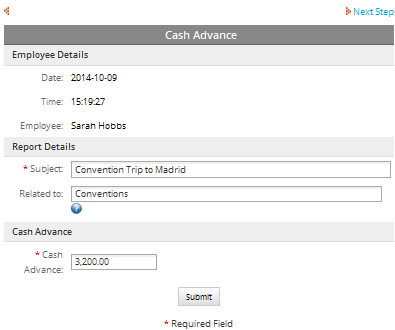
The first section Employee Details shows the name of the user, the current date and time. In the second section Report Details Sarah must fill the details of the request such as the subject and what it is related to. In the last section Cash Advance, Sarah must fill the total amount requested in advance.
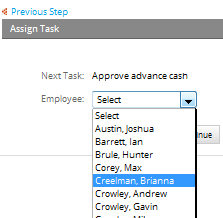
After submitting the form the next task Approve Advance Cash must be sent to a user from the Managers group, based on the following assignment rule: manual assignment rule. It means Sarah must select a user from the dropdown field "Employee". In this case, the user selected is Brianna.
Login as Brianna, open the case sent by Sarah, and select NO to reject the request or click YES to approve the request.

The response will be evaluated inside a gateway in which if the value selected is NO the next step will return to the first task with the first application form to be corrected as soon as possible, but this time the task will be assign to a different employee for the cyclical assignment.
On the other hand, if the value selected is YES (it means the request is approved) the next task will be Report Expenses where Sarah must fill the details of the request. Login as Sarah again and open the case sent by Brianna. Sarah must complete the expenses details inside the "Report Details" section.
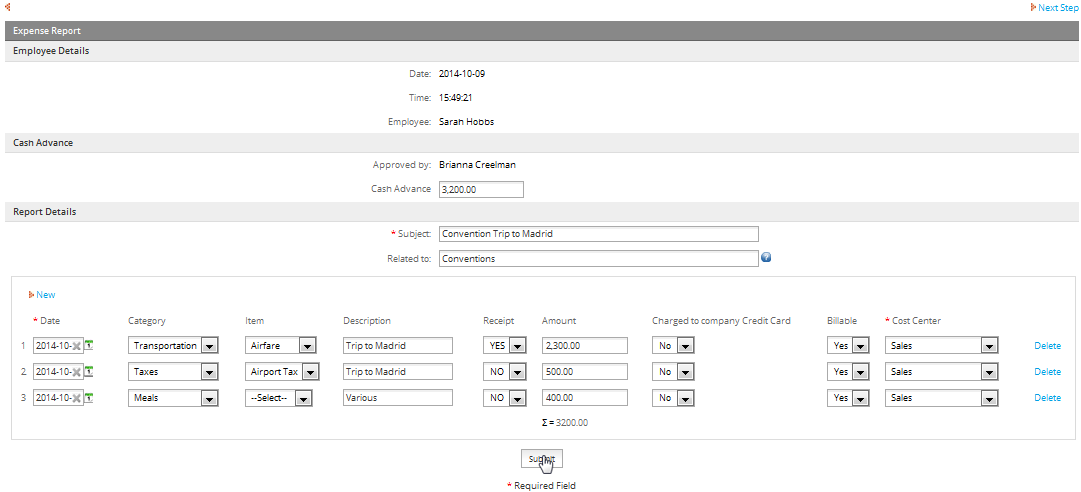
Note 1: In the grid the column Item is dependent of the column Category. This means that depending on the category selected, the options for the items change their values.
Note 2: To add more categories in the dropdown control and/or additional items for a category add new records in the PM tables "EXPCATEGORY" and "ITEMS".
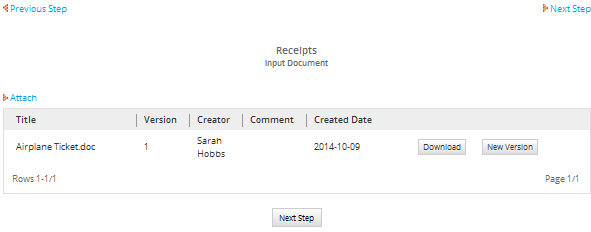
After filling the expenses details, submit the form and the next step is to upload an Input Document. In this step if there are receipts of the expenses, they must be uploaded. If there are not receipts go to the next step.
Once completed, the case will be send to Sarah's supervisor: Andrew. (The supervisor/manager can be seen in the Organizational Chart above). In this step Andrew can approve or reject the Report Expenses submitted by Sarah selecting YES or NO in the column Approved? of the grid. The option selected is evaluated inside a gateway that either redirects the request to Sarah to make corrections in the previous task if any of the columns is rejected (NO) or, if all of them are approved (YES), the task will be sent to any user from the Financial Department, based on the following assignment rule: cyclical assignment rule. The user selected in this example was Arlene.

Login as Arlene and open the case sent by Andrew from the inbox. Make the necessary corrections to the report details and at select if the payment type will be cash or check.
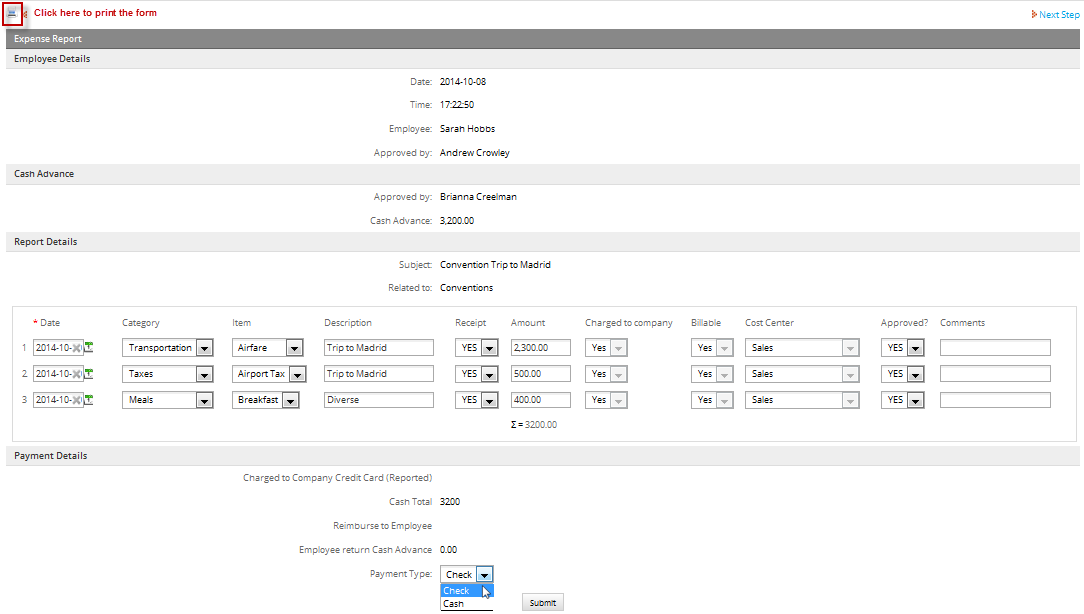
In the top left side of the Dynaform there is the icon ![]() .
Click on this icon to print the form if necessary. Finally submit the
report download the documents sent if necessary and finish the process.
.
Click on this icon to print the form if necessary. Finally submit the
report download the documents sent if necessary and finish the process.
Report Expenses
This process allows an employee to request a reimbursement of expenses already incurred. To do this, log in with a user from the Employees group such as "jason" and start a new case of the Expense Report v_2 (Report Expenses) process.
Fill the form to report all the expenses incurred previously and submit it.

Note 1: In the grid the column Item is dependent of the column Category. This means that depending on the category selected, the options for the items change their values.
Note 2: To add more categories in the dropdown control and/or additional items for a category add new records in the PM tables "EXPCATEGORY" and "ITEMS".
In the next step attach receipts of the expenses if they exist. If not, go to the next step.

The next task is assigned to the employee's supervisor. In this case Jason's supervisor is Hunter.
Login as Hunter, and open the case created by Jason from the inbox. In this step Hunter can approve or reject the Report Expenses submitted by Jason selecting YES or NO in the column Approved? of the grid. The option selected is evaluated inside a gateway that either redirects the request to Jason to make corrections in the previous task if any of them is rejected (NO) or, if all of them are approved (YES), the task will be sent to any user from the Financial Department, based on the following assignment rule: cyclical assignment rule. The user selected in this example was Max.
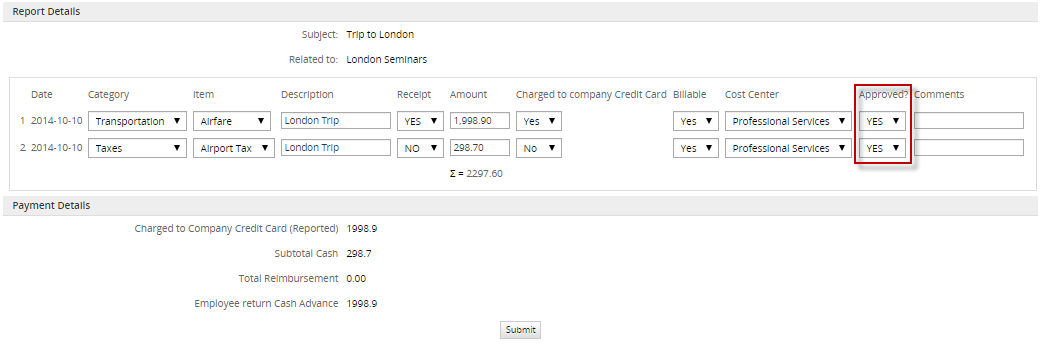
Login as Max and open the case sent by Hunter from the inbox. Make the necessary corrections, approve or not the report details and at select if the payment type will be cash or check.

Finally submit the report download the documents sent if necessary and finish the process.

Press Next Step and the case will show a confirmation for the case to end.
Invoice Approval Process v2
This simple 3 step process allows an employee to submit invoices. Once the invoice is reviewed by the employee's supervisor, it is sent to the Finance department for processing. The Process Map is the following:
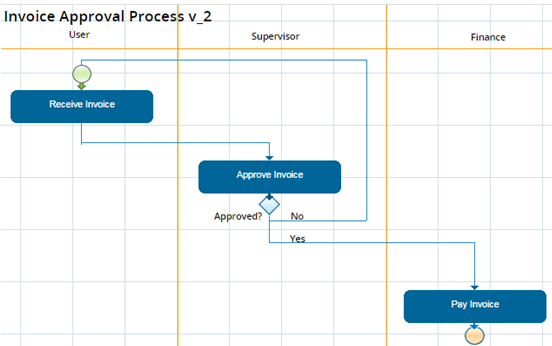
To start a case for this process log in with any employee user. For example, login as "amy" and select a new case from the Invoice Approval Process.
A form opens where Amy must fill the details of the invoice. The first section User Details shows the name of the employee, the current time and date and additionally Amy must select the country. In the second section Invoice Details, Amy must select the type of invoice, the date of the invoice, the number of the invoice, the number of the PO (Purchase Order) and finally the payment terms.
In the next section Items fill in the details of the items in the invoice. In the final section fill the information of the payee and submit the form.

Note: If more types of invoice and payment terms are needed add them to the options of the dropdown field inside the design of the Dynaform.
The next step is to upload an Input Document. In this step a paper invoice can be uploaded. Once completed, the case will be send to Amy's supervisor: Gavin. (The supervisor/manager can be seen in the Organizational Chart above).

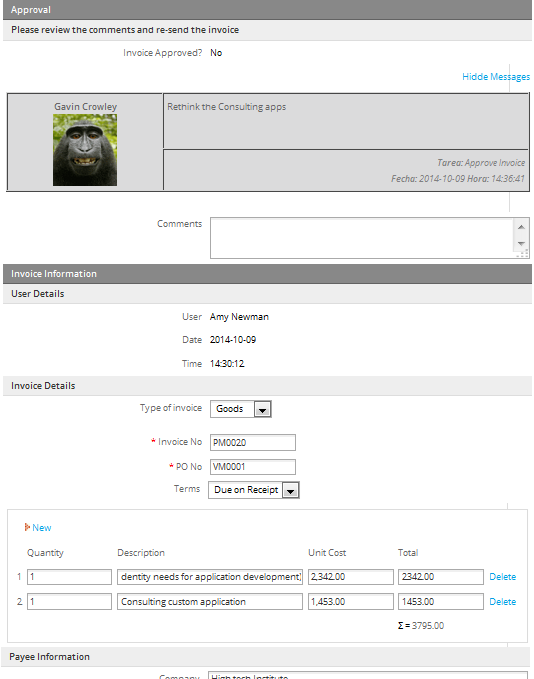
Login as Gavin, and open the case created by Amy from the inbox. In this step Gavin can approve or reject the Invoice submitted by Amy selecting YES/NO from the Invoice Approval field.

The value of Invoice Approved? field is evaluated inside a gateway which, if the value is NO goes back to the first task where Amy receives the refusal of her first application and must re-submit the form making the corresponding corrections.
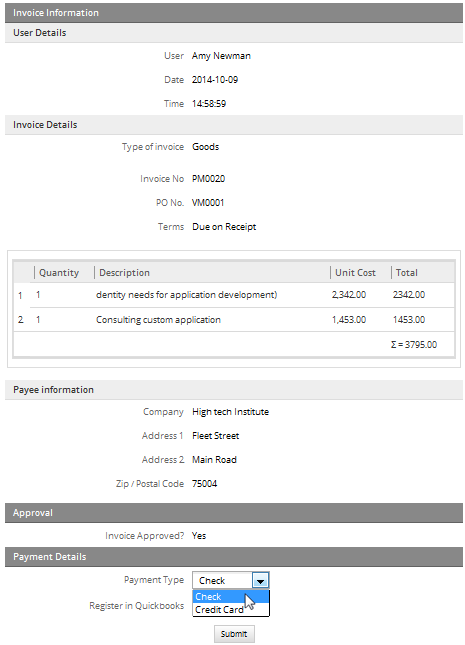
After the form is submitted, Gavin will receive Amy's application again and if Gavin approves the application (setting Invoice Approved? to YES) and by pressing Submit, the task will be sent to any user from the Financial Department, based on the following assignment rule: cyclical assignment rule. The user selected in this example was Max.
Login as Max, and open the case sent by Gavin, and select the payment type. Select Check and press Submit.
The next step is an Output Document that has been created for this case, which can be downloaded.
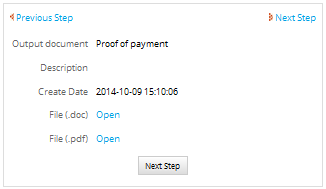
After downloading (or not) press Next Step and the case will show a confirmation for the case to end.
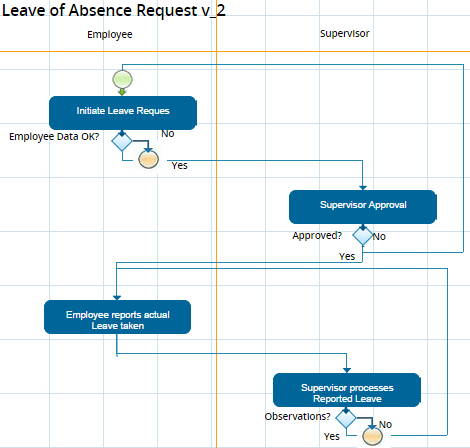
Leave of Absence Request Process V2
This process allows company employees to request time off (business, vacation, maternity leave). The request is routed to the employee's manager, and once it is approved, a table is generated which demonstrates how ProcessMaker information could be used to update an external HR system. The Process Map is the following:
The first task “Initiate Leave Request” retrieves data of the employee user that started the case from the PM table HR_LEAVE_SETUP. All users can only have maximum 20 paid days, 20 sick days and 20 unpaid days. This table stores all “leave requests” sent by users and controls the days taken by users. By default this table has 10 records of some users that previously asked for permission.
So, when an employee starts a case of this process, for example Amy, the information of previous requests is retrieved from this table and the following message is shown to her.
Amy works in the Marketing department as the manager and her supervisor is Gavin (the supervisor/manager can be seen in the Organizational Chart above). If the user has previously made any request the information is shown in the section “Employee Details”, for example, Amy has previously asked 5 days out of their 20 days:
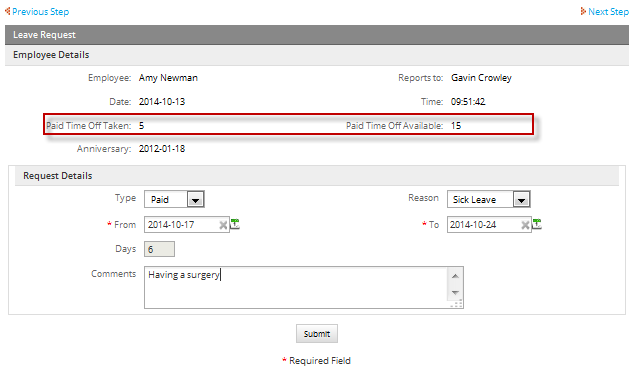
To make a new request fill in the fields in the Request Details section specifying the type of absence, the reason and the lapse of absence time. If the data entered about the employee is correct it is sent to Amy's supervisor: Gavin. Data is evaluated inside a gateway and if no data about the employee when gathering the information in the first interface shown, the request form is not shown and the process finishes.
Take into account that if you have created new users and assigned them to the tasks of this case, after one of those users starts a case and the process makes the validation of the information of the user a blank page might be shown if the user has not been assigned to a department as an employee or as manager.
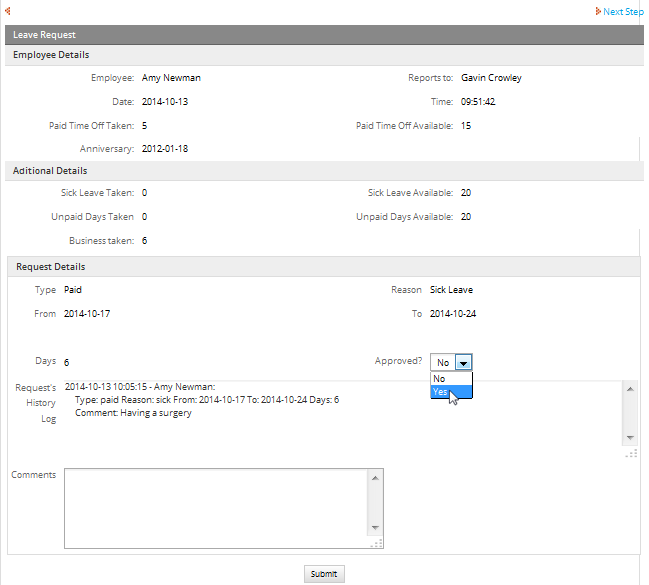
Login as the user Gavin, open the case sent by Amy with the information of a request of absence and select YES to approve the request, or NO to reject it.
If the request is rejected Gavin must add a comment, submit it and the form will be send back to Amy with the history log of the rejection, so she can correct her request.
If the request is approved, Gavin could type an optional comment and press Submit. The task will be sent back to Amy and an email will be sent to her informing that the request has been approved.
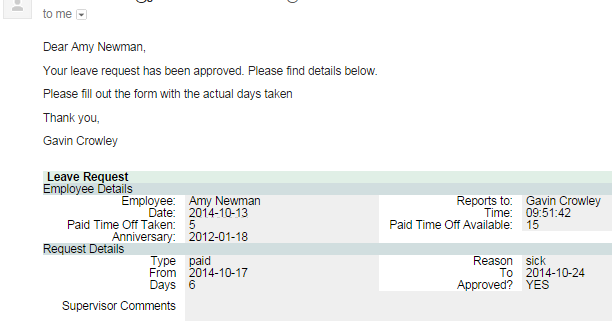
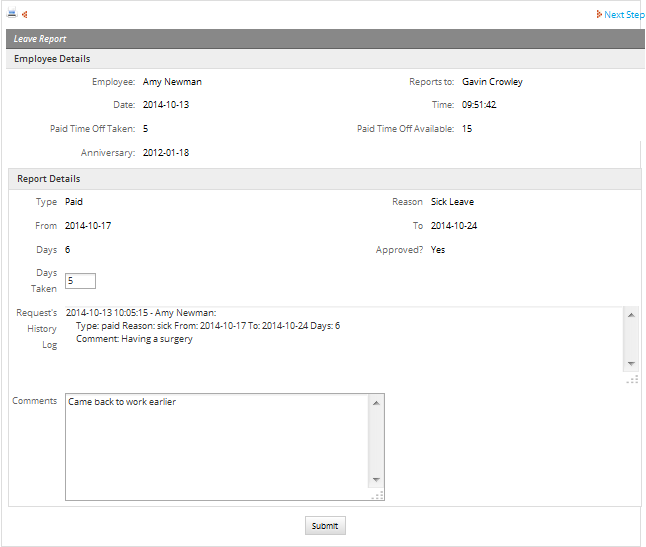
Login as Amy, and open the case sent by Gavin, and fill in the number of days actually taken for absence and press Submit.
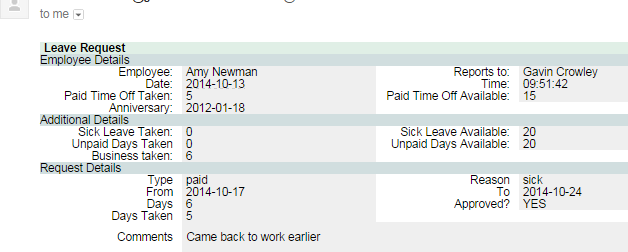
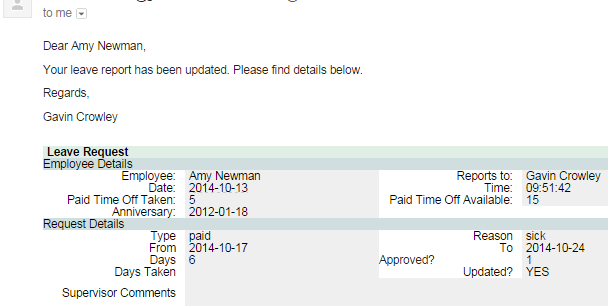
And email is sent to Gavin with a summary of Amy's request and her report of the days taken.
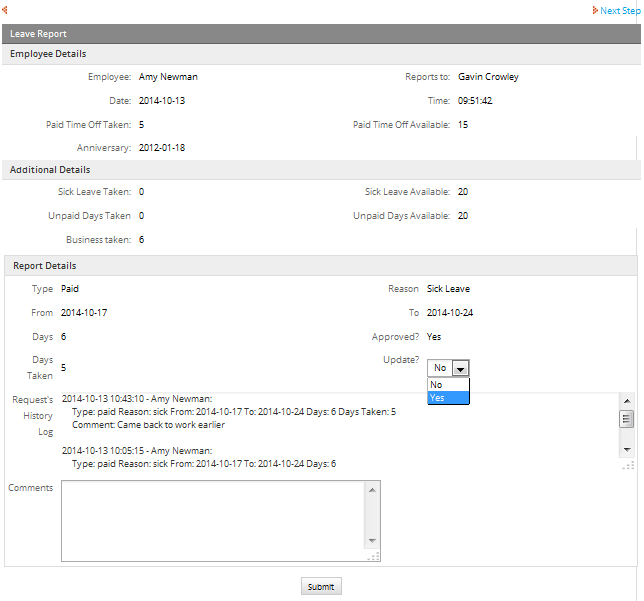
Login as Gavin again and open the case sent by Amy. There is the information about Amy in the first section, there are additional details of all the request made by Amy previously in the second section, and the report details of the last request as well as the history log of the request which shows all comments made previously. Gavin must fill the yes/no field Update? to update the information of Amy's absences in the PM table HR_LEAVE_SETUP and a new record is inserted in the table HR_LEAVEABSENSE.
This field is evaluated inside a gateway, so if Gavin does not update the table (Update?=No) Gavin must add a comment and the form is returned to Amy who must make the necessary correction and send the form back to Gavin until he updates it.
If Gavin updates the table (Update? = Yes) the table is updated and a summary of Amy's absences is shown to Gavin.

Finally, submit the form and the case will show a confirmation for the case to end.
Either if the update was made or not by Gavin. Amy receives an email with Gavin's answer. For example, when the update is done.
Note: This process has a Report Table configured with data of the case UID, the case number, the UID of the user that makes the request, the full name of the user, the days requested and the days taken.
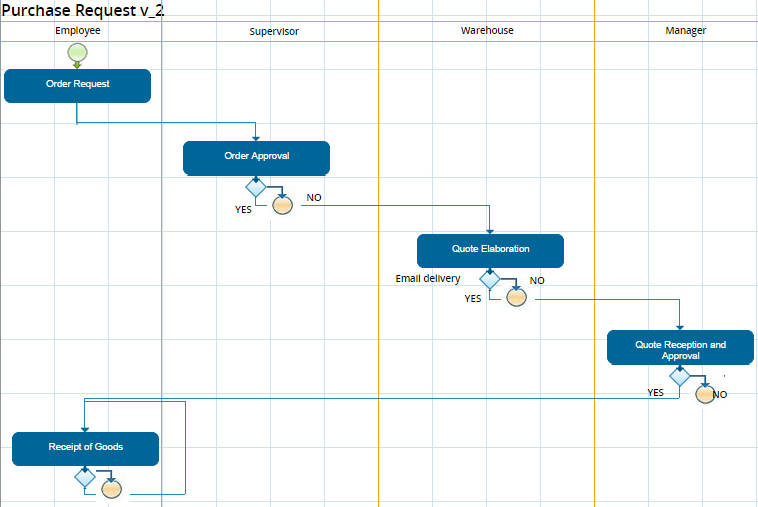
Purchase Request Process V2
This process allows employees in a company to request approval for purchases. The purchase will be initially reviewed by a supervisor then send to the warehouse and finally to the manager so that the purchase can be executed. The Process Map of the process is the following:
The first task Order Request initiates the case with information about the applicant, the employee name, date and the department where the employee belongs in the first section. In the second section the detail of the purchase request must be filled. For example if Julian is requesting paper:

Resources: By default there are three categories to make a request: Office Supplies, Furniture and IT Supplies in the column Category of the request form. For each category there are two possible item to be requested as well (For Office Supplies= Paper A and Paper Legal, for Furniture = Desk and Bookshelf and for IT Supplies= Ink and Mouse) in the column Items. However, it is possible to add categories and items and custom them adding or updating rows inside the PM tables: CATEGORY and ITEMS.
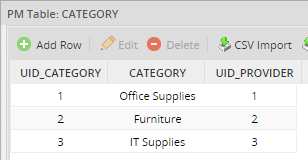
Each category has a Provider as well. These providers are inside the PM table PROVIDERS. It is possible to add a category with a new provider or update a provider.
After an employee has sent the purchase request it will be sent to the department's supervisor. In the example Julian's department is Operation and Business whose supervisor/manager is Ian (the supervisor/manager can be seen in the Organizational Chart above).
Login as Ian and open the case sent by Julian in the task Order Approval. The form that opens has the information of the request and the supervisor's approval request in the yes/no field Approve Request.

The supervisor's answer is evaluated inside a gateway in which if the request is rejected (Approve Request = No) the process finishes. If the request is approved (Approve Request = Yes) the case is sent to a user of the warehouse group in the cyclical assignment method. In the example, Ian approved the request and it was sent to Dorothy.
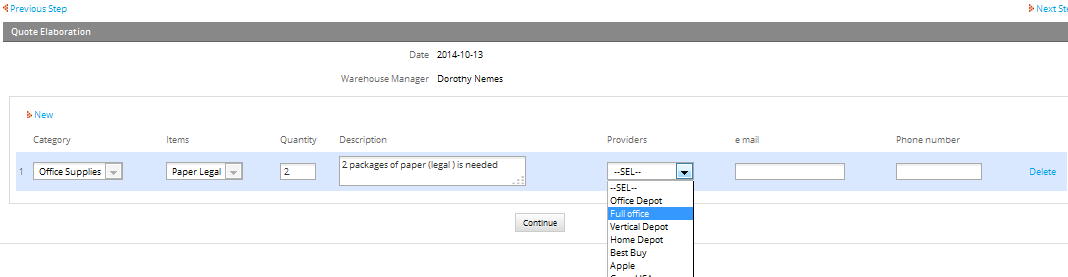
Login as Dorothy and open the case sent by Ian. The form that opens shows in the first section the applicant's information, in the second section the applicant's supervisor approval and in the third the stock verification.

Dorothy must elaborate the quotes for the purchase and must select a provider in the yes/no field Select Providers. In case that no providers are selected the next step finishes the process in the evaluation of the gateway that follows the task.
In the next form that opens Dorothy must specify the product (s) to be bought as well as the provider (s) where the purchase will be done.
After submitting the form the data will be saved inside the PM table QUOTE where the details of all quotes are stored. The next task is assigned by the cyclical assignment method to an employee of the manager's group. For this example, the next user is Olivia.
Login as Olivia and open the case sent by Dorothy.
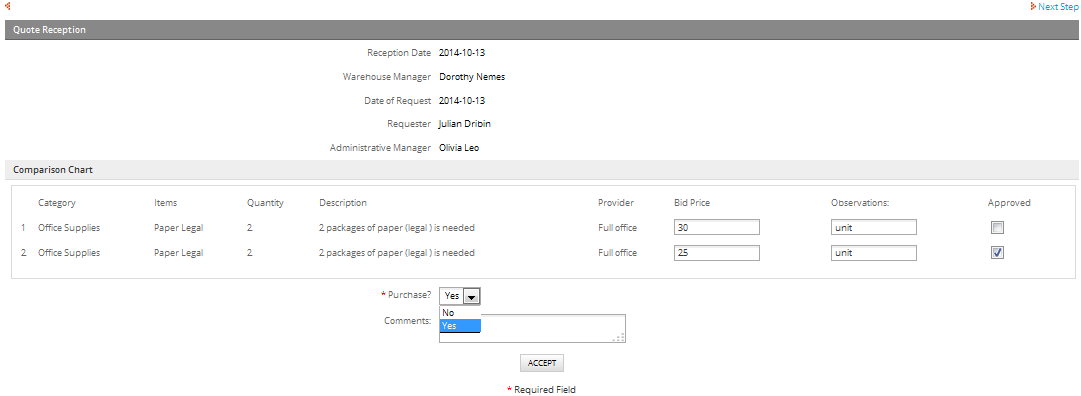
In the form that opens there is a comparison chart of the requested product. The information of this chart is retrieved from the QUOTES table. Verify that the fields of this table are filled, especially the columns Price and Provider Description that fill the column Bid Price and Observations of the grid in the form.
Next, approve the purchase in the field Purchase? to make the purchase. In the next step where it is possible to download a .pdf file with the detail of the purchase.
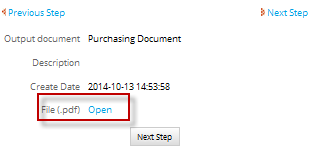
Take into account that the value of Purchase is evaluated inside a gateway and if the purchase is rejected in this step (Purchase?=No) the process finishes for the next step.
After approving the purchase, the employee that requested the purchase must notify if the products were received. In this case login as Julian again and open the case send by Olivia.
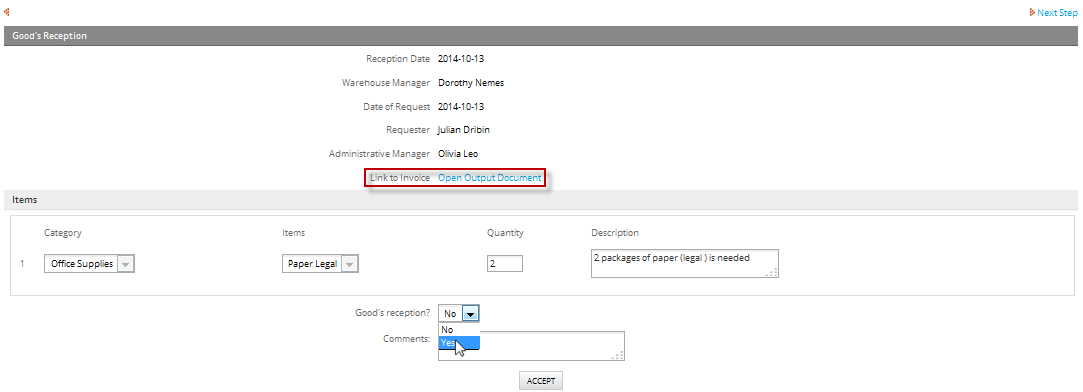
There, in the form, there is the information about the goods and the .pdf file generated in the previous step by the manager. The employee must report if the goods were received in the yes/no field Good's reception. If Julian received (Yes) the goods the process finishes, if they were not received the form is resend to his inbox until he receives the goods.
Configuring the Trial Workspace
The trial workspace can be used without any additional configuration, however, it is necessary to configure the workspace if wishing to take advantage of some of the additional features offered by ProcessMaker.
Configuring the Email Server
To be able to send out email notifications, the workspace will have to be configured to connect to an email server. Go to ADMIN > Settings > Email to set up a connection to an email server.
If your organization has its own email server, then enter the settings to connect to it. If your organization doesn't have an email server available, then online email services such as gmail, Yahoo! or Hotmail can be used. For more information, see Email Settings.
上一篇: Centos7-64bit尝试编译最新版的nginx1.9.3+php7+mysql5.6.25
下一篇:How to Install PHP 7 with Apache and MariaDB on CentOS 7/Debian 8