http://www.codershood.info/2016/10/23/angular-2-crud-application-using-nodejs/
Angular 2 CRUD application using Nodejs
HTTP requests are very crucial and much needed in any modern front-end application and Angular 2 does this job very effortlessly. Angular 2 comes with its own HTTP library. Here, we will create Angular 2 CRUD application using Nodejs.
We will use Nodejs to create our REST API and we will use Angular 2's HTTP library to make HTTP requests with the help of Observables. In this article, We will make a list of user's and we will create functionality to Update/Remove the user from the list of users.
The final outcome of this article shown below in Image.

Angular 2 HTTP library
First take a look into Angular 2 HTTP library before creating our angular 2 CRUD application. Let's understand what each request does and arguments required to it. Angular 2 HTTP library have different types of requests listed below,
- Request :
request(url: string | Request, options?: RequestOptionsArgs): Observable<Response>;- The first argument is a URL and the second argument is optional which can be anything.
- Can perform any type of request.
- get
get(url: string, options?: RequestOptionsArgs): Observable<Response>;- The first argument is a URL and the second argument is optional which can be anything .
- Performs a request with `get` HTTP method.
- post
post(url: string, body: any, options?: RequestOptionsArgs): Observable<Response>;- The first argument is a URL and the second argument is optional which can be anything.
- Performs a request with `post` HTTP method.
- put
put(url: string, body: any, options?: RequestOptionsArgs): Observable<Response>;- The first argument is a URL and the second argument is optional which can be anything.
- Performs a request with `put` HTTP method.
- delete
delete(url: string, options?: RequestOptionsArgs): Observable<Response>;- The first argument is a URL and the second argument is optional which can be anything.
- Performs a request with `delete` HTTP method.
- patch
patch(url: string, body: any, options?: RequestOptionsArgs): Observable<Response>;- The first argument is a URL and the second argument is optional which can be anything.
- Performs a request with `patch` HTTP method.
- head
head(url: string, options?: RequestOptionsArgs): Observable<Response>;- The first argument is a URL and the second argument is optional which can be anything.
- Performs a request with `head` HTTP method.
Setting up our Application
Let's use Angular CLI to setup our application. If you don't have
Angular CLI installed on your machine run the below command to install it globally.npm install -g angular-cli
After Angular CLI installation,to create a new Angular project Run below command. This command will create all the necessary files, download all the required external dependencies and do all of the setup work for us.
ng new AppName
The application
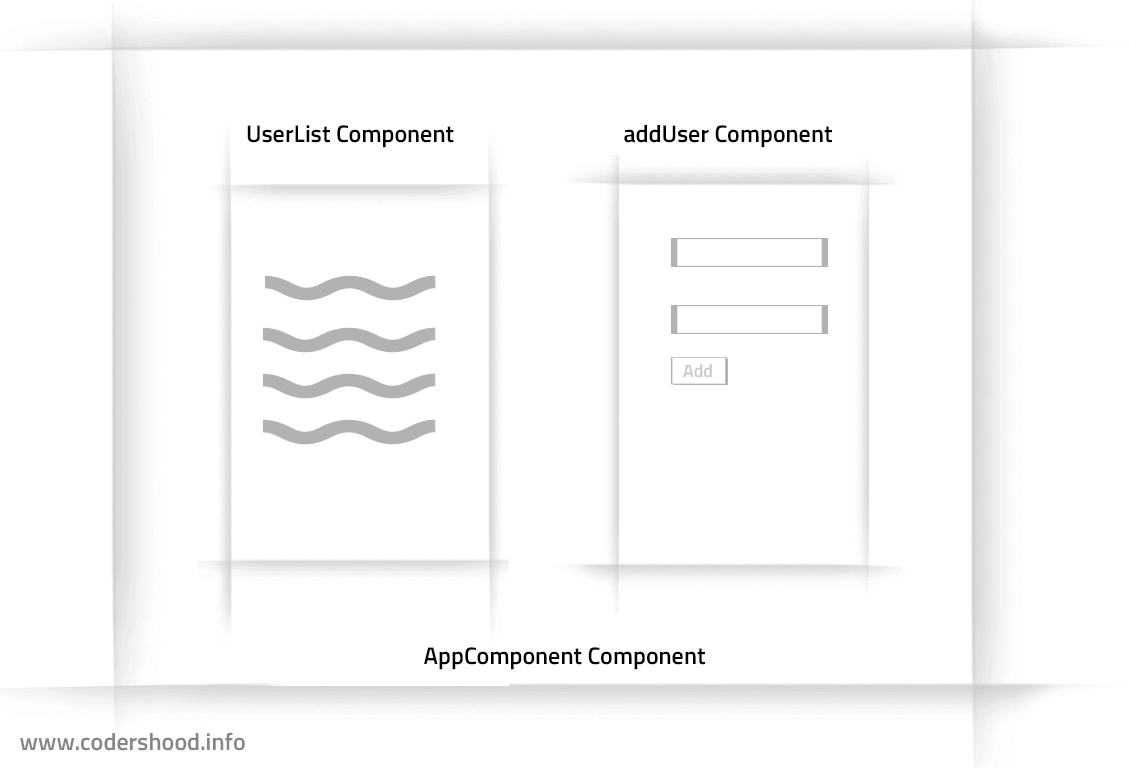
Here,we will create 2 components. The first component is used to show the list of users and the second will be used to add new users as shown in below Image.
To create components in the Angular application is very easy with the help of Angular CLI. Below command is used to create a component,
ng generate component componentName
Run the below commands,
- To create userList component run :
ng generate component userList - To create AddUser component run :
ng generate component AddUser
Basically, our application is comprised of three component userList,AddUser, and the default AppComponent.
Before going further let's take a look at app.module.ts.
app.module.ts:
/*
* Angular 2 CRUD application using Nodejs
* @autthor Shashank Tiwari
*/

import { BrowserModule } from '@angular/platform-browser';
import { NgModule } from '@angular/core';
import { FormsModule } from '@angular/forms';
import { HttpModule } from '@angular/http';

import { AppComponent } from './app.component';
import { UserListComponent } from './user-list/user-list.component';
import { AddUserComponent } from './add-user/add-user.component';

import { EmitterService } from './services/emitter.service';


@NgModule({
    declarations:[ AppComponent, UserListComponent, AddUserComponent ],
    imports:[ BrowserModule,FormsModule,HttpModule ],
    providers: [EmitterService],
    bootstrap: [ AppComponent ]
})
export class AppModule { }
Angular 2 CRUD application using Nodejs
Till now we understood the application architecture and Angular 2 HTTP library. Now let's create angular 2 service for our application. In this service, we will implement methods to get a list of users, update a single user, add a user to the list and delete a user from the list.
In this application, we will show a list of the user based on below class. Create a file named as
userModel.ts and write below code.
userModel.ts :
/*
* Angular 2 CRUD application using Nodejs
* @autthor Shashank Tiwari
*/

export class UserModel {
    constructor(
    	public _id: string,
		public name: string,
		public gender: string,
		public country: string
	) {}
}
Create folder named as services inside app folder. Now we will use angular cli to a create service file.Run the below command to create a service,
ng generate service http
http.service.ts:
/*
* Angular 2 CRUD application using Nodejs
* @autthor Shashank Tiwari
*/

import { Injectable } from '@angular/core';

import { Http, Response, Headers, RequestOptions } from '@angular/http';

import { UserModel } from '../userModel';

import {Observable} from 'rxjs/Rx';

// Import RxJs required methods
import 'rxjs/add/operator/map';
import 'rxjs/add/operator/catch';


@Injectable()
export class HttpService {

    private BASE_URL:string = 'http://localhost:8080/api/users/';

    constructor(
	        private http: Http
	) { }

	public getAllUser(){
		return this.http.get(`${this.BASE_URL}`)
			.map((res:Response) => res.json())
			.catch((error:any) => Observable.throw(error.json().error || 'Server error'));
	}

	public addUser(body:UserModel){
		let options = new RequestOptions({
        	headers: new Headers({ 'Content-Type': 'application/json;charset=UTF-8' })
        });
		return this.http.post(`${this.BASE_URL}`,JSON.stringify(body), options)
			.map((res:Response) => res.json())
			.catch((error:any) => Observable.throw(error.json().error || 'Server error'));
	}

	public updateUser(body:UserModel){

        let options = new RequestOptions({
        	headers: new Headers({ 'Content-Type': 'application/json;charset=UTF-8' })
        });

		return this.http.put(`${this.BASE_URL}${body['_id']}`,JSON.stringify(body), options)
			.map((res:Response) => res.json())
			.catch((error:any) => Observable.throw(error.json().error || 'Server error'));
	}

	public deleteUser(usersID:string){

        let options = new RequestOptions({
        	headers: new Headers({ 'Content-Type': 'application/json;charset=UTF-8' })
        });

		return this.http.delete(`${this.BASE_URL}${usersID}`,options)
			.map((res:Response) => res.json())
			.catch((error:any) => Observable.throw(error.json().error || 'Server error'));
	}

}
In the above code,
We have imported userModel and observable from RXJS library. Since we are using map and catch operator we'll have to import map and catch methods too. we have defined the BASE URL and injected the HTTP in the constructor method.
In the HTTP request, we are sending a request in JSON format encoded into UTF-8 Unicode and I believe the name of methods in above class specifies there job.
Getting list of users
Now our first step will be to get the list of users from the server. Our work will start from
user-list.component.ts but before writing code into it, let's first take a look at app.component.html and
app.component.ts.
app.component.ts :
/*
* Angular 2 CRUD application using Nodejs
* @autthor Shashank Tiwari
*/

import { Component } from '@angular/core';

import { UserListComponent } from './user-list/user-list.component';
import { AddUserComponent } from './add-user/add-user.component';

import { EmitterService } from './services/emitter.service';


@Component({
    selector: 'app-root',
    templateUrl: './app.component.html',
	styleUrls: ['./app.component.css']
})


export class AppComponent {

	public host_id: "HOST_COMPONENT";
	public title:string = 'Angular 2, Nodejs & MongoDB CRUD';

	private userInfo = 'CRUD_USER_INFO';
    private reset = 'CRUD_RESET_FORM';
    private userList = 'CRUD_USER_LIST';

	constructor(private _emitterService: EmitterService) {}
}
In the above code, We have imported EmitterService to pass data between siblings component. In the AppComponent class, we have three keys for
EmitterService to pass data between siblings component.
app.component.html:
<!--
Angular 2 CRUD application using Nodejs
@autthor Shashank Tiwari
-->

<div class="container">

    <h1 class="app-heading">
    	{{title}}
	</h1>

	<div class="row">

		<div class="col-md-7">
			<app-user-list [userInfo]="userInfo" [reset]="reset" [userList]="userList"></app-user-list>
		</div>
		<div class="col-md-5">
			<app-add-user [userInfo]="userInfo" [reset]="reset" [userList]="userList"></app-add-user>
		</div>

	</div>

</div>
Now open user-list.component.ts file write down below code. In the below code,
1. We are importing EmitterService and HttpService, to get data from other component and to call the HTTP request respectively. If you notice we have added
HttpService as providers option in a component decorator.
2. Our UserListComponent implements OnInit, in this method we will load a list of users. So, basically, we will call
getAllUser() of HttpService.
3. Rest of the code is to highlight a selected row from the list of users. We have a separate article for highlighting a selected row in angular 2, I suggest you to read that article once if you don't know how to do that.
user-list.component.ts:
/*
* Angular 2 CRUD application using Nodejs
* @autthor Shashank Tiwari
*/


import { Component, Input, OnInit,OnChanges } from '@angular/core';

import { HttpService } from '../services/http.service';
import { EmitterService } from '../services/emitter.service';

import { UserModel } from '../userModel';

@Component({
  selector: 'app-user-list',
  templateUrl: './user-list.component.html',
  styleUrls: ['./user-list.component.css'],
  providers: [ HttpService ]
})
export class UserListComponent implements OnInit, OnChanges{

    @Input() reset: string;
    @Input() userInfo: string;
	@Input() userList: string;


	private usersList;
	private currentUser:UserModel;

    constructor(
			private httpService: HttpService
		) {}

	ngOnInit(){
		this.httpService.getAllUser().subscribe(
                       response => this.usersList = response.users,
                       error=>  { alert(`Can't get users.`); }
                    );
	}

	public userSelected(user){
		this.currentUser = user;
	}

	public isSelected(user): boolean {
		if(!this.currentUser) {
			return false;
		}
		return this.currentUser._id ===  user._id ? true : false;
	}
}
Let's take a look at a markup, open user-list.component.html: write the below code.
user-list.component.html:
<!--
Angular 2 CRUD application using Nodejs
@autthor Shashank Tiwari
-->


<h3 class="user-list-heading">List of Users</h3>
<hr>

<div class="list-users">
    <ul class="list-group">
    	<li *ngFor="let user of usersList"
			class="list-group-item"
			(click)="userSelected(user)"
			[class.active]="isSelected(user)">
			{{ user.name}}
		</li>
	</ul>
</div>
Deleting a user
To delete a user from the list of users we'll have to again work in list.component.ts file. Basically, we will add a button to each row of the list to delete a particular user from the list.Let's take a look at user-list.component.html
file.
In the below code,
1. When users click on X button we will call
deleteUser() method of UserListComponent class.
2. In the deleteUser() method we will pass the
_id of the user and based on this _id user will be deleted.
user-list.component.html :
<!--
Angular 2 CRUD application using Nodejs
@autthor Shashank Tiwari
-->


<h3 class="user-list-heading">List of Users</h3>
<hr>

<div class="list-users">
    <ul class="list-group">
    	<li *ngFor="let user of usersList"
			class="list-group-item"
			(click)="userSelected(user)"
			[class.active]="isSelected(user) && isReset">
			{{ user.name}}
			<div class="deleteUsers" (click)="deleteUser(user._id)">X</div>
		</li>
	</ul>
</div>
Time to add new user
Open add-user.component.html file and write the below code. In below the code,
1. We have two input tags and one select tag.
2. After that we have two buttons, one is for to add a new user and other is to reset the form.
3. When the user clicks on the add user button we will call the addUser() method of the AddUserComponent class.
add-user.component.html:
<!--
Angular 2 CRUD application using Nodejs
@autthor Shashank Tiwari
-->

<h3 class="add-user-heading">Add/Upadte User </h3>
<hr>

<div class="form-group">
    Name :
    <input class="form-control"
		type ="text"
		placeholder="Your name here."
		name= "name"
		[(ngModel)]="userModel.name">
</div>

<div class="form-group">
	Gender :
	<select class="form-control" name="gender" [(ngModel)]="userModel.gender">
		<option value='m'> Male </option>
		<option value='f'> Female </option>
	</select>
</div>

<div class="form-group">
	Country :
	<input class="form-control"
		type ="text"
		placeholder="Your Country here."
		name="country"
		[(ngModel)]="userModel.country">
</div>

<div class="form-group">
	<button class="btn btn-primary" (click)="addUser()">Add User</button>
	<button  class="btn " (click)="resetAddUser()">Reset</button>
</div>
Now let's take a look at the add-user.component.ts file. In the below code,
1. Everything looks familiar till addUser() method, Here we are calling
addUser() method of the httpService by passing the userModel which contains the data filled by users.
2. In the resetAddUser() function, we will make
userModel empty.
3. We have one problem over here, how we will update the list of users ? Now technically question is how we will notify the
user-list.component.ts that a new add is added to the list of users.
Well, here comes the EmitterService to the rescue. We will emit the updated list of users from addUser() method from AddUserComponent class. Let's take a look at it.
add-user.component.ts:
/*
* Angular 2 CRUD application using Nodejs
* @autthor Shashank Tiwari
*/


import { Component,Input, OnChanges } from '@angular/core';
import { FormsModule } from '@angular/forms';

import { HttpService } from '../services/http.service';
import { EmitterService } from '../services/emitter.service';

import { UserModel } from '../userModel';

@Component({
  selector: 'app-add-user',
  templateUrl: './add-user.component.html',
  styleUrls: ['./add-user.component.css'],
  providers: [ HttpService ]
})
export class AddUserComponent implements OnChanges {

    @Input() userInfo: string;
    @Input() reset: string;
	@Input() userList: string;

	private userModel:UserModel = new UserModel('','','','');

	constructor(
			private httpService: HttpService
		) {}

	public addUser(){
		this.httpService.addUser(this.userModel).subscribe(
                        response =>  {
							if(response.error) {
	                        	alert(`The user could not be added, server Error.`);
	                        } else {
	                        	EmitterService.get(this.userList).emit(response.users);
	                        }
                        },
                        error=> {
                       		alert(`The user could not be added, server Error.`);
                       	}
                    );
	}

	public resetAddUser(){
		this.userModel = new UserModel('','','','');
	}
}
But But But,
How list.component.ts suppose to get the updated list of users, Well solution is by using
ngOnChanges() method.
Whenever any occurs in input property of the component, then ngOnChanges() method gets executed.
In the below code we are updating the list of users, by calling get() method on
EmitterService.
user-list.component.ts:
/*
* Angular 2 CRUD application using Nodejs
* @autthor Shashank Tiwari
*/


import { Component, Input, OnInit,OnChanges } from '@angular/core';

import { HttpService } from '../services/http.service';
import { EmitterService } from '../services/emitter.service';

import { UserModel } from '../userModel';

@Component({
  selector: 'app-user-list',
  templateUrl: './user-list.component.html',
  styleUrls: ['./user-list.component.css'],
  providers: [ HttpService ]
})
export class UserListComponent implements OnInit, OnChanges{

    @Input() reset: string;
    @Input() userInfo: string;
    @Input() userList: string;


	private usersList;
	private currentUser:UserModel;
	private isReset:boolean = true;


	constructor(
			private httpService: HttpService
		) {}

	ngOnInit(){
		this.httpService.getAllUser().subscribe(
                       response => this.usersList = response.users,
                       error=>  { alert(`Can't get users.`); }
                    );
	}

	public userSelected(user){
		this.currentUser = user;
		EmitterService.get(this.userInfo).emit(this.currentUser);
		this.isReset = true;
	}

	public isSelected(user): boolean {
		if(!this.currentUser) {
			return false;
		}
		return this.currentUser._id ===  user._id ? true : false;
	}

	public deleteUser(userId:string){
		this.httpService.deleteUser(userId).subscribe(
						response => {
							if(response.error) {
	                        	alert(`The user could not be deleted, server Error.`);
	                        } else {
	                        	this.usersList = response.users;
	                        }
                        },
                       error=> {
                       		alert(`The user could not be deleted, server Error.`);
                       	}
                    );
	}

    ngOnChanges(changes:any) {

    	EmitterService.get(this.userList).subscribe( (userList:string) => {
			this.usersList = userList;
		});
	}
}
Updating an existing user
So the idea is to update the details of a user, whenever a row of the list is gets selected. In order to do that, we have to pass the details of the user from
user-list.component to add-user.component just like we did above. So let's start,
Open the user-list.component.ts replace the below code.
user-list.component.ts:
/*
* Angular 2 CRUD application using Nodejs
* @autthor Shashank Tiwari
*/


import { Component, Input, OnInit,OnChanges } from '@angular/core';

import { HttpService } from '../services/http.service';
import { EmitterService } from '../services/emitter.service';

import { UserModel } from '../userModel';

@Component({
  selector: 'app-user-list',
  templateUrl: './user-list.component.html',
  styleUrls: ['./user-list.component.css'],
  providers: [ HttpService ]
})
export class UserListComponent implements OnInit, OnChanges{

    @Input() reset: string;
    @Input() userInfo: string;
	@Input() userList: string;


	private usersList;
	private currentUser:UserModel;
	private isReset:boolean = true;


	constructor(
			private httpService: HttpService
		) {}

	ngOnInit(){
		this.httpService.getAllUser().subscribe(
                       response => this.usersList = response.users,
                       error=>  { alert(`Can't get users.`); }
                    );
	}

	public userSelected(user){
		this.currentUser = user;
		EmitterService.get(this.userInfo).emit(this.currentUser);
		this.isReset = true;
	}

	public isSelected(user): boolean {
		if(!this.currentUser) {
			return false;
		}
		return this.currentUser._id ===  user._id ? true : false;
	}

	public deleteUser(userId:string){
		this.httpService.deleteUser(userId).subscribe(
						response => {
							if(response.error) {
	                        	alert(`The user could not be deleted, server Error.`);
	                        } else {
	                        	this.usersList = response.users;
	                        }
                        },
                       error=> {
                       		alert(`The user could not be deleted, server Error.`);
                       	}
                    );
	}

	ngOnChanges(changes:any) {

		EmitterService.get(this.reset).subscribe( (reset:string) => {
			this.isReset = false;
		});


		EmitterService.get(this.userList).subscribe( (userList:string) => {
			this.usersList = userList;
		});
	}
}
In the above code,
1. We will emit the selected user's information in userSelected() method, which will be caught by add-user.component component.
2. If you notice we have one more incoming data from add-user.component component inside
ngOnChanges() method. That will be used to clear all the selection from the list of users, Whenever Reset button from
add-user.component component gets clicked.
Now let's add update button into add-user.component.html, In the below code, There are two buttons actually but one can be displayed at a time and the other hidden. So here is the final code for add-user.component.html.
add-user.component.html :
<!--
Angular 2 CRUD application using Nodejs
@autthor Shashank Tiwari
-->

<h3 class="add-user-heading">Add/Upadte User </h3>
<hr>

<div class="form-group">
    Name :
    <input class="form-control"
		type ="text"
		placeholder="Your name here."
		name= "name"
		[(ngModel)]="userModel.name">
</div>

<div class="form-group">
	Gender :
	<select class="form-control" name="gender" [(ngModel)]="userModel.gender">
		<option value='m'> Male </option>
		<option value='f'> Female </option>
	</select>
</div>

<div class="form-group">
	Country :
	<input class="form-control"
		type ="text"
		placeholder="Your Country here."
		name="country"
		[(ngModel)]="userModel.country">
</div>

<div class="form-group">
	<button *ngIf="isInsert" class="btn btn-primary" (click)="addUser()">Add User</button>
    <button  *ngIf="!isInsert" class="btn btn-primary" (click)="updateUser()">Update</button>
	<button  class="btn " (click)="resetAddUser()">Reset</button>
</div>
The below code is final code for the add-user.component.ts file. In the below code,
1. Whenever any change occurs in userInfo input property (means whenever the new row selected in the list of users) the update button will be shown instead of the add new user button.
2. On the click of update button we will call updateUser() method, which will make HTTP request by calling updateUser() method from HttpService.
3. Lastly on the click of the reset button, we are emitting the reset as true just to clear the selection of rows in
user-list.component file.
add-user.component.ts :
/*
* Angular 2 CRUD application using Nodejs
* @autthor Shashank Tiwari
*/


import { Component,Input, OnChanges } from '@angular/core';
import { FormsModule } from '@angular/forms';

import { HttpService } from '../services/http.service';
import { EmitterService } from '../services/emitter.service';

import { UserModel } from '../userModel';

@Component({
  selector: 'app-add-user',
  templateUrl: './add-user.component.html',
  styleUrls: ['./add-user.component.css'],
  providers: [ HttpService ]
})
export class AddUserComponent implements OnChanges {

    @Input() userInfo: string;
    @Input() reset: string;
	@Input() userList: string;

	private isInsert:boolean = true;
	private userModel:UserModel = new UserModel('','','','');

	constructor(
			private httpService: HttpService
		) {}

	public addUser(){
		this.httpService.addUser(this.userModel).subscribe(
                        response =>  {
							if(response.error) {
	                        	alert(`The user could not be added, server Error.`);
	                        } else {
	                        	EmitterService.get(this.userList).emit(response.users);
	                        }
                        },
                        error=> {
                       		alert(`The user could not be added, server Error.`);
                       	}
                    );
	}

	public updateUser(){
		this.httpService.updateUser(this.userModel).subscribe(
						response => {
							if(response.error) {
	                        	alert(`The user could not be updated, server Error.`);
	                        } else {
	                        	EmitterService.get(this.userList).emit(response.users);
	                        }
                        },
                        error=> {
                        	alert(`The user could not be updated, server Error.`);
                        }
                    );
	}

	public resetAddUser(){
		this.userModel = new UserModel('','','','');
		EmitterService.get(this.reset).emit(true);
		this.isInsert = true;
	}

	ngOnChanges(changes:any) {

		EmitterService.get(this.userInfo).subscribe( (value:UserModel) => {
			this.userModel = new UserModel(value._id,value.name,value.gender,value.country);
			this.isInsert = false;
		});
	}
}
Final thoughts
In this article we understood,
- Angular 2 HTTP library.
- How to create a service in Angular 2.
- and we created a basic CRUD application using Angular 2.
So that's the end of this long article. If you find this article useful share with others.