http://www.cnblogs.com/davidrua/p/6810778.html
背景
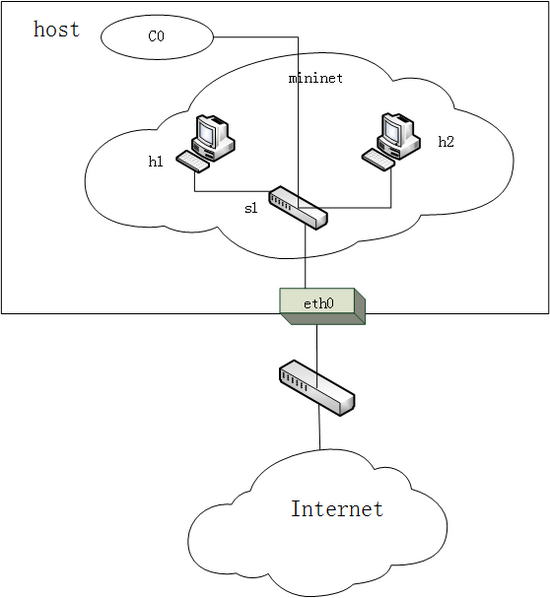
Mininet是由一些虚拟的终端节点(end-hosts)、交换机、路由器连接而成的一个网络仿真器,它采用轻量级的虚拟化技术使得系统可以和真实网络相媲美。但是默认的情况下,Mininet是没有链接到网络,这通常来说是一个好事,隔离了外界网络的干扰,但是有时我们是需要我们创建的网络链接到网络中。
环境
- Ubuntu14.04LTS x86_64 in VM
- Internet:DHCP/NAT
过程
在Mininet 2.2 以及更新的版本中,可以使用 --nat 标签
sudo mn --nat ...
值得注意的是,默认情况下,所有的这些方法将重路由(reroute)来自Mininet服务器或者VM的本地的流量,并将重定向到Mininet的IP子网当中(默认为10.0.0.0/8)。如果正在使用的LAN中相同的网段,则可能会造成断开链接。可以使用--ipbase来更改这个子网。
我们同样可以通过调用Python API包 Mininet.addNAT() 来达到NAT。
net = Mininet( topo=... )
net.addNAT().configDefault()
net.start()
...
同时你也可以建立NAT拓扑。

class NatTopo( Topo ):
    def build( self, natIP='10.0.0.254' ):
        self.hopts = { 'defaultRoute': 'via ' + natIP }
        hosts  = [ self.addHost( h ) for h in 'h1', 'h2' ]
        s1 = self.addSwitch( 's1' )
        for h in hosts:
            self.addLink( s1, h )
        nat1 = self.addNode( 'nat1', cls=NAT, ip=natIP,
                             inNamespace=False )
        self.addLink( nat1, s1 )
或者
def Natted( topoClass ):
    "Return a customized Topo class based on topoClass"
    class NattedTopo( topoClass ):
        "Customized topology with attached NAT"
        def build( self, *args, **kwargs ):
            """Build topo with NAT attachment
               natIP: local IP address of NAT node for routing (10.0.0.254)
               connect: switch to connect (s1)"""
            self.natIP = kwargs.pop( 'natIP', '10.0.0.254')
            self.connect = kwargs.pop( 'connect', 's1' )
            self.hopts.update( defaultRoute='via ' + self.natIP )
            super( NattedTopo, self ).build( *args, **kwargs )
            nat1 = self.addNode( 'nat1', cls=NAT, ip=self.natIP,
                                 inNamespace=False )
            self.addLink( self.connect, nat1 )
    return NattedTopo

def natted( topoClass, *args, **kwargs ):
    "Create and invoke natted version of topoClass"
    topoClass = Natted( topoClass )
    return topoClass( *args, **kwargs )

topo = natted( TreeTopo, depth=2, fanout=2 )
net = Mininet( topo=topo )
具体的实现方式可以参考Mininet的Github https://github.com/mininet/mininet/blob/master/examples/nat.py
但是这种的实现方法会造成在Mininet中增加了一个nat0主机以达到链接Internet的目的。
另一种实现的方法是将交换机链接到eth0端口从而实现链接网络的目的。
Minitnet自定义拓扑:https://github.com/huang362432/Mininet-connect-to-Net/blob/master/topo.py
通过运行py文件建立网络拓扑
sudo ./topo.py
或者可以通过建立简单的Mininet自定义拓扑https://github.com/huang362432/Mininet-connect-to-Net/blob/master/mytopo.py,然后向S1交换机添加eth0端口
sudo ovs-vsctl add-port s1 eth0
此时主机已经可以实现DHCP功能,可以自动分配IP,并且每次运行分配的IP不同。但是从Net却不能链接Ubuntu,这时候还需要更改
ifconfig s1 <ip/netmask>
ifconfig eth0 0.0.0.0
route add default gw <nat_ip> s1
route del default gw <nat_ip> eth0
目的是把原来处理数据包的eth0改为s1处理数据包,所以相关的route ,ip都得全部重设。
参考http://roan.logdown.com/posts/195601-sdn-lab3-mininet-connect-to-real-internet