一、添加普通用户,通过sudo授权管理
- 添加普通用户:
useradd [用户名] 填加用户命令
passwd [用户名] 填加用户密码 添加密码的时候一定要指定用户名,否则就是修改当前用户密码
- 给普通用户授权:visudo=vi /etc/sudoers------进入授权配置文件:
修改格式如下:用户 用户机器=(授权那个角色的权限) 授权的东西

但是在普通用户执行命令时得在命令前加sudo 例子:sudo useradd 666
查看所在用户有的权限:sudo -l
授权目的:即能让小白干活,又不能威胁系统安全。
二、更改默认的SSH服务器端口及禁止root用户远程连接
- 查看ssh的文件夹:
[root@localhost ~]# ls -l /etc/ssh/sshd_config
-rw-------. 1 root root 3879 Oct 15  2014 /etc/ssh/sshd_config
- 进入ssh文件夹:
[root@localhost ~]# cd /etc/ssh
- 更改配之前进行备份:
[root@localhost ssh]# cp sshd_config sshd_config.ori
- 编辑sshd_config:
[root@localhost ssh]# vi sshd_config
Port 52113     ##ssh端口谁都知道是22,得改了##
PermitEmptyPasswords no   ##禁止空密码登陆##
PermitRootLogin no    ##root用户都知道,禁止他远程登陆,用的时候切进去   su -##
UseDns no ##不适用DNS## - 重启sshd服务:
[root@localhost ssh]# /etc/init.d/sshd reload Reloading sshd: [ OK ] - 关闭防火墙:
[root@localhost ssh]# /etc/init.d/sshd reload/
三、定时更新服务器时间
- 临时生效时间同步服务:
[root@localhost ~]# /usr/sbin/ntpdate time.nist.gov
- 定时任务:
[root@localhost ~]# echo '*/5* * * * /uer/sbin/ntpdate time.nist.gov > /dev/null 2>&1' >>/var/spool/cron/root
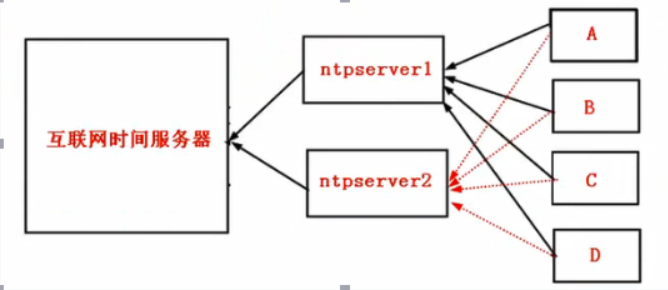
- 时间服务器构建及其优化:
四、配置yum更新源,从国内更新下载安装rpm包
- 进入yum的目录下:
[root@localhost ~]#cd /etc/yum.repos.d/
[root@localhost ~]yum.repos.d]#
- 备份源:
[root@localhost ~]#yum.repos.d]# cp CentOS-Base.repo CentOS-Base.repo.bak
- 下载163的源:163是国内的
[root@localhost ~yum.repos.d]# wget http://mirrors.163.com/.help/CentOS6-Base-163.repo
- 更换163源
[root@localhost ~yum.repos.d]# cp CentOS6-Base-163.repo CentOS-Base.repo
5 cp: overwrite `CentOS-Base.repo'? y
[root@localhost ~yum.repos.d]#
五、关闭selinux及iptables
- 查看修改配置文件:
[root@localhost ~]# cat /etc/selinux/config
[root@localhost ~]# vi /etc/selinux/config
# This file controls the state of SELinux on the system.
# SELINUX= can take one of these three values:
#     enforcing - SELinux security policy is enforced.
#     permissive - SELinux prints warnings instead of enforcing.
#     disabled - No SELinux policy is loaded.
SELINUX=disabled    ##改这个原来是:enforcing##
# SELINUXTYPE= can take one of these two values:
#     targeted - Targeted processes are protected,
#     mls - Multi Level Security protection.
SELINUXTYPE=targeted
- 查看结果:
[root@localhost ~]# grep "disable" /etc/selinux/config
[root@localhost ~]# setenforce 0  ##临时关闭防火墙##
[root@localhost ~]#/etc/init.d/iptables stop
[root@localhost ~ yum.repos.d]# getenforce ##查看selinux当前状态## Permissive
六、调整文件描述符的数量
- 加大:
ulimit -HSn 65535 ##临时加大##
echo '* - nofile 65535 '>>/etc/security/limits.conf##永久加大##
七、清理/var/spool/clientmquene/目录垃圾文件,防止inodes节点被沾满
- /var/spool/clientmquene/sendmail邮件服务邮件临时存放地点。C5.8默认有,6.5没有
- 手动清理方法:
[root@localhost /]#find /var/spool/clientmquene/ -type f |xargs rm -f
八、精简开机自启动服务(crond,sshd,network,syslog(rsysloy))
- 查看启动的软件:
[root@localhost ~]# chkconfig
- 首先关掉3下所有的软件:
[root@localhost ~]#for lcr in `chkconfig --list | grep "3:on" | awk '{print $1}'`;do chkconfig $lcr off;done - 打开所需要的:
[root@localhost ~]#for lcr in crond sshd network rsyslog;do chkconfig $lcr on;done
九、linux内核参数优化/etc/sysct.conf,然后sysctl -p生效
-
服务器内核优化:
[root@localhost /]# vi /etc/sysctl.conf
对网络ipv4的优化:把图片里的内容放到/etc/sysctl.conf下面
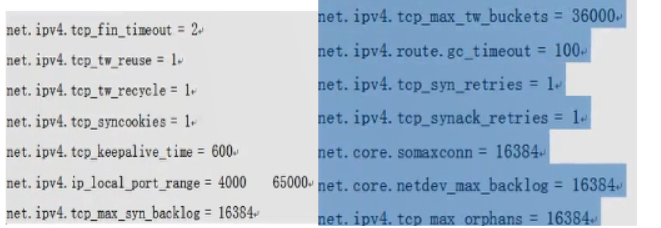
对防火墙优化:做法同上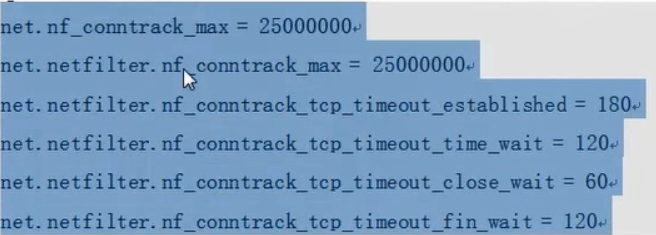
十、更改字符集,支持中文,但建议还是用英文字符集,防止乱码问题
[root@localhost sysconfig]# vi /etc/sysconfig/i18n
#LANG="en_US.UTF-8"
LANG="zh_CN.GB18030"
SYSFONT="latarcyrheb-sun16"
十一、锁定关键系统文件。
- chattr +i /etc/passwd
- chattr +i /etc/shadow
- chattr +i /etc/group
- 解锁参数是 -i