scrapy介绍,架构介绍(框架)ghref
scrapy就是爬虫界的django
爬虫框架,别人写好的代码,以后只需要在指定位置写指定代码即可
基于twisted:性能很高
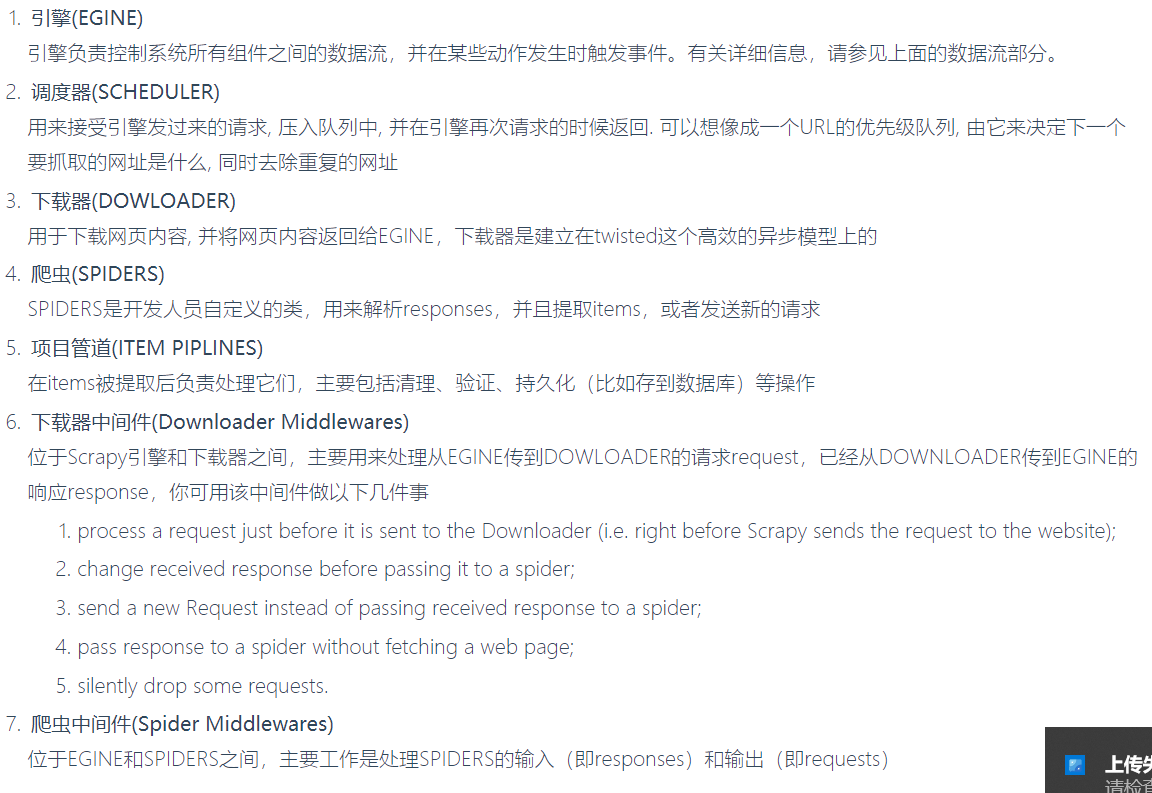
五大组件
引擎:大总管,总的控制数据流动
调度器:去重,加入队列
下载器 :负责下载,加载数据
爬虫:主要写这,解析response和重新发起请求
项目管道:持久化相关
两大中间件
爬虫中间件:爬虫和引擎之间(用的少)
下载中间件:引擎和下载器之间(加代理,加cookie,修改user-agent,继承selenium)
scrapy安装(windows)
mac/linux:pip3 install scrapy
windows:
    pip3 install scrapy(大部分都可以)
-如果上面不行
    	-pip3 install wheel   (xxx.whl文件安装模块)
      -下载pywin32:两种方式:1 pip3 install pywin32    2 下一个exe安装https://sourceforge.net/projects/pywin32/files/pywin32/
      -下载twisted的wheel文件:http://www.lfd.uci.edu/~gohlke/pythonlibs/#twisted   下载完是一个xxx.whl文件
    -执行pip3 install 下载目录Twisted-17.9.0-cp36-cp36m-win_amd64.whl
scrapy创建项目 创建爬虫 运行爬虫
#通过命令创建项目,到指定的文件夹下
#创建项目(django中创建项目)
scrapy startproject 项目名
# 创建爬虫(django中创建app)在spiders文件夹下创建py文件,一个py文件就是一个爬虫(不要注册,没有注册一说)
scrapy genspider 爬虫名字 爬取地址
scrapy genspider chouti dig.chouti.com
#打开项目 pycharm打开
#运行爬虫 命令行下
scrapy crawl 爬虫名字
scrapy crawl 爬虫名字 --nolog #不打印日志
# 运行爬虫 py文件
# 在项目目录下创建一个py文件,假设交main.py,点击右键执行即可执行爬虫 等同于命令
from scrapy.cmdline import execute
execute(['scrapy','crawl','chouti'])
# execute(['scrapy','crawl','chouti','--nolog'])
目录介绍
-scarpyfirst 项目名
	-scrapy.cfg 上线相关的(不用管)
  -scrapyfirst 文件夹
  	-spiders文件夹     :所有的爬虫写在这里面
    	-chouti.py			:一个py文件就是一个爬虫(类似于django的app)
    -items.py         :配合管道,做数据存储(类似于django中models.py 写一个个的模型类)
    -middlewares.py   :中间件(爬虫中间件,下载中间件都写在这里面)
    -pipelines.py  		:管道,持久化相关,数据存储卸载
    -settings.py			:配置文件相关
settings介绍
#配置文件全是大写
ROBOTSTXT_OBEY = False #是否遵循爬虫协议 如果是True,基本上网站都爬不了,遵循要爬取网站的爬虫协议 一般设置成False
USER_AGENT = 'Mozilla/5.0 (Windows NT 10.0; Win64; x64) AppleWebKit/537.36 (KHTML, like Gecko) Chrome/80.0.3987.122 Safari/537.36'
LOG_LEVEL='ERROR' #只打印错误信息
scrapy的数据解析
css选择
	response.css().extract_first()#取第一个 只要是取一个就用它
xpath选择
	response.xpath().extract()#取所有 取所有的就用它
scrapy的持久化存储
第一种:通过命令:scrapy crawl chouti -o aa.csv#chouti是爬虫名 aa.csv文件名,不能用txt
	需要在parser解析方法中返回列表套字典
第二种:通过管道方式(文件,数据,redis,MongoDB),同时支持以多种方式存储
	1 在item.py中定义一个类 写属性(要存多少字段,就有多少属性)
    2 在爬虫中解析出数据 把数据放到这个类对象中,然后 yield item
    3 在配置文件中配置:ChoutiPipeline对应piplines.py中的类
    ITEM_PIPELINES = {
   		'scrapyfirst.pipelines.ChoutiPipeline': 300,   # 数字表示优先级,数字越小,优先级越高
		}
    4 pipelines.py中写ChoutiPipeline类
    -open_spider:开启时调用,打开文件,打开数据库连接
    -process_item:存数据
    -close_sapider:关闭时调用,关闭文件,关闭数据库连接
    总结:ITEM_PIPELINES可以写多个,有优先级的 数字越小 优先级越大 一定要注意 process_item一定要return,否则后续就拿不到item了
第一种
# -*- coding: utf-8 -*-
import scrapy


class ChoutiSpider(scrapy.Spider):
    # 爬虫名字
    name = 'chouti'
    # 只允许爬取当前域名
    allowed_domains = ['dig.chouti.com']
    # 起始爬取的地址
    start_urls = ['http://dig.chouti.com/']

    #解析的方法
    def parse(self, response):
        li=[] #列表套字典
        #response 响应回来的对象
        # print(response)
        # 获取response的文本数据
        # print(response.text)
        #自带解析库
        # css选择
        '''
        div_list=response.css('div.link-item')
        for div in div_list:
            #不管用的css选择器还是xpath选择器 选出来的都是列表,都需要取出来
            # extract() 表示取出列表所有
            # extract_first()取出列表死一个
            desc=div.css('a.link-title::text').extract_first()
            # desc=div.css('a.link-title::text').extract()
            print(desc)
        '''
        # xpath选择
        '''
        div_list=response.xpath('/html/body/main/div/div/div[1]/div/div[2]/div[1]/div')
        for div in div_list:
            #可以混用
            # desc = div.css('a.link-title::text').extract_first()
            #xpath选择
            desc=div.xpath('./div/div/div[1]/a/text()').extract_first()
            print(desc)
        '''
        #自己写xpath
        div_list=response.xpath('//div[contains(@class,"link-item")]')
        for div in div_list:
            # 可以混用
            # desc = div.css('a.link-title::text').extract_first()
            # 用xpath选择
            # desc=div.xpath('./div/div/div[1]/a/text()')[0].extract() 一般不用
            desc=div.xpath('./div/div/div[1]/a/text()').extract_first()
            img_url=div.xpath('./div/a/img/@src').extract_first()
            # print(desc)
            # print(img_url)
            li.append({'desc':desc,'img_url':img_url})
        return li
第二种
chouti.py
from scrapyfirst.items import ChoutiItem
class ChoutiSpider(scrapy.Spider):
    # 爬虫名字
    name = 'chouti'
    # 只允许爬取当前域名
    allowed_domains = ['dig.chouti.com']
    # 起始爬取的地址
    start_urls = ['http://dig.chouti.com/']

    #解析的方法
    def parse(self, response):
        #自己写xpath
        div_list=response.xpath('//div[contains(@class,"link-item")]')
        for div in div_list:
            # 可以混用
            # desc = div.css('a.link-title::text').extract_first()
            # 用xpath选择
            # desc=div.xpath('./div/div/div[1]/a/text()')[0].extract() 一般不用
            desc=div.xpath('./div/div/div[1]/a/text()').extract_first()
            img_url=div.xpath('./div/a/img/@src').extract_first()
            #实例化得到对象
            item=ChoutiItem()
            item['desc']=desc
            item['img_url']=img_url
            yield item
items.py
import scrapy


class ChoutiItem(scrapy.Item):
    # define the fields for your item here like:
    # name = scrapy.Field()
    desc=scrapy.Field()
    img_url=scrapy.Field()
pipelines.py
class ChoutiPipeline(object):
    def open_spider(self,spider):
        print('我开了')
        self.f=open('a.txt','w',encoding='utf-8')

    def process_item(self, item, spider):
        '''
         with open('b.txt','a',encoding='utf-8') as f:
        f.write(item['desc']+item['img_url']+'
')
        '''
        self.f.write(item['desc']+item['img_url']+'
')

        return item#return的原因是可以支持多种方式存储

    def close_spider(self,spider):
        self.f.close()
        print('我关了')

    #保存到数据库中
class ChoutiMysqlPipeline(object):
    def open_spider(self, spider):
        # autocommit=True 表示自动提交
        self.conn = pymysql.connect(host='127.0.0.1', user='root', password='', database='chouti', port=3306)

    def process_item(self, item, spider):
        cursor = self.conn.cursor()
        sql = "insert into article (`desc`,img_url) values ('%s','%s')" % (item['desc'], item['img_url'])
        cursor.execute(sql)
        # 不要忘记了提交
        self.conn.commit()

        # return item#return的原因是可以支持多种方式存储

    def close_spider(self, spider):
        self.conn.close()
settings.py
ITEM_PIPELINES = {
   'scrapyfirst.pipelines.ChoutiPipeline': 300,
}
个人补充
scrapy.Resuest'
# -*- coding: utf-8 -*-
import scrapy
import json
from scrapyfirst.items import ChoutiItem
class Huya2Spider(scrapy.Spider):
    name = 'huya2'
    allowed_domains = ['huya.com/cache.php?m=LiveList']
    start_urls = ['https://www.huya.com/cache.php?m=LiveList&do=getLiveListByPage&gameId=1663&tagAll=0']

    def parse(self, response):
        data=json.loads(response.text.encode('utf8')).get('data')
        max_page=data.get('totalPage')
        datas=data.get('datas')
        print(data)
        item = ChoutiItem()
        for dic in datas:
            item['introduction']=dic.get('introduction')
            item['nick']=dic.get('nick')
            item['totalCount']=dic.get('totalCount')
            item['url']='https://www.huya.com/'+dic.get('profileRoom')
            yield item
        for page in range(max_page):
            next_page_url=self.start_urls+f'&page={page}'
            print(next_page_url)
            yield scrapy.Request(url=next_page_url,callback=self.parse,dont_filter=True)
            '''
            Request类是一个http请求的类,url接链接 callback接回调函数
            Request对象在我们写爬虫,爬取一页的数据需要重新发送一个请求的时候调用。这个类需要传递一些参数。其中比较常用的参数有:
1.url    请求的url对象
2.callback  在下载器下载完相应的数据后执行的回调函数
3.method   请求的方式,默认为GET方法,可以设置为其他方法
4.meta   比较常用,用于在不同的请求之间传递数据用的.Request.meta属性的初始值。如果给定,则此参数中传递的dict将被浅拷贝。
5.encoding   编码。默认的为  utf-8,使用默认的就可以了。
6.dot_filter    表示不有调度器过滤,在执行多次重复的请求的时候就用的比较多。
7.cookie     请求的cookie。
8.errback    在发生错误的时候执行的函数。
Response对象一般是有Scrapy给你自动构建,因此开发者不需要关心如何创建Response对象,而是如何使用它,Response对象有很多属性,可以用开提取数据,主要有一下属性:
1.meta   从其他请求传过来的meta属性,可以用来保持多个请求之间的数据连接。
2.encoding   返回当前字符串编码和解码的格式。
3.text   将返回来的数据作为unicode字符串返回。
4.xpath   xpath选择器。
5.css   css选择器。
6.body   将返回来的数据作为bytes字符串返回。
7.status     响应的HTTP状态。默认为200。
8.flags     一个包含属性初始值的 Response.flags列表。如果给定,列表将被浅拷贝
9.request    属性的初始值Response.request。这代表Request生成此响应。
            '''
爬抽屉 爬虎牙
ide,开发工具
你用什么ide,
ide系列
java:eclipe(免费) myeclips(收费) ieda(大部分Java都使用他)
python:pycharm,vscode(微软出的 免费 go c python java)
go:goland vscode
开发安卓:eclipse+adt,谷歌买下了jetbrains公司的版权idea+adt=androidstatdio 当年已经有大量的Java开发人员 Java可以直接无缝转过去,Java虚拟机
开发iOS:必须用Mac Xcode
jetbrains公司全家桶系列:idea pycharm webstom goland php
python体系:python基础,mysql,前端,web爬虫,数据分析,人工智能
Java体系
Javase:基础
学完基础+安卓相关包的学习
javaee:web相关
javame:手机开发(不是安卓 ,iOS,很古老的Java手机软件)
区别:jdk,jre,jvm
jdk:java软甲开发工具包,Java开发人员需要开发
jre:java运行环境
jvm:java虚拟机(Java程序一定要运行在虚拟机之上),跨平台,一次编码到处运行
c/c++:如果想在Windows上运行,需要在windon上编译exe
go--->编译之后---》直接运行 跨平台编译在Windows平台可以编译出linux下可执行的文件
Java写了代码---》不是编译成直接可以运行的二进制(中间态)---》需要操作系统装Java虚拟机(Java虚拟机跑起来至少就得占500m内存)