基于模板匹配的车牌识别
1、项目准备
# 导入所需模块
import cv2
from matplotlib import pyplot as plt
import os
import numpy as np
# 定义必要函数

# 显示图片
def cv_show(name,img):
    cv2.imshow(name,img)
    cv2.waitKey()
    cv2.destroyAllWindows()

# plt显示彩色图片
def plt_show0(img):
    b,g,r = cv2.split(img)
    img = cv2.merge([r, g, b])
    plt.imshow(img)
    plt.show()

# plt显示灰度图片
def plt_show(img):
    plt.imshow(img,cmap='gray')
    plt.show()

# 图像去噪灰度处理
def gray_guss(image):
    image = cv2.GaussianBlur(image, (3, 3), 0)
    gray_image = cv2.cvtColor(image, cv2.COLOR_RGB2GRAY)
    return gray_image
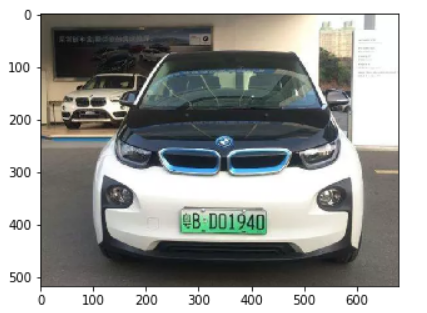
# 读取待检测图片
origin_image = cv2.imread('./image/test2.png')
plt_show0(origin_image)
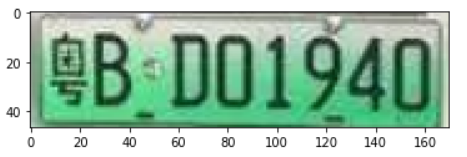
2、提取车牌位置图片
# 提取车牌部分图片
def get_carLicense_img(image):
    gray_image = gray_guss(image)
    Sobel_x = cv2.Sobel(gray_image, cv2.CV_16S, 1, 0)
    absX = cv2.convertScaleAbs(Sobel_x)
    image = absX
    ret, image = cv2.threshold(image, 0, 255, cv2.THRESH_OTSU)
    kernelX = cv2.getStructuringElement(cv2.MORPH_RECT, (17, 5))
    image = cv2.morphologyEx(image, cv2.MORPH_CLOSE, kernelX,iterations = 3)
    kernelX = cv2.getStructuringElement(cv2.MORPH_RECT, (20, 1))
    kernelY = cv2.getStructuringElement(cv2.MORPH_RECT, (1, 19))
    image = cv2.dilate(image, kernelX)
    image = cv2.erode(image, kernelX)
    image = cv2.erode(image, kernelY)
    image = cv2.dilate(image, kernelY)
    image = cv2.medianBlur(image, 15)
    contours, hierarchy = cv2.findContours(image, cv2.RETR_EXTERNAL, cv2.CHAIN_APPROX_SIMPLE)
    for item in contours:
        rect = cv2.boundingRect(item)
        x = rect[0]
        y = rect[1]
        weight = rect[2]
        height = rect[3]
        if (weight > (height * 3)) and (weight < (height * 4)):
            image = origin_image[y:y + height, x:x + weight]
            return image
image = origin_image.copy()
carLicense_image = get_carLicense_img(image)
plt_show0(carLicense_image)
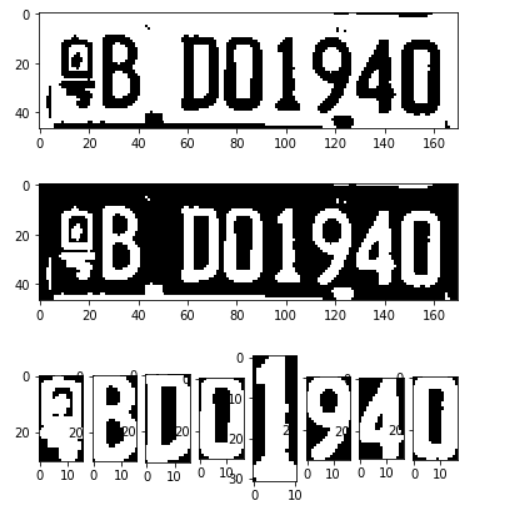
3、车牌字符分割
def carLicense_spilte(image):
    gray_image = gray_guss(image)

    ret, image = cv2.threshold(gray_image, 0, 255, cv2.THRESH_OTSU)
    plt_show(image)
    # 计算二值图像黑白点的个数,处理绿牌照问题,让车牌号码始终为白色
    area_white = 0
    area_black = 0
    height, width = image.shape
    for i in range(height):
        for j in range(width):
            if image[i, j] == 255:
                area_white += 1
            else:
                area_black += 1
    if area_white>area_black:
        ret, image = cv2.threshold(image, 0, 255, cv2.THRESH_OTSU | cv2.THRESH_BINARY_INV)
        plt_show(image)

    kernel = cv2.getStructuringElement(cv2.MORPH_RECT, (2, 2))
    image = cv2.dilate(image, kernel)
    contours, hierarchy = cv2.findContours(image, cv2.RETR_EXTERNAL, cv2.CHAIN_APPROX_SIMPLE)
    words = []
    word_images = []
    for item in contours:
        word = []
        rect = cv2.boundingRect(item)
        x = rect[0]
        y = rect[1]
        weight = rect[2]
        height = rect[3]
        word.append(x)
        word.append(y)
        word.append(weight)
        word.append(height)
        words.append(word)
    words = sorted(words,key=lambda s:s[0],reverse=False)
    i = 0
    for word in words:
        if (word[3] > (word[2] * 1.8)) and (word[3] < (word[2] * 3.5)):
            i = i+1
            splite_image = image[word[1]:word[1] + word[3], word[0]:word[0] + word[2]]
            word_images.append(splite_image)
    return word_images
image = carLicense_image.copy()
word_images = carLicense_spilte(image)

# 绿牌要改为8,蓝牌为7,显示所用
for i,j in enumerate(word_images):
    plt.subplot(1,8,i+1)
    plt.imshow(word_images[i],cmap='gray')
plt.show()
4、模板匹配
# 准备模板
template = ['0','1','2','3','4','5','6','7','8','9',
            'A','B','C','D','E','F','G','H','J','K','L','M','N','P','Q','R','S','T','U','V','W','X','Y','Z',
            '藏','川','鄂','甘','赣','贵','桂','黑','沪','吉','冀','津','晋','京','辽','鲁','蒙','闽','宁',
            '青','琼','陕','苏','皖','湘','新','渝','豫','粤','云','浙']

# 读取一个文件夹下的所有图片,输入参数是文件名,返回文件地址列表
def read_directory(directory_name):
    referImg_list = []
    for filename in os.listdir(directory_name):
        referImg_list.append(directory_name + "/" + filename)
    return referImg_list

# 中文模板列表(只匹配车牌的第一个字符)
def get_chinese_words_list():
    chinese_words_list = []
    for i in range(34,64):
        c_word = read_directory('./refer1/'+ template[i])
        chinese_words_list.append(c_word)
    return chinese_words_list
chinese_words_list = get_chinese_words_list()

# 英文模板列表(只匹配车牌的第二个字符)
def get_eng_words_list():
    eng_words_list = []
    for i in range(10,34):
        e_word = read_directory('./refer1/'+ template[i])
        eng_words_list.append(e_word)
    return eng_words_list
eng_words_list = get_eng_words_list()

# 英文数字模板列表(匹配车牌后面的字符)
def get_eng_num_words_list():
    eng_num_words_list = []
    for i in range(0,34):
        word = read_directory('./refer1/'+ template[i])
        eng_num_words_list.append(word)
    return eng_num_words_list
eng_num_words_list = get_eng_num_words_list()


# 读取一个模板地址与图片进行匹配,返回得分
def template_score(template,image):
    template_img=cv2.imdecode(np.fromfile(template,dtype=np.uint8),1)
    template_img = cv2.cvtColor(template_img, cv2.COLOR_RGB2GRAY)
    ret, template_img = cv2.threshold(template_img, 0, 255, cv2.THRESH_OTSU)
#     height, width = template_img.shape
#     image_ = image.copy()
#     image_ = cv2.resize(image_, (width, height))
    image_ = image.copy()
    height, width = image_.shape
    template_img = cv2.resize(template_img, (width, height))
    result = cv2.matchTemplate(image_, template_img, cv2.TM_CCOEFF)
    return result[0][0]
def template_matching(word_images):
    results = []
    for index,word_image in enumerate(word_images):
        if index==0:
            best_score = []
            for chinese_words in chinese_words_list:
                score = []
                for chinese_word in chinese_words:
                    result = template_score(chinese_word,word_image)
                    score.append(result)
                best_score.append(max(score))
            i = best_score.index(max(best_score))
            # print(template[34+i])
            r = template[34+i]
            results.append(r)
            continue
        if index==1:
            best_score = []
            for eng_word_list in eng_words_list:
                score = []
                for eng_word in eng_word_list:
                    result = template_score(eng_word,word_image)
                    score.append(result)
                best_score.append(max(score))
            i = best_score.index(max(best_score))
            # print(template[10+i])
            r = template[10+i]
            results.append(r)
            continue
        else:
            best_score = []
            for eng_num_word_list in eng_num_words_list:
                score = []
                for eng_num_word in eng_num_word_list:
                    result = template_score(eng_num_word,word_image)
                    score.append(result)
                best_score.append(max(score))
            i = best_score.index(max(best_score))
            # print(template[i])
            r = template[i]
            results.append(r)
            continue
    return results
word_images_ = word_images.copy()
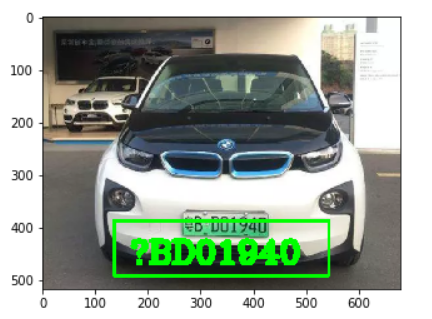
result = template_matching(word_images_)
result
# ['粤', 'B', 'D', '0', '1', '9', '4', '0']
5、结果渲染
height,weight = origin_image.shape[0:2]
print(height)
print(weight)
# 517
# 680
# 中文无法显示(百度可解决)
image = origin_image.copy()
cv2.rectangle(image, (int(0.2*weight), int(0.75*height)), (int(weight*0.8), int(height*0.95)), (0, 255, 0), 5)
cv2.putText(image, "".join(result), (int(0.2*weight)+30, int(0.75*height)+80), cv2.FONT_HERSHEY_COMPLEX, 2, (0, 255, 0), 10)
plt_show0(image)
6、总结
- 项目的容错性还不够高,图片比较模糊的时候识别不到车牌,还待提高
- 识别速度不够快
- 模板匹配算法太依赖模板的质量
- 使用大量的模板可以提高精度,但是速度下降严重
- 还有很多待优化的地方,比如一张图中有多个车牌等
- 我认为整个项目最难的地方是车牌位置的提取
- 项目还是很不错的一个对OpenCV图像处理的课题项目
- 自己独立完成,收获挺大的
- 作者:曾强
- 日期:2020-4-13
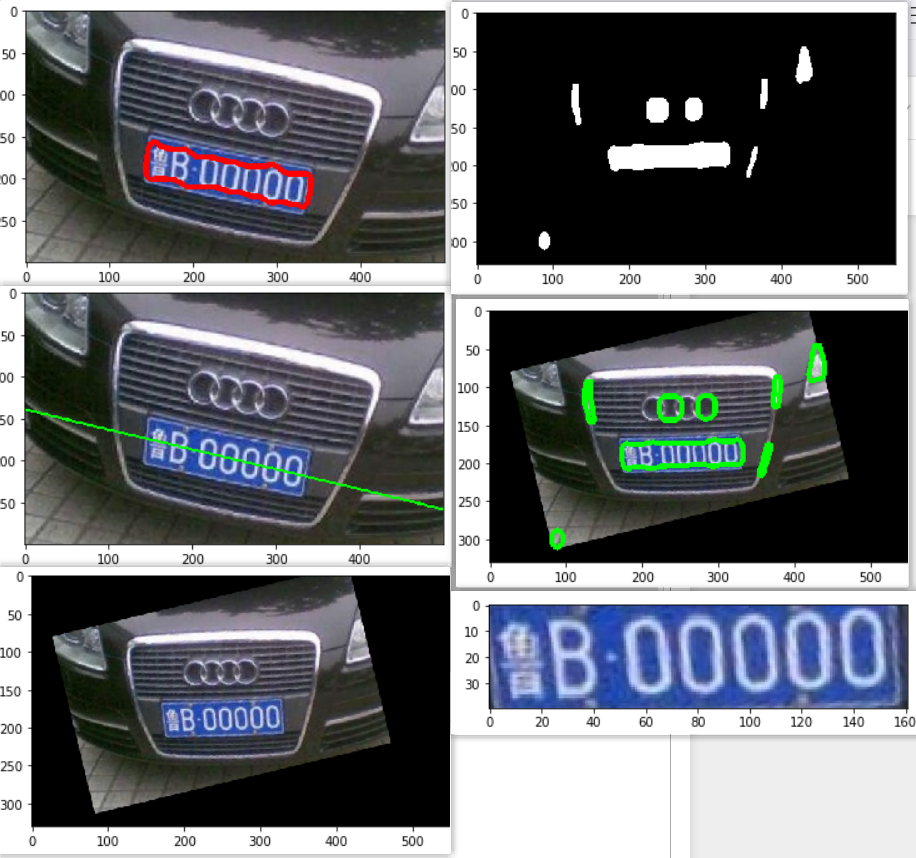
补充-倾斜车牌提取
# 导入所需模块
import cv2
from matplotlib import pyplot as plt

# 显示图片
def cv_show(name,img):
    cv2.imshow(name,img)
    cv2.waitKey()
    cv2.destroyAllWindows()

# plt显示彩色图片
def plt_show0(img):
    b,g,r = cv2.split(img)
    img = cv2.merge([r, g, b])
    plt.imshow(img)
    plt.show()

# plt显示灰度图片
def plt_show(img):
    plt.imshow(img,cmap='gray')
    plt.show()

# 加载图片
rawImage = cv2.imread("./image/test3.png")
plt_show0(rawImage)

# 高斯去噪
image = cv2.GaussianBlur(rawImage, (3, 3), 0)
# 预览效果
plt_show0(image)

# 灰度处理
gray_image = cv2.cvtColor(image, cv2.COLOR_RGB2GRAY)
plt_show(gray_image)

# sobel算子边缘检测(做了一个y方向的检测)
Sobel_x = cv2.Sobel(gray_image, cv2.CV_16S, 1, 0)
# Sobel_y = cv2.Sobel(image, cv2.CV_16S, 0, 1)
absX = cv2.convertScaleAbs(Sobel_x)  # 转回uint8
# absY = cv2.convertScaleAbs(Sobel_y)
# dst = cv2.addWeighted(absX, 0.5, absY, 0.5, 0)
image = absX
plt_show(image)

# 自适应阈值处理
ret, image = cv2.threshold(image, 0, 255, cv2.THRESH_OTSU)
plt_show(image)

# 闭运算,是白色部分练成整体
kernelX = cv2.getStructuringElement(cv2.MORPH_RECT, (14, 5))
print(kernelX)

image = cv2.morphologyEx(image, cv2.MORPH_CLOSE, kernelX,iterations = 1)
plt_show(image)

# 去除一些小的白点
kernelX = cv2.getStructuringElement(cv2.MORPH_RECT, (20, 1))
kernelY = cv2.getStructuringElement(cv2.MORPH_RECT, (1, 19))

# 膨胀,腐蚀
image = cv2.dilate(image, kernelX)
image = cv2.erode(image, kernelX)
# 腐蚀,膨胀
image = cv2.erode(image, kernelY)
image = cv2.dilate(image, kernelY)

plt_show(image)

# 中值滤波去除噪点
image = cv2.medianBlur(image, 15)
plt_show(image)

# 轮廓检测
# cv2.RETR_EXTERNAL表示只检测外轮廓
# cv2.CHAIN_APPROX_SIMPLE压缩水平方向,垂直方向,对角线方向的元素,只保留该方向的终点坐标,例如一个矩形轮廓只需4个点来保存轮廓信息
contours, hierarchy = cv2.findContours(image, cv2.RETR_EXTERNAL, cv2.CHAIN_APPROX_SIMPLE)
# 绘制轮廓
image1 = rawImage.copy()
cv2.drawContours(image1, contours, -1, (0, 255, 0), 5)
plt_show0(image1)

# 筛选出车牌位置的轮廓
# 这里我只做了一个车牌的长宽比在3:1到4:1之间这样一个判断
for index,item in enumerate(contours):
    # cv2.boundingRect用一个最小的矩形,把找到的形状包起来
    rect = cv2.boundingRect(item)
    x = rect[0]
    y = rect[1]
    weight = rect[2]
    height = rect[3]
    # 440mm×140mm
    if (weight > (height * 2.5)) and (weight < (height * 4)):
        print(index)
        image2 = rawImage.copy()
        cv2.drawContours(image2, contours, 1, (0, 0, 255), 5)
        plt_show0(image2)
直线拟合找斜率
直线拟合fitline https://blog.csdn.net/lovetaozibaby/article/details/99482973
参数:
-
InputArray Points: 待拟合的直线的集合,必须是矩阵形式;
-
distType: 距离类型。fitline为距离最小化函数,拟合直线时,要使输入点到拟合直线的距离和最小化。这里的** 距离**的类型有以下几种:
- cv2.DIST_USER : User defined distance
- cv2.DIST_L1: distance = |x1-x2| + |y1-y2|
- cv2.DIST_L2: 欧式距离,此时与最小二乘法相同
- cv2.DIST_C:distance = max(|x1-x2|,|y1-y2|)
- cv2.DIST_L12:L1-L2 metric: distance = 2(sqrt(1+x*x/2) - 1))
- cv2.DIST_FAIR:distance = c^2(|x|/c-log(1+|x|/c)), c = 1.3998
- cv2.DIST_WELSCH: distance = c2/2(1-exp(-(x/c)2)), c = 2.9846
- cv2.DIST_HUBER:distance = |x|<c ? x^2/2 : c(|x|-c/2), c=1.345 -
param: 距离参数,跟所选的距离类型有关,值可以设置为0。
-
reps, aeps: 第5/6个参数用于表示拟合直线所需要的径向和角度精度,通常情况下两个值均被设定为1e-2.
output :
- 对于二维直线,输出output为4维,前两维代表拟合出的直线的方向,后两位代表直线上的一点。(即通常说的点斜式直线)
- 其中(vx, vy) 是直线的方向向量,(x, y) 是直线上的一个点。
- 斜率k = vy / vx
- 截距b = y - k * x
cnt = contours[1]
image3 = rawImage.copy()

h, w = image3.shape[:2]
[vx, vy, x, y] = cv2.fitLine(cnt, cv2.DIST_L2, 0, 0.01, 0.01)
print([vx, vy, x, y])

k = vy/vx
b = y-k*x

print(k,b)

lefty = b
righty = k*w+b

img = cv2.line(image3, (w, righty), (0, lefty), (0, 255, 0), 2)

plt_show0(img)

print((w, righty))
print((0, lefty))

import math
a = math.atan(k)
a

a = math.degrees(a)
a

image4 = rawImage.copy()
# 图像旋转
h,w = image1.shape[:2]
print(h,w)
#第一个参数旋转中心,第二个参数旋转角度,第三个参数:缩放比例
M = cv2.getRotationMatrix2D((w/2,h/2),a,0.8)
#第三个参数:变换后的图像大小
dst = cv2.warpAffine(image4,M,(int(w*1.1),int(h*1.1)))
plt_show0(dst)

# 高斯去噪
image = cv2.GaussianBlur(dst, (3, 3), 0)
# 预览效果
plt_show0(image)

# 灰度处理
gray_image = cv2.cvtColor(image, cv2.COLOR_RGB2GRAY)
plt_show(gray_image)

# sobel算子边缘检测(做了一个y方向的检测)
Sobel_x = cv2.Sobel(gray_image, cv2.CV_16S, 1, 0)
# Sobel_y = cv2.Sobel(image, cv2.CV_16S, 0, 1)
absX = cv2.convertScaleAbs(Sobel_x)  # 转回uint8
# absY = cv2.convertScaleAbs(Sobel_y)
# dst = cv2.addWeighted(absX, 0.5, absY, 0.5, 0)
image = absX
plt_show(image)

# 自适应阈值处理
ret, image = cv2.threshold(image, 0, 255, cv2.THRESH_OTSU)
plt_show(image)

# 闭运算,是白色部分练成整体
kernelX = cv2.getStructuringElement(cv2.MORPH_RECT, (14, 5))
print(kernelX)
image = cv2.morphologyEx(image, cv2.MORPH_CLOSE, kernelX,iterations = 1)
plt_show(image)

# 去除一些小的白点
kernelX = cv2.getStructuringElement(cv2.MORPH_RECT, (20, 1))
kernelY = cv2.getStructuringElement(cv2.MORPH_RECT, (1, 19))

# 膨胀,腐蚀
image = cv2.dilate(image, kernelX)
image = cv2.erode(image, kernelX)
# 腐蚀,膨胀
image = cv2.erode(image, kernelY)
image = cv2.dilate(image, kernelY)

plt_show(image)

# 中值滤波去除噪点
image = cv2.medianBlur(image, 15)
plt_show(image)

# 轮廓检测
# cv2.RETR_EXTERNAL表示只检测外轮廓
# cv2.CHAIN_APPROX_SIMPLE压缩水平方向,垂直方向,对角线方向的元素,只保留该方向的终点坐标,例如一个矩形轮廓只需4个点来保存轮廓信息
contours, hierarchy = cv2.findContours(image, cv2.RETR_EXTERNAL, cv2.CHAIN_APPROX_SIMPLE)
# 绘制轮廓
image1 = dst.copy()
cv2.drawContours(image1, contours, -1, (0, 255, 0), 5)
plt_show0(image1)

c = None
i = None
# 筛选出车牌位置的轮廓
# 这里我只做了一个车牌的长宽比在3:1到4:1之间这样一个判断
for item in contours:
    # cv2.boundingRect用一个最小的矩形,把找到的形状包起来
    rect = cv2.boundingRect(item)
    x = rect[0]
    y = rect[1]
    weight = rect[2]
    height = rect[3]
    # 440mm×140mm
    if (weight > (height * 2.5)) and (weight < (height * 5)):
        c=rect
        i = item
        image = dst[y:y + height, x:x + weight]
#         cv_show('image',image)
        # 图像保存
        plt_show0(image)
        cv2.imwrite('./car_license/test3.png', image)
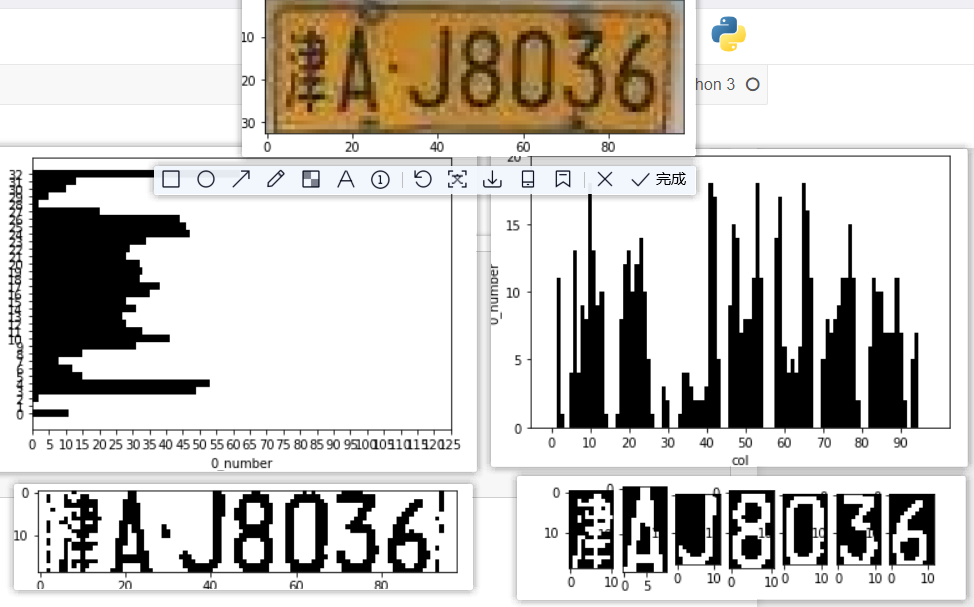
补充-直方图分割车牌字符
# 导入所需模块
import cv2
from matplotlib import pyplot as plt

# 显示图片
def cv_show(name,img):
    cv2.imshow(name,img)
    cv2.waitKey()
    cv2.destroyAllWindows()

# plt显示彩色图片
def plt_show0(img):
    b,g,r = cv2.split(img)
    img = cv2.merge([r, g, b])
    plt.imshow(img)
    plt.show()

# plt显示灰度图片
def plt_show(img):
    plt.imshow(img,cmap='gray')
    plt.show()
# 加载图片
rawImage = cv2.imread("./car_license/test4.png")
plt_show0(rawImage)
# 灰度处理
image = rawImage.copy()
gray_image = cv2.cvtColor(image, cv2.COLOR_RGB2GRAY)
plt_show(gray_image)
字符水平方向的切割
目的:去除车牌边框和铆钉的干扰
# 自适应阈值处理(二值化)
ret, image = cv2.threshold(gray_image, 0, 255, cv2.THRESH_OTSU)
plt_show(image)
image.shape # 47行,170列
rows = image.shape[0]
cols = image.shape[1]
print(rows,cols)
33 98
# 二值统计,统计没每一行的黑值(0)的个数
hd = []
for row in range(rows):
    res = 0
    for col in range(cols):
        if image[row][col] == 0:
            res = res+1
    hd.append(res)
len(hd)
max(hd)
62
# 画出柱状图
y = [y for y in range(rows)]
x = hd
plt.barh(y,x,color='black',height=1)
# 设置x,y轴标签
plt.xlabel('0_number')
plt.ylabel('row')
# 设置刻度
plt.xticks([x for x in range(0,130,5)])
plt.yticks([y for y in range(0,rows,1)])

plt.show()
中间较为密集的地方就是车牌有字符的地方,从而很好的去除了牌边框及铆钉
从图中可以明显看出车牌字符区域的投影值和车牌边框及铆钉区域的投影值之间明显有一个波谷,找到此处波谷,就可以得到车牌的字符区域,去除车牌边框及铆钉。
x = range(int(rows/2),2,-1)
x = [*x]
x
[16, 15, 14, 13, 12, 11, 10, 9, 8, 7, 6, 5, 4, 3]
# 定义一个算法,找到波谷,定位车牌字符的行数区域
# 我的思路;对于一个车牌,中间位置肯定是有均匀的黑色点的,所以我将图片垂直分为两部分,找波谷
mean = sum(hd[0:int(rows/2)])/(int(rows/2)+1)
mean
region = []
for i in range(int(rows/2),2,-1): # 0,1行肯定是边框,直接不考虑,直接从第二行开始
    if hd[i]<mean:
        region.append(i)
        break
for i in range(int(rows/2),rows): # 0,1行肯定是边框,直接不考虑,直接从第二行开始
    if hd[i]<mean:
        region.append(i)
        break
region
[8, 27]
image1 = image[region[0]:region[1],:] # 使用行区间
plt_show(image1)
字符垂直方向的切割
image11 = image1.copy()
image11.shape # 47行,170列
rows = image11.shape[0]
cols = image11.shape[1]
print(rows,cols)
19 98
cols # 170列
98
# 二值统计,统计没每一列的黑值(0)的个数
hd1 = []
for col in range(cols):
    res = 0
    for row in range(rows):
        if image11[row][col] == 0:
            res = res+1
    hd1.append(res)
len(hd1)
max(hd1)
18
# 画出柱状图
y = hd1 # 点个数
x = [x for x in range(cols)] # 列数
plt.bar(x,y,color='black',width=1)
# 设置x,y轴标签
plt.xlabel('col')
plt.ylabel('0_number')
# 设置刻度
plt.xticks([x for x in range(0,cols,10)])
plt.yticks([y for y in range(0,max(hd1)+5,5)])

plt.show()
mean = sum(hd1)/len(hd1)
mean
6.448979591836735
# 简单的筛选
for i in range(cols):
    if hd1[i] < mean/4:
        hd1[i] = 0
# 画出柱状图
y = hd1 # 点个数
x = [x for x in range(cols)] # 列数
plt.bar(x,y,color='black',width=1)
# 设置x,y轴标签
plt.xlabel('col')
plt.ylabel('0_number')
# 设置刻度
plt.xticks([x for x in range(0,cols,10)])
plt.yticks([y for y in range(0,max(hd1)+5,5)])

plt.show()
从直方图中可以看到很多波谷,这些就是字符分割区域的黑色点的个数等于0,我们就可以通过这些0点进行分割,过滤掉这些不需要的部分部分
# 找所有不为0的区间(列数)
region1 = []
reg = []
for i in range(cols-1):
    if hd1[i]==0 and hd1[i+1] != 0:
        reg.append(i)
    if hd1[i]!=0 and hd1[i+1] == 0:
        reg.append(i+2)
    if len(reg) == 2:
        if (reg[1]-reg[0])>5: # 限定区间长度要大于5(可以更大),过滤掉不需要的点
            region1.append(reg)
            reg = []
        else:
            reg = []
region1
[[4, 15], [17, 27], [33, 45], [45, 56], [57, 69], [69, 81], [81, 93]]
# 测试
image2 = image1[:,region1[0][0]:region1[0][1]]
plt_show(image2)

# 为了使字符之间还是存在空格,定义一个2像素白色的区域
import numpy as np
white = []
for i in range(rows*2):
    white.append(255)
white = np.array(white)
white = white.reshape(rows,2)
white.shape
(19, 2)
#  遍历所有区域,保存字符图片到列表
p = []
for r in region1:
    r = image1[:,r[0]:r[1]]
    plt_show(r)
    p.append(r)
    p.append(white)
# 将字符图片列表拼接为一张图
image2 = np.hstack(p)
plt_show(image2)
# 将分割好的字符图片保存到文件夹
print(region)
print(region1)
[8, 27]
[[4, 15], [17, 27], [33, 45], [45, 56], [57, 69], [69, 81], [81, 93]]
plt_show0(rawImage)
v_image = rawImage[region[0]:region[1],:]
plt_show0(v_image)
i = 1
for reg in region1:
    h_image = v_image[:,reg[0]:reg[1]]
    plt_show0(h_image)
    cv2.imwrite('./words/test4_'+str(i)+'.png', h_image)
    i = i+1
word_images = []
for i in range(1,8):
    word =  cv2.imread('./words/test4_'+str(i)+'.png',0)
    ret, word = cv2.threshold(word, 0, 255, cv2.THRESH_OTSU | cv2.THRESH_BINARY_INV)
    word_images.append(word)
word_images
plt.imshow(word_images[0],cmap='gray')
for i,j in enumerate(word_images):
    plt.subplot(1,8,i+1)
    plt.imshow(word_images[i],cmap='gray')
plt.show()
详细源码(各阶段分析,模板图片,资料等)获取地址
链接:https://pan.baidu.com/s/16oFDSdD8dMk_rT7t2bLl2A
提取码:5u8z