FTP 是一种在互联网中进行文件传输的协议,基于客户端/服务器模式,默认使用 20、21号端口,其中端口 20(数据端口)用于进行数据传输,端口 21(命令端口)用于接受客户端
发出的相关 FTP 命令与参数。FTP 服务器是按照 FTP 协议在互联网上提供文件存储和访问服务的主机,FTP 客户端则是向服务器发送连接请求,以建立数据传输链路的主机。FTP 协议有下面两种工作模式
➢主动模式 :FTP 服务器主动向客户端发起连接请求。
➢ 被动模式:FTP 服务器等待客户端发起连接请求(FTP 的默认工作模式)
vsftpd(very secure ftp daemon,非常安全的 FTP 守护进程)是一款运行在 Linux 操作系统上的 FTP 服务程序,不仅完全开源而且免费,此外,还具有很高的安全性、传输速度,以及支持虚拟用户验证等其他 FTP 服务程序不具备的特点。
配置妥当 Yum 软件仓库之后,就可以安装 vsftpd 服务程序了
[root@localhost Desktop]# yum install vsftpd
Loaded plugins: langpacks, product-id, subscription-manager
………………省略部分输出信息………………
===============================================================================
Package Arch Version Repository Size
===============================================================================
Installing:
vsftpd x86_64 3.0.2-9.el7 rhel 166 k
Transaction Summary
===============================================================================
Install 1 Package
Total download size: 166 k
Installed size: 343 k
Is this ok [y/d/N]: y
Downloading packages:
Running transaction check
Running transaction test
Transaction test succeeded
Running transaction
Installing : vsftpd-3.0.2-9.el7.x86_64 1/1
Verifying : vsftpd-3.0.2-9.el7.x86_64 1/1
Installed:
vsftpd.x86_64 0:3.0.2-9.el7
Complete!
老版本的系统会有iptables防火墙,具默认禁止了 FTP 传输协议的端口号,因此还需要清空 iptables 防火墙的默认策略,并把当前已经被清理的防火墙策略状态保存下来。
[root@localhost Desktop]# iptables -F
[root@localhost Desktop]# service iptables save
iptables: Saving firewall rules to /etc/sysconfig/iptables:[ OK ]
vsftpd 服务程序的主配置文件(/etc/vsftpd/vsftpd.conf)内容总长度达到 123,可以在 grep 命令后面添加-v 参数,过滤并反选出没有包含井号(#)的参数行(即过滤掉所有的注释信息),然后将过滤后的参数行通过输出重定向符写回原始的主配置文件中
[root@localhost Desktop]# mv /etc/vsftpd/vsftpd.conf /etc/vsftpd/vsftpd.conf_bak
[root@localhost Desktop]# grep -v "#" /etc/vsftpd/vsftpd.conf_bak > /etc/vsftpd/vsftpd.conf
[root@localhost Desktop]# cat /etc/vsftpd/vsftpd.conf
anonymous_enable=YES
local_enable=YES
write_enable=YES
local_umask=022
dirmessage_enable=YES
xferlog_enable=YES
connect_from_port_20=YES
xferlog_std_format=YES
listen=NO
listen_ipv6=YES
pam_service_name=vsftpd
userlist_enable=YES
tcp_wrappers=YES
vsftpd 服务程序常用的参数以及作用
| 参数 | 作用 |
| listen=[YES|NO | 是否以独立运行的方式监听服务 |
| listen_address=IP 地址 | 设置要监听的 IP 地址 |
| listen_port=21 | 设置 FTP 服务的监听端口 |
| download_enable=[YES|NO] | 是否允许下载文件 |
| userlist_enable=[YES|NO] userlist_deny=[YES|NO] |
设置用户列表为“允许”还是“禁止”操作 |
| max_clients=0 | 最大客户端连接数,0 为不限制 |
| max_per_ip=0 | 同一 IP 地址的最大连接数,0 为不限制 |
| anonymous_enable=[YES|NO] | 是否允许匿名用户访问 |
| anon_upload_enable=[YES|NO] | 是否允许匿名用户上传文件 |
| anon_umask=022 | 匿名用户上传文件的 umask 值 |
| anon_root=/var/ftp | 匿名用户的 FTP 根目录 |
| anon_mkdir_write_enable=[YES|NO] | 是否允许匿名用户创建目录 |
| anon_other_write_enable=[YES|NO] | 是否开放匿名用户的其他写入权限(包括重命名、删 除等操作权限) |
| anon_max_rate=0 | 匿名用户的最大传输速率(字节/秒),0 为不限制 |
| local_enable=[YES|NO] | 是否允许本地用户登录 FTP |
| local_umask=022 | 本地用户上传文件的 umask 值 |
| local_root=/var/ftp | 本地用户的 FTP 根目录 |
| chroot_local_user=[YES|NO] | 是否将用户权限禁锢在 FTP 目录,以确保安全 |
| local_max_rate=0 | 本地用户最大传输速率(字节/秒),0 为不限制 |
vsftpd 作为更加安全的文件传输的服务程序,允许用户以三种认证模式登录到 FTP 服务器上
➢匿名开放模式 :是一种最不安全的认证模式,任何人都可以无需密码验证而直接登录到 FTP 服务器。
➢本地用户模式 :是通过 Linux 系统本地的账户密码信息进行认证的模式,相较于匿名开放模式更安全,而且配置起来也很简单。但是如果被破解了账户的信息,就可以畅通无阻地登录 FTP 服务器,从而完全控制整台服务器。
➢虚拟用户模式 :是这三种模式中最安全的一种认证模式,它需要为 FTP 服务单独建立用户数据库文件,虚拟出用来进行口令验证的账户信息,而这些账户信息在服务器系统中实际上是不存在的,仅供 FTP 服务程序进行认证使用。
ftp 是 Linux 系统中以命令行界面的方式来管理 FTP 传输服务的客户端工具。我们首先手动安装这个 ftp 客户端工具


[root@localhost Desktop]# yum install ftp
Loaded plugins: langpacks, product-id, subscription-manager
………………省略部分输出信息………………
Installing:
ftp x86_64 0.17-66.el7 rhel 61 k
Transaction Summary
===============================================================================
Install 1 Package
Total download size: 61 k
Installed size: 96 k
Is this ok [y/d/N]: y
Downloading packages:
Running transaction check
Running transaction test
Transaction test succeeded
Running transaction
Installing : ftp-0.17-66.el7.x86_64 1/1
Verifying : ftp-0.17-66.el7.x86_64 1/1
Installed:
ftp.x86_64 0:0.17-66.el7
Complete!
匿名开放模式
匿名用户开放的权限参数以及作用
| 参数 | 作用 |
| anonymous_enable=YES | 允许匿名访问模式 |
| anon_umask=022 | 匿名用户上传文件的 umask 值 |
| anon_upload_enable=YES | 允许匿名用户上传文件 |
| anon_mkdir_write_enable=YES | 允许匿名用户创建目录 |
| anon_other_write_enable=YES | 允许匿名用户修改目录名称或删除目录 |
[root@localhost Desktop]# vim /etc/vsftpd/vsftpd.conf
  1 anonymous_enable=YES
  2 anon_umask=022
  3 anon_upload_enable=YES
  4 anon_mkdir_write_enable=YES
  5 anon_other_write_enable=YES
  6 local_enable=YES
  7 write_enable=YES
  8 local_umask=022
  9 dirmessage_enable=YES
 10 xferlog_enable=YES
 11 connect_from_port_20=YES
 12 xferlog_std_format=YES
 13 listen=NO
 14 listen_ipv6=YES
 15
 16 pam_service_name=vsftpd
 17 userlist_enable=YES
 18 tcp_wrappers=YES
重启 vsftpd服务程序,让新的配置参数生效
[root@localhost Desktop]# systemctl restart vsftpd
[root@localhost Desktop]# systemctl enable vsftpd
ln -s '/usr/lib/systemd/system/vsftpd.service' '/etc/systemd/system/multi-user.
target.wants/vsftpd.service
在 vsftpd 服务程序的匿名开放认证模式下,其账户统一为 anonymous,密码为空。而且在连接到 FTP 服务器后,默认访问的是/var/ftp 目录。我们可以切换到该目录下的 pub 目录中,然后尝试创建一个新的目录文件
[root@localhost Desktop]# ftp 192.168.10.10
Connected to 192.168.10.10 (192.168.10.10).
220 (vsFTPd 3.0.2)
Name (192.168.10.10:root): anonymous
331 Please specify the password.
Password:   按下回车键
230 Login successful.
Remote system type is UNIX.
Using binary mode to transfer files.
ftp> cd pub
250 Directory successfully changed.
ftp> mkdir files
550 Create directory operation failed.
创建目录的操作失败,在 vsftpd 服务程序的匿名开放认证模式下,默认访问的是/var/ftp 目录。查看该目录的权限得知,只有 root 管理员才有写入权限。将目录的所有者身份改成系统账户 ftp 即可
[root@localhost Desktop]# ls -ld /var/ftp/pub/
drwxr-xr-x. 2 root root 6 Mar  7  2014 /var/ftp/pub/
[root@localhost Desktop]# chown -Rf ftp /var/ftp/pub
[root@localhost Desktop]# ls -ld /var/ftp/pub/
drwxr-xr-x. 2 ftp root 6 Mar  7  2014 /var/ftp/pub/
[root@localhost Desktop]# ftp 192.168.10.10
Connected to 192.168.10.10 (192.168.10.10).
220 (vsFTPd 3.0.2)
Name (192.168.10.10:root): anonymous
331 Please specify the password.
Password: 按下回车键
230 Login successful.
Remote system type is UNIX.
Using binary mode to transfer files.
ftp> cd pub
250 Directory successfully changed.
ftp> mkdir files
550 Create directory operation failed.
系统再次报错!尽管我们在使用 ftp 命令登入 FTP 服务器后,再创建目录时系统依然提示操作失败,这是SELinux的问题。
使用 getsebool 命令查看与 FTP 相关的 SELinux 域策略都有哪些
[root@localhost Desktop]# getsebool -a | grep ftp
ftp_home_dir --> off
ftpd_anon_write --> off
ftpd_connect_all_unreserved --> off
ftpd_connect_db --> off
ftpd_full_access --> off
ftpd_use_cifs --> off
ftpd_use_fusefs --> off
ftpd_use_nfs --> off
ftpd_use_passive_mode --> off
httpd_can_connect_ftp --> off
httpd_enable_ftp_server --> off
sftpd_anon_write --> off
sftpd_enable_homedirs --> off
sftpd_full_access --> off
sftpd_write_ssh_home --> off
tftp_anon_write --> off
tftp_home_dir --> off
是 ftpd_full_access--> off 策略规则导致了操作失败。修改该策略规则,并且在设置时使用-P 参数让修改过的策略永久生效,确保在服务器重启后依然能够顺利写入文件。
[root@localhost Desktop]# setsebool -P ftpd_full_access=on
现在便可以顺利执行文件创建、修改及删除等操作了。
[root@localhost Desktop]# ftp 192.168.10.10
Connected to 192.168.10.10 (192.168.10.10).
220 (vsFTPd 3.0.2)
Name (192.168.10.10:root): anonymous
331 Please specify the password.
Password: 按下回车键
230 Login successful.
Remote system type is UNIX.
Using binary mode to transfer files.
ftp> cd pub
250 Directory successfully changed.
ftp> mkdir files
257 "/pub/files" created
ftp> rename files data
350 Ready for RNTO.
250 Rename successful.
ftp> rmdir data
250 Remove directory operation successful.
ftp> exit
221 Goodbye.
本地用户模式
本地用户模式使用的权限参数以及作用
| 参数 | 作用 |
| anonymous_enable=NO | 禁止匿名访问模式 |
| local_enable=YES | 允许本地用户模式 |
| write_enable=YES | 设置可写权限 |
| local_umask=022 | 本地用户模式创建文件的 umask 值 |
| userlist_enable=YES | 启用“禁止用户名单”,名单文件为 ftpusers 和 user_list |
| userlist_deny=YES | 开启用户作用名单文件功能 |
[root@localhost Desktop]# vim /etc/vsftpd/vsftpd.conf
1 anonymous_enable=NO
2 local_enable=YES
3 write_enable=YES
4 local_umask=022
5 dirmessage_enable=YES
6 xferlog_enable=YES
7 connect_from_port_20=YES
8 xferlog_std_format=YES
9 listen=NO
10 listen_ipv6=YES
11 pam_service_name=vsftpd
12 userlist_enable=YES
13 tcp_wrappers=YES
重启 vsftpd服务程序,让新的配置参数生效
[root@localhost Desktop]# systemctl restart vsftpd
[root@localhost Desktop]# systemctl enable vsftpd
ln -s '/usr/lib/systemd/system/vsftpd.service' '/etc/systemd/system/multi-user.
target.wants/vsftpd.service
按理来讲,现在已经完全可以本地用户的身份登录 FTP 服务器了。但是在使用 root 管理员登录后,系统提示如下的错误信息
[root@localhost Desktop]# ftp 192.168.10.10
Connected to 192.168.10.10 (192.168.10.10).
220 (vsFTPd 3.0.2)
Name (192.168.10.10:root): root
530 Permission denied.
Login failed.
ftp>
可见,在我们输入 root 管理员的密码之前,就已经被系统拒绝访问了。这是因为 vsftpd 服务程序所在的目录中默认存放着两个名为“用户名单”的文件(ftpusers 和 user_list)。
vsftpd 服务程序目录中的这两个文件里只要写有某位用户的名字,就不再允许这位用户登录到 FTP服务器上。
[root@localhost Desktop]# cat /etc/vsftpd/user_list
1 # vsftpd userlist
2 # If userlist_deny=NO, only allow users in this file
3 # If userlist_deny=YES (default), never allow users in this file, and
4 # do not even prompt for a password.
5 # Note that the default vsftpd pam config also checks /etc/vsftpd/ftpusers
6 # for users that are denied.
7 root
8 bin
9 daemon
10 adm
11 lp
12 sync
13 shutdown
14 halt
15 mail
16 news
17 uucp
18 operator
19 games
20 nobody
[root@localhost Desktop]# cat /etc/vsftpd/ftpusers
# Users that are not allowed to login via ftp
1 root
2 bin
3 daemon
4 adm
5 lp
6 sync
7 shutdown
8 halt
9 mail
10 news
11 uucp
12 operator
13 games
14 nobody
vsftpd 服务程序为了保证服务器的安全性而默认禁止了 root 管理员和大多数系统用户的登录行为,只需要把root行注释掉就行,或者也可以选择 ftpusers 和 user_list 文件中没有的一个普通用户尝试登录 FTP 服务器
[root@localhost Desktop]# ftp 192.168.10.10
Connected to 192.168.10.10 (192.168.10.10).
220 (vsFTPd 3.0.2)
Name (192.168.10.10:root): lisi
331 Please specify the password.
Password: 输入用户密码
230 Login successful.
Remote system type is UNIX.
Using binary mode to transfer files.
ftp> mkdir files
550 Create directory operation failed.
在采用本地用户模式登录 FTP 服务器后,默认访问的是该用户的家目录,也就是说,访问的是/home/linuxprobe 目录。而且该目录的默认所有者、所属组都是该用户自己,因此不存
在写入权限不足的情况。为此,需要再次开启 SELinux 域中对 FTP 服务的允许策略。
[root@localhost Desktop]# getsebool -a | grep ftp
ftp_home_dir --> off
ftpd_anon_write --> off
ftpd_connect_all_unreserved --> off
ftpd_connect_db --> off
ftpd_full_access --> off
ftpd_use_cifs --> off
ftpd_use_fusefs --> off
ftpd_use_nfs --> off
ftpd_use_passive_mode --> off
httpd_can_connect_ftp --> off
httpd_enable_ftp_server --> off
sftpd_anon_write --> off
sftpd_enable_homedirs --> off
sftpd_full_access --> off
sftpd_write_ssh_home --> off
tftp_anon_write --> off
tftp_home_dir --> off
[root@localhost Desktop]# setsebool -P ftpd_full_access=on
一定记得添加-P参数,否则服务器在重启后就会按照原有的策略进行控制,从而导致配置过的服务无法使用。
[root@localhost Desktop]# ftp 192.168.10.10
Connected to 192.168.10.10 (192.168.10.10).
220 (vsFTPd 3.0.2)
Name (192.168.10.10:root): lisi
331 Please specify the password.
Password: 输入用户密码
230 Login successful.
Remote system type is UNIX.
Using binary mode to transfer files.
ftp> mkdir files
257 "/home/lisi/files" created
ftp> rename files database
350 Ready for RNTO.
250 Rename successful
ftp> rmdir database
250 Remove directory operation successful.
ftp> exit
221 Goodbye.
虚拟用户模式
第一步:创建用于进行 FTP 认证的用户数据库文件,其中奇数行为账户名,偶数行为密码。例如,我们分别创建出 test1 和 test2 两个用户,密码均为 123456
[root@localhost Desktop]# cd /etc/vsftpd/
[root@localhost vsftpd]# vim vuser.list
test1
123456
test2
123456
但是,明文信息既不安全,也不符合让 vsftpd 服务程序直接加载的格式,因此需要使用 db_load 命令用哈希(hash)算法将原始的明文信息文件转换成数据库文件,并且降低
数据库文件的权限(避免其他人看到数据库文件的内容),然后再把原始的明文信息文件删除。
[root@localhost vsftpd]# db_load -T -t hash -f vuser.list vuser.db
[root@localhost vsftpd]# file vuser.db
vuser.db: Berkeley DB (Hash, version 9, native byte-order)
[root@localhost vsftpd]# chmod 600 vuser.db
[root@localhost vsftpd]# rm -f vuser.list
第二步:创建 vsftpd 服务程序用于存储文件的根目录以及虚拟用户映射的系统本地用户。FTP 服务用于存储文件的根目录指的是,当虚拟用户登录后所访问的默认位置。
由于 Linux 系统中的每一个文件都有所有者、所属组属性,例如使用虚拟账户“张三”新建了一个文件,但是系统中找不到账户“张三”,就会导致这个文件的权限出现错误。为此,需要再创建一个可以映射到虚拟用户的系统本地用户。简单来说,就是让虚拟用户默认登录到与之有映射关系的这个系统本地用户的家目录中,虚拟用户创建的文件的属性也都归属于这个系统本地用户,从而避免 Linux 系统无法处理虚拟用户所创建文件的属性权限。
为了方便管理 FTP 服务器上的数据,可以把这个系统本地用户的家目录设置为/var 目录(该目录用来存放经常发生改变的数据)。并且为了安全起见,我们将这个系统本地用户设置
为不允许登录 FTP 服务器,这不会影响虚拟用户登录
[root@localhost vsftpd]# useradd -d /var/ftproot -s /sbin/nologin virtual
[root@localhost vsftpd]# ls -ld /var/ftproot/
drwx------. 3 virtual virtual 74 Nov  8 18:50 /var/ftproot/
[root@localhost vsftpd]# chmod -Rf 755 /var/ftproot/
第三步:建立用于支持虚拟用户的 PAM 文件
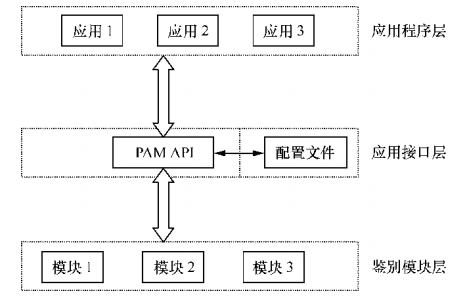
PAM(可插拔认证模块)是一种认证机制,通过一些动态链接库和统一的 API 把系统提供的服务与认证方式分开,使得系统管理员可以根据需求灵活调整服务程序的不同认证方式。
通俗来讲,PAM 是一组安全机制的模块,系统管理员可以用来轻易地调整服务程序的认证方式,而不必对应用程序进行任何修改。PAM 采取了分层设计(应用程序层、应用接口层、鉴别模块层)的思想
新建一个用于虚拟用户认证的 PAM 文件 vsftpd.vu,其中 PAM 文件内的 “db=” 参数为使用 db_load 命令生成的账户密码数据库文件的路径,但不用写数据库文件的后缀
[root@localhost Desktop]# vim /etc/pam.d/vsftpd.vu
auth      required  pam_userdb.so db=/etc/vsftpd/vuser
account   required  pam_userdb.so db=/etc/vsftpd/vuser
第四步:在 vsftpd 服务程序的主配置文件中通过 pam_service_name 参数将 PAM 认证文件的名称修改为 vsftpd.vu
PAM 作为应用程序层与鉴别模块层的连接纽带,可以让应用程序根据需求灵活地在自身插入所需的鉴别功能模块。当应用程序需要 PAM 认证时,则需要在应用程序中定义负责认证的 PAM 配置文件,实现所需的认证功能。
例如,在 vsftpd 服务程序的主配置文件中默认就带有参数 pam_service_name=vsftpd,表示登录 FTP 服务器时是根据/etc/pam.d/vsftpd 文件进行安全认证的。现在我们要做的就是把vsftpd 主配置文件中原有的 PAM 认证文件 vsftpd 修改为新建的 vsftpd.vu 文件即可。
利用 PAM 文件进行认证时使用的参数以及作用
| 参数 | 作用 |
| anonymous_enable=NO | 禁止匿名开放模式 |
| local_enable=YES | 允许本地用户模式 |
| guest_enable=YES | 开启虚拟用户模式 |
| guest_username=virtual | 指定虚拟用户账户 |
| pam_service_name=vsftpd.vu | 指定 PAM 文件 |
| allow_writeable_chroot=YES | 允许对禁锢的FTP 根目录执行写入操作,而且不拒绝用户的登录请求 |
[root@localhost Desktop]# vim /etc/vsftpd/vsftpd.conf
  1 anonymous_enable=NO
  2 local_enable=YES
  3 guest_enable=YES
  4 guest_username=virtual
  5 allow_writeable_chroot=YES
  6 write_enable=YES
  7 local_umask=022
  8 dirmessage_enable=YES
  9 xferlog_enable=YES
 10 connect_from_port_20=YES
 11 xferlog_std_format=YES
 12 listen=NO
 13 listen_ipv6=YES
 14 pam_service_name=vsftpd.vu
 15 userlist_enable=YES
 16 tcp_wrappers=YES
第五步:为虚拟用户设置不同的权限。
允许 test1 上传、创建、修改、查看、删除文件,只允许 test2 查看文件。这可以通过 vsftpd 服务程序来实现。只需新建一个目录,在里面分别创建两个以 test1 和 test2 命名的文件,其中在名为 test1 的文件中写入允许的相关权限(使用匿名用户的参数)
[root@localhost Desktop]# mkdir /etc/vsftpd/vusers_dir/
[root@localhost Desktop]# cd /etc/vsftpd/vusers_dir/
[root@localhost vusers_dir]# touch test1
[root@localhost vusers_dir]# touch test2
[root@localhost vusers_dir]# vim test1
anon_upload_enable=YES
anon_mkdir_write_enable=YES
anon_other_write_enable=YES
然后再次修改 vsftpd 主配置文件,通过添加 user_config_dir 参数来定义这两个虚拟用户不同权限的配置文件所存放的路径。重启 vsftpd 服务程序并将该服务添加到开机启动项中
[root@localhost vusers_dir]# vim /etc/vsftpd/vsftpd.conf
anonymous_enable=NO
local_enable=YES
guest_enable=YES
guest_username=virtual
allow_writeable_chroot=YES
write_enable=YES
local_umask=022
dirmessage_enable=YES
xferlog_enable=YES
connect_from_port_20=YES
xferlog_std_format=YES
listen=NO
listen_ipv6=YES
pam_service_name=vsftpd.vu
userlist_enable=YES
tcp_wrappers=YES
user_config_dir=/etc/vsftpd/vusers_dir
[root@localhost Desktop]# systemctl restart vsftpd
[root@localhost Desktop]# systemctl enable vsftpd
下面来试验一下
[root@localhost Desktop]# ftp 192.168.10.10
Connected to 192.168.10.10 (192.168.10.10).
220 (vsFTPd 3.0.2)
Name (192.168.10.10:root): test2
331 Please specify the password.
Password: 输入虚拟用户密码
230 Login successful.
Remote system type is UNIX.
Using binary mode to transfer files.
ftp> mkdir files
550 Permission denied.
ftp> exit
221 Goodbye.
[root@localhost Desktop]# ftp 192.168.10.10
Connected to 192.168.10.10 (192.168.10.10).
220 (vsFTPd 3.0.2)
Name (192.168.10.10:root): test1
331 Please specify the password.
Password: 输入虚拟用户密码
230 Login successful.
Remote system type is UNIX.
Using binary mode to transfer files.
ftp> mkdir files
257 "/files" created
ftp> rename files data
350 Ready for RNTO.
250 Rename successful.
ftp> rmdir data
250 Remove directory operation successful.
ftp> exit
221 Goodbye.
简单文件传输协议
简单文件传输协议(Trivial File Transfer Protocol,TFTP)是一种基于 UDP 协议在客户端和服务器之间进行简单文件传输的协议。顾名思义,它提供不复杂、开销不大的文件传输服务(可将其当作 FTP 协议的简化版本)。 TFTP 在传输文件时采用的是 UDP 协议,占用的端口号为 69。
接下来在系统上安装 TFTP 的软件包
[root@localhost Desktop]# yum install tftp-server.x86_64 tftp
Loaded plugins: langpacks, product-id, subscription-manager
This system is not registered to Red Hat Subscription Management. You can use subscription-manager to register.
Resolving Dependencies
--> Running transaction check
---> Package tftp.x86_64 0:5.2-11.el7 will be installed
---> Package tftp-server.x86_64 0:5.2-11.el7 will be installed
--> Processing Dependency: xinetd for package: tftp-server-5.2-11.el7.x86_64
--> Running transaction check
---> Package xinetd.x86_64 2:2.3.15-12.el7 will be installed
--> Finished Dependency Resolution

Dependencies Resolved

================================================================================
 Package             Arch           Version                 Repository     Size
================================================================================
Installing:
 tftp                x86_64         5.2-11.el7              rhel7          35 k
 tftp-server         x86_64         5.2-11.el7              rhel7          44 k
Installing for dependencies:
 xinetd              x86_64         2:2.3.15-12.el7         rhel7         128 k

Transaction Summary
================================================================================
Install  2 Packages (+1 Dependent package)

Total download size: 207 k
Installed size: 373 k
Is this ok [y/d/N]: y
Downloading packages:
--------------------------------------------------------------------------------
Total                                              1.5 MB/s | 207 kB  00:00
Running transaction check
Running transaction test
Transaction test succeeded
Running transaction
  Installing : 2:xinetd-2.3.15-12.el7.x86_64                                1/3
  Installing : tftp-server-5.2-11.el7.x86_64                                2/3
  Installing : tftp-5.2-11.el7.x86_64                                       3/3
rhel7/productid                                          | 1.6 kB     00:00
  Verifying  : 2:xinetd-2.3.15-12.el7.x86_64                                1/3
  Verifying  : tftp-5.2-11.el7.x86_64                                       2/3
  Verifying  : tftp-server-5.2-11.el7.x86_64                                3/3

Installed:
  tftp.x86_64 0:5.2-11.el7            tftp-server.x86_64 0:5.2-11.el7

Dependency Installed:
  xinetd.x86_64 2:2.3.15-12.el7

Complete!
RHEL 7 系统中,TFTP 服务是使用 xinetd 服务程序来管理的。xinetd 服务可以用来管理多种轻量级的网络服务,而且具有强大的日志功能。简单来说,在安装 TFTP 软件包后,还需要在 xinetd 服务程序中将其开启,把默认的禁用(disable)参数修改为 no
[root@localhost Desktop]# vim /etc/xinetd.d/tftp
service tftp
{
        socket_type             = dgram
        protocol                = udp
        wait                    = yes
        user                    = root
        server                  = /usr/sbin/in.tftpd
        server_args             = -s /var/lib/tftpboot
        disable                 = no
        per_source              = 11
        cps                     = 100 2
        flags                   = IPv4
}
重启 xinetd 服务并将它添加到系统的开机启动项中,以确保 TFTP 服务在系统重启后依然处于运行状态,考虑到有些系统的防火墙默认没有允许 UDP 协议的 69 端口,因此
需要手动将该端口号加入到防火墙的允许策略中
[root@localhost Desktop]# systemctl restart xinetd
[root@localhost Desktop]# systemctl enable xinetd
[root@localhost Desktop]# firewall-cmd --permanent --add-port=69/udp
success
[root@localhost Desktop]# firewall-cmd --reload
success
TFTP 的根目录为 /var/lib/tftpboot。我们可以使用刚安装好的 tftp 命令尝试访问其中的文件
tftp 命令中可用的参数以及作用
| 参数 | 作用 |
| ? | 帮助信息 |
| put | 上传文件 |
| get | 下载文件 |
| verbose | 显示详细的处理信息 |
| status | 显示当前的状态信息 |
| binary | 使用二进制进行传输 |
| ascii | 使用ASCII码进行传输 |
| timeout | 设置重传的超时时间 |
| quit | 退出 |
[root@localhost Desktop]# echo "hello world" > /var/lib/tftpboot/readme.txt
[root@localhost Desktop]# tftp 192.168.10.10
tftp> get readme.txt
tftp> quit
[root@localhost Desktop]# ls
a.txt  readme.txt
[root@localhost Desktop]# cat readme.txt
hello world