SSH(Secure Shell)是一种能够以安全的方式提供远程登录的协议,想要使用 SSH 协议来远程管理 Linux 系统,则需要部署配置 sshd 服务程序。sshd 是基于 SSH
协议开发的一款远程管理服务程序,不仅使用起来方便快捷,而且能够提供两种安全验证的方法:
➢ 基于口令的验证—用账户和密码来验证登录;
➢ 基于密钥的验证—需要在本地生成密钥对,然后把密钥对中的公钥上传至服务器,
并与服务器中的公钥进行比较;该方式相较来说更安全。
sshd 服务的配置信息保存在/etc/ssh/sshd_config 文件中。保存着最主要配置信息的文件称为主配置文件,(一般的配置文件在 /etc/服务名称/服务名称.conf 中)而配置文件中有许多以
井号开头的注释行,要想让这些配置参数生效,需要在修改参数后再去掉前面的井号。
sshd 服务配置文件中包含的参数以及作用
| 参数 | 作用 |
| Port 22 | 默认的 sshd 服务端口 |
| ListenAddress 0.0.0.0 | 设定 sshd 服务器监听的 IP 地址 |
| Protocol 2 | SSH 协议的版本号 |
| HostKey /etc/ssh/ssh_host_key | SSH 协议版本为 1 时,DES 私钥存放的位置 |
| HostKey /etc/ssh/ssh_host_rsa_key | SSH 协议版本为 2 时,RSA 私钥存放的位置 |
| HostKey /etc/ssh/ssh_host_dsa_key | SSH 协议版本为 2 时,DSA 私钥存放的位置 |
| PermitRootLogin yes | 设定是否允许 root 管理员直接登录 |
| StrictModes yes | 当远程用户的私钥改变时直接拒绝连接 |
| MaxAuthTries 6 | 最大密码尝试次数 |
| MaxSessions 10 | 最大终端数 |
| PasswordAuthentication yes | 是否允许密码验证 |
| PermitEmptyPasswords no | 是否允许空密码登录(很不安全) |
1、密码验证
在 RHEL 7 系统中,已经默认安装并启用了 sshd 服务程序。接下来使用 ssh 命令进行远程连接,其格式为“ssh [参数] 主机 IP 地址”。要退出登录则执行 exit 命令。
[root@localhost Desktop]# ssh 192.168.10.10
The authenticity of host '192.168.10.10 (192.168.10.10)' can't be established.
ECDSA key fingerprint is 35:01:64:40:4c:22:41:f1:2e:2c:75:76:a3:14:47:40.
Are you sure you want to continue connecting (yes/no)? yes
Warning: Permanently added '192.168.10.10' (ECDSA) to the list of known hosts.
root@192.168.10.10's password:   此处输入密码
Last login: Tue Oct  2 16:26:24 2018
[root@localhost ~]# exit
logout
Connection to 192.168.10.10 closed.
[root@localhost Desktop]#
禁止root管理员的身份登入
首先使用 Vim 文本编辑器打开 sshd 服务的主配置文件,然后把第 48 行#PermitRootLogin yes 参数前的井号(#)去掉,并把参数值 yes 改成 no,这样就不再
允许 root 管理员远程登录了。
 [root@localhost Desktop]# vim /etc/ssh/sshd_config
………………省略部分输出信息………………47 #LoginGraceTime 2m
 48 PermitRootLogin no
 49 #StrictModes yes
 50 #MaxAuthTries 6
 51 #MaxSessions 10
………………省略部分输出信息………………
一般的服务程序并不会在配置文件修改之后立即获得最新的参数。如果想让新配置文件生效,则需要手动重启相应的服务程序。最好也将这个服务程序加入到开机
启动项中,这样系统在下一次启动时,该服务程序便会自动运行,继续为用户提供服务。
[root@localhost Desktop]# systemctl restart sshd
[root@localhost Desktop]# systemctl enable sshd
当 root 管理员再来尝试访问 sshd 服务程序时,系统会提示不可访问的错误信息。
[root@localhost Desktop]# ssh 192.168.10.10
root@192.168.10.10's password:
Permission denied, please try again.
2、安全密钥验证
加密是对信息进行编码和解码的技术,它通过一定的算法(密钥)将原本可以直接阅读的明文信息转换成密文形式。密钥即是密文的钥匙,有私钥和公钥之分。
在传输数据时,如果担心被他人监听或截获,就可以在传输前先使用公钥对数据加密处理,然后再行传送。这样,只有掌握私钥的用户才能解密这段数据,
第一步:在客户端主机中生成“密钥对”。
[root@localhost Desktop]# ssh-keygen
Generating public/private rsa key pair.
Enter file in which to save the key (/root/.ssh/id_rsa): 按回车键或设置密钥的存储路径
Enter passphrase (empty for no passphrase): 按回车键或设置密钥的密码
Enter same passphrase again: 再次按回车键或设置密钥的密码
Your identification has been saved in /root/.ssh/id_rsa.
Your public key has been saved in /root/.ssh/id_rsa.pub.
The key fingerprint is:
cd:32:23:79:21:4a:c4:69:6f:26:ac:63:2b:97:c7:61 root@localhost
The key's randomart image is:
+--[ RSA 2048]----+
|   ...           |
|   .+            |
|   o... .        |
|   .o.+o +       |
|   ..+o S o      |
|  + E  o +       |
| . * .           |
|. + o            |
| o .             |
+-----------------+
第二步:把客户端主机中生成的公钥文件传送至远程主机
[root@localhost Desktop]# ssh-copy-id 192.168.10.10
/usr/bin/ssh-copy-id: INFO: attempting to log in with the new key(s), to filter out any that are already installed
/usr/bin/ssh-copy-id: INFO: 1 key(s) remain to be installed -- if you are prompted now it is to install the new keys
root@192.168.10.10's password: 输入远程服务器密码

Number of key(s) added: 1

Now try logging into the machine, with:   "ssh '192.168.10.10'"
and check to make sure that only the key(s) you wanted were added.
第三步:对服务器进行设置,使其只允许密钥验证,拒绝传统的口令验证方式。记得在修改配置文件后保存并重启 sshd 服务程序。
[root@localhost Desktop]# vim /etc/ssh/sshd_config
………………省略部分输出信息…………
 74
 75 # To disable tunneled clear text passwords, change to no here!
 76 #PasswordAuthentication yes
 77 #PermitEmptyPasswords no
 78 PasswordAuthentication no
 79
………………省略部分输出信息…………
[root@localhost Desktop]# systemctl restart sshd
第四步:在客户端尝试登录到服务器,此时无须输入密码也可成功登录。
[root@localhost Desktop]# ssh 192.168.10.10
Last login: Tue Oct  2 17:52:50 2018 from 192.168.10.10
3、远程传输命令
scp(secure copy)是一个基于 SSH 协议在网络之间进行安全传输的命令,其格式为“scp [参数] 本地文件 远程帐户@远程 IP 地址:远程目录”。所必须的是这两台主机必须是Linux系统。
scp 命令中可用的参数及作用
| 参数 | 作用 |
| -v | 显示详细的连接进度 |
| -P | 指定远程主机的 sshd 端口号 |
| -r | 用于传送文件夹 |
| -6 | 使用 IPv6 协议 |
在使用 scp 命令把文件从本地复制到远程主机时,首先需要以绝对路径的形式写清本地文件的存放位置。如果要传送整个文件夹内的所有数据,还需要额外添加参数-r 进行递归操
作。然后写上要传送到的远程主机的 IP 地址,远程服务器便会要求进行身份验证了。当前用户名称为 root,而密码则为远程服务器的密码。如果想使用指定用户的身份进行验证,可使用用户名@主机地址的参数格式。最后需要在远程主机的 IP 地址后面添加冒号,并在后面写上要传送到远程主机的哪个文件夹中。只要参数正确并且成功验证了用户身份,即可开始传送工作。
[root@localhost Desktop]# scp readme.txt 192.168.10.10:/home/
The authenticity of host '192.168.10.10 (192.168.10.10)' can't be established.
ECDSA key fingerprint is 35:01:64:40:4c:22:41:f1:2e:2c:75:76:a3:14:47:40.
Are you sure you want to continue connecting (yes/no)? yes
Warning: Permanently added '192.168.10.10' (ECDSA) to the list of known hosts.
root@192.168.10.10's password: 输入远程服务器中root管理员的密码
readme.txt                                    100%   12     0.0KB/s   00:00
此外,还可以使用 scp 命令把远程主机上的文件下载到本地主机,其命令格式为“scp [参数] 远程用户@远程 IP 地址:远程文件 本地目录”。
[root@localhost Desktop]# scp 192.168.10.10:/root/Desktop/a.txt /root/Desktop/
root@192.168.10.10's password:
a.txt                                         100%  208     0.2KB/s   00:00
[root@localhost Desktop]# ls
a.txt  readme.txt
4、不间断会话服务
当与远程主机的会话被关闭时,在远程主机上运行的命令也随之被中断。如果我们正在使用命令来打包文件,或者正在使用脚本安装某个服务程序,中途是绝对不能关闭在本地打开的终端窗口或断开网络链接的,甚至是网速的波动都有可能导致任务中断,此时只能重新进行远程链接并重新开始任务。
screen 是一款能够实现多窗口远程控制的开源服务程序,简单来说就是为了解决网络异常中断或为了同时控制多个远程终端窗口而设计的程序。用户还可以使用 screen 服务程序同
时在多个远程会话中自由切换,能够做到实现如下功能。
➢ 会话恢复:即便网络中断,也可让会话随时恢复,确保用户不会失去对远程会话的控制。
➢ 多窗口:每个会话都是独立运行的,拥有各自独立的输入输出终端窗口,终端窗口内显示过的信息也将被分开隔离保存,以便下次使用时依然能看到之前的操作记录。
➢ 会话共享:当多个用户同时登录到远程服务器时,便可以使用会话共享功能让用户之间的输入输出信息
在 RHEL 7 系统中,没有默认安装 screen 服务程序,因此需要配置 Yum 仓库来安装它。首先将虚拟机的 CD/DVD 光盘选项设置为“使用 ISO 镜像文件”,并选择已经下载好的系统
镜像
然后,把光盘设备中的系统镜像挂载到/media/cdrom 目录。并写入 /etc/fstab 文件中
[root@localhost Desktop]# mkdir -p /media/cdrom
[root@localhost Desktop]# mount /dev/cdrom /media/cdrom/
mount: /dev/sr0 is write-protected, mounting read-only
[root@localhost Desktop]# vim /etc/fstab
#
# /etc/fstab
# Created by anaconda on Wed Sep  5 21:24:14 2018
#
# Accessible filesystems, by reference, are maintained under '/dev/disk'
# See man pages fstab(5), findfs(8), mount(8) and/or blkid(8) for more info
#
/dev/mapper/rhel-root   /                       xfs     defaults        1 1
UUID=1e81605b-4fdf-46b6-a0e4-244ea1ac9e7d /boot                   xfs     defaults        1 2
/dev/mapper/rhel-swap   swap                    swap    defaults        0 0
/dev/cdrom /media/cdrom iso9660 default 0 0
最后,使用 Vim 文本编辑器创建 Yum 仓库的配置文件。
[root@localhost yum.repos.d]# vim rhel7.repo
[rhel7]
name=rhel7
baseurl=file:///media/cdrom
enabled=1
gpgcheck=0
现在,就可以使用 Yum 仓库来安装 screen 服务程序了


[root@localhost yum.repos.d]# yum install screen
Loaded plugins: langpacks, product-id, subscription-manager
This system is not registered to Red Hat Subscription Management. You can use subscription-manager to register.
rhel7                                                    | 4.1 kB     00:00
(1/2): rhel7/group_gz                                      | 134 kB   00:00
(2/2): rhel7/primary_db                                    | 3.4 MB   00:00
Resolving Dependencies
--> Running transaction check
---> Package screen.x86_64 0:4.1.0-0.19.20120314git3c2946.el7 will be installed
--> Finished Dependency Resolution

Dependencies Resolved

================================================================================
 Package     Arch        Version                               Repository  Size
================================================================================
Installing:
 screen      x86_64      4.1.0-0.19.20120314git3c2946.el7      rhel7      551 k

Transaction Summary
================================================================================
Install  1 Package

Total download size: 551 k
Installed size: 914 k
Is this ok [y/d/N]: y
Downloading packages:
Running transaction check
Running transaction test
Transaction test succeeded
Running transaction
  Installing : screen-4.1.0-0.19.20120314git3c2946.el7.x86_64               1/1
rhel7/productid                                          | 1.6 kB     00:00
  Verifying  : screen-4.1.0-0.19.20120314git3c2946.el7.x86_64               1/1

Installed:
  screen.x86_64 0:4.1.0-0.19.20120314git3c2946.el7

Complete!
5、管理远程会话
screen 命令能做的事情非常多:可以用-S 参数创建会话窗口;用-d 参数将指定会话进行离线处理;用-r 参数恢复指定会话;用-x 参数一次性恢复所有的会话;用-ls 参数显示当前已
有的会话;以及用-wipe 参数把目前无法使用的会话删除,等等
下面创建一个名称为 backup 的会话窗口。当在命令行中敲下这条命令的一瞬间,屏幕会快速闪动一下,这时就已经进入 screen 服务会话中了,在里面运行的任何操作都会被后台记录下来。
calhost Desktop]# screen -S backup
执行命令后会立即返回一个提示符。虽然看起来与刚才没有不同,但实际上可以查看到当前的会话正在工作中
[root@localhost Desktop]# screen -ls
There is a screen on:
        6124.backup     (Attached)
1 Socket in /var/run/screen/S-root.
要想退出一个会话也十分简单,只需在命令行中执行 exit 命令即可。
其实并不是必须先创建会话,然后再开始工作。可以直接使用screen 命令执行要运行的命令,这样在命令中的一切操作也都会被记录下来,当命令执行结束
后 screen 会话也会自动结束
先来创建一个名为 linux 的会话,然后强行把窗口关闭掉(这与进行远程连接时突然断网具有相同的效果)
[root@localhost Desktop]# screen -S linux
[root@localhost Desktop]# top
top - 20:00:24 up  3:34,  2 users,  load average: 0.10, 0.07, 0.08
Tasks: 494 total,   1 running, 493 sleeping,   0 stopped,   0 zombie
%Cpu(s):  9.2 us,  0.9 sy,  0.0 ni, 89.9 id,  0.0 wa,  0.0 hi,  0.0 si,  0.0 st
KiB Mem:   2035648 total,  1126740 used,   908908 free,     1588 buffers
-----------省略以下信息--------------------
由于刚才关闭了会话窗口,这样的操作在传统的远程控制中一定会导致正在运行的命令也突然终止,但在 screen 不间断会话服务中则不会这样。我们只需查看一下刚刚离线的会话
名称,然后尝试恢复回来就可以继续工作了
[root@localhost Desktop]# screen -ls
There is a screen on:
    6380.linux    (Detached)
1 Socket in /var/run/screen/S-root.
[root@localhost Desktop]# screen -r 6380

6、会话共享功能
screen 命令不仅可以确保用户在极端情况下也不丢失对系统的远程控制,保证了生产环境中远程工作的不间断性,而且它还具有会话共享、分屏切割、会话锁定等实用的功能。其中,会话共享功能是一件很酷的事情,当多个用户同时控制主机的时候,它可以把屏幕内容共享出来,也就是说每个用户都可以看到相同的内容
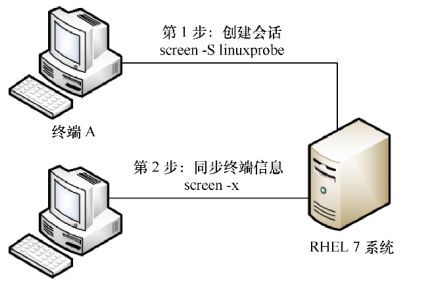
要实现会话共享功能,首先使用 ssh 服务程序将终端 A 远程连接到服务器,并创建一个会话窗口。
[root@localhost A]# ssh 192.168.10.10
Last login: Tue Oct  2 18:54:42 2018
[root@localhost A]# screen -S linux
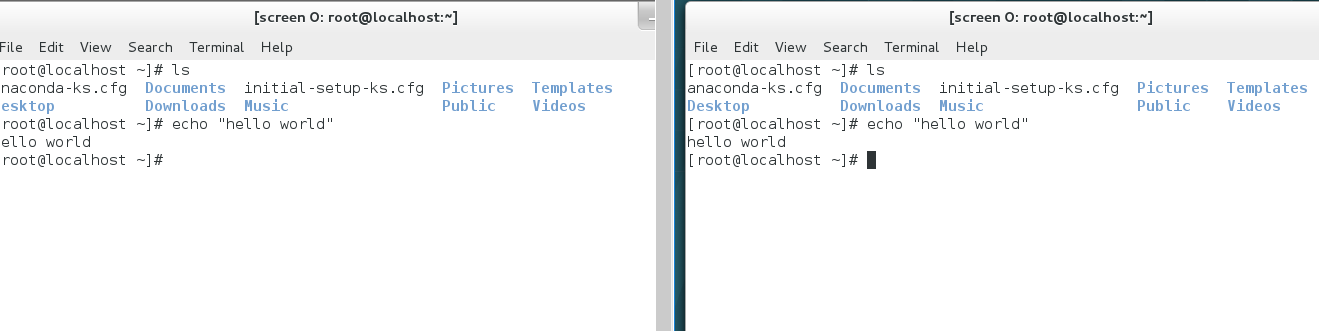
然后,使用 ssh 服务程序将终端 B 远程连接到服务器,并执行获取远程会话的命令。接下来,两台主机就能看到相同的内容了。
[root@localhost B]# ssh 192.168.10.10
root@192.168.10.10's password:
Last login: Tue Oct  2 20:11:38 2018
[root@localhost B]# screen -x