1、设置边框、圆角、背景色案例
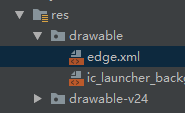
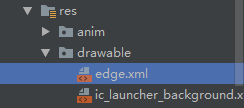
在drawable中 新建一个edge.xml文件
<?xml version="1.0" encoding="utf-8"?>
<shape xmlns:android="http://schemas.android.com/apk/res/android">
    <!-- 这里是设置背景色-->
    <solid android:color="@color/colorGrey" />
    <!-- 这里是设置为四周 也可以单独设置某个位置为圆角-->
    <corners android:topLeftRadius="5dp"
        android:topRightRadius="5dp"
        android:bottomRightRadius="5dp"
        android:bottomLeftRadius="5dp"/>
    <!-- 这里设置边框 -->
    <stroke android:width="1dp" android:color="#000000" />
</shape>
Activity页面引用:
android:background="@drawable/edge"
如下案例所示:
 <ScrollView
        android:id="@+id/scrollView2"
        android:layout_width="0dp"
        android:layout_height="0dp"
        android:layout_marginStart="8dp"
        android:layout_marginTop="8dp"
        android:layout_marginEnd="8dp"
        android:layout_marginBottom="8dp"
        app:layout_constraintBottom_toTopOf="@+id/guideline"
        app:layout_constraintEnd_toEndOf="parent"
        app:layout_constraintHorizontal_bias="0.0"
        app:layout_constraintStart_toStartOf="parent"
        app:layout_constraintTop_toTopOf="parent"
        app:layout_constraintVertical_bias="0.0"
        android:background="@drawable/edge">

        <LinearLayout
            android:layout_width="match_parent"
            android:layout_height="wrap_content"
            android:orientation="vertical">

            <TextView
                android:id="@+id/et"
                android:layout_width="match_parent"
                android:layout_height="wrap_content"
                android:minLines="8"
                android:text="123456789" />

        </LinearLayout>
    </ScrollView>
说明: solid为填充色 即内部的背景填充色 ,stroke 为边框 可以设置颜色和宽度
效果如下:

2、设置边框颜色案例:
在drawable中 新建一个button_edge.xml文件
<?xml version="1.0" encoding="utf-8"?>
<layer-list xmlns:android="http://schemas.android.com/apk/res/android">
    <!-- 边框颜色值 -->
    <item>
        <shape>
            <solid android:color="#3bbaff" />
        </shape>
    </item>

    <!--这个是按钮边框设置为四周 并且宽度为1-->
    <item
        android:right="1dp"
        android:left="1dp"
        android:top="1dp"
        android:bottom="1dp">
        <shape>
            <!--这个是背景颜色-->
            <solid android:color="#ffffff" />
            <!--这个是按钮中的字体与按钮内的四周边距-->
            <padding android:bottom="5dp"
                android:left="5dp"
                android:right="5dp"
                android:top="5dp" />
        </shape>
    </item>
</layer-list>
使用:
android:background="@drawable/button_edge"
3、设置圆角按钮案例:(其实按钮还是方形的,只是将外围部分隐藏了而已)
在drawable中: 新建一个 button_circle_shape.xml文件
<?xml version="1.0" encoding="UTF-8"?>
<shape
    xmlns:android="http://schemas.android.com/apk/res/android"
    android:shape="rectangle">
    <!-- 填充的颜色 -->
    <solid android:color="#FFFFFF" />
    <!-- android:radius 弧形的半径 -->
    <!-- 设置按钮的四个角为弧形 -->
    <corners
    android:radius="5dip" />
    <!--也可单独设置-->
    <!-- <corners -->
   <!-- android:topLeftRadius="10dp"-->
   <!-- android:topRightRadius="10dp"-->
   <!-- android:bottomRightRadius="10dp"-->
  <!--  android:bottomLeftRadius="10dp"-->
 <!--   />  -->
        **设置文字padding**
    <!-- padding:Button里面的文字与Button边界的间隔 -->
    <padding
        android:left="10dp"
        android:top="10dp"
        android:right="10dp"
        android:bottom="10dp"
        />
</shape>
使用:
android:background="@drawable/shape"
4、设置圆角图片案例
1 简单的设置:(不能添加自定义图片 只能设置颜色和字体)
在drawable中 创建一个image_circle.xml图片
<?xml version="1.0" encoding="utf-8"?>
<shape xmlns:android="http://schemas.android.com/apk/res/android">
    <solid android:color="#FFFFFF" />
    <corners android:topLeftRadius="10dp"
        android:topRightRadius="10dp"
        android:bottomRightRadius="10dp"
        android:bottomLeftRadius="10dp"/>
</shape>
使用:
android:background="@drawable/image_circle"
5、真实案例:
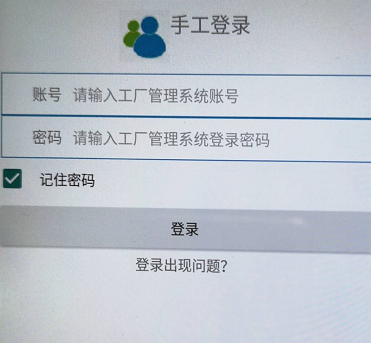
edge.xml
<?xml version="1.0" encoding="utf-8"?>
<layer-list xmlns:android="http://schemas.android.com/apk/res/android">
    <!-- 边框颜色值 -->
    <item>
        <shape>
            <solid android:color="#3bbaff" />
        </shape>
    </item>

    <!--这个是按钮边框设置为四周 并且宽度为1-->
    <item
        android:right="1dp"
        android:left="1dp"
        android:top="1dp"
        android:bottom="1dp">
        <shape>
            <!--这个是背景颜色-->
            <solid android:color="#ffffff" />
            <!--这个是按钮中的字体与按钮内的四周边距-->
            <padding android:bottom="5dp"
                android:left="5dp"
                android:right="5dp"
                android:top="5dp" />
        </shape>
    </item>
</layer-list>
布局文件 LeftFragment.xml:
<?xml version="1.0" encoding="utf-8"?>
<FrameLayout xmlns:android="http://schemas.android.com/apk/res/android"
    xmlns:tools="http://schemas.android.com/tools"
    android:layout_width="match_parent"
    android:layout_height="match_parent"
    tools:context=".LeftFragment">

    <LinearLayout
        android:layout_width="match_parent"
        android:layout_height="match_parent"
        android:layout_gravity="center"
        android:orientation="vertical">

        <LinearLayout
            android:layout_width="wrap_content"
            android:layout_height="wrap_content"
            android:layout_gravity="center_horizontal"
            android:orientation="horizontal"
            android:padding="10dp"
            >
            <ImageView
                android:layout_width="wrap_content"
                android:layout_height="wrap_content"
                android:layout_gravity="center_horizontal"
                android:src="@mipmap/user" />
            <TextView
                android:layout_width="wrap_content"
                android:layout_height="wrap_content"
                android:layout_gravity="center_horizontal"
                android:text="手工登录"
                android:textSize="20sp" />

        </LinearLayout>

        <LinearLayout
            android:layout_width="match_parent"
            android:layout_height="wrap_content"
            android:padding="10dp"
            android:background="@drawable/edge"
            android:layout_marginLeft="5dp"
            android:layout_marginRight="5dp"
            >
            <TextView
                android:layout_width="wrap_content"
                android:layout_height="wrap_content"
                android:paddingLeft="20dp"
                android:text="账号"
                android:textSize="15sp"/>
            <EditText
                android:layout_width="match_parent"
                android:layout_height="wrap_content"
                android:hint="请输入工厂管理系统账号"
                android:background="@null"
                android:paddingLeft="10dp"
                android:textSize="15sp"/>
        </LinearLayout>

        <LinearLayout
            android:layout_width="match_parent"
            android:layout_height="wrap_content"
            android:padding="10dp"
            android:background="@drawable/edge"
            android:layout_marginLeft="5dp"
            android:layout_marginRight="5dp">
            <TextView
                android:layout_width="wrap_content"
                android:layout_height="wrap_content"
                android:paddingLeft="20dp"
                android:textSize="15sp"
                android:text="密码" />
            <EditText
                android:layout_width="match_parent"
                android:layout_height="wrap_content"
                android:hint="请输入工厂管理系统登录密码"
                android:background="@null"
                android:paddingLeft="10dp"
                android:textSize="15sp"/>
        </LinearLayout>

        <CheckBox
            android:layout_width="match_parent"
            android:layout_height="wrap_content"
            android:padding="10dp"
            android:text="记住密码" />

        <Button
            android:layout_width="match_parent"
            android:layout_height="wrap_content"
            android:padding="10dp"
            android:text="登录" />

        <TextView
            android:layout_width="wrap_content"
            android:layout_height="wrap_content"
            android:layout_gravity="center"
            android:text="登录出现问题?" />
    </LinearLayout>
</FrameLayout>