一、线程和进程
1.什么是进程?
一个程序的执行实例就是一个进程。An executing instance of a program is called a process.
一个进程都有一个虚拟内存地址空间,可执行代码,调用操作系统的接口,安全的上下文,唯一的进程标识符PID,环境变量,优先级类,最大最小的工作的内存空间,和最少一个线程。
  每一个进程想要执行,至少需要有一个线程,经常叫做主线程;
  进程中的线程可以创建额外的线程,主线程可以创建子线程,子线程又可以创建子线程。
  线程之间相互独立,不相互依赖。a线程生成b线程,a线程消失,b线程仍然可以存在。
A thread is an execution context, which is all the information a CPU needs to execute a stream of instructions.
Suppose you're reading a book, and you want to take a break right now, but you want to be able to come back and resume reading from the exact point where you stopped.
One way to achieve that is by jotting down the page number, line number, and word number.
So your execution context for reading a book is these 3 numbers.
If you have a roommate, and she's using the same technique, she can take the book while you're not using it, and resume reading from where she stopped.
Then you can take it back, and resume it from where you were. Threads work in the same way.
A CPU is giving you the illusion that it's doing multiple computations at the same time.
It does that by spending a bit of time on each computation.
It can do that because it has an execution context for each computation.
Just like you can share a book with your friend, many tasks can share a CPU.
On a more technical level, an execution context (therefore a thread) consists of the values of the CPU's registers.
Last: threads are different from processes.
A thread is a context of execution, while a process is a bunch of resources associated with a computation.
A process can have one or many threads.
Clarification:
the resources associated with a process include memory pages (all the threads in a process have the same view of the memory), file descriptors (e.g., open sockets), and security credentials (e.g., the ID of the user who started the process).
比如:
    想要执行QQ,那么QQ要以一个整体的形式暴露给操作系统管理,里面包含对各种资源的调用,内存的管理,网络接口的调用...
2.什么是线程?
线程是操作系统能够进行运算调度的最小单位。它被包含在进程之中,是进程中的实际运作单位。
一条线程指的是进程中一个单一顺序的控制流,一个进程中可以并发多个线程,每条线程并行执行不同的任务。
线程是一串指令的集合。
线程是一个执行的上下文,它包含了CPU执行一串指令所需需要的所有信息。
3.进程和线程的区别?
线程共享内存空间,进程间的内存是独立的。
线程可以直接访问自己隶属的进程的数据,线程间访问该进程的数据是访问的同一块数据;子进程从它们的父进程中复制出了数据,独立地占用在其进程中的数据。
同一个进程的线程之间可以直接交流;两个进程之间想要通信,必须通过一个中间代理来实现。
创建新线程很简单;创建新进程需要对其父进程进行一次克隆。
一个线程可以控制和操作同一进程里的其他线程,但是进程只能操作子进程。
主线程的改变可能会影响同一进程内的其他线程;父进程的改变不会影响其子进程。

Threads share the address space of the process that created it; processes have their own address space.
Threads have directly access to the data segment of its process; processes have their own copy of the data segment of the parent process.
Threads can directly communicate with other threads of its process; process must use interprocess communication to communicate with sibling processes.
New threads are easily created; new processes require duplication of the parent processes.
Threads can exercise considerable control over threads of the same process; process can only exercise control over child processes.
Changes to the main thread (cancellation, priority change, etc.) may affect the behavior of the other threads of the process; changes to the parent process does not affect child processes.
注意:线程和进程没有可比性,无法比较哪个比较快。
进程是资源的集合,进程的执行必须要通过线程;线程是真正执行任务。两者无法进行比较速度。
但是,启动一个线程的速度快于启动一个进程的速度。
4.GIL(Global Interpreter Lock)
单核的CPU只能执行单个进程,但是实际使用中却看上去像是可以多任务并发的执行。这个是如何实现的呢?  ————是通过线程执行时的在CPU上的上下文的切换。
4核的CPU代表同一时间最多可以启动4个进程,但是在Python中,无论是多少核的CPU,在同一时间都只能通过执行单个线程。多任务的并发执行是通过快速的线程的上下文切换实现的。

In CPython, the global interpreter lock, or GIL, is a mutex that prevents multiple native threads from executing Python bytecodes at once.
This lock is necessary mainly because CPython's memory management is not thread-safe.
Howerver, since the GIL exists, other features have grown to depend on the guarantees that it enforces.
总而言之,无论启动多少个线程,有多少个CPU,Python在执行的时候会淡定地在同一时刻只允许一个线程运行。

CPython是用C语言实现的解释器,调用的是操作系统(C语言写的)的原生线程,Python在调用C语言的原生线程时,必须把上下文发给C语言的原生线程,由于解释器无法控制C语言的原生线程。
所以CPython中引入了GIL,在线程的上下文都传递给CPU时,确保同一时间内只有一个线程运行,确保数据的安全,准确,不混乱。

首先需要明确的一点是GIL并不是Python的特性,它是在实现Python解析器(CPython)时所引入的一个概念。
就好比C++是一套语言(语法)标准,但是可以用不同的编译器来编译成可执行代码。
有名的编译器例如GCC,INTEL C++,Visual C++等。Python也一样,同样一段代码可以通过CPython,PyPy,Psyco等不同的Python执行环境来执行。
像其中的JPython就没有GIL。然而因为CPython是大部分环境下默认的Python执行环境。
所以在很多人的概念里CPython就是Python,也就想当然的把GIL归结为Python语言的缺陷。

所以这里要先明确一点:GIL并不是Python的特性,Python完全可以不依赖于GIL。
比方说,在JPython解释器中,调用的线程是用Java重新写的,所以不存在GIL。在PyPy中,新增了JIT(即时编译),附带中解决了GIL问题,所以在PyPy中也没有GIL。
二、Python threading模块
1.调用方式
线程有两种调用方式,一种是直接调用,另一种是继承式调用。
第一种:直接调用,使用threading.Thread()


 1 import threading,time
 2 def sayhi(num):
 3     print('running on number:%s'%num)
 4     time.sleep(3)
 5 if __name__=='__main__':
 6     t1=threading.Thread(target=sayhi,args=(1,))
 7     t2=threading.Thread(target=sayhi,args=(2,))
 8     t1.start()
 9     t2.start()
10     print(t1.getName())
11     print(t2.getName())
返回:

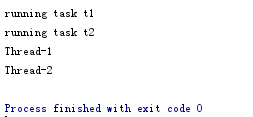
上面的返回结果显示的是两个线程t1,t2的运行输出结果和主线程向屏幕打印两个子线程t1,t2的名称。
第二种:继承式调用
 1 import threading
 2 class MyThread(threading.Thread):
 3     def __init__(self,n):
 4         super(MyThread,self).__init__()
 5         self.n=n
 6     def run(self):  #定义每个线程要运行的函数
 7         print('running task',self.n)
 8 if __name__=='__main__':
 9     t1=MyThread('t1')
10     t2=MyThread('t2')
11 t1.start()
12 t2.start()
13 print(t1.getName())
14 print(t2.getName())
返回:
2.调用启动多个线程
上面的两个实例,都是通过创建一个新的线程来创建线程的,想要一次性创建多个线程,可以用循环的方式实现:
 1 import threading,time
 2 def run(n):
 3     print('Task',n)
 4     time.sleep(2)
 5     print('Task done')
 6
 7 start_time=time.time()
 8 t_obj=[]  #初始化一个列表,用来存放线程t
 9 for i in range(5):
10     t=threading.Thread(target=run,args=('thread-%s'%i,))
11     t.start()
12     t_obj.append(t)
13     print('cost:',time.time()-start_time)  #检测每个子线程的执行时间
14
15 print('threading type',threading.current_thread())
16 print('main threading cost:',time.time()-start_time)
返回:
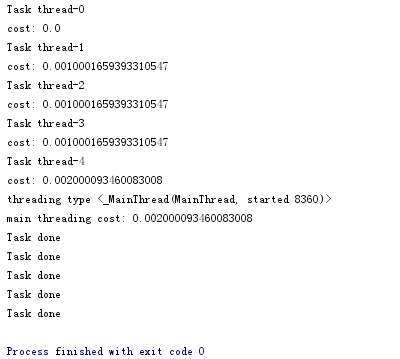
从上面的脚本的运行结果来看,主线程创建了子线程后,是并行的运行的,子线程不会等主线程完成以后再执行,而是独立地运行的。

3.help(threading.Thread)
class Thread(builtins.object)
A class that represents a thread of control. 表示控制线程的类Thread。
This class can be safely subclassed in a limited fashion. Thread可以用有限的方式安全地生成子类。
There are two ways to specify the activity: by passing a callable object to the constructor, or by overriding the run() method in a subclass. 有两种方式可以指定活动:通过将调用调用传入构造函数直接调用;或者通过重写子类的run()方法继承调用。

Methods defined here:
构造函数:
 __init__(self, group=None, target=None, name=None, args=(), kwargs=None, *, daemon=None)
#构造函数总是用关键字参数调用。
'''参数:
group默认为None,是为了ThreadGroup类扩展时保留的参数。
target默认为None,表示没有调用任何方法。target指定的方法是Thread类中run方法的调用对象
name是线程名称。默认情况下,每个线程的唯一的名称是按照‘Thread-N’的格式构造的,N是一个小的十进制数字。
args是传给target指定方法中的参数容器,是元组的类型。默认为().如果传入的参数是单个参数,传入时写成args=(1,)
*kwargs是传给target指定方法的关键字参数的容器,是字典类型。默认为{}.
如果一个子类重写了构造函数,那么它必须确保在执行线程之前调用基类Thread的构造函数(Thread.__init__())。
'''
线程方法:
__repr__(self)

getName(self)  #返回线程名称

isAlive = is_alive(self)  #判断是否运行

isDaemon(self)  #判断是否守护线程

is_alive(self)   #判断是否运行

join(self, timeout=None)  #阻塞线程

run(self)  #运行线程

setDaemon(self, daemonic)  #将线程设置为守护线程

setName(self, name)  #设置线程名称

start(self)  #运行线程
关于数据描述符的方法:
 __dict__  #定义的线程实例的各种属性的字典集合。

t.__dict__
Out[11]:
{'_args': (),
 '_daemonic': False,
 '_ident': None,
 '_initialized': True,
 '_is_stopped': False,
 '_kwargs': {},
 '_name': 'Thread-6',
 '_started': <threading.Event at 0x9b6dcc0>,
 '_stderr': <ipykernel.iostream.OutStream at 0x87106d8>,
 '_target': <function __main__.f>,
 '_tstate_lock': None}

__weakref__  #定义的线程的弱引用列表

daemon  #判断一个线程是否为守护线程,返回值为布尔值。

ident  #返回线程的线程标识符。如果没有启动该线程,返回值为None.线程标识符是一个非零整数。标称标识符可以在线程退出时被回收。

name  #线程名,它没有语义。多个线程可以使用相同的名称。初始名称由构造函数设置。
4.join阻塞进程
语法:threading.Thread.join(self,[timeout])
Thread调用join方法可以阻塞进程直到该线程执行完毕。
通用的做法是我们启动一批线程,使得所有的子线程并行执行,再通过在下面加上一层循环,给每个子线程加上join方法,使所有的子线程结束后,再执行主线程。
实例:join的常用用法——等多个子线程并行地全部执行完成后执行主线程
 1 import threading,time
 2 def run(n):
 3     print('Task',n,'Thread Type',threading.current_thread())
 4     time.sleep(2)
 5     print('Tack done')
 6
 7 start_time=time.time()
 8
 9 t_obj=[]  #定义一个列表,用来存放子线程t
10 for i in range(5):
11     t=threading.Thread(target=run,args=('thread-%s'%i,))
12     t.start()
13     t_obj.append(t)
14     print('cost:',time.time()-start_time)
15
16 print(t_obj)  #查看所有的子线程
17 for t in t_obj:
18     t.join()  #用加一层循环的方法,阻塞所有的线程,等所有子线程执行结束后,执行下面的线程(此处为主线程)。
19
20 print('thread type',threading.current_thread())  #由于上面子线程都加上了join,所以主线程会等子线程全部完成后再执行
21 print('total cost:',time.time()-start_time)
返回:
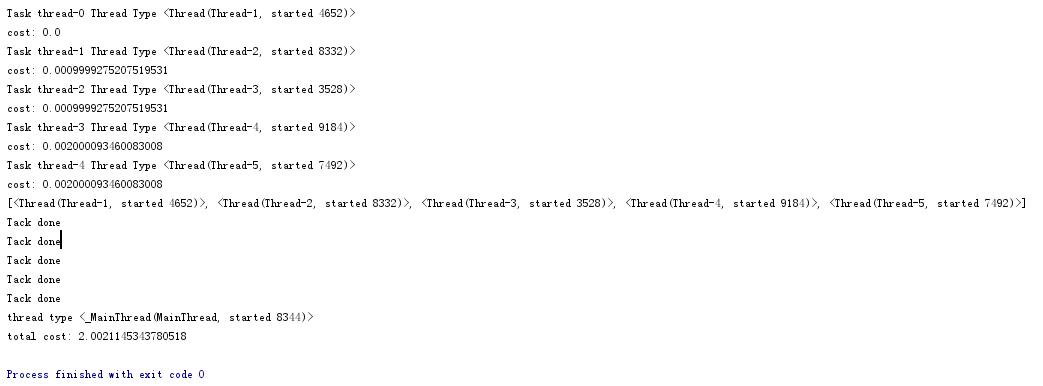
上面的脚本的执行结果显示join的常用方式:
  通过for循环并行启动了所有的子线程,再通过for循环join,让上面一层的for循环中的所有的子线程执行完成后(或超时后)再执行下面的主线程。
  这样能够确保在执行主线程之前子线程是以并行的状态运行的,又能确保主线程运行之前所有的join的子线程全部都已经运行结束。
实例:对上面实例的实现的错误用法,将程序变成了串形的join。
阻塞进程,将并行的线程全部加上了join,将线程阻塞,编程了串形的运行方式。
 1 import threading,time
 2 def run(n):
 3     print('Task',n,'Thread Type',threading.current_thread()) #打印任务,打印当前执行的线程类型
 4     time.sleep(2)
 5     print('Task done')
 6 start_time=time.time()
 7 for i in range(5):
 8     t=threading.Thread(target=run,args=('t-%s'%i,))
 9     t.start()
10     t.join()  #等待每个线程执行完成后,再执行下一个,串形的运行方式。
11     print('cost:', time.time() - start_time)  #只能检测每个子线程的执行时间
12 print(threading.current_thread())  #打印当前线程类型,确认当前执行的线程为子线程还是主线程。——该阶段为主线程
13 print('cost:',time.time()-start_time)
返回:
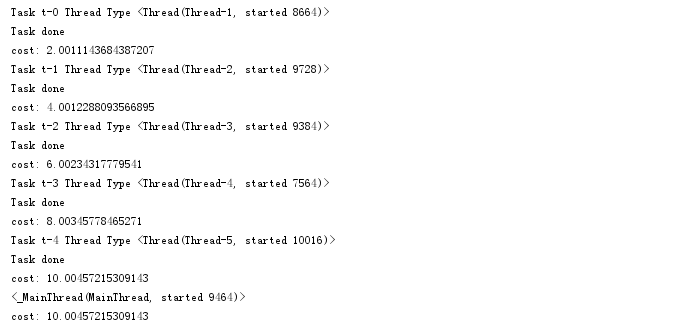
通过上面脚本执行返回的结果来看,t.join()加在了每个线程的后面,阻塞了每一个线程,导致每一个线程都要等前面一个线程执行完成后才执行,最后执行主线程。
5.守护进程Daemon
什么是守护进程?
有些线程执行后台任务,比方说发送keepalive包,或者执行周期性垃圾收集等等。
这些后台任务仅有主程序执行时才可以运行,一旦其他的非守护进程线程退出,这些线程就会直接停止。
如果没有守护进程线程,则必须跟踪这些线程,并且告诉这些线程必须在主程序彻底退出之前退出。
通过设置守护线程,可以不用管它们运行程序,当程序退出是,所有的守护进程线程都会被自动关闭。

Some threads do background tasks, like sending keepalive packets, or performing periodic garbage collection, or whatever.
These are only useful when the main program is running, and it's okay to kill them off once the other,non-daemon, threads have exited.
Without daemon threads, you'd have to keep track of them, and tell them to exit, before your program can completely quit.
By setting them as deamon threads, you can let them run and forget about them, and when you program quits, any daemon threads are killed automatically.
注意:守护进程线程会在关闭时自动中止。它们占用的资源(例如打开文件,数据库事务等)可能不能正确发布。
如果想要线程优雅地中止,可以使他们成为非守护进程线程,并使用一个合适的信号机制,如事件。
Note:Daemon threads are abruptly stopped at shutdown. Their resources (such as open files, database transactions, etc.) may not be released properly.
If you want your threads to stop gracefully, make them non-daemonic and use a suitable signalling mechanism such as an Event.

主线程,子线程和守护线程之间的关系?
1 主线程
主线程就是程序本身,可以通过thread.current_thread()打印查看。
如果是主线程则会返回<_MainThread(MainThread,started 3636)>,如果是子线程就会返回<Thread(Thread-1,started 8200)>.后面是started后面跟的是线程号(PID)。
threading.active_count():返回正在运行的线程数量,与len(threading.enumerate())有相同的结果。
2 主线程和子线程的关系
主线程和子线程的关系是相互独立的,没有依赖关系的。
子线程不加join的情况下,子线程不会等主线程执行完毕才执行。在主线程先执行结束,子线程还未执行结束的情况下,程序还是会等子线程执行完成后才退出。
子线程加join的情况下,主线程会等子线程执行完毕之后再执行,最后才退出。

3 子线程与守护线程
将子线程转化为守护线程的方法是thread.setDaemon(True),把当前线程设置为守护线程。并且setDamon(True)一定是放在thread.start()之前设置。
将子线程转化为守护线程之后,只要主线程执行完毕,程序只会等待非守护线程执行结束,不论守护线程是否执行完毕,程序都会退出。

4 主线程与守护线程
一个主线程可以启动多个守护线程,守护线程依赖主线程。
守护线程执行一些后台任务,如监听服务,接收数据包等,辅助主线程执行任务。
实例:设置守护进程
 1 import threading,time
 2 def run(n):
 3     print('Task',n,'Thread Type',threading.current_thread())
 4     time.sleep(2)
 5     print('Task done')
 6 start_time=time.time()
 7 for i in range(5):
 8     t=threading.Thread(target=run,args=('t-%s'%i,))
 9     t.setDaemon(True)
10     t.start()
11     print('cost:', time.time() - start_time)  #只能检测每个子线程的执行时间
12 print(threading.current_thread())  #打印当前线程类型,确认当前执行的线程为子线程还是主线程。——该阶段为主线程
13 print('cost:',time.time()-start_time)
返回:

解析:
从上面脚本返回的结果来看,主线程花费了0.0020003318786621094s,程序退出。上面的for循环中的守护线程全部随着程序的中止而中止。全部都只打印了开始,而没有打印结束的结果。
三、GIL,Thread Lock线程锁(互斥锁Mutex)和递归锁
1.GIL和Thread Lock
GIL全局解释锁,保证执行时,同一时间就只有一个线程在运行。
Thread Lock线程锁,又称互斥锁Mutex,保证程序执行时,同一时间就只有一个线程在修改数据。与GIL无关。
2.CPython加入GIL的原因?
为了降低程序开发的复杂度。
比方说:写Python时不用考虑内存回收的问题,Python解释器会自动定期进行内存回收。
Python解释器里有一个独立的线程,每过一段时间这个线程会wake up做一次全局论询来看看哪些内存数据是可以清空的。
此时,我们自己写的Python程序里的线程和Python解释器自己的线程是并发运行的。假设你的线程删除了一个变量,Python解释器的垃圾回收线程在清空这个变量的过程中clearing时刻,可能一个其他线程正好又重新给这个还没来得及清空的内存空间赋值了,结果就有可能新赋值的数据被删除了。
为了解决这种类似的问题,Python解释器简单粗暴的加了一层锁,即当一个线程运行时,其他人都不能动,这样就解决了上述的问题。
这也是Python早期版本的遗留问题。
3.用户程序加互斥锁的原因?
GIL仅保证在统一时间内仅一个线程能够运行,但是在Python2.x中,有可能会出现线程对数据的修改时发生混乱。
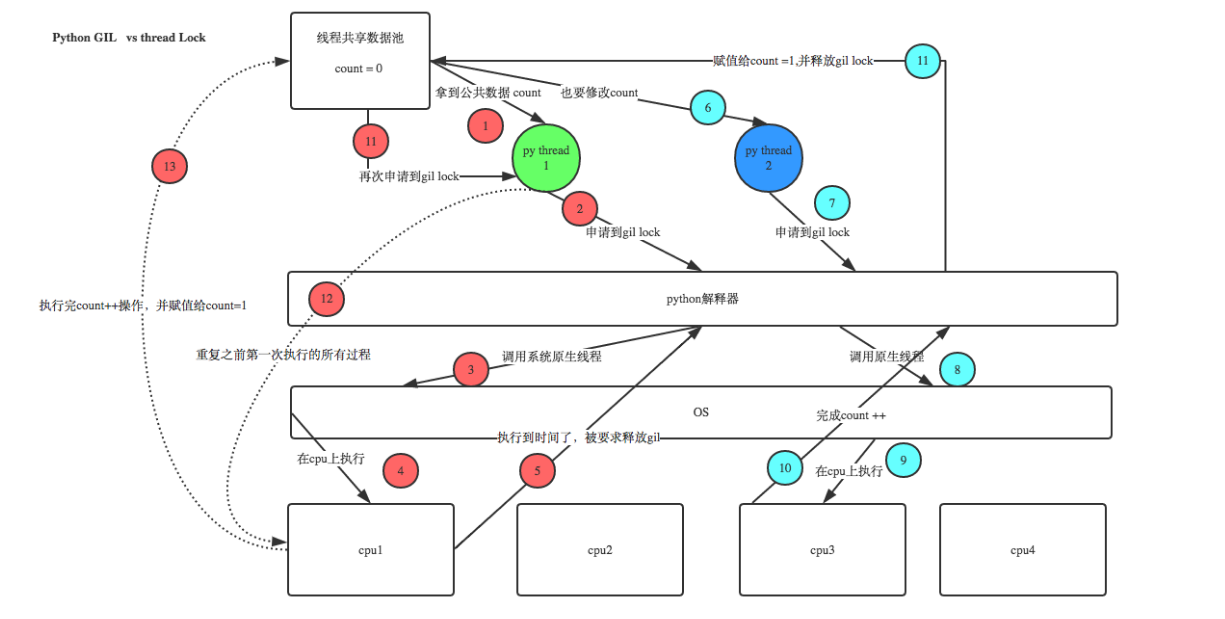
混乱的原因:
每个线程对数据进行修改时,不是每次的执行都能修改成功,如下图的示例中,第5步执行时间到了,但是被没有完成数据修改的所有指令,就释放了GIL;
线程2成功修改了count;线程1继续申请GIL锁,继续执行指令,继续修改count。
如果线程多,可能会有不同的线程在统一时间修改同一数据,可能会导致数据混乱,所以需要对数据的加上一层程序的用户锁。
具体可以参考:http://www.cnblogs.com/alex3714/articles/5230609.html
4.GIL的多线程运行实例
图示:
脚本实例:
1.数据修改之前,先生成一个互斥锁的实例;
2.程序中修改数据之前先申请互斥锁,锁住数据,修改数据成功后,释放锁。
3.在实际程序运行过程中,Python3中似乎实现了优化,但是官方未有声明称Python3中不需要加Mutex。
 1 import threading
 2 def run(n):
 3     lock.acquire()
 4     global num  #在函数中通过global声明全局变量num
 5     num +=1
 6     # time.sleep(1)  #这个time.sleep()时,用户锁还没释放,把程序变成了串形。
 7     lock.release()
 8 lock = threading.Lock()  #先生成一个实例,后面并发运行5000个子线程时,在对数据进行修改时,通过lock.acquire(),lock.release()加上程序锁,将数据修改的运行编程了串形的。
 9 num = 0
10 t_objs = [] #存线程实例
11 for i in range(5000):
12     t = threading.Thread(target=run,args=("t-%s" %i ,))
13     t.start()
14     t_objs.append(t)  #为了不阻塞后面线程的启动,不在这里join,先放到一个列表里
15 for t in t_objs: #循环线程实例列表,等待所有线程执行完毕
16     t.join()
17
18 print("num:",num)
返回结果:向屏幕打印"num: 5000".
如果不加上Thread Lock,在Python2中或linux上运行的脚本中可能返回的结果会小于5000.因为多个子线程对同一块内存数据进行操作,未加互斥锁的情况下,出现了数据混淆。
5.递归锁RLock
在一个大锁中还要再包含子锁。
如果还是用lock = threading.Lock()生成一个锁的实例,那么下面的程序在执行的过程中会出现大锁和子锁的混乱,导致无法正确地release对应的锁,会出现死循环。
而lock=threading.RLock()可以用来生成一个递归锁的实例,实现大锁包小锁。

实现的原理主要通过字典的方式实现:
locks = {
    door1:key1,
    door2:key2,
}
实例:
 1 import threading, time
 2 def run1():
 3     print("grab the first part data")
 4     lock.acquire()  #申请加锁
 5     global num
 6     num += 1
 7     lock.release()  #释放锁
 8     return num
 9
10 def run2():
11     print("grab the second part data")
12     lock.acquire()  #申请加锁
13     global num2
14     num2 += 1
15     lock.release()  #释放锁
16     return num2
17
18 def run3():
19     lock.acquire()  #申请加锁
20     res = run1()
21     print('--------between run1 and run2-----')
22     res2 = run2()
23     lock.release()  #释放锁
24     print(res, res2)
25
26 num, num2 = 0, 0
27
28 lock = threading.RLock()  #生成了一个递归锁的实例.
29
30 for i in range(10):
31     t = threading.Thread(target=run3,)
32     t.start()
33
34 while threading.active_count() != 1:
35     print(threading.active_count())
36 else:
37     print('----all threads done---')
38     print(num, num2)
递归锁在实际的应用中,没有太多的应用场景,但是一定要知道遇到多层锁的情况下要使用递归锁。
6.信号量Semaphore

互斥锁Mutex同时只允许一个线程更改数据,而Semaphore是同时允许一定数量的线程更改数据。
使用方法同互斥锁一样,都是先生成一个实例,再在程序中申请锁住,修改完成后,释放锁。
实例:
 1 import threading, time
 2 def run(n):
 3     semaphore.acquire()
 4     time.sleep(1)
 5     print("run the thread: %s
" % n)
 6     semaphore.release()
 7 if __name__ == '__main__':
 8     semaphore = threading.BoundedSemaphore(5)  # 最多允许5个线程同时运行
 9     for i in range(22):
10         t = threading.Thread(target=run, args=(i,))
11         t.start()
12 while threading.active_count() != 1:
13     pass
14 else:
15     print('----all threads done---')
上面的实例的执行结果是:向屏幕输出的打印值,每五个向屏幕输出,22个子线程,最后向屏幕打印了2个。
7.Event事件
Event是一个简单的同步对象(synchronization object)。
Event对象用于线程间的通信,它是由线程设置的信号标志,它提供了设置信号,清除信号,等待等方法用于实现线程间的通信。
信号标志可以被设置、清除、等待。
如果由线程设置的信号标志为假,则线程等待直到信号被其他线程设置为真。
生成一个event对象:
    event = threading.Event()
设置信号:设置Event对象内部的信号标志为真。event.is_set()方法可以用来判断其内部信号标志的状态。
    event.set()
清除信号:清除Event对象内部的信号标志,将其设为假。
    event.clear()
import threading
event=threading.Event()  #生成一个事件实例
event.is_set()  #判断事件是否设置信号标志
Out[3]: False
event.set()  #将事件的信号标志设置为真
event.is_set()
Out[5]: True
event.clear()  #清除信号
event.is_set()
Out[8]: False
等待:Event对象wait的方法只有在内部标志为真的时候才会很快的执行并完成返回。当Event对象的内部信号标志为假时,则wait方法会一直等到其为真时才返回。
   event.wait()  #等待标志位被设置,如果未设置,则阻塞线程;如果设置了,则执行。
实例:红绿灯
通过Event来实现两个或多个线程间的交互:启动一个线程做交通指挥灯,生成几个线程做车辆,测量行驶按红灯停,绿灯行的规则。
1 import threading, time 2 event = threading.Event() # 生成一个事件实例 3 4 def traffic_signal(): 5 sec = 0 # 初始化一个计时器 6 while True: 7 if sec <= 10: #10s内,设置为红灯 8 event.clear() #清除信号 9 print('�33[41;1mtraffic signal is red, cars stop...�33[0m') 10 elif sec>10 and sec<=20: #10s-20s为绿灯 11 event.set() #设置信号 12 print('�33[42;1mtraffic signal is green,cars start running�33[0m') 13 else: 14 sec=0 #大于20s后清零 15 sec += 1 16 time.sleep(1) 17 18 def cars(name): 19 while True: 20 if event.is_set(): #信号被设置,车辆通行 21 print('%s is running...' % name) 22 time.sleep(1) 23 else: 24 print('%s stopped...' % name) 25 event.wait() 26 print('�33[34;1m traffic signal turns green,%s starts running...�33[0m' % name) 27 28 tra_sig = threading.Thread(target=traffic_signal, ) 29 tra_sig.start() 30 car1 = threading.Thread(target=cars, args=('Tesla',)) 31 car1.start()
上面的实例通过event的设置,用来代替红绿灯的状态,从而实现红绿灯和车辆的两个线程间的通信。
8.queue队列——线程queue
queue队列可以理解为一个有顺序的容器。(列表,字典都是容器)
队列和列表这类的容器的区别:从列表中取数,不会从列表中删除该值;但是在队列中取出,在队列中就会少掉这个数。
当数据必须在不同的线程间安全地交换信息时,队列在线程编程中特别有用。
queue队列可以用来提升线程的执行效率,并且有助于完成程序的解耦。

queue队列的常用方法:
class queue.Queue([maxsize=0]) #生成queue对象的类,原则:先进先出First in First out0
Queue.put(item, block=True, timeout=None)   #向队列中放数据
Queue.get(block=True, timeout=None)  #从队列中取数据,
Queue.qsize()  #判断队列大小
Queue.full() #队列可以设置大小,如果队列达到最大值,返回True
生成其他queue队列的类:
class queue.LifoQueue(maxsize=0) #后入先出 Last in First Out
class queue.PriorityQueue(maxsize=0) #存储数据时可设置优先级的队列,应用场景:VIP
9.生产者消费者模型
在并发编程中使用生产者和消费者模式能够解决绝大多数并发问题。该模式通过平衡生产线程和消费线程的工作能力来提高程序的整体处理数据的速度。

为什么要使用生产者和消费者模式?

在线程世界里,生产者就是生产数据的线程,消费者就是消费数据的线程。
在多线程开发当中,如果生产者处理速度很快,而消费者处理速度很慢,那么生产者就必须等待消费者处理完,才能继续生产数据。
同样的道理,如果消费者的处理能力大于生产者,那么消费者就必须等待生产者。
为了解决这个问题于是引入了生产者和消费者模式。
什么是生产者消费者模式?
生产者消费者模式是通过一个容器来解决生产者和消费者的强耦合问题。
生产者和消费者彼此之间不直接通讯,而通过阻塞队列来进行通讯,所以生产者生产完数据之后不用等待消费者处理,直接扔给阻塞队列,消费者不找生产者要数据,而是直接从阻塞队列里取,阻塞队列就相当于一个缓冲区,平衡了生产者和消费者的处理能力。

实例:
 1 import threading,time
 2 import queue
 3 q=queue.Queue(10)  #生成一个queue,先进先出
 4 def producer():
 5     count = 1
 6     while True:
 7         for i in range(10):
 8             q.put(count)
 9             print('生产了包子%s个'%count)
10             time.sleep(1)
11
12 def consumer(name):
13     while True:
14         q.get()
15         print('%s 买了一个包子...'%name)
16         time.sleep(2)
17 pro=threading.Thread(target=producer,)
18 pro.start()
19 names=['li','yuan','ding','ge']
20 for i in names:
21     c=threading.Thread(target=consumer,args=(i,))
22     c.start()
10.多进程
Python中调用的进程也是操作系统的原生进程,操作系统的原生进程的管理都是操作系统自己维护的。
multiprocessing是一个包,它支持使用类似于threading模块的API来生成进程。
multiprocessing is a package that supports spawning process using an API similar to the threading module.
multiprocessing包提供了本地和远程的并发,通过使用子线程代替线程,有效地避免了全局解释锁GIL。
由于这个原因,multiprocessing模块允许程序员在给定的机器上充分利用多个处理器CPU运行程序。
multiprocessing在Unix和Windows系统上均可运行。
The multiprocessing package offers both local and remote concurrency, effectively side-stepping the Global Interpreter Lock by using subprocesses instead of threads.
Due to this, the multiporecessing module allows the programmer to fully leverage multiple processors on a given machine.
It runs on both Unix and Windows.
因为进程之间无法互相访问,QQ进程无法操作Word进程,所以不存在锁的概念。
IO与CPU:
  IO操作不占用cpu,计算占用cpu。
Python多线程:
  不适合CPU密集操作型的任务,适合IO操作密集型的任务.
那么如果想要利用多核CPU实现多进程任务呢?
做法:那么可以发起多进程。
缺点:各进程中的线程无法访问同一块数据,无法进行数据交流。

生成一个进程实例:
 1 import multiprocessing
 2 import time
 3 def run(name):
 4     print('hello',name)
 5     time.sleep(2)
 6
 7 if __name__=='__main__':
 8     p=multiprocessing.Process(target=run,args=('Li',))
 9     p.start()
10     p.join()
在进程中再起线程:
 1 import multiprocessing,threading
 2 import time
 3
 4 def t():
 5     print('this is a threading...')
 6
 7 def run(name):
 8     print('hello',name)
 9     time.sleep(2)
10
11     for i in range(3):
12         th=threading.Thread(target=t,)
13         th.start()
14
15 if __name__=='__main__':
16     p=multiprocessing.Process(target=run,args=('Li',))
17     p.start()
18     p.join()
每一个进程都是由父进程启动的。
在Linux上执行都是由terminal这个进程启动上面这个脚本的进程。在windows上是根据相应的软件的父进程查看的。

实现实例:
1 from multiprocessing import Process 2 import os 3 4 def info(title): 5 print(title) 6 print('module name:', __name__) 7 print('parent process:', os.getppid()) #os.getppid() 返回进程的父进程的进程号 8 print('process id:', os.getpid()) #os.getpid() 返回进程的进程号 9 print(" ") 10 def f(name): 11 info('�33[31;1mcalled from child process function f�33[0m') 12 print('hello', name) 13 if __name__ == '__main__': 14 info('�33[32;1mmain process line�33[0m') 15 p = Process(target=f, args=('bob',)) 16 p.start()
返回:

11.进程间通信
两个进程间的内存是相互独立的,A进程想要访问B进程中的数据是不行的。想要实现进程间的通信,必须找一个“中间件”,帮助实现进程间的通信。
multiprocessing是python中的多进程模块,使用这个模块可以方便地进行多进程应用程序开发。multiprocessing模块中提供了:Process、Pool、Queue、Manager等组件。
1.Queue
线程queue的模块名为queue,线程queue只能在同一进程中互相访问。想要实现进程间的数据交互,就要使用multiprocessing中的类Queue。
实例:实现主进程和子进程的通信
 1 #实现主进程和子进程间的通信
 2 from multiprocessing import Queue,Process
 3 import queue,threading
 4 import os
 5 def f(q):
 6     q.put([1])
 7     print(q.get())
 8     print('f pid',os.getpid(),'father pid',os.getppid(),'thread',threading.current_thread())   #从结果来看,此处的进程的父进程为p
 9 if __name__=='__main__':
10     q=Queue()
11     p=Process(target=f,args=(q,))  #将q作为参数传入子进程f
12     p.start()
13     print('main pid',os.getpid(),'father pid',os.getppid(),'thread',threading.current_thread())
返回:
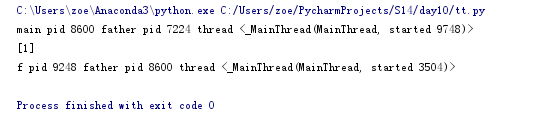
通过上面的实例返回的结果,打印pid(进程号)和进程的ppid(父进程号)可以得出:p生成了子进程,将序列q作为args参数传入了f中。
如果将实例中q=Queue()改为q=queue.Queue(),会报错:‘TypeError:can't pickle _thread.lock objects’。
通过上面的错误可以推论,进程间Queue的通信不是两个进程访问同一块数据,而是通过pickle序列化的方式将Queue中的数据作为副本进行交互。
2.Pipe管道
Pipe()函数的作用:返回一对默认通过管道双向连接的连接对象。
实例:通过Pipe实现两个进程间的数据的双向传输。
 1 from multiprocessing import Process,Pipe
 2 def f(conn):
 3     conn.send([1,2,3,4])
 4     conn.send([2,2,3,4])
 5     print(conn.recv())  #打印from father
 6     conn.close()
 7 if __name__=='__main__':
 8      parent_conn,child_conn=Pipe()  #Pipe()返回两个通过Pipe双向连接的对象。
 9      p=Process(target=f,args=(child_conn,))
10      p.start()
11      print(parent_conn.recv())  #打印[1,2,3,4]
12      print(parent_conn.recv()) #打印[2,2,3,4]
13      parent_conn.send('from father')
14      p.join()
返回:

查看Pipe()函数返回的两个对象。
conn_father,conn_child=Pipe()
conn_father
Out[5]: <multiprocessing.connection.PipeConnection at 0x97476d8>
conn_child
Out[6]: <multiprocessing.connection.PipeConnection at 0x97475c0>
Pipe()返回的两个连接对象,每个连接对象都有发送和接受方法(send(),recv())。
注意,如果两个进程(或线程)试图同时读取或写入到管道的同一端,那么管道中的数据可能会被破坏。
当然,在同时使用不同的管道末端的过程中也没有腐败的危险。
3.Manages
由manager()返回的manage对象控制着一个包含Python对象的服务器进程,并允许其他进程使用代理来操作它们。
由manger()返回的manage对象支持列表list,字典dict,名称空间Namespace,锁Lock,递归锁RLock,信号量Semaphore,BoundedSemaphore,Condition,事件Event,Barrier,队列Queue,Value和数组Array。
 1 from multiprocessing import Process, Manager
 2 import os
 3 def f(d, l):
 4     d[os.getpid()] =os.getpid()  #os.getpid()返回运行的进程的进程号,d[key]=value
 5     l.append(os.getpid())
 6     print('d',d)
 7     print('l',l)
 8 if __name__ == '__main__':
 9     with Manager() as manager:  #manager=Manager()
10         d = manager.dict() #{} #生成一个字典,可在多个进程间共享和传递的字典
11         l = manager.list(range(5))#生成一个列表,可在多个进程间共享和传递的列表
12         p_list = []  #为了多个进程join()
13         for i in range(3):
14             p = Process(target=f, args=(d, l))
15             p.start()
16             p_list.append(p)
17         for res in p_list: #等待结果
18             res.join()
19         print('last d',d)
20         print('last l',l)
4.进程同步
进程中也有锁,不同的进程之间相互独立,不操作同一块内存数据,那为什么进程中也要有锁呢?

实例:进程间不加锁产生的数据混淆。
1 from multiprocessing import Process,Lock
2 def f(l,i):
3     l.acquire()
4     print('hello world',i)
5     l.release()
6 if __name__=='__main__':
7     lock=Lock()  #生成一个实例
8     for num in range(10):
9         Process(target=f,args=(lock,num)).start()
返回:

那么这个Lock()的作用究竟是什么呢?
这个Lock()主要是为了解决向屏幕输出的问题。在windows上Python3.x上基本上无法体现效果。
但是在Linux上使用Python2.x多尝试几次,在没有使用Lock()的情况下,向屏幕输出的数据会出现错乱混淆。
如‘hello wor hello world4 ld’等屏幕打印输出的占用等————未实际打印过。
12.进程池
1.为什么要有进程池?
因为在实际的程序运行中,一个进程发起一个子进程,就相当于把父进程拷贝一份给子进程用,所以这样的CPU开销非常大。进程过多占用的CPU资源太多,容易导致系统瘫痪。
为了避免占用太多的CPU资源,所以有进程池的限制。

2.有进程池,那么有线程池吗?
在Python中是没有提供线程池的,因为Python中线程启动的开销太小了。
如果想要有线程池,可以自己利用信号量Semaphore自己做一个线程池。
多线程的唯一的不好,就是切换CPU的次数过于频繁,导致的整个程序的任务变慢。

3.进程池是什么?
进程池内部维护一个进程序列,当使用时,则去进程池中获取一个进程,如果进程池序列中没有可供使用的进进程,那么程序就会等待,直到进程池中有可用进程为止。

4.进程池的主要方法:
进程池中有两个方法:
  apply:串形执行
  apply_async:并行执行
5.实例:
 1 from multiprocessing import Process,Pool
 2 import time,os
 3 def Foo(i):
 4     time.sleep(2)
 5     print(i)
 6 def Bar(arg):
 7     print('-->exec done:',arg)
 8     print('bar',os.getpid())
 9 if __name__=='__main__':#如果在windows上启动线程池,必须要使用。
10     pool = Pool(2)  # 生成一个最大值为2的进程池实例,该实例允许进程池同时放入2个进程。
11     print(os.getpid())
12     for i in range(4):
13         pool.apply_async(func=Foo, args=(i,),callback=Bar)  #callback回调,子进程执行完成Foo之后,由父进程回调再执行callback传入的方法Bar.具体可以通过os.getpid()确认
14     print('end')
15     pool.close()  # 进程池要先关闭再join
16     pool.join()  # 等所有进程结束。因为所有的进程都在进程池中
17     # 进程池中进程执行完毕后再关闭,如果注释,那么程序直接关闭。.join()
返回:
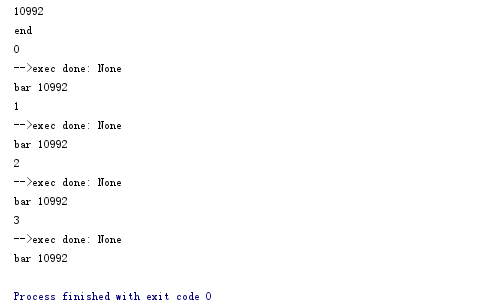
解析:
1.主进程先执行print(os.getpid());
2.for循环再发起4个子进程。
  pool.apply(func=Foo,args=(i,))  串形执行,向屏幕输出时会一条一条地打印。
  pool.apply_async(func=Foo, args=(i,))   并行执行,在上面的脚本中进程池限定为2,执行子程序时向屏幕打印是2个打印,2个打印。
  pool.apply_async(func=Foo, args=(i,),callback=Bar)
3.执行print('end')  #注意,由于主进程和子进程是并行的,子进程中也做了time.sleep(2),所以'end'会先输出到屏幕。
4.进程池关闭。
注意:pool.apply_async(func=Foo,args=(i,),callback=Bar),callback回调的应用场景:
数据库操作中,进程完成指令了以后,主进程回调callback可以去添加一条日志。
用主进程就回调方法的好处:
   这样做只要主进程和数据库进行长连接就可以往日志中追加记录,但如果在子进程中直接写入到日志,每次写入都需要重新连接数据库。