效果图:

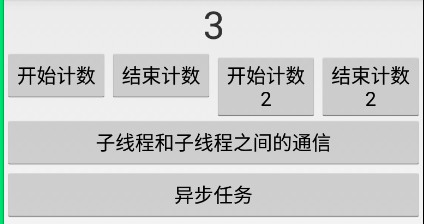


1、activity_main.xml
描述:定义了六个按钮
<?xml version="1.0" encoding="utf-8"?>
<LinearLayout xmlns:android="http://schemas.android.com/apk/res/android"
    android:id="@+id/activity_main"
    android:layout_width="match_parent"
    android:layout_height="match_parent"
    android:orientation="vertical"
    >

    <TextView
        android:id="@+id/showNumber"
        android:textSize="35dp"
        android:gravity="center"
        android:layout_width="match_parent"
        android:layout_height="wrap_content"
        android:text="0"
        />
    <LinearLayout
        android:layout_width="match_parent"
        android:layout_height="wrap_content"
        android:orientation="horizontal"
        >
        <Button
            android:layout_width="match_parent"
            android:layout_height="wrap_content"
            android:text="开始计数"
            android:onClick="doStart"
            android:layout_weight="1"
            />
        <Button
            android:layout_width="match_parent"
            android:layout_height="wrap_content"
            android:text="结束计数"
            android:onClick="doStop"
            android:layout_weight="1"
            />
        <Button
            android:layout_width="match_parent"
            android:layout_height="wrap_content"
            android:text="开始计数2"
            android:onClick="doStart2"
            android:layout_weight="1"
            />
        <Button
            android:layout_width="match_parent"
            android:layout_height="wrap_content"
            android:text="结束计数2"
            android:onClick="doStop2"
            android:layout_weight="1"
            />
    </LinearLayout>
    <Button
        android:layout_width="match_parent"
        android:layout_height="wrap_content"
        android:text="子线程和子线程之间的通信"
        android:onClick="test_1"
        />
    <Button
        android:layout_width="match_parent"
        android:layout_height="wrap_content"
        android:text="异步任务"
        android:onClick="test_2"
        />
</LinearLayout>
2、MainActivity.java
package com.nf.android_thread;

import android.app.Activity;
import android.content.Intent;
import android.os.Bundle;
import android.os.Handler;
import android.os.Message;
import android.os.SystemClock;
import android.view.View;
import android.widget.TextView;
import android.widget.Toast;

public class MainActivity extends Activity {
  //用来显示数字
    private TextView showNumber;
    @Override
    protected void onCreate(Bundle savedInstanceState) {
        super.onCreate(savedInstanceState);
        setContentView(R.layout.activity_main);
        showNumber = (TextView)findViewById(R.id.showNumber);
     //弹出提示
        Toast.makeText(this,"程序开始",Toast.LENGTH_SHORT).show();
        //将耗时操作放到子线程中,将不会阻塞主线程运行
        new Thread(new Runnable() {
            @Override
            public void run() {
                try{
            //线程休眠20秒
                    Thread.currentThread().sleep(20000);
                }catch (InterruptedException e){
                    e.printStackTrace();
                }
            }
        }).start();
        Toast.makeText(this,"程序结束",Toast.LENGTH_SHORT).show();
    }
    //声明一个主线程的Handler对象
  /*
    handler:
    消息的封装者和处理者,handler负责将需要传递的信息封装成Message,通过调用handler对象的obtainMessage()来实现;
    将消息传递给Looper,这是通过handler对象的sendMessage()来实现的。继而由Looper将Message放入MessageQueue中。
    当Looper对象看到MessageQueue中含有Message,就将其广播出去。
    该handler对象收到该消息后,调用相应的handler对象的handleMessage()方法对其进行处理。

  */
  /*
    Message:
    消息对象,Message Queue中的存放的对象。一个Message Queue中包含多个Message。
    Message实例对象的取得,通常使用Message类里的静态方法obtain(),该方法有多个重载版本可供选择;
    它的创建并不一定是直接创建一个新的实例,而是先从Message Pool(消息池)中看有没有可用的Message实例,存在则直接取出返回这个实例。
    如果Message Pool中没有可用的Message实例,则才用给定的参数创建一个Message对象。
    调用removeMessages()时,将Message从Message Queue中删除,同时放入到Message Pool中。
    除了上面这种方式,也可以通过Handler对象的obtainMessage()获取一个Message实例。
  */
  /*
    MessageQueue
    是一种数据结构,见名知义,就是一个消息队列,存放消息的地方。每一个线程最多只可以拥有一个MessageQueue数据结构。
    创建一个线程的时候,并不会自动创建其MessageQueue。通常使用一个Looper对象对该线程的MessageQueue进行管理。
    主线程创建时,会创建一个默认的Looper对象,而Looper对象的创建,将自动创建一个Message Queue。
    其他非主线程,不会自动创建Looper,要需要的时候,通过调用prepare函数来实现。
  */
  /*
    Looper:
    是MessageQueue的管理者。每一个MessageQueue都不能脱离Looper而存在,Looper对象的创建是通过prepare函数来实现的。
    同时每一个Looper对象和一个线程关联。通过调用Looper.myLooper()可以获得当前线程的Looper对象创建一个Looper对象时,会同时创建一个MessageQueue对象。
    除了主线程有默认的Looper,其他线程默认是没有MessageQueue对象的,所以,不能接受Message。
    如需要接受,自己定义一个Looper对象(通过prepare函数),这样该线程就有了自己的Looper对象和MessageQueue数据结构了。
    Looper从MessageQueue中取出Message然后,交由Handler的handleMessage进行处理。
    处理完成后,调用Message.recycle()将其放入Message Pool中。
  */
    private Handler handler = new Handler(){
        @Override
        public void handleMessage(Message msg){
            super.handleMessage(msg);
       //判断来自哪个线程的handler
            if (msg.what == 1){
          //给ui控件绑定计算得到的数字
                showNumber.setText(msg.arg1+"");
            }
        }
    };
    //开始计数
    int number = 1;
    boolean isRun;
    public void doStart(View view){
        isRun = true;
        new Thread(new Runnable() {
            @Override
            public void run() {
                while (isRun){
                    //将计数发送给UI线程【Main Thread】
            // 这里的数据data我们必须发送给UI的主线程,所以我们通过Message的方式来做桥梁。
                    Message message = Message.obtain();
            //设置handler版本
                    message.what = 1;
                    message.arg1 = number;
                    //如果将消息发给主线程呢
            //调用handler的sendMessage()方法,将得到的数字传进去
                    handler.sendMessage(message);
                    SystemClock.sleep(1000);
                    number++;
                }
            }
        }).start();
    }
   //当点击停止按钮时,将isRun设置为false,并将number设置为1
    public void doStop(View view){
        isRun = false;
        number = 1;
    }


    public void doStart2(View view){
        isRun = true;
        new Thread(new Runnable() {
            @Override
            public void run() {
                while (isRun){
                    //UI多线程中不能直接更新UI
                    runOnUiThread(new Runnable() {
                        @Override
                        public void run() {
                            showNumber.setText(number+"");
                        }
                    });
                    number++;
                    SystemClock.sleep(1000);
                }
            }
        }).start();
    }
    public void doStop2(View view){
        doStop(view);
    }

    public void test_1(View view){
        Intent intent = new Intent(this,Thread2Activity.class);
        startActivity(intent);
    }
    public void test_2(View view){
        Intent intent = new Intent(this,AsyncTaskActivity.class);
        startActivity(intent);
    }
}
3、activity_thread2.xml
<?xml version="1.0" encoding="utf-8"?>
<LinearLayout xmlns:android="http://schemas.android.com/apk/res/android"
    android:id="@+id/activity_thread2"
    android:layout_width="match_parent"
    android:layout_height="match_parent"
    android:orientation="vertical"
    >
    <TextView
        android:layout_width="match_parent"
        android:layout_height="wrap_content"
        android:id="@+id/showNumber"
        android:text="0"
        android:textSize="40dp"
        android:gravity="center"
        />
    <Button
        android:layout_width="match_parent"
        android:layout_height="wrap_content"
        android:text="开始计算"
        android:onClick="doStart"
        />
    <Button
        android:layout_width="match_parent"
        android:layout_height="wrap_content"
        android:text="停止计算"
        android:onClick="doStop"
        />
</LinearLayout>
4、Thread2Activity.java
package com.nf.android_thread;

import android.app.Activity;
import android.app.Notification;
import android.os.Bundle;
import android.os.Handler;
import android.os.Looper;
import android.os.Message;
import android.os.SystemClock;
import android.util.Log;
import android.view.View;
import android.widget.TextView;

import java.util.Random;


public class Thread2Activity extends Activity {
    private TextView showNumber;
    @Override
    protected void onCreate(Bundle savedInstanceState) {
        super.onCreate(savedInstanceState);
        setContentView(R.layout.activity_thread2);
        showNumber = (TextView)findViewById(R.id.showNumber);
    }

    private Handler mainHandler = new Handler(){
        @Override
        public void handleMessage(Message msg){
            super.handleMessage(msg);
            if (msg.what == 2){
                showNumber.setText(msg.arg1+"");
            }
        }
    };

    boolean isRun;
    int count = 0;
    Handler myHandler;
    public void doStart(View view){
        //用来处理数字平方的线程
        new Thread(new Runnable() {
            @Override
            public void run() {
          //Android中的Looper类,是用来封装消息循环和消息队列的一个类,用于在android线程中进行消息处理。
          //handler其实可以看做是一个工具类,用来向消息队列中插入消息的。
                Looper.prepare();//准备好一个消息队列
                myHandler = new Handler(){
                    @Override
                    public void handleMessage(Message msg){
                        super.handleMessage(msg);
                        if (msg.what==1){
                            Log.i("Thread2:","消息:"+msg.arg1);
                            int number = msg.arg1*msg.arg1;
                            Message message = Message.obtain();
                            message.what = 2;
                            message.arg1 = number;
                            mainHandler.sendMessage(message);
                        }
                    }
                };
                Looper.loop();//循环
            }
        }).start();

        //开始计数的线程
        isRun = true;
        new Thread(new Runnable() {
            @Override
            public void run() {
                while (isRun){
                    int rand = new Random().nextInt(100);//获得随机数
                    Log.i("Thread1:","随机数:"+rand);
                    //发生消息到处理数字的线程
                    Message msg = Message.obtain();
                    msg.what = 1;
                    msg.arg1 = rand;
                    myHandler.sendMessage(msg);//通过Handler将消息发送到线程2
                    count++;
                    if (count>100)
                        break;
                    SystemClock.sleep(1000);
                }
            }
        }).start();
    }
    public void doStop(View view){
        isRun = false;
        count = 0;
    }
}
5、activity_async_task.xml
<?xml version="1.0" encoding="utf-8"?>
<LinearLayout xmlns:android="http://schemas.android.com/apk/res/android"
    android:id="@+id/activity_async_task"
    android:layout_width="match_parent"
    android:layout_height="match_parent"
    android:orientation="vertical"
    >
    <ProgressBar
        android:layout_width="match_parent"
        android:layout_height="wrap_content"
        android:id="@+id/progressBar"
        style="@android:style/Widget.ProgressBar.Horizontal"
        />
    <Button
        android:layout_width="match_parent"
        android:layout_height="wrap_content"
        android:text="开始下载"
        android:onClick="doStart"
        />
    <Button
        android:layout_width="match_parent"
        android:layout_height="wrap_content"
        android:text="结束下载"
        android:onClick="doStop"
        />
</LinearLayout>
6、AsyncTaskActivity.java
package com.nf.android_thread;

import android.app.Activity;
import android.content.Intent;
import android.os.AsyncTask;
import android.os.Bundle;
import android.os.SystemClock;
import android.view.View;
import android.widget.ProgressBar;
import android.widget.Toast;

public class AsyncTaskActivity extends Activity {
  //进度条
    private ProgressBar progressBar;
    @Override
    protected void onCreate(Bundle savedInstanceState) {
        super.onCreate(savedInstanceState);
        setContentView(R.layout.activity_async_task);
        progressBar =(ProgressBar)findViewById(R.id.progressBar);
    }

    MyAsyncTask task;
    //开启一个异步任务执行下载
    public void doStart(View view){
     //当点击开始按钮后,实例化一个异步任务
        task = new MyAsyncTask();

        task.execute(0);
    }

    //结束异步下载任务
    public void doStop(View view){
        task.cancel(true);
    }

    //构建一个异步任务
    class MyAsyncTask extends AsyncTask<Integer,Integer,String>{
        //必须的,执行异步操作
     //属于后台操作
     /**
        * 这里的Integer参数对应AsyncTask中的第一个参数
        * 这里的String返回值对应AsyncTask的第三个参数
         * 该方法并不运行在UI线程当中,主要用于异步操作,所有在该方法中不能对UI当中的空间进行设置和修改
         * 但是可以调用publishProgress方法触发onProgressUpdate对UI进行操作
         */
        @Override
        protected String doInBackground(Integer...integers){
            for (int i=1;i<100;i++){
                publishProgress(i);//刷新进度
                SystemClock.sleep(100);
            }
            return "success";
        }
     //做一些初始化的操作
     //该方法运行在UI线程当中,并且运行在UI线程当中 可以对UI空间进行设置
        @Override
        protected void onPreExecute(){
            super.onPreExecute();
            Toast.makeText(AsyncTaskActivity.this,"开始下载",Toast.LENGTH_SHORT).show();
        }
     //得到后台操作返回的结果
    /**
* 这里的String参数对应AsyncTask中的第三个参数(也就是接收doInBackground的返回值)
* 在doInBackground方法执行结束之后在运行,并且运行在UI线程当中 可以对UI空间进行设置
*/
        @Override
        protected void onPostExecute(String s){
            super.onPostExecute(s);
            if ("success".equals(s)){
                Toast.makeText(AsyncTaskActivity.this,"下载完毕",Toast.LENGTH_SHORT).show();
            }else{
                Toast.makeText(AsyncTaskActivity.this,"下载失败",Toast.LENGTH_SHORT).show();
            }
        }
     //更新进度
/**
* 这里的Intege参数对应AsyncTask中的第二个参数
* 在doInBackground方法当中,每次调用publishProgress方法都会触发onProgressUpdate执行
* onProgressUpdate是在UI线程中执行,所以可以对UI空间进行操作
*/
        @Override
        protected void onProgressUpdate(Integer... values){
            super.onProgressUpdate(values);
            //更新进度条
            progressBar.setProgress(values[0]);
        }
    }
}