Android开发---如何操作资源目录中的资源文件3
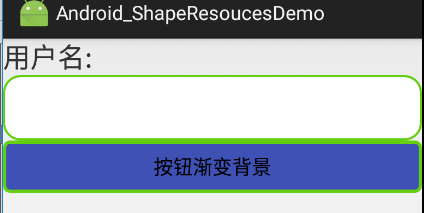
效果图
1、圆角边框
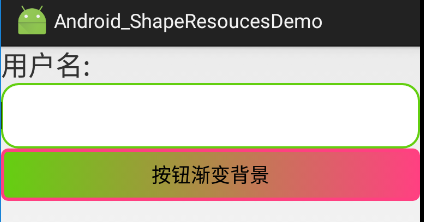
2、背景颜色渐变效果
1、activity_main.xml
描述:
定义了一个shape资源管理按钮
<?xml version="1.0" encoding="utf-8"?>
<LinearLayout xmlns:android="http://schemas.android.com/apk/res/android"
    android:id="@+id/activity_main"
    android:layout_width="match_parent"
    android:layout_height="match_parent"
    android:orientation="vertical">
    <Button
        android:layout_width="match_parent"
        android:layout_height="wrap_content"
        android:text="Shape资源管理"
        android:onClick="test_3"
        />
</LinearLayout>
2、MainActivity.java
描述:
页面跳转
package com.example.android_shaperesoucesdemo;

import android.app.Activity;
import android.content.Intent;
import android.graphics.Typeface;
import android.os.Bundle;
import android.view.View;
import android.widget.Button;

public class MainActivity extends Activity {


    @Override
    protected void onCreate(Bundle savedInstanceState) {
        super.onCreate(savedInstanceState);
        setContentView(R.layout.activity_main);
    }
    public void test_3(View view){
        Intent intent = new Intent(this,ShapeActivity.class);
        startActivity(intent);
    }
}
3、activity_shape.xml
描述:
1、定义了一个文本输入框和一个按钮
2、其中文本输入框通过android:background="@drawable/back_shape_solid"引入back_shape_solid.xml中定义的资源,设置背景填充色为白色、边框颜色为绿色、边框为圆角、内边距
3、其中按钮通过android:background="@drawable/button_back_color"引入button_back_color.xml中定义的资源,没点击按钮前填充色为蓝色、边框颜色为绿色、圆角,当点击时,边框颜色变为红色,圆角,背景色从左往右由绿色变为红色
<?xml version="1.0" encoding="utf-8"?>
<LinearLayout xmlns:android="http://schemas.android.com/apk/res/android"
    android:id="@+id/activity_shape"
    android:layout_width="match_parent"
    android:layout_height="match_parent"
    android:orientation="vertical"
    >
    <TextView
        android:layout_width="match_parent"
        android:layout_height="wrap_content"
        android:text="用户名:"
        android:textSize="25dp"
        />
    <EditText
        android:layout_width="match_parent"
        android:layout_height="60dp"
        android:id="@+id/uname"
        android:background="@drawable/back_shape_solid"
        />
    <Button
        android:layout_width="match_parent"
        android:layout_height="wrap_content"
        android:background="@drawable/button_back_color"
        android:text="按钮渐变背景"
        />
</LinearLayout>
4、ShapeActivity.java
描述:
无操作
package com.example.android_shaperesoucesdemo;

import android.app.Activity;
import android.os.Bundle;

public class ShapeActivity extends Activity {

    @Override
    protected void onCreate(Bundle savedInstanceState) {
        super.onCreate(savedInstanceState);
        setContentView(R.layout.activity_shape);
    }
}
5、res资源目录下drawable包中创建一个back_shape_solid.xml文件
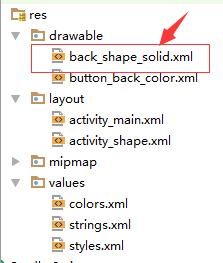
back_shape_solid.xml
描述:
设置了文本框的背景填充色、边框颜色、圆角、边距
<?xml version="1.0" encoding="utf-8"?>
<shape xmlns:android="http://schemas.android.com/apk/res/android">

    <!--整个UI的背景填充色-->
    <solid android:color="@android:color/white"/>
    <!--描边android:dashGap="10sp"
        android:dashWidth="5dp"-->
    <stroke android:color="@color/navicat_color"
        android:width="2dp"/>
    <!--圆角-->
    <corners android:radius="15dp"/>
    <!--内容和边框间距-->
    <padding android:bottom="0dp" android:left="0dp"/>
</shape>
6、res资源目录下drawable包中创建一个button_back_color.xml文件

button_back_color.xml
描述:
设置了按钮的填充色、边框、圆角、背景色渐变效果
<?xml version="1.0" encoding="utf-8"?>
<selector xmlns:android="http://schemas.android.com/apk/res/android">
    <item android:state_pressed="false">
        <shape>
            <!--填充色-->
            <solid android:color="@color/colorPrimary"/>
            <!--描边-->
            <stroke android:color="@color/navicat_color"
                android:width="3dp"/>
            <!--圆角-->
            <corners android:radius="5dp"/>
        </shape>
    </item>
    <item android:state_pressed="true">
        <shape>
            <!--描边-->
            <stroke android:color="@color/colorAccent"
                android:width="3dp"/>
            <!--圆角-->
            <corners android:radius="5dp"/>
            <!--渐变背景色-->
            <gradient android:startColor="@color/navicat_color"
                android:endColor="@color/colorAccent"
                android:gradientRadius="3000"/>
        </shape>
    </item>
</selector>
7、res资源目录下values包中修改colors.xml文件
colors.xml
<?xml version="1.0" encoding="utf-8"?>
<resources>
    <color name="colorPrimary">#3F51B5</color>
    <color name="colorPrimaryDark">#303F9F</color>
    <color name="colorAccent">#FF4081</color>
    <color name="navicat_color">#63CF10</color>
</resources>