1.服务器规划
为配置Kubesphere高可用集群,需要三台或三台以上机器作为Master节点,每台机器既可以作为Master也可以作为Worker节点。其中Master节点数量建议为单数。该示例中采用三台服务器,即作为Master节点也作为Worker节点,配置如下:
| 服务名称 | IP地址 | 节点类型 | 服务器 | 挂接磁盘 |
|---|---|---|---|---|
| node1 | 192.168.1.103 | master、worker | 8核心CPU 16G内存 400G系统磁盘 | 300G |
| node2 | 192.168.1.104 | master、worker | 8核心CPU 16G内存 400G系统磁盘 | 300G |
| node3 | 192.168.1.105 | master、worker | 8核心CPU 16G内存 400G系统磁盘 | 300G |
2. 配置系统设置
2.1. 配置root账户登录
设置管理员账户登录密码
sudo passwd root
切换至管理员账户
su
配置ssh文件
vim /etc/ssh/sshd_config
按i是开启编辑模式
找到内容PermitRootLogin without-password 修改为PermitRootLogin yes
ESC键退出编辑模式
:wq(保存并退出编辑)
ip addr (查询IP地址)
使用ip地址链接FinalShell
2.2. 设置ubuntu20.04 设置静态IP
cd /etc/netplan/ (cd进入到下层文件, 找到netplan下面的文件夹)
假设IP地址修改为192.168.1.100,子网掩码24位即255.255.255.0,网关设置为192.168.1.1,DNS1:223.5.5.5,DNS2:223.6.6.6
network:
 ethernets:
  ens33:
   dhcp4: no
   addresses: [192.168.1.100/24]
   optional: true
   gateway4: 192.168.1.1
   nameservers:
    addresses: [223.5.5.5,223.6.6.6]

version: 2
应用配置
sudo netplan apply
3. 安装Docker及依赖软件
安装docker 命令
curl -sSL https://get.daocloud.io/docker | sh
安装K8S依赖的软件
apt-get install -y conntrack socat ebtables ipset
配置阿里云镜像加速器
登录阿里云>控制台>镜像工具>镜像加速器 找到对应操作系统命令并在服务器中执行
如Ubuntu:
sudo mkdir -p /etc/docker
sudo tee /etc/docker/daemon.json <<-'EOF'
{
 "registry-mirrors": ["https://chn4ef4v.mirror.aliyuncs.com"]
}
EOF
sudo systemctl daemon-reload
sudo systemctl restart docker
4. 使用Kubekey安装Kubernetes
参考:https://github.com/kubesphere/kubekey/blob/master/README_zh-CN.md
具体步骤如下:
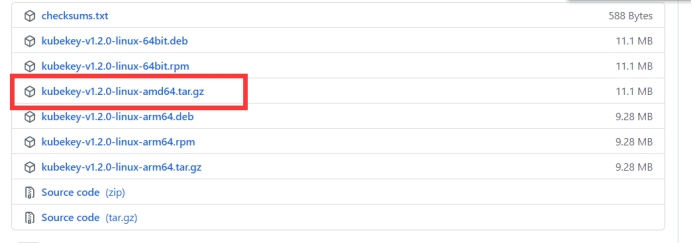
在官网下载最新版Kubekey:https://github.com/kubesphere/kubekey/releases
选择Linux AMD64的tar.gz包如下图:
在node1中创建文件夹并将上一步下载的文件上传至该文件夹
# 创建K8S要下载文件的目录
mkdir kubekey
# 到k8s目录下
cd kubekey
将下载的kubekey-v1.2.0-linux-amd64.tar.gz文件上传至当前文件夹
解压缩文件:
tar -zxvf kubekey-v1.2.0-linux-amd64.tar.gz
可删除kk文件外的其他文件
给kk文件授权:
chmod 777 ./kk
创建配置文件
./kk create config
依据实际情况修改配置文件
使用配置文件创建集群
./kk create cluster -f /root/kubekey/config-sample.yaml
此过程会因为获取GitHub地址失败多次报错,报错时会显示错误链接,需手动下载指定链接的文件上传到安装目录并重新运行创建集群命令直至安装完成
等待创建完成
查看节点状态:
kubectl get node
等待所有节点为Ready状态则Kubenetes安装成功

5. 分布式文件系统
5.1. 配置无密码SSH登录
1. 通过运行以下命令在 server1 上创建密钥。直接按回车键跳过所有提示。
ssh-keygen
一直按回车到命令结束
2. 将密钥复制到所有 GlusterFS 节点。
ssh-copy-id root@node1

ssh-copy-id root@node2

ssh-copy-id root@node3
3. 请验证您可以从 server1 通过无密码登录访问所有服务器机器。
ssh root@node1

ssh root@node2

ssh root@node3
5.2. 在所有服务器机器上安装 GlusterFS
1. 运行以下命令在 所有 上安装 software-properties-common。
apt-get install software-properties-common -y
2. 添加社区 GlusterFS PPA。
add-apt-repository ppa:gluster/glusterfs-7
3. 请确保使用的是最新安装包。
apt-get update
4. 安装 GlusterFS 服务器。
apt-get install glusterfs-server -y
5. 请确保也在 node2 和 node3 上运行上述命令,并在所有机器上验证安装包版本。
glusterfs -V
5.3. 加载内核模块
1. 运行以下命令在 node1 上加载三个必要的内核模块。
echo dm_thin_pool | sudo tee -a /etc/modules

echo dm_snapshot | sudo tee -a /etc/modules

echo dm_mirror | sudo tee -a /etc/modules
2. 安装 thin-provisioning-tools。
apt-get -y install thin-provisioning-tools
3. 请确保您也在 node2 和 node3 上运行以上命令。
iptables -I INPUT -p all -s '192.168.1.103' -j ACCEPT
iptables -I INPUT -p all -s '192.168.1.104' -j ACCEPT
iptables -I INPUT -p all -s '192.168.1.105' -j ACCEPT
4, 启动glusterfs
service glusterd start
5. 设置glusterfs自启动
systemctl enable glusterd
5.4. 创建 GlusterFS 集群
1. 在 server1 上运行以下命令添加其他节点并创建集群。
gluster peer probe node2

gluster peer probe node3
2. 请验证集群中的所有节点均已成功连接。
gluster peer status
预计输出如下:
Number of Peers: 2
Hostname: node2
Uuid: e1192d6a-b65e-4ce8-804c-72d9425211a6
State: Peer in Cluster (Connected)
Hostname: node3
Uuid: 9bd733e4-96d4-49d5-8958-6c947a2b4fa6
State: Peer in Cluster (Connected)
5.5. 安装 Heketi
tar zxvf heketi-v10.4.0-release-10.linux.amd64.tar.gz
3. 拷贝命令
cd heketi

cp heketi /usr/bin
cp heketi-cli /usr/bin
4. 创建 Heketi 服务文件。
vi /lib/systemd/system/heketi.service
写入以下内容:
[Unit]
Description=Heketi Server
[Service]
Type=simple
WorkingDirectory=/var/lib/heketi
ExecStart=/usr/bin/heketi --config=/etc/heketi/heketi.json
Restart=on-failure
StandardOutput=syslog
StandardError=syslog
[Install]
WantedBy=multi-user.target
5. 创建 Heketi 文件夹。
mkdir -p /var/lib/heketi
mkdir -p /etc/heketi
6. 创建 JSON 文件以配置 Heketi。
vi /etc/heketi/heketi.json
写入以下内容:
{
  "_port_comment": "Heketi Server Port Number",
  "port": "18080",

  "_use_auth": "Enable JWT authorization. Please enable for deployment",
  "use_auth": false,

  "_jwt": "Private keys for access",
  "jwt": {
    "_admin": "Admin has access to all APIs",
    "admin": {
      "key": "123456"
    },
    "_user": "User only has access to /volumes endpoint",
    "user": {
      "key": "123456"
    }
  },

  "_glusterfs_comment": "GlusterFS Configuration",
  "glusterfs": {
    "_executor_comment": [
      "Execute plugin. Possible choices: mock, ssh",
      "mock: This setting is used for testing and development.",
      "      It will not send commands to any node.",
      "ssh:  This setting will notify Heketi to ssh to the nodes.",
      "      It will need the values in sshexec to be configured.",
      "kubernetes: Communicate with GlusterFS containers over",
      "            Kubernetes exec api."
    ],
    "executor": "ssh",

    "_sshexec_comment": "SSH username and private key file information",
    "sshexec": {
      "keyfile": "/root/.ssh/id_rsa",
      "user": "root"
    },

    "_kubeexec_comment": "Kubernetes configuration",
    "kubeexec": {
      "host" :"https://kubernetes.host:8443",
      "cert" : "/path/to/crt.file",
      "insecure": false,
      "user": "kubernetes username",
      "password": "password for kubernetes user",
      "namespace": "Kubernetes namespace",
      "fstab": "Optional: Specify fstab file on node.  Default is /etc/fstab"
    },

    "_db_comment": "Database file name",
    "db": "/var/lib/heketi/heketi.db",
    "brick_max_size_gb" : 1024,
 "brick_min_size_gb" : 1,
 "max_bricks_per_volume" : 33,


    "_loglevel_comment": [
      "Set log level. Choices are:",
      "  none, critical, error, warning, info, debug",
      "Default is warning"
    ],
    "loglevel" : "debug"
  }
}
7. 启动 Heketi。
systemctl start heketi
8. 检查 Heketi 的状态。
systemctl status heketi
9. 设置自启动
systemctl enable heketi
10. GlusterFS需要一个空白盘做为存储磁盘
fdisk -l
例如空白盘为/dev/sdb
vi /etc/heketi/topology.json
写入以下内容注意IP地址和磁盘分区按实际情况修改
{
    "clusters": [
       {
         "nodes": [
           {
             "node": {
               "hostnames": {
                 "manage": [
                   "192.168.1.103"
                ],
                "storage": [
                  "192.168.1.103"
                ]
              },
              "zone": 1
            },
            "devices": [
              "/dev/sdb"
            ]
          },
          {
            "node": {
              "hostnames": {
                "manage": [
                  "192.168.1.104"
                ],
                "storage": [
                  "192.168.1.104"
                ]
              },
              "zone": 1
            },
            "devices": [
              "/dev/sdb"
            ]
          },
          {
             "node": {
               "hostnames": {
                 "manage": [
                   "192.168.1.105"
                ],
                "storage": [
                  "192.168.1.105"
                ]
              },
              "zone": 1
            },
            "devices": [
              "/dev/sdb"
            ]
          }
        ]
      }
    ]
  }
12. 加载 Heketi JSON 文件。
export HEKETI_CLI_SERVER=http://localhost:18080

heketi-cli -s $HEKETI_CLI_SERVER --user admin --secret '123456' topology load --json=/etc/heketi/topology.json
Creating cluster ... ID: fc4a237cceaf33bc14ce9fdc2cf2e86c
        Allowing file volumes on cluster.
        Allowing block volumes on cluster.
        Creating node 192.168.1.103 ... ID: 6e1023d99c7c5a34fe21b90644809183
                Adding device /dev/sdb ... OK
        Creating node 192.168.1.104 ... ID: 0aad2a60a7f178226158d86c2d1a6805
                Adding device /dev/sdb ... OK
        Creating node 192.168.1.105 ... ID: 87576f0f26aa63c6e627e49d0bff1a46
                Adding device /dev/sdb ... OK
13. 查看部署情况:
heketi-cli cluster info fc4a237cceaf33bc14ce9fdc2cf2e86c --user admin --secret '123456'
注意info中的ID和上一步输出的cluster ID一致
Cluster id: fc4a237cceaf33bc14ce9fdc2cf2e86c
Nodes:
0aad2a60a7f178226158d86c2d1a6805
6e1023d99c7c5a34fe21b90644809183
87576f0f26aa63c6e627e49d0bff1a46
Volumes:

Block: true
6. 配置SC
apiVersion: storage.k8s.io/v1
kind: StorageClass
metadata:
  name: mysc
provisioner: kubernetes.io/glusterfs
reclaimPolicy: Retain
parameters:
  gidMax: "50000"
  gidMin: "40000"
  resturl: http://192.168.1.103:18080
  volumetype: replicate:3
  restauthenabled: "true"
  restuser: "admin"
  restuserkey: "123456"
执行该文件:
kubectl apply -f sc.yml
设置mysc为默认
kubectl patch storageclass mysc -p '{"metadata": {"annotations":{"storageclass.kubernetes.io/is-default-class":"true"}}}'
查看sc
kubectl get sc
7. 部署Kubesphere
kubectl apply -f https://github.com/kubesphere/ks-installer/releases/download/v3.2.1/kubesphere-installer.yaml

kubectl apply -f https://github.com/kubesphere/ks-installer/releases/download/v3.2.1/cluster-configuration.yaml
上面命令会可能会因为GitHub无法访问导致失败,可将这两个文件下载到本地再上传至服务器,然后执行以下命令
kubectl apply -f 文件名
完成后稍等半分钟左右,可执行以下命令查看安装日志:
kubectl logs -n kubesphere-system $(kubectl get pod -n kubesphere-system -l app=ks-install -o jsonpath='{.items[0].metadata.name}') -f
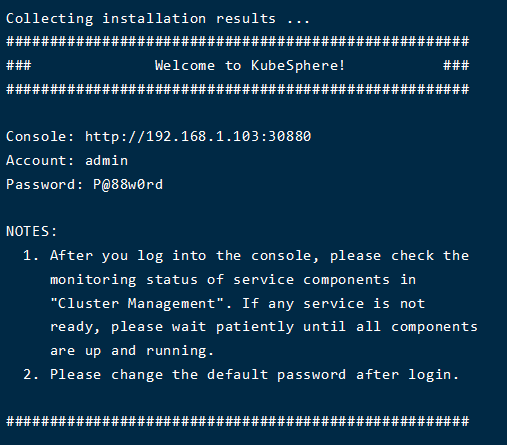
部署完成后访问Kubesphere控制台:http://192.168.1.103:30880 用户名:admin,密码:P@88w0rd