用到的工具:OBS Studio(推流)、nginx-rtmp流媒体服务器、VLC(拉取流播放)
Nginx系列1:ubuntu16.04编译出适合自己的nginx服务器
Nginx系列1.1:ubuntu16.04编译nginx-rtmp流媒体服务器
1 配置推流权限
配置nginx-rtmp流媒体服务器的conf/nginx.conf文件;
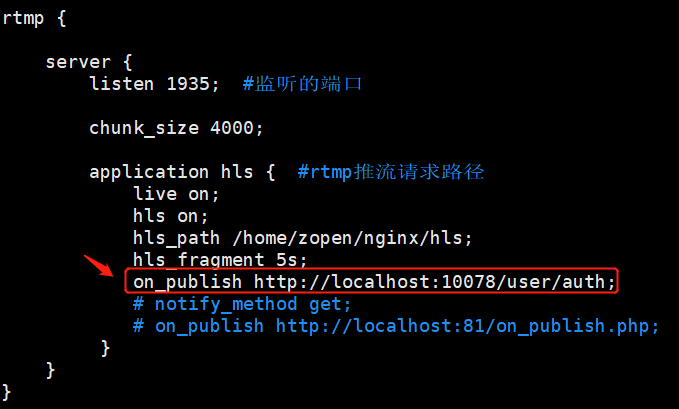
rtmp {
     server {
         listen 1935;  #监听的端口

         chunk_size 4000;

         application hls {  #rtmp推流请求路径
             live on;
             hls on;
             hls_path /home/zopen/nginx/hls;
             hls_fragment 5s;
             on_publish http://localhost:10078/user/auth;
             # notify_method get;
             # on_publish http://localhost:81/on_publish.php;
     }
 }
把auth.py放到任意目录下面,运行:
(固定用户名密码验证和数据库验证二选一即可)
auth.py代码(使用固定用户名密码):
#!/usr/bin/env python
# -*- coding:utf-8 -*-

#https://www.jianshu.com/p/0d14ae8f081c

#https://blog.csdn.net/wei389083222/article/details/78721074/
#https://blog.csdn.net/weixin_34368949/article/details/85991563
#验证只能用post方法
#虽然流密钥的格式像是get类型,但是必须使用POST获取参数。
from flask import Flask, request, Response
app = Flask(__name__)

#传入url格式为: xx.xx.xx.xx:10078/user/auth?usr=xxx&passWord=xxx
@app.route('/user/auth',methods=['POST'])
def auth():
    usr = request.form['username']#从url后获取的数据
    password = request.form['password']
    print(user,'	',password)
    #此处可改为从数据库获取数据
    auth_user='abc'
    auth_passWord='123'
    if auth_user == user and auth_passWord ==password:
        return Response(response='success',status=200)#返回200状态码
    else:
        return Response(status=500)#返回500状态码
        #Flask.abort(404)
    return password


if __name__ == '__main__':
    app.run(host='0.0.0.0',port=10078,debug=True)
auth.py代码(使用数据库验证):
#!/usr/bin/python3
# -*- coding:utf-8 -*-

#https://www.jianshu.com/p/0d14ae8f081c

#https://blog.csdn.net/wei389083222/article/details/78721074/
#https://blog.csdn.net/weixin_34368949/article/details/85991563
#验证只能用post方法
#虽然流密钥的格式像是get类型,但是必须使用POST获取参数。
import pymysql
from flask import Flask, request, Response
app = Flask(__name__)

#传入url格式为: xx.xx.xx.xx:10078/user/auth?usr=xxx&passWord=xxx
@app.route('/user/auth',methods=['POST'])
def auth():
    # 打开数据库连接
    db = pymysql.connect("ip地址","用户名","密码","数据库名称" )

    # 使用 cursor() 方法创建一个游标对象 cursor
    cursor = db.cursor()

    username = request.form['username']#从url后获取的数据
    password = request.form['password']
    print(username, '	', password)

    # SQL查询语句
    sql = "select * from user where user_name = '%s' and user_password = '%s' " % (username, password)

    # 使用 execute()  方法执行 SQL 查询
    ret = cursor.execute(sql)

    if ret:
        return Response(response='success',status=200)#返回200状态码
    else:
        return Response(status=500)#返回500状态码
        #Flask.abort(404)
    return password

if __name__ == '__main__':
    app.run(host='0.0.0.0',port=10078,debug=True)
运行auth.py之前,需要先安装flask和pymysql
命令1:sudo pip install flask
命令2:sudo pip install pymysql
运行auth.py命令:python3 auth.py
通过OBS推流到nginx-rtmp流媒体服务器进行推流测试
推送不加user和pass的裸流:rtmp://ip地址:1935/hls/test01(推流失败)
推送加user和pass的视频流:rtmp://ip地址:1935/hls/test01?username=abc&password=123(推流成功)
2 配置播放权限
配置nginx-rtmp流媒体服务器的conf/nginx.conf文件;
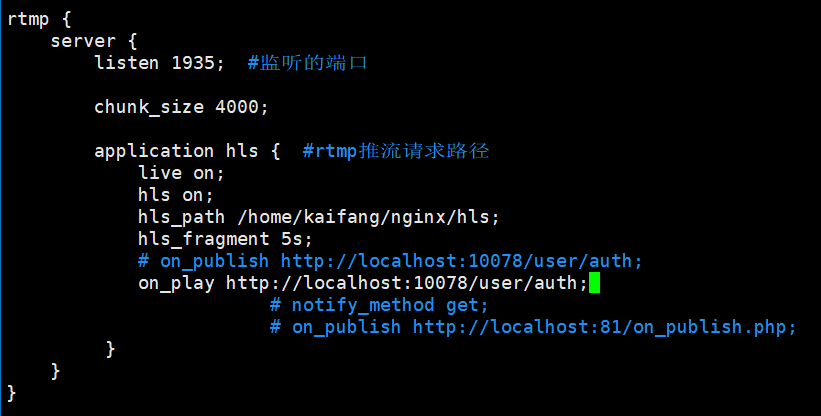
rtmp {
     server {
         listen 1935;  #监听的端口

         chunk_size 4000;

         application hls {  #rtmp推流请求路径
             live on;
             hls on;
             hls_path /home/kaifang/nginx/hls;
             hls_fragment 5s;
             on_play http://localhost:10078/user/auth;
             # notify_method get;
             # on_publish http://localhost:81/on_publish.php;
     }
 }
把auth.py放到任意目录下面,运行:
auth.py代码(使用固定用户名密码):
#!/usr/bin/env python
# -*- coding:utf-8 -*-

#https://www.jianshu.com/p/0d14ae8f081c

#https://blog.csdn.net/wei389083222/article/details/78721074/
#https://blog.csdn.net/weixin_34368949/article/details/85991563
#验证只能用post方法
#虽然流密钥的格式像是get类型,但是必须使用POST获取参数。
from flask import Flask, request, Response
app = Flask(__name__)

#传入url格式为: xx.xx.xx.xx:10078/user/auth?usr=xxx&passWord=xxx
@app.route('/user/auth',methods=['POST'])
def auth():
    usr = request.form['username']#从url后获取的数据
    password = request.form['password']
    print(user,'	',password)
    #此处可改为从数据库获取数据
    auth_user='abc'
    auth_passWord='123'
    if auth_user == user and auth_passWord ==password:
        return Response(response='success',status=200)#返回200状态码
    else:
        return Response(status=500)#返回500状态码
        #Flask.abort(404)
    return password


if __name__ == '__main__':
    app.run(host='0.0.0.0',port=10078,debug=True)
auth.py代码(使用数据库验证):
#!/usr/bin/python3
# -*- coding:utf-8 -*-

#https://www.jianshu.com/p/0d14ae8f081c

#https://blog.csdn.net/wei389083222/article/details/78721074/
#https://blog.csdn.net/weixin_34368949/article/details/85991563
#验证只能用post方法
#虽然流密钥的格式像是get类型,但是必须使用POST获取参数。
import pymysql
from flask import Flask, request, Response
app = Flask(__name__)

#传入url格式为: xx.xx.xx.xx:10078/user/auth?usr=xxx&passWord=xxx
@app.route('/user/auth',methods=['POST'])
def auth():
    # 打开数据库连接
    db = pymysql.connect("ip地址","用户名","密码","数据库名称" )

    # 使用 cursor() 方法创建一个游标对象 cursor
    cursor = db.cursor()

    username = request.form['username']#从url后获取的数据
    password = request.form['password']
    print(username, '	', password)

    # SQL查询语句
    sql = "select * from user where user_name = '%s' and user_password = '%s' " % (username, password)

    # 使用 execute()  方法执行 SQL 查询
    ret = cursor.execute(sql)

    if ret:
        return Response(response='success',status=200)#返回200状态码
    else:
        return Response(status=500)#返回500状态码
        #Flask.abort(404)
    return password

if __name__ == '__main__':
    app.run(host='0.0.0.0',port=10078,debug=True)
运行auth.py之前,需要先安装flask和pymysql
命令1:sudo pip install flask
命令2:sudo pip install pymysql
运行auth.py命令:python3 auth.py
通过OBS推流到nginx-rtmp流媒体服务器进行播放测试
播放不加user和pass的裸流:rtmp://ip地址:1935/hls/test01(播放失败)
播放加user和pass的视频流:rtmp://ip地址:1935/hls/test01?username=abc&password=123(播放成功)