ubantu也是debian阵营的一员,大体操作一样
阿里云镜像下载地址:https://mirrors.aliyun.com/ubuntu-releases/
一、root账户问题
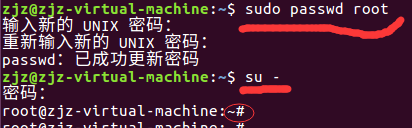
1、初始登录的时候root密码是随机的,自己改一个。
2、登录界面没有root选项
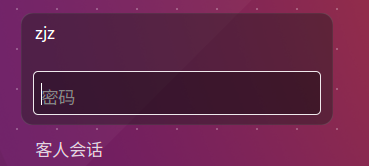
解决:
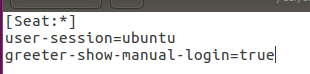
#gedit /usr/share/lightdm/lightdm.conf.d/50-ubuntu.conf
第三行加入:greeter-show-manual-login=true
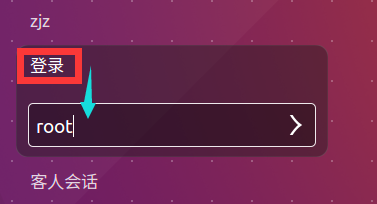
再次登录出现“登录”选项
ubantu18.04版本不一样,请参照
http://www.c3389.com/index.php/post/454.html
二、网络问题
配置静态ip
# vim /etc/network/interfaces
# interfaces(5) file used by ifup(8) and ifdown(8)
auto lo
iface lo inet loopback

auto ens33
iface ens33 inet static
address 192.168.40.201
gateway 192.168.40.2
netmask 255.255.255.0
dns-nameservers 114.114.114.114  8.8.8.8  (/etc/resolv.conf 自动会去读取 )
# /etc/init.d/networking restart  (或者ifup ens33 重启网卡)
[ ok ] Restarting networking (via systemctl): networking.service

当resolv.conf和interfaces都配置完毕后依然上不了网
# cat /etc/resolv.conf
nameserver 114.114.114.114

解决:
root@ubuntu:~# route  查看路由
Kernel IP routing table
Destination     Gateway         Genmask         Flags Metric Ref    Use Iface
192.168.40.0    *               255.255.255.0   U     0      0        0 ens33
192.168.122.0   *               255.255.255.0   U     0      0        0 virbr0
root@ubuntu:~# route add default gw 192.168.40.2 (添加本机的路由)
root@ubuntu:~# route
Kernel IP routing table
Destination     Gateway         Genmask         Flags Metric Ref    Use Iface
default         192.168.40.2    0.0.0.0         UG    0      0        0 ens33
192.168.40.0    *               255.255.255.0   U     0      0        0 ens33
192.168.122.0   *               255.255.255.0   U     0      0        0 virbr0
root@ubuntu:~# ping baidu.com
PING baidu.com (220.181.38.148) 56(84) bytes of data.
64 bytes from 220.181.38.148: icmp_seq=1 ttl=128 time=51.3 ms
64 bytes from 220.181.38.148: icmp_seq=2 ttl=128 time=34.3 ms
64 bytes from 220.181.38.148: icmp_seq=3 ttl=128 time=34.6 ms
三、vi编辑器问题
Ubuntu安装完成后vi编辑器键盘不能正常使用,使用下面方法解决:
vim /etc/vim/vimrc.tiny
将“compatible”改成“nocompatible”非兼容模式;
并添加一句:set backspace=2
四、跨系统粘贴复制
在Ubuntu的命令行中执行一下命令(报错找六)
# apt-get autoremove open-vm-tools
# apt-get install open-vm-tools
# apt-get install open-vm-tools-desktop
记得重启系统
五、root登录一直索要密码
安装apt-get install openssh-server
注意:/etc/ssh/ssh_config下不能瞎动
正确修改文件:/etc/ssh/sshd_config
六、安装vm-tools失败
root@zjz:~# apt-get install open-vm-tools (报 错)
正在读取软件包列表... 完成
正在分析软件包的依赖关系树
正在读取状态信息... 完成
有一些软件包无法被安装。如果您用的是 unstable 发行版,这也许是
因为系统无法达到您要求的状态造成的。该版本中可能会有一些您需要的软件
包尚未被创建或是它们已被从新到(Incoming)目录移出。
下列信息可能会对解决问题有所帮助:
下列软件包有未满足的依赖关系:
open-vm-tools : 依赖: libdumbnet1 (>= 1.8) 但无法安装它
依赖: libxmlsec1 (>= 1.2.20) 但无法安装它
依赖: libxmlsec1-openssl (>= 1.2.20) 但无法安装它
推荐: zerofree 但无法安装它
E: 无法修正错误,因为您要求某些软件包保持现状,就是它们破坏了软件包间的依赖关系。
解决:更新系统的源 (也可以先更新apt源,在下载就可以)
七、root登录报错mesg:ttyname failed
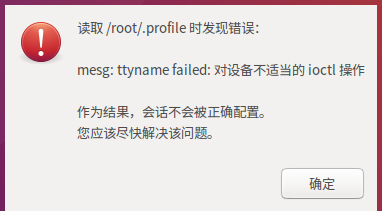
方法一:
将/root/.profile文件中的mesg n
替换成tty -s && mesg n
重启
方法二:
将非root账户目录中的.profile复制到/root/:
例如:cp /home/username/.profile /root/
重启
八、debain10 root没法本地登录问题
vi /etc/gdm3/daemon.conf
在[security]下,输入“ AllowRoot = true”。因此,文件中的[security]部分应如下所示:
[security]
AllowRoot=true
保存退出。

vi /etc/pam.d/gdm-password
注释掉如下一行,而不是取消注释
auth required pam_succeed_if.so user != root quiet_success
注释后如下所示:
#auth required pam_succeed_if.so user != root quiet_success
保存退出。